2008 Hyundai Tiburon lock
[x] Cancel search: lockPage 208 of 268
6
DO-IT-YOURSELF MAINTENANCE
8
G050D03A-AATTo Change the Engine CoolantThe engine coolant should be changed at those
intervals specified in the vehicle maintenance
schedule in Section 5.
CAUTION:
Engine coolant can damage the finish of
your car. If you spill engine coolant on the
car, wash it off thoroughly with clean water.
1. Park the car on level ground, set the park-
ing brake and remove the radiator cap when
cool.
2. Be sure your drain receptacle is in place.
Open the drain cock on the radiator. Allow all
the engine coolant to drain from the cooling
system, then securely close the drain cock.
3. Check Section 9 for the capacity of the
cooling system in your car. Then, following
the manufacturer’s directions on the engine
coolant container, add the appropriate quan-
tity of coolant to the radiator.
!
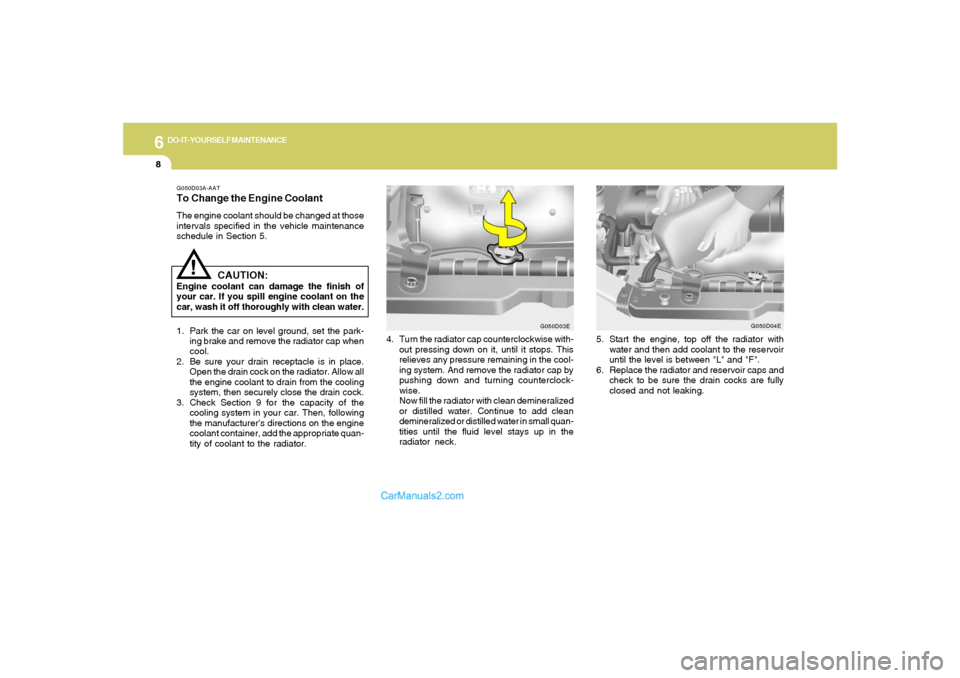
4. Turn the radiator cap counterclockwise with-
out pressing down on it, until it stops. This
relieves any pressure remaining in the cool-
ing system. And remove the radiator cap by
pushing down and turning counterclock-
wise.
Now fill the radiator with clean demineralized
or distilled water. Continue to add clean
demineralized or distilled water in small quan-
tities until the fluid level stays up in the
radiator neck.
G050D03E
5. Start the engine, top off the radiator with
water and then add coolant to the reservoir
until the level is between "L" and "F".
6. Replace the radiator and reservoir caps and
check to be sure the drain cocks are fully
closed and not leaking.
G050D04E
Page 210 of 268

6
DO-IT-YOURSELF MAINTENANCE
10
o When the wiper blades are frozen in
winter weather or the washer fluid reser-
voir is empty, the wipers may not operate
for ten minutes.
This isn't a mechanical trouble but the
function protecting the wiper by operat-
ing circuit breaker inside of the wiper
motor.
G080B01GK-GATReplacing the Wiper Blades
To remove the wiper blade1. Raise the wiper arm and turn the wiper blade
assembly to expose the plastic locking clip.
1LDA5023
2. Compress the clip and slide the blade as-
sembly downward.
3. Lift it off the arm.
1JBA7037
To install the wiper bladeInstall the blade assembly in the reverse order
of removal.
1JBA7038
Page 224 of 268

6
DO-IT-YOURSELF MAINTENANCE
24
OGK076047
5. Turn the plastic cover counterclockwise
and remove it.
G270A01GK-AATHeadlight and Front Turn Signal Light1. Allow the bulb to cool. Wear eye protection.
2. Open the engine hood.
3. Always grasp the bulb by its plastic base,
avoid touching the glass.4. Disconnect the power cord from the bulb
base in the back of the headlight.
OGK076066N
REPLACEMENT OF LIGHT BULBS!
G260A01MC-AATBefore attempting to replace a light bulb, be sure
the switch is turned to the "OFF" position.
The next paragraph shows how to reach the
light bulbs so they may be changed. Be sure to
replace the burned-out bulb with one of the
same number and wattage rating.
See page 6-27 for the wattage descriptions.
CAUTION:
o Keep the lamps out of contact with
petroleum products, such as oil, gaso-
line, etc.
o If you don't have necessary tools, the
correct bulbs and the expertise, consult
your authorized Hyundai dealer.
OGK076048
6. Disconnect the connector from the bulb
base in the back of the headlight.
Page 227 of 268

6
DO-IT-YOURSELF MAINTENANCE
27
OGK076041
3. Remove the nut (8mm) with a socket wrench.
4. To detach the rear combination light tap it
strongly with your hand.
5. To replace the rear combination light (stop/
tail light, back-up light, turn signal light, side
mark light), take it out from the bulb holder by
turning it counterclockwise.
6. Install the new bulb.
(1) Stop/Tail light
(2) Back-up light
(3) Turn signal light
(4) Side mark light
OGK076042
2. To remove the cover of the rear luggage trim,
turn the knobs by hand to the counterclock-
wise.
OGK076040
Page 229 of 268

6
DO-IT-YOURSELF MAINTENANCE
29
8. To replace the rear combination light (stop/
tail light, back-up light, turn signal light, side
mark light), take it out from the bulb holder by
turning it counterclockwise.
9. Install the new bulb.
(1) Stop/Tail light
(2) Back-up light
(3) Turn signal light
(4) Side mark light
OGK076040
5. To remove the cover of the rear luggae trim,
turn the knob by hand to the counterclock-
wise.
OGK076041
6. Remove the nut (8mm) with a socket wrench.
OGK076042
7. To detach the rear combination light tap it
strongly with your hand.
Page 237 of 268
6
DO-IT-YOURSELF MAINTENANCE
37
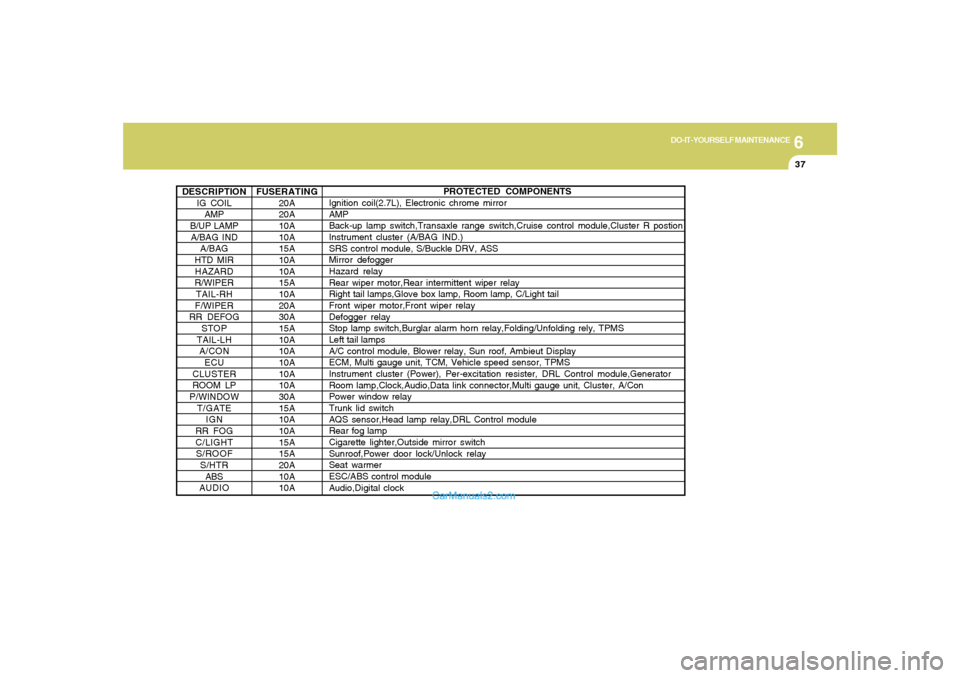
DESCRIPTION
IG COIL
AMP
B/UP LAMP
A/BAG IND
A/BAG
HTD MIR
HAZARD
R/WIPER
TAIL-RH
F/WIPER
RR DEFOG
STOP
TAIL-LH
A/CON
ECU
CLUSTER
ROOM LP
P/WINDOW
T/GATE
IGN
RR FOG
C/LIGHT
S/ROOF
S/HTR
ABS
AUDIO
PROTECTED COMPONENTS
Ignition coil(2.7L), Electronic chrome mirror
AMP
Back-up lamp switch,Transaxle range switch,Cruise control module,Cluster R postion
Instrument cluster (A/BAG IND.)
SRS control module, S/Buckle DRV, ASS
Mirror defogger
Hazard relay
Rear wiper motor,Rear intermittent wiper relay
Right tail lamps,Glove box lamp, Room lamp, C/Light tail
Front wiper motor,Front wiper relay
Defogger relay
Stop lamp switch,Burglar alarm horn relay,Folding/Unfolding rely, TPMS
Left tail lamps
A/C control module, Blower relay, Sun roof, Ambieut Display
ECM, Multi gauge unit, TCM, Vehicle speed sensor, TPMS
Instrument cluster (Power), Per-excitation resister, DRL Control module,Generator
Room lamp,Clock,Audio,Data link connector,Multi gauge unit, Cluster, A/Con
Power window relay
Trunk lid switch
AQS sensor,Head lamp relay,DRL Control module
Rear fog lamp
Cigarette lighter,Outside mirror switch
Sunroof,Power door lock/Unlock relay
Seat warmer
ESC/ABS control module
Audio,Digital clock FUSERATING
20A
20A
10A
10A
15A
10A
10A
15A
10A
20A
30A
15A
10A
10A
10A
10A
10A
30A
15A
10A
10A
15A
15A
20A
10A
10A
Page 242 of 268

8
CONSUMER INFORMATION, REPORTING SAFETY DEFECTS & BINDING ARBITRATION OF WARRANTY CLAIMS2
ENGINE NUMBER
VEHICLE IDENTIFICATION
NUMBER (VIN)
I010B01A-AAT I010A01A-AAT
The vehicle identification number (VIN) is the
number used in registering your car and in all
legal matters pertaining to its ownership, etc. It
can be found in three different places on your
car:
1. On the bulkhead between the engine and
passenger compartments.
2. On the left top side of the instrument panel
where it can be seen by looking down through
the windshield.
3. On the lower side of the center pillar outer
panel.
The engine number is stamped on the engine
block as shown in the drawing.
OGK086100L
TIRESI020A02A-AATTire InformationThe tires supplied on your new Hyundai
are chosen to provide the best perfor-
mance for normal driving.
If you ever have questions about your
tire warranty and where to obtain ser-
vice, see the tire manufacture's booklet
included with your vehicle's Owner's
Manual Literature Kit.
I010B01B
2.7L
HFO6003
2.0L
gkflhma-8.p659/12/2006, 3:30 PM 2
Page 263 of 268

10
INDEX
2
A
Air Bag...............................................................................................1-30
Air Cleaner Filter ...............................................................................6-10
Air Conditioning
Care..............................................................................................6-16
Operation......................................................................................6-16
Switch...........................................................................................1-90
Antenna..........................................................................................1-104
Anti-Lock Brake System (ABS) ........................................................2-12
Ashtray..............................................................................................1-65
Automatic Transaxle........................................................................... 2-8
Auto Remote Control Switch .............................................................1-83
B
Battery..................................................................................... 2-17, 6-19
Binding arbitration..............................................................................8-17
Brake
Anti-lock system..........................................................................2-12
Checking the brakes ....................................................................6-14
Fluid ..............................................................................................6-14
Practices......................................................................................2-14
Breaking-In your new Hyundai ........................................................... 1-3
Bulbs Wattage...................................................................................6-31
C
California Perchlorate Notice ..........................................................5-10
Care of Cassette tapes ..................................................................1-125
Care of Disc ...................................................................................1-125
Cassette Tape Player Operation (H280) ......................................1-108
Catalytic Converter ............................................................................. 7-3Child Restraint System......................................................... 1-21 ~ 1-26
Cigarette Lighter................................................................................1-65
Climate Control Air Filter...................................................................1-86
Clutch
Checking fluid...............................................................................6-15
Combination Light
Auto Light......................................................................................1-59
Headlight flasher..........................................................................1-60
Headlight switch...........................................................................1-58
High-beam switch........................................................................1-59
Lane change signal ......................................................................1-58
Turn signal operation...................................................................
1-58
Compact Disc Player Operation
(H280, H265, H465)........................................... 1-110, 1-116, 1-122
Consumer Information......................................................................8-13
Cooling Fans.....................................................................................6-21
Corrosion Protection
Cleaning the interior....................................................................... 4-5
Protecting your Hyundai from corrosion....................................... 4-2
Washing and waxing...................................................................... 4-3
Cruise Control...................................................................................1-80
D
Defrosting/Defogging........................................................................1-93
Door
Central door lock............................................................................ 1-6
Door locks...................................................................................... 1-4
Front door edge warning light ......................................................1-73
Locking, unlocking front door with a key ...................................... 1-5
Drink Holder ......................................................................................1-65