2008 Hyundai Santa Fe Low side
[x] Cancel search: Low sidePage 70 of 355
1FEATURES OF YOUR HYUNDAI58
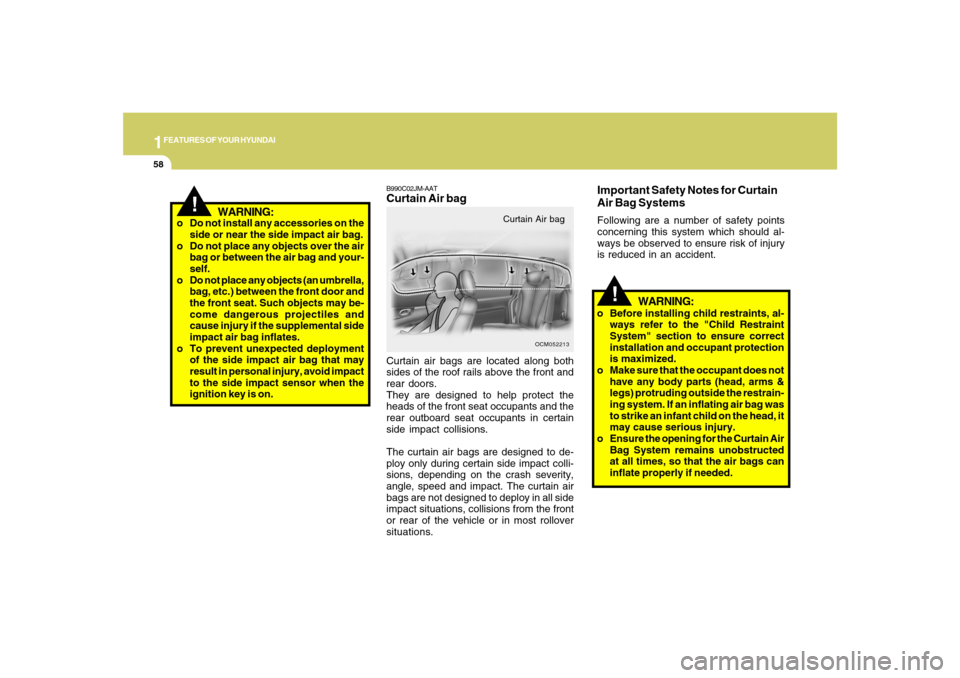
B990C02JM-AATCurtain Air bagCurtain air bags are located along both
sides of the roof rails above the front and
rear doors.
They are designed to help protect the
heads of the front seat occupants and the
rear outboard seat occupants in certain
side impact collisions.
The curtain air bags are designed to de-
ploy only during certain side impact colli-
sions, depending on the crash severity,
angle, speed and impact. The curtain air
bags are not designed to deploy in all side
impact situations, collisions from the front
or rear of the vehicle or in most rollover
situations.
OCM052213
Curtain Air bag
!
o Do not install any accessories on the
side or near the side impact air bag.
o Do not place any objects over the air
bag or between the air bag and your-
self.
o Do not place any objects (an umbrella,
bag, etc.) between the front door and
the front seat. Such objects may be-
come dangerous projectiles and
cause injury if the supplemental side
impact air bag inflates.
o To prevent unexpected deployment
of the side impact air bag that may
result in personal injury, avoid impact
to the side impact sensor when the
ignition key is on.
WARNING:
!
WARNING:
o Before installing child restraints, al-
ways refer to the "Child Restraint
System" section to ensure correct
installation and occupant protection
is maximized.
o Make sure that the occupant does not
have any body parts (head, arms &
legs) protruding outside the restrain-
ing system. If an inflating air bag was
to strike an infant child on the head, it
may cause serious injury.
o Ensure the opening for the Curtain Air
Bag System remains unobstructed
at all times, so that the air bags can
inflate properly if needed.Important Safety Notes for Curtain
Air Bag SystemsFollowing are a number of safety points
concerning this system which should al-
ways be observed to ensure risk of injury
is reduced in an accident.
Page 75 of 355

1
FEATURES OF YOUR HYUNDAI
63
1. Low Windshield Washer Fluid Level Warning Light
2. Malfunction Indicator Light (MIL)
3. TPMS (Tire Pressure Monitoring System) Malfunction
Indicator
4. Low Tire Pressure Position Telltale
5. Low Tire Pressure Telltale
6. AWD System Warning Light (If installed)
7. AWD Lock Indicator Light (If installed)
8. Odometer / Tripmeter / Trip Computer (If installed)
9. Fuel Gauge
10. Low Fuel Warning Light
11. Seat Belt Warning Light (Driver's Side)
12. Parking Brake/Low Brake Fluid Level Warning Light
13. Charging System Warning Light
14. Coolant Temperature Gauge15. Low Oil Pressure Warning Light
16. Supplemental Restraint (Air bag) System
Service Reminder Indicator (SRI)
17. Tail Gate Open Warning Light
18. Door Ajar Warning Light
19. Automatic Transaxle Position Indicator Light (If installed)
20. High Beam Indicator Light
21. Cruise SET Indicator Light
22. Cruise Indicator Light
23. ABS Service Reminder Indicator
24. Turn Signal Indicator Light
25. Speedometer
26. Electronic Stability Control (ESC) Indicator Light
27. Immobilizer Warning Indicator Light (If Installed)
28. Tachometer
Page 77 of 355
1
FEATURES OF YOUR HYUNDAI
65
!
WARNING:
Significantly low tire pressure makes
the vehicle unstable and can contribute
to loss of vehicle control and increased
braking distances.
Continued driving on low pressure tires
may cause the tires to overheat and fail. Avoid hard braking and overcorrecting at
the steering wheel. Inflate the tires to the
proper pressure as indicated on the
vehicle’s tire information placard.
If you have a flat tire, the Low tire Pressure
and Position Telltales will illuminate.
Replace the flat tire with the spare tire(see
page 3-12)
Each wheel is equipped with a tire pres-
sure sensor mounted inside the tire be-
hind the valve stems. You must use TPMS
specific wheels. IT is recommended that
you always have tires serviced by your
Hyundai dealer or qualified technician.
After you replace the flat tire, the Low Tire
Pressure and Position Telltales remain
illuminated. This is normal; the system is
not monitoring the spare tire pressure.
Check the spare tire pressure to make sure
it is correct.B260T01O-GAT
AWD (All Wheel Drive)
System Warning Light
(If installed)
When the key is turned to the "ON" position,
the AWD(All Wheel Drive) system warning
light will illuminate and then go off in a few
seconds.
CAUTION:
If the AWD system warning light ( )
blinks while driving, this indicates that
there is a malfunction in the AWD sys-
tem. If this occurs, have your vehicle
checked by an authorized Hyundai dealer
as soon as possible.
!
CAUTION:
Never use a puncture-repair agent in a
flat tire. If used, the tire pressure sensor
will be damaged and will require replace-
ment. Have the flat tire repaired by a
Hyundai dealer or qualified technician
as soon as possible.
!
B260V01CM-GAT
AWD (All Wheel Drive) Lock
Indicator Light (If installed)
The AWD (All Wheel Drive) lock indicator
light in the instrument cluster is illuminated
when the AWD lock switch is pushed.
The purpose of this switch is to increase
the drive power when driving on wet pave-
ment, snow-covered roads and/or off-road.
The AWD lock indicator light is turned off by
pushing the switch again.NOTE:Do not use AWD LOCK on normal dry
pavement conditions.
Page 85 of 355
1
FEATURES OF YOUR HYUNDAI
73
Push in the RESET switch more than 1
second to initialize the displayed informa-
tion.
OCM051018L
Reset Switch
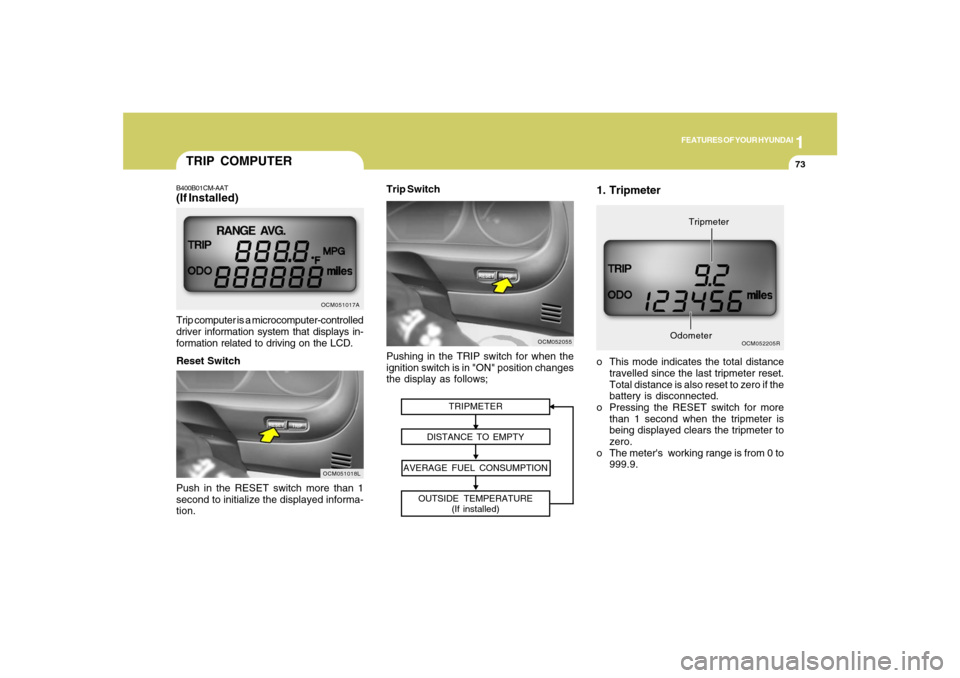
TRIPMETER
DISTANCE TO EMPTY
AVERAGE FUEL CONSUMPTION
OUTSIDE TEMPERATURE
(If installed)
Pushing in the TRIP switch for when the
ignition switch is in "ON" position changes
the display as follows;
OCM052055
Trip Switch
TRIP COMPUTERB400B01CM-AAT(If Installed)Trip computer is a microcomputer-controlled
driver information system that displays in-
formation related to driving on the LCD.
OCM051017A
1. Tripmetero This mode indicates the total distance
travelled since the last tripmeter reset.
Total distance is also reset to zero if the
battery is disconnected.
o Pressing the RESET switch for more
than 1 second when the tripmeter is
being displayed clears the tripmeter to
zero.
o The meter's working range is from 0 to
999.9.
OCM052205R
OdometerTripmeter
Page 88 of 355
1FEATURES OF YOUR HYUNDAI76
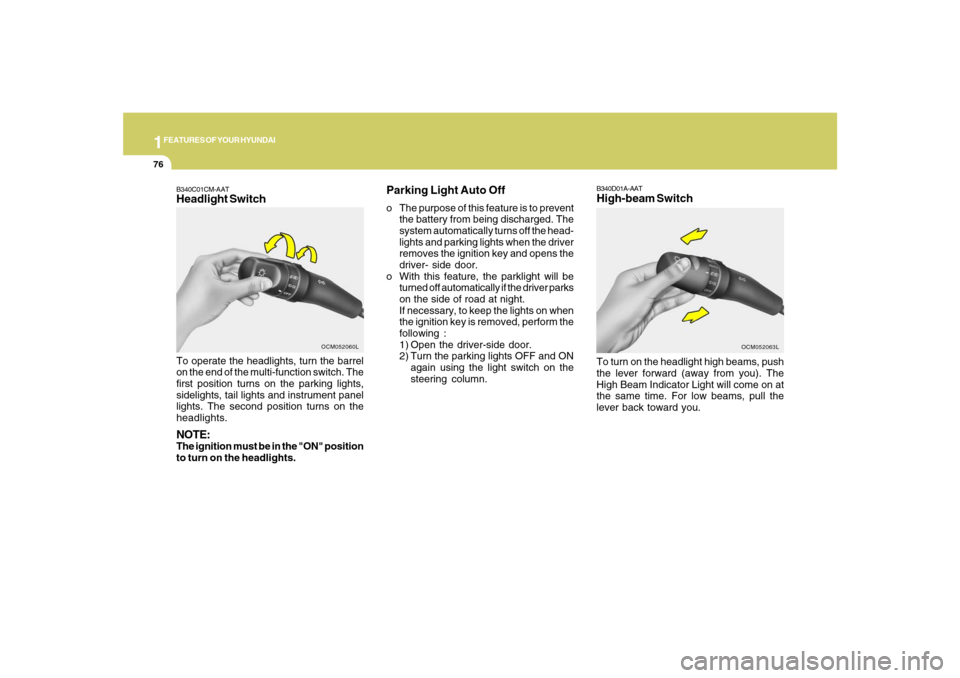
B340D01A-AATHigh-beam SwitchTo turn on the headlight high beams, push
the lever forward (away from you). The
High Beam Indicator Light will come on at
the same time. For low beams, pull the
lever back toward you.
OCM052063L
B340C01CM-AATHeadlight SwitchTo operate the headlights, turn the barrel
on the end of the multi-function switch. The
first position turns on the parking lights,
sidelights, tail lights and instrument panel
lights. The second position turns on the
headlights.NOTE:The ignition must be in the "ON" position
to turn on the headlights.
OCM052060L
Parking Light Auto Offo The purpose of this feature is to prevent
the battery from being discharged. The
system automatically turns off the head-
lights and parking lights when the driver
removes the ignition key and opens the
driver- side door.
o With this feature, the parklight will be
turned off automatically if the driver parks
on the side of road at night.
If necessary, to keep the lights on when
the ignition key is removed, perform the
following :
1) Open the driver-side door.
2) Turn the parking lights OFF and ON
again using the light switch on the
steering column.
Page 109 of 355

1
FEATURES OF YOUR HYUNDAI
97
!
WARNING:
o Do not store cigarette lighters, pro-
pane cylinders, or other flammable/
explosive materials in the vehicle.
These items may catch fire and/or
explode if the vehicle is exposed to
hot temperatures for extended peri-
ods.
o To avoid the possibility of injury in
case of an accident or a sudden stop,
the center facia upper tray lid should
be kept closed when the car is in
motion.
OUTSIDE REARVIEW
MIRROR
CAUTION:
If the mirror is jammed with ice, do not
adjust the mirror by force. Use an ap-
proved spray de-icer (not radiator anti-
freeze) to release the frozen mecha-
nism or move the vehicle to a warm
place and allow the ice to melt.
To adjust the position of either
mirror:1. Move the selecting switch to the right or
left to activate the adjustable mecha-
nism for the corresponding door mirror.
2. Adjust mirror angle by depressing the
appropriate perimeter switch as illus-
trated.
!
OCM052053
B510B01TG-AATThe outside rearview mirrors can be ad-
justed to your preferred rear vision, both
directly behind the vehicle, and to the rear
of the left and right sides.
The remote control outside rearview mir-
ror switch controls the adjustments for both
right and left outside mirrors.NOTE:Before driving away, always check that
your mirrors are positioned so you can
see behind you, both to the left and right
sides, as well as directly behind your
vehicle.
Page 111 of 355
1
FEATURES OF YOUR HYUNDAI
99
!
WARNING:
Do not adjust or fold the outside rearview
mirrors while the vehicle is moving. This
could result in loss of control, and an
accident causing death, serious injury
or property damage.
CAUTION:
If the mirror is jammed with ice, do not
adjust the mirror by force. Use an ap-
proved spray de-icer (not radiator anti-
freeze) to release the frozen mecha-
nism or move the vehicle to a warm
place and allow the ice to melt.
!
DAY/NIGHT INSIDE REAR-
VIEW MIRRORB520A01A-AATManual TypeYour Hyundai is equipped with a day/night
inside rearview mirror. The "night" position
is selected by flipping the tab at the bottom
of the mirror toward you. In the "night"
position, the glare of headlights of cars
behind you is reduced.
B520A01CM
B520C01CM-AATAutomatic Dimming Rearview
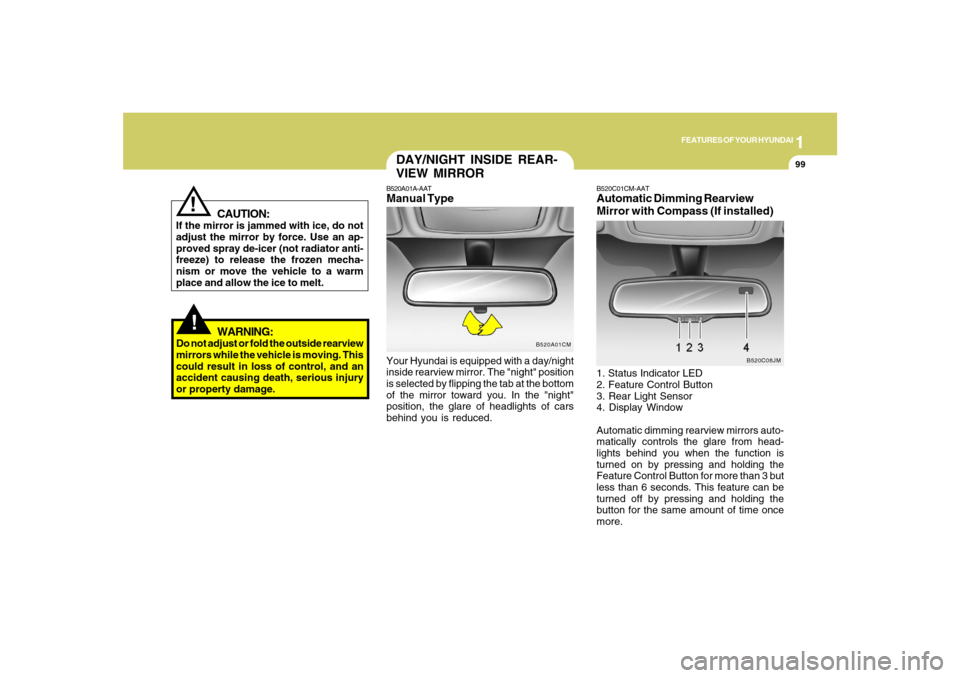
Mirror with Compass (If installed)1. Status Indicator LED
2. Feature Control Button
3. Rear Light Sensor
4. Display Window
Automatic dimming rearview mirrors auto-
matically controls the glare from head-
lights behind you when the function is
turned on by pressing and holding the
Feature Control Button for more than 3 but
less than 6 seconds. This feature can be
turned off by pressing and holding the
button for the same amount of time once
more.
B520C08JM
Page 112 of 355
1FEATURES OF YOUR HYUNDAI
100
- The compass headings are inaccurate
in long distance driving.
If the vehicle’s compass headings become
inaccurate, the compass should be cali-
brated as follows:
1. Ensure the vehicle is not located near
large steel structures or under electric
power lines.
2. Turn on the compass by pressing the
button.
3. Press and hold the
button for more
than 6 but less than 9 seconds. The
current zone number will appear in the
display. Release then press the
but-
ton until your zone number appears in
the display.
4. Check the mirror angle by pressing and
holding the
button for more than
12seconds. Release then press the
button to “L”(for steering wheel on the
Left side of the vehicle). (if installed)
5. Press and hold the
button between 9
and 12 seconds. Release the
button
when a “C” appears in the display.
6. Drive the vehicle in 2 complete circles
at less than 5mph(8km/h) or until the
compass heading appears.
CAUTION:
Be sure the area is free of traffic, pedes-
trians, and obstructions.
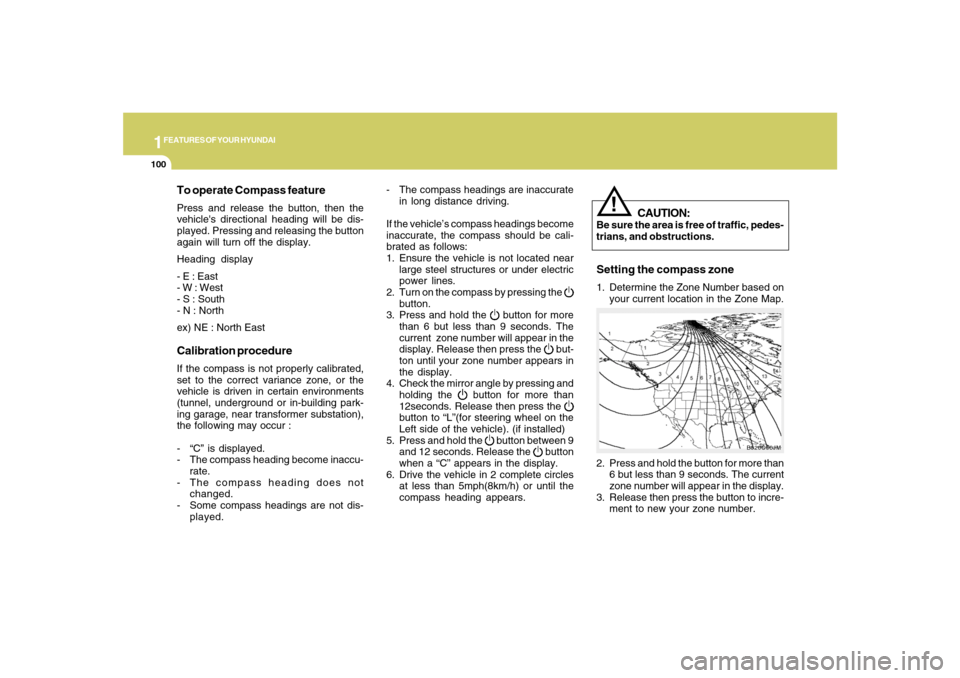
2. Press and hold the button for more than
6 but less than 9 seconds. The current
zone number will appear in the display.
3. Release then press the button to incre-
ment to new your zone number.
B520C06JM
To operate Compass featurePress and release the button, then the
vehicle's directional heading will be dis-
played. Pressing and releasing the button
again will turn off the display.
Heading display
- E : East
- W : West
- S : South
- N : North
ex) NE : North EastCalibration procedureIf the compass is not properly calibrated,
set to the correct variance zone, or the
vehicle is driven in certain environments
(tunnel, underground or in-building park-
ing garage, near transformer substation),
the following may occur :
- “C” is displayed.
- The compass heading become inaccu-
rate.
- The compass heading does not
changed.
- Some compass headings are not dis-
played.
!
Setting the compass zone1. Determine the Zone Number based on
your current location in the Zone Map.