2008 Hyundai Santa Fe door lock
[x] Cancel search: door lockPage 24 of 355
1FEATURES OF YOUR HYUNDAI12
B075C01CM-AATAlarm StageThe alarm will be activated if any of the
following occurs while the car is parked
and the system is armed.
1) A front or rear door is opened without
using the transmitter or the ignition key.
2) The tail gate is opened without using
the transmitter.
3) The engine hood is opened.
The siren will sound and the turn signal
lights will blink continuously for about 30
seconds (This will repeat 3 times). To turn
off the system, unlock the door or tail gate
using the transmitter or the ignition key.
CAUTION:
Avoid trying to start the engine while the
system is armed.
!
B075D01CM-AATDisarmed StageIf the follwing conditions are met, the sys-
tem will be disarmed.
o When the doors are unlocked with the
transmitter or the ignition key.
After depressing unlock button, you
must open the doors within 30 seconds
or all doors will automatically lock again
and theft-alarm system will be armed.
o When the ignition switch is in the "ON"
position.
The turn signal lights will blink twice when
the door is unlocked with the transmitter.
The alarm will be deactivated when:
o The lock/unlock button on the transmit-
ter is pressed.
o The doors are unlocked with the igni-
tion key.
o The ignition switch is in the "ON" posi-
tion for 30 seconds.NOTE:When the system is disarmed while the
"DOOR" button of the interior light is
depressed, the interior light will illumi-
nate for 30 seconds.
CAUTION:
Do not arm the system until all passen-
gers have left the car. If the system is
armed while a passenger(s) remains in
the car, the alarm may be activated when
the remaining passenger(s) leaves the
car.
!
NOTE:If the "LOCK" button is pressed once
more within 4 seconds after pushing the
"LOCK" button on the transmitter, the
siren will sound once to indicate that the
system is armed.
Page 25 of 355
1
FEATURES OF YOUR HYUNDAI
13
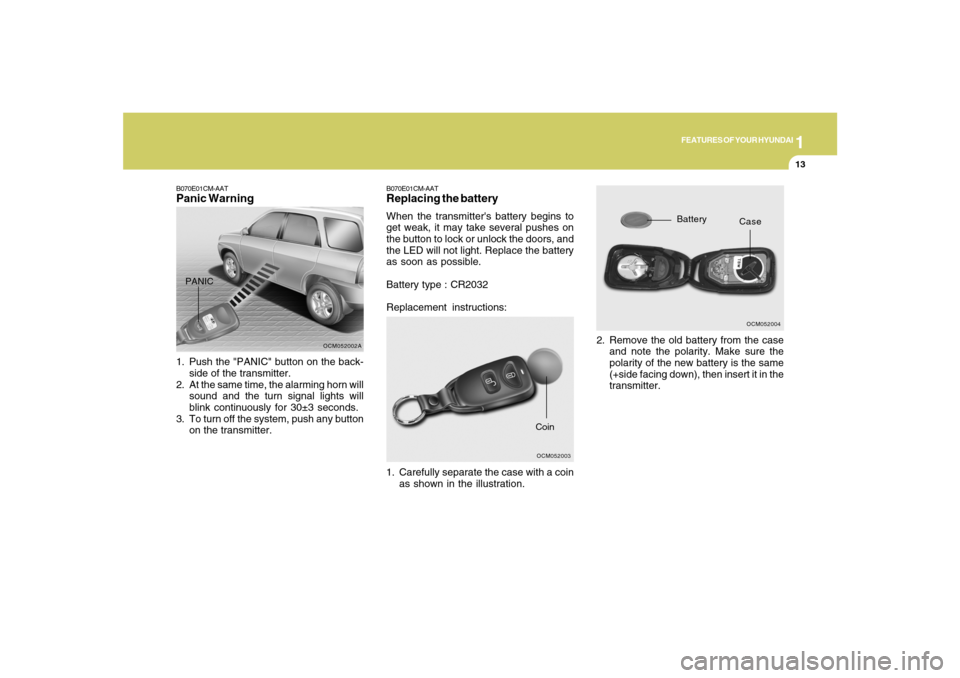
B070E01CM-AATReplacing the batteryWhen the transmitter's battery begins to
get weak, it may take several pushes on
the button to lock or unlock the doors, and
the LED will not light. Replace the battery
as soon as possible.
Battery type : CR2032
Replacement instructions:
1. Carefully separate the case with a coin
as shown in the illustration.2. Remove the old battery from the case
and note the polarity. Make sure the
polarity of the new battery is the same
(+side facing down), then insert it in the
transmitter.
OCM052003Coin
OCM052004
Battery
Case
B070E01CM-AATPanic Warning1. Push the "PANIC" button on the back-
side of the transmitter.
2. At the same time, the alarming horn will
sound and the turn signal lights will
blink continuously for 30±3 seconds.
3. To turn off the system, push any button
on the transmitter.
OCM052002A
PANIC
Page 26 of 355
1FEATURES OF YOUR HYUNDAI14
WINDOWS
OCM052011
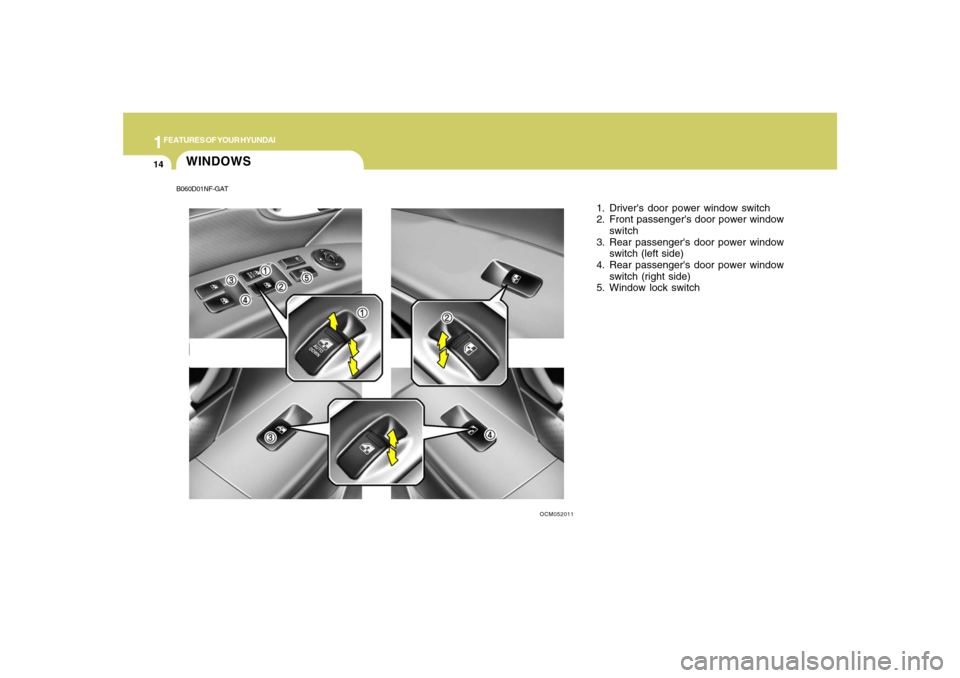
1. Driver's door power window switch
2. Front passenger's door power window
switch
3. Rear passenger's door power window
switch (left side)
4. Rear passenger's door power window
switch (right side)
5. Window lock switch
B060D01NF-GAT
Page 27 of 355
1
FEATURES OF YOUR HYUNDAI
15
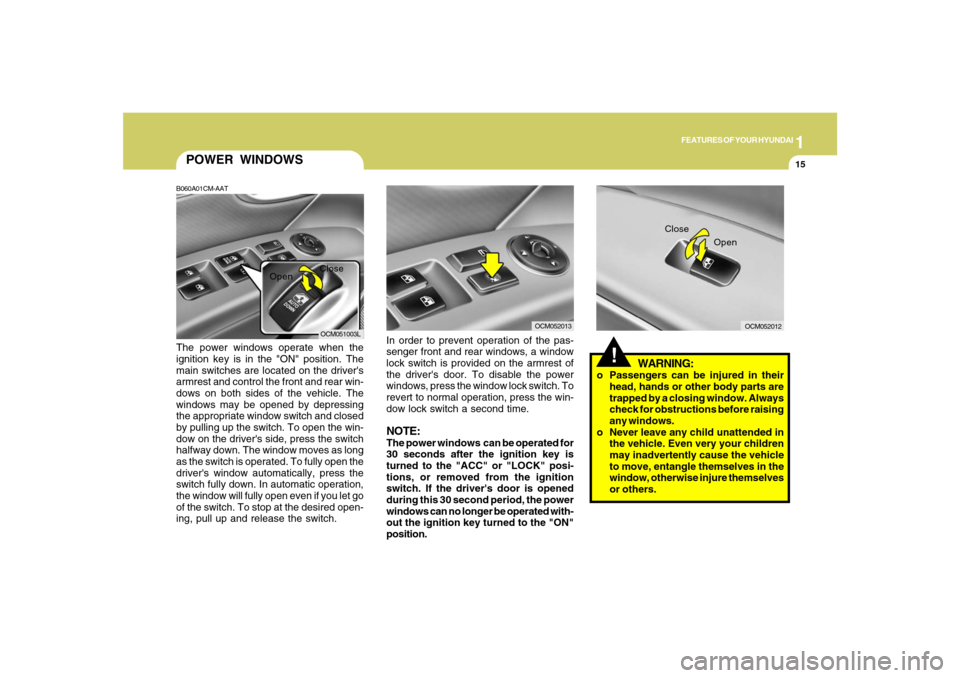
POWER WINDOWSB060A01CM-AATThe power windows operate when the
ignition key is in the "ON" position. The
main switches are located on the driver's
armrest and control the front and rear win-
dows on both sides of the vehicle. The
windows may be opened by depressing
the appropriate window switch and closed
by pulling up the switch. To open the win-
dow on the driver's side, press the switch
halfway down. The window moves as long
as the switch is operated. To fully open the
driver's window automatically, press the
switch fully down. In automatic operation,
the window will fully open even if you let go
of the switch. To stop at the desired open-
ing, pull up and release the switch.
OCM051003L
!
In order to prevent operation of the pas-
senger front and rear windows, a window
lock switch is provided on the armrest of
the driver's door. To disable the power
windows, press the window lock switch. To
revert to normal operation, press the win-
dow lock switch a second time.NOTE:The power windows can be operated for
30 seconds after the ignition key is
turned to the "ACC" or "LOCK" posi-
tions, or removed from the ignition
switch. If the driver's door is opened
during this 30 second period, the power
windows can no longer be operated with-
out the ignition key turned to the "ON"
position.
WARNING:
o Passengers can be injured in their
head, hands or other body parts are
trapped by a closing window. Always
check for obstructions before raising
any windows.
o Never leave any child unattended in
the vehicle. Even very your children
may inadvertently cause the vehicle
to move, entangle themselves in the
window, otherwise injure themselves
or others.
OCM052012
Close
Open
OCM052013
Close
Open
Page 28 of 355
1FEATURES OF YOUR HYUNDAI16
!
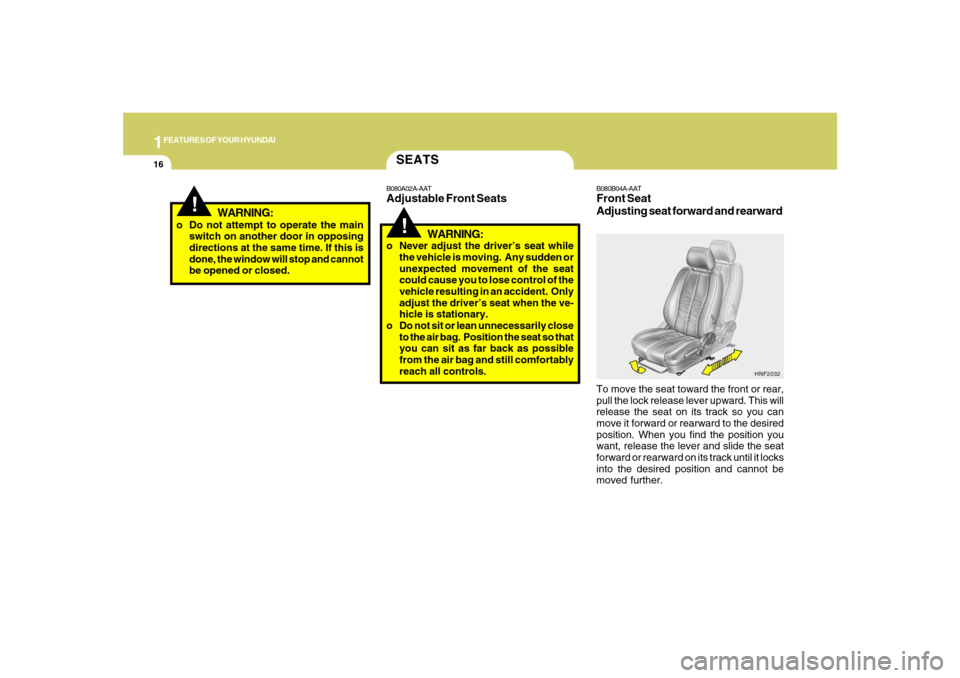
B080B04A-AATFront Seat
Adjusting seat forward and rearwardTo move the seat toward the front or rear,
pull the lock release lever upward. This will
release the seat on its track so you can
move it forward or rearward to the desired
position. When you find the position you
want, release the lever and slide the seat
forward or rearward on its track until it locks
into the desired position and cannot be
moved further.
HNF2032
SEATSB080A02A-AATAdjustable Front Seats
!
WARNING:
o Never adjust the driver’s seat while
the vehicle is moving. Any sudden or
unexpected movement of the seat
could cause you to lose control of the
vehicle resulting in an accident. Only
adjust the driver’s seat when the ve-
hicle is stationary.
o Do not sit or lean unnecessarily close
to the air bag. Position the seat so that
you can sit as far back as possible
from the air bag and still comfortably
reach all controls. o Do not attempt to operate the main
switch on another door in opposing
directions at the same time. If this is
done, the window will stop and cannot
be opened or closed.
WARNING:
Page 42 of 355
1FEATURES OF YOUR HYUNDAI30
!
OCM052307
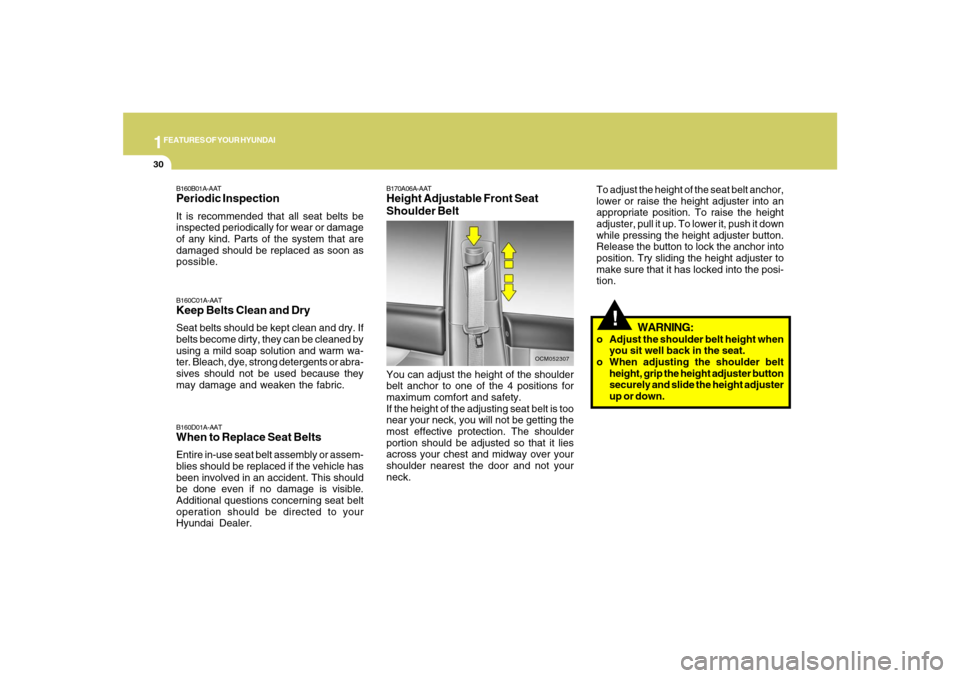
B170A06A-AATHeight Adjustable Front Seat
Shoulder BeltYou can adjust the height of the shoulder
belt anchor to one of the 4 positions for
maximum comfort and safety.
If the height of the adjusting seat belt is too
near your neck, you will not be getting the
most effective protection. The shoulder
portion should be adjusted so that it lies
across your chest and midway over your
shoulder nearest the door and not your
neck.To adjust the height of the seat belt anchor,
lower or raise the height adjuster into an
appropriate position. To raise the height
adjuster, pull it up. To lower it, push it down
while pressing the height adjuster button.
Release the button to lock the anchor into
position. Try sliding the height adjuster to
make sure that it has locked into the posi-
tion.
B160C01A-AATKeep Belts Clean and DrySeat belts should be kept clean and dry. If
belts become dirty, they can be cleaned by
using a mild soap solution and warm wa-
ter. Bleach, dye, strong detergents or abra-
sives should not be used because they
may damage and weaken the fabric.B160D01A-AATWhen to Replace Seat BeltsEntire in-use seat belt assembly or assem-
blies should be replaced if the vehicle has
been involved in an accident. This should
be done even if no damage is visible.
Additional questions concerning seat belt
operation should be directed to your
Hyundai Dealer.B160B01A-AATPeriodic InspectionIt is recommended that all seat belts be
inspected periodically for wear or damage
of any kind. Parts of the system that are
damaged should be replaced as soon as
possible.
WARNING:
o Adjust the shoulder belt height when
you sit well back in the seat.
o When adjusting the shoulder belt
height, grip the height adjuster button
securely and slide the height adjuster
up or down.
Page 45 of 355
1
FEATURES OF YOUR HYUNDAI
33
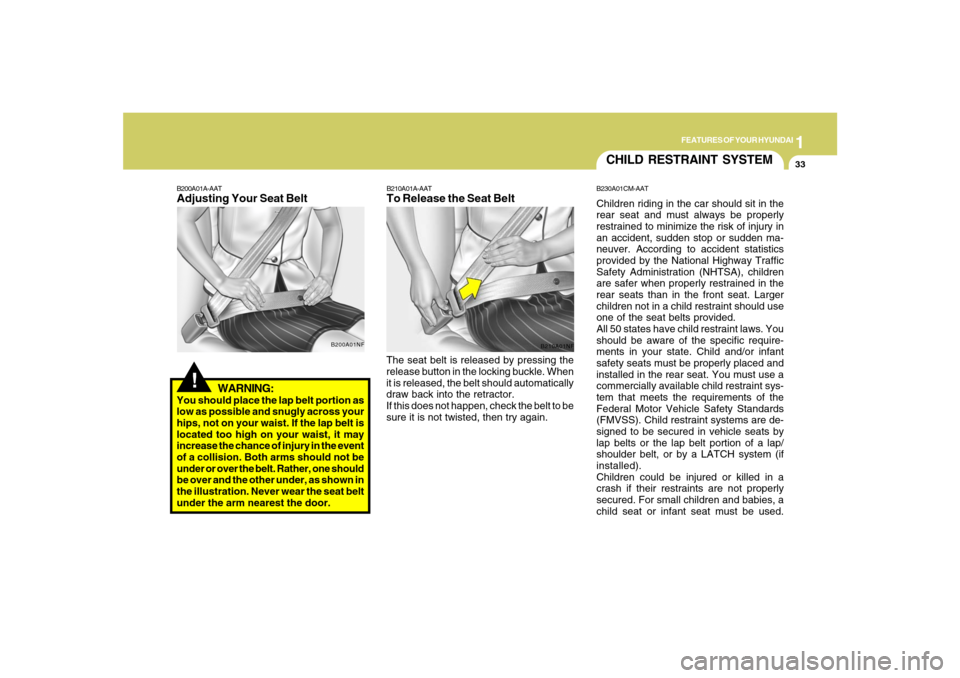
WARNING:
You should place the lap belt portion as
low as possible and snugly across your
hips, not on your waist. If the lap belt is
located too high on your waist, it may
increase the chance of injury in the event
of a collision. Both arms should not be
under or over the belt. Rather, one should
be over and the other under, as shown in
the illustration. Never wear the seat belt
under the arm nearest the door.
!
B200A01A-AATAdjusting Your Seat Belt
B200A01NF
The seat belt is released by pressing the
release button in the locking buckle. When
it is released, the belt should automatically
draw back into the retractor.
If this does not happen, check the belt to be
sure it is not twisted, then try again.B210A01A-AATTo Release the Seat Belt
B210A01NF
CHILD RESTRAINT SYSTEMB230A01CM-AATChildren riding in the car should sit in the
rear seat and must always be properly
restrained to minimize the risk of injury in
an accident, sudden stop or sudden ma-
neuver. According to accident statistics
provided by the National Highway Traffic
Safety Administration (NHTSA), children
are safer when properly restrained in the
rear seats than in the front seat. Larger
children not in a child restraint should use
one of the seat belts provided.
All 50 states have child restraint laws. You
should be aware of the specific require-
ments in your state. Child and/or infant
safety seats must be properly placed and
installed in the rear seat. You must use a
commercially available child restraint sys-
tem that meets the requirements of the
Federal Motor Vehicle Safety Standards
(FMVSS). Child restraint systems are de-
signed to be secured in vehicle seats by
lap belts or the lap belt portion of a lap/
shoulder belt, or by a LATCH system (if
installed).
Children could be injured or killed in a
crash if their restraints are not properly
secured. For small children and babies, a
child seat or infant seat must be used.
Page 75 of 355

1
FEATURES OF YOUR HYUNDAI
63
1. Low Windshield Washer Fluid Level Warning Light
2. Malfunction Indicator Light (MIL)
3. TPMS (Tire Pressure Monitoring System) Malfunction
Indicator
4. Low Tire Pressure Position Telltale
5. Low Tire Pressure Telltale
6. AWD System Warning Light (If installed)
7. AWD Lock Indicator Light (If installed)
8. Odometer / Tripmeter / Trip Computer (If installed)
9. Fuel Gauge
10. Low Fuel Warning Light
11. Seat Belt Warning Light (Driver's Side)
12. Parking Brake/Low Brake Fluid Level Warning Light
13. Charging System Warning Light
14. Coolant Temperature Gauge15. Low Oil Pressure Warning Light
16. Supplemental Restraint (Air bag) System
Service Reminder Indicator (SRI)
17. Tail Gate Open Warning Light
18. Door Ajar Warning Light
19. Automatic Transaxle Position Indicator Light (If installed)
20. High Beam Indicator Light
21. Cruise SET Indicator Light
22. Cruise Indicator Light
23. ABS Service Reminder Indicator
24. Turn Signal Indicator Light
25. Speedometer
26. Electronic Stability Control (ESC) Indicator Light
27. Immobilizer Warning Indicator Light (If Installed)
28. Tachometer