Page 87 of 329

�µ
�µ
The childproof door locks are
designed to prevent children seated
in the rear f rom accidentally opening
the rear doors. Each rear door has a
lock lever near the edge. With the
lever in the LOCK position, the door
cannot be opened f rom inside
regardless of the position of the lock
tab. To open the door, pull the lock
tab up, and use the outside door
handle. Pressthisbuttononce
to unlock the driver’s door. Push it
twice to unlock the other doors and
the tailgate. Some exterior lights will
f lash twice each time you press the
button.
Press this button once to
lock all doors and the tailgate. Some
exterior and interior lights will f lash.
When you push LOCK twice within 5
seconds, you will hear a beep to
verify that the security system has
set. You cannot lock it if any door is
not f ully closed or the key is in the
ignition switch. When you press the UNLOCK
button, the f ront and rear individual
map lights, depending on the interior
light control switch position, will
come on (see page ). If you do
not open any door, the lights stay on
f or about 30 seconds, then go out. If
you relock the doors and the tailgate
with the remote transmitter before
30 seconds have elapsed, the lights
will go of f immediately.
If you do not open any door or the
tailgate within 30 seconds, they will
automatically relock, and the
security system (if equipped) will
reset.
102
CONT INUED
Childproof Door L ocks UNL OCK
LOCK
Remote Transmitter
Childproof Door L ocks, Remot e T ransmit t er
Inst rument s and Cont rols
83
PANIC
BUTTONLOCK
BUTTON UNLOCK
BUTTON
LED
LOCK LEVER Unlock
Lock
�\f���—�\f���—�\f���y�
�
�������\f�
�y���
�(���+�����\f�y�\f�\f�����y
2008 Pilot
Page 88 of 329
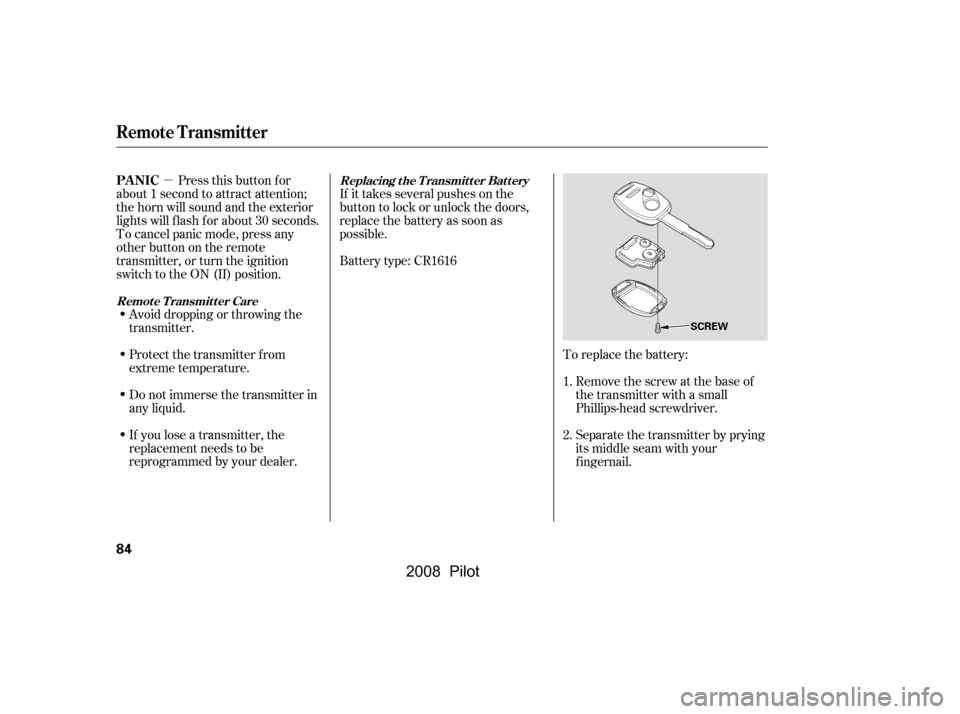
�µTo replace the battery:Remove the screw at the base of
the transmitter with a small
Phillips-head screwdriver.
Separate the transmitter by prying
its middle seam with your
f ingernail.
Battery type: CR1616
If it takes several pushes on the
button to lock or unlock the doors,
replace the battery as soon as
possible.
Pressthisbuttonfor
about 1 second to attract attention;
thehornwillsoundandtheexterior
lights will f lash f or about 30 seconds.
To cancel panic mode, press any
other button on the remote
transmitter, or turn the ignition
switch to the ON (II) position.
Avoid dropping or throwing the
transmitter.
If you lose a transmitter, the
replacement needs to be
reprogrammed by your dealer.
Do not immerse the transmitter in
any liquid.
Protect the transmitter from
extreme temperature. 1.
2.Replacing the Transmitter Battery
Remote Transmitter CarePA NIC
Remote Transmitter
84
SCREW
�\f���—�\f���—�\f���y�
�
�������
�
�y���
�(���+�����\f�y�\f�\f�����y
2008 Pilot
Page 90 of 329

In the HI setting, the heater turns off
when the seat gets warm, and turns
back on after the seat’s temperature
drops.
In the LO setting, the heater runs
continuously. It does not cycle with
temperature changes.
Follow these precautions whenever
you use the seat heaters:Use the HI setting only to heat the
seats quickly, because it draws
large amounts of current f rom the
battery.
Push the top of the switch, HI, to
rapidly heat up the seat. Af ter the
seat reaches a comfortable
temperature, select LO by pushing
the bottom of the switch. This will
keep the seat warm. If the engine is lef t idling f or an
extended period, do not use the
seat heaters, even on the LO
setting. It can weaken the battery,
causing hard starting.
Both f ront seats are equipped with
seat heaters. Because of the sensors
f or the side airbag cutof f system,
there is no heater in the passenger’s
seat-back. The ignition switch must
be ON (II) to use the heaters.If equipped
Seat Heaters
86
SEAT HEATER BUTTONS
SEAT HEATER BUTTONS
�\f���—�\f���—�\f���y�
�
�����������y���
�(���+�����\f�y�\f�\f���
�y
2008 Pilot
Page 91 of 329
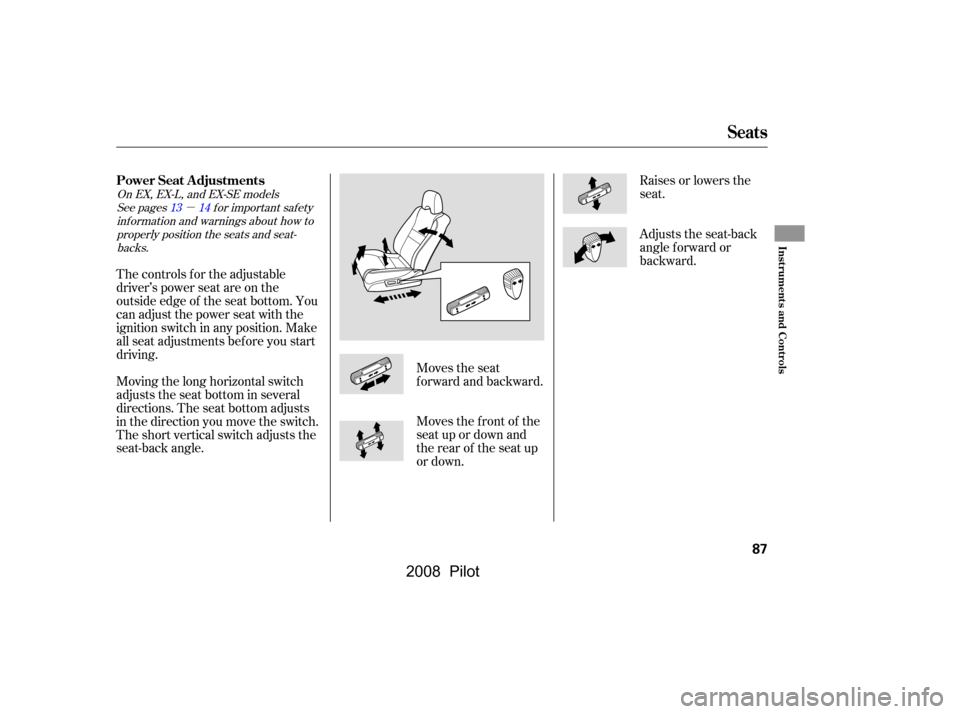
�µ
See pagesf or important saf ety
inf ormation and warnings about how toproperly position the seats and seat-backs. 1314
On EX, EX-L, and EX-SE models
Moving the long horizontal switch
adjusts the seat bottom in several
directions. The seat bottom adjusts
in the direction you move the switch.
The short vertical switch adjusts the
seat-back angle.
The controls f or the adjustable
driver’s power seat are on the
outside edge of the seat bottom. You
can adjust the power seat with the
ignition switch in any position. Make
all seat adjustments bef ore you start
driving. Adjusts the seat-back
angle f orward or
backward.
Moves the seat
f orward and backward.
Moves the f ront of the
seat up or down and
the rear of the seat up
or down. Raises or lowers the
seat.
Seats
Power Seat A djustments
Inst rument s and Cont rols
87
�\f���—�\f���—�\f���y�
�
�����������y���
�(���+�����\f�y�\f�\f�����y
2008 Pilot
Page 93 of 329
.
Lower the")
The left and right halves can be
f olded separately.If you are f olding the lef t half of
the seat, use the ignition key to
release the center seat belt from
thedetachableanchor(seepage ).
Lower the head restraint to its
lowest position.
Pull up the handle on the outside
of the seat-back.
Fold the seat-back forward.
To change the angle of the seats in
the second row seat-backs, pull up
the handle on the seat-back. Moving
the short vertical switch f orward or
backward adjusts the seat back in
those directions.
To adjust the seats forward and
backward, pull up on the lever under
the seat cushion. Af ter moving the
seat, make sure it is locked into
position.
The height of your driver’s seat is
adjustable. Turn the front dial on the
outside of the seat cushion to raise
the front of the seat bottom, and turn
the rear dial to raise the rear.
Reverse this procedure to return the
seat to its upright position. Make
sure the seat is locked and secured
bef ore driving.
2.
3.
1.
4.18On LX and LX-VP models
Seats
Folding the Second Row Seats
Adjusting the Second Row Seats
Driver’s Seat Height A djustment
Inst rument s and Cont rols
89
SECOND
ROW SEAT
�\f���—�\f���—�\f���y�
�
�����������y���
�(���+�����\f�y�\f�\f�����y
2008 Pilot
Page 95 of 329
.
Unlock the seat-back by pulling
the handle. Push the seat-back
forward.
Make sure you clip the small latch
pla")
Use the ignition key to release the
seat belt from the detachable
anchor (see page ).
Unlock the seat-back by pulling
the handle. Push the seat-back
forward.
Make sure you clip the small latch
plate of each outer shoulder belt to
the seat belt webbing whenever the
third seat is f olded.
Reverse this procedure to return the
seat to its upright position.
Reinstall the head restraints,
reconnect the seat belts, and make
sure the seats are secured bef ore
driving.
Make sure all items in the cargo area
are secured. Loose items can f ly
f orward and cause injury if you have
to brake hard (See
on page ). Your vehicle is equipped with head
restraints in all seating positions to
help protect you and your
passengers f rom whiplash and other
injuries.
They are most ef f ective when you
adjust them so the center of the back
of the occupant’s head rests against
the center of the restraint.
3.
4.
18
198
See pagef or important saf ety inf ormation and a warning aboutimproperly positioning head restraints. 15
CONT INUED
Seats
Head Restraints
Carrying Cargo
Inst rument s and Cont rols
91
�\f���—�\f���—�\f���y�
�
�������
���y���
�(���+�����\f�y�\f�\f�����y
2008 Pilot
Page 97 of 329
Push the appropriate edge of the
adjustment switch to move the
mirrorright,left,up,ordown.
When you f inish, move the
selector switch to the center (off)
position. This turns the
adjustment switch of f to keep your
settings.
Turn the ignition switch to the ON
(II) position.
Move the selector switch to L
(driver’s side) or R (passenger’s
side).
Therearviewmirrorhasacompass
function to indicate the vehicle’s
direction.
Refer to on page .
1.
2.3.
4.
179If equipped
Mirrors
A djusting the Power Mirrors
Compass
Inst rument s and Cont rols
93
ADJUSTMENT SWITCH SELECTOR SWITCH
�\f���—�\f���—�\f���y�
�
�����������y���
�(���+�����\f�y�\f�\f�����y
2008 Pilot
Page 98 of 329

�µTo open the driver’s
window f ully, push the window
switch f irmly down, then release it.
The window automatically goes
down all the way. To stop the
window f rom going all the way down,
pull back on the window switch
brief ly.
To close the driver’s window f ully,
pull back the window switch f irmly,
then release it. The window
automatically goes all the way up. To
stop the window f rom going all the
way up, push down on the window
switch brief ly.
Turn the ignition switch to the ON
(II) position to raise or lower any
window. To open a window, push the
switchdownandholdit.Releasethe
switch when you want the window to
stop. Pull back on the switch and
hold it to close the window.
The windows will operate f or up to
10 minutes af ter you turn of f the
ignition switch. Opening either f ront
door cancels this f unction.
The outside mirrors are heated to
remove fog and frost. With the
ignition switch in the ON (II)
position, turn on the heaters by
pressing the button. The indicator in
the button comes on as a reminder.
Press the button again to turn the
heaters off.
If equipped
AUTO
PowerMirrorHeaters PowerWindows
Mirrors, Power Windows
94
DRIVER’S WINDOW
SWITCH
MAIN SWITCH
HEATED MIRROR BUTTONClosing a power window on
someone’s hands or fingers can
cause serious injury.
Make sure your passengers are
away from the windows before
closing them.
�\f���—�\f���—�\f���y�
�
�����������y���
�(���+�����\f�y�\f�\f�����y
2008 Pilot

position. This turns the
adjustment switch")