Page 149 of 329
, press the RR
CTRL knob. The system’s icon
shows in the upper display. Your
passengers can then operate the")
Press the REAR PWR button. To
turn on the rear controls (ceiling
panel/remote control), press the RR
CTRL knob. The system’s icon
shows in the upper display. Your
passengers can then operate the rear
system with the control panel in the
ceiling. The rear control panel can be
used as a remote control when it is
detached f rom the ceiling unit. Press
the RR CTRL knob again to turn the
rear controls of f . You will see the
RearControlsOff iconintheupper
display.Whenyouturnonthesystem,the
rear speakers are automatically
turned of f if the rear system selects
a dif f erent entertainment source
than the front system. You will see
the Rear Speakers Of f icon in the
upper display. The sound f or the rear
system is sent to the wireless
headphones.
The rear speakers are
connected to the f ront system, so
they will always play the source that
the f ront system is set to.
If youwanttoturntherearspeakers
on again, press and hold the REAR
PWR button until the Rear Speakers
Of f icon goes of f .
The rear system selects the source it
waslastsetto.Ifthatsourcehas
been removed (the DVD has been
ejected f rom the player, f or example),
you will see ‘‘DVD EJECT’’ in the
display. You should select another
source or insert a DVD.
Your vehicle is equipped with a rear
entertainment system that includes a
DVD player f or the enjoyment of the
rear passengers.
With this system, the rear
passengers can enjoy a dif f erent
entertainment source (AM/FM
radio, XM radio, CD changer, or
DVD player) than the f ront seat
occupants. The audio is broadcast
through the supplied wireless
headphones.
The ignition switch must be in the
ACCESSORY (I) or the ON (II)
position to operate the rear
entertainment system.
If equippedTo Turn On the System Rear Speakers
Rear Entertainment System
Features
145
NOTE:
�\f���—�\f���—�\f���y�
�
�����������y���
�(���+�����\f�y�\f�
���\f�y
2008 Pilot
Page 152 of 329

�µ
�µ
�´
�µ
�´ �µPress the eject button to
remove the DVD from the drive.
Press and hold the
button to move f orward; you will
see ‘‘CUE’’ in the display. Press and
hold the button to move
backward; you will see ‘‘REV’’ in the
display. Release the button when the
system reaches the point you want.
Each time you press and release the
button of the SEEK/SKIP, the
system skips f orward to the
beginning of the next track or
chapter. Press and release the
buttontoskipbackwardtothe
beginning of the current track or
chapter. Press it again to skip to the
beginning of the previous track or
chapter. To return f ront panel control to the
front audio system, turn the REAR
CTRL knob counterclockwise.
To turn on the rear entertainment
system f rom the rear control panel,
press the PWR button. Use the AM/
FM button, XM button (U.S. models),
CD button, DVD/AUX button (U.S.
models), or AUX button (Canadian
models) to select the entertainment
source. The selected source will be
shown in the display. Make sure the
rear control operation has not been
disabled with the REAR CTRL knob
on the f ront panel.
Rear Entertainment System
EJECT
SEEK /SK IP
To Return to Front Audio
ControlsUsing the Rear Control Panel
148
�\f���—�\f���—�\f���y�
�
�������\f���y���
�(���+�����\f�y�\f�
�����y
2008 Pilot
Page 156 of 329
When you press the DISP button
while a DVD is playing, the title,
chapter, elapsed time, and personal
surround logo are displayed
(STATUS 1).When you press the DISP button
again, the subtitle, audio, angle,
sound characteristics, and personal
surround logo are displayed
(STATUS 2).To go back to play, press the DISP
button.
DISP Button
Rear Entertainment System
152
�\f���—�\f���—�\f���y�
�
�����������y���
�(���+�����\f�y�\f�
�����y
2008 Pilot
Page 158 of 329
�Ý�Û�Ý�Û
�Ý�Û
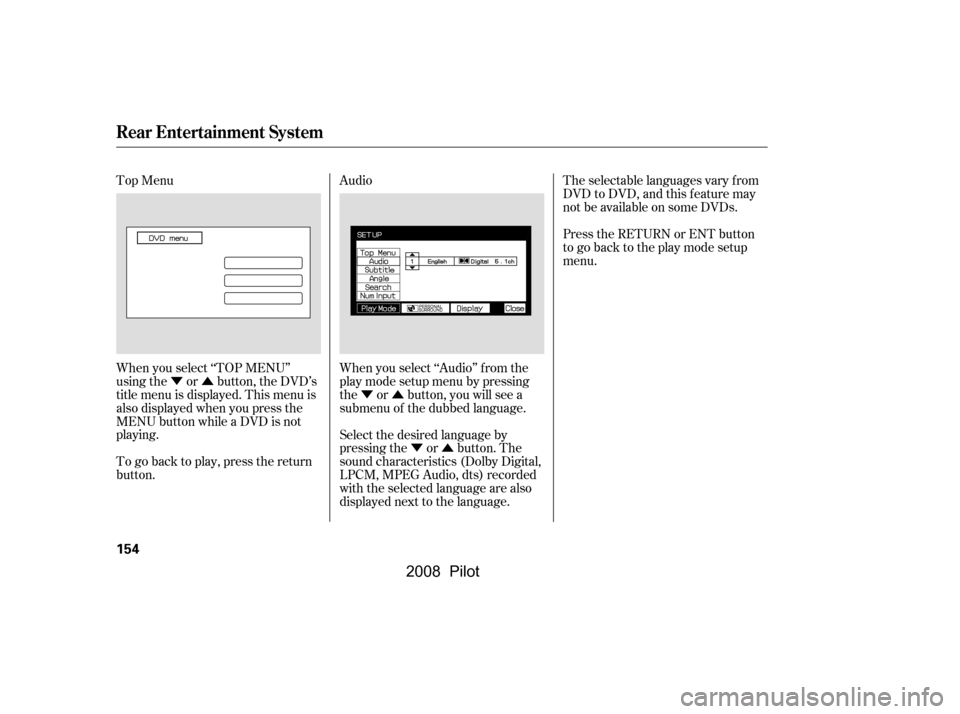
Top Menu Audio
When you select ‘‘TOP MENU’’
using the or button, the DVD’s
title menu is displayed. This menu is
also displayed when you press the
MENU button while a DVD is not
playing.
When you select ‘‘Audio’’ f rom the
play mode setup menu by pressing
the or button, you will see a
submenu of the dubbed language.The selectable languages vary f rom
DVD to DVD, and this feature may
notbeavailableonsomeDVDs.
Press the RETURN or ENT button
to go back to the play mode setup
menu.
Select the desired language by
pressing the or button. The
sound characteristics (Dolby Digital,
LPCM, MPEG Audio, dts) recorded
with the selected language are also
displayed next to the language.
To go back to play, press the return
button.
Rear Entertainment System
154
�\f���—�\f���—�\f���y�
�
�����������y���
�(���+�����\f�y�\f�
�����y
2008 Pilot
Page 168 of 329
�Ý�Û
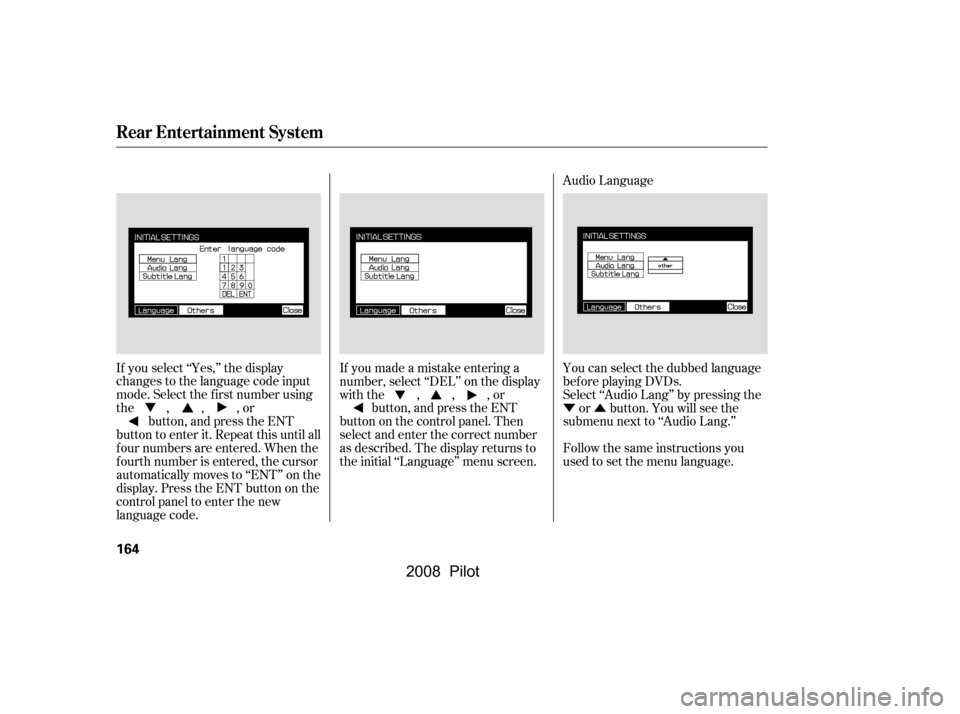
Audio Language
You can select the dubbed language
bef ore playing DVDs.
Select ‘‘Audio Lang’’ by pressing theor button. You will see the
submenu next to ‘‘Audio Lang.’’
Follow the same instructions you
used to set the menu language.
If you made a mistake entering a
number, select ‘‘DEL’’ on the display
with the , , , or
button, and press the ENT
buttononthecontrolpanel.Then
select and enter the correct number
as described. The display returns to
the initial ‘‘Language’’ menu screen.
If you select ‘‘Yes,’’ the display
changes to the language code input
mode. Select the f irst number using
the,,,or
button, and press the ENT
button to enter it. Repeat this until all
f our numbers are entered. When the
f ourth number is entered, the cursor
automatically moves to ‘‘ENT’’ on the
display. Press the ENT button on the
control panel to enter the new
language code.
Rear Entertainment System
164
�\f���—�\f���—�\f���y�
�
�������\f���y���
�(���+�����\f�y�\f�
�����y
2008 Pilot
Page 177 of 329

Message Solution
ERROR F0
ERROR F2
Invalid region code
Invalid disc
Parental control active.
Change level to view.Eject the disc and reinsert it.
Use a disc with the regional designation of ‘‘1’’ or ‘‘All’’.
The disc is not playable in this unit. Eject the disc, and insert a disc
compatible with this system.
Reinsert the disc, and increase the parental control level (see
pages167and168).
Thechartontherightexplainsthe
error messages you may see in the
display while playing a disc.
If you see an error message in the
display while playing a disc, press
the eject button. After ejecting the
disc, check it for damage or
deformation. If there is no damage,
insert the disc again.
Theaudiosystemwilltrytoplaythe
disc. If there is still a problem, the
error message will reappear. Press
the eject button, and pull out the disc.
Insert a dif f erent disc. If the new
disc plays, there is a problem with
the f irst disc. If the error message
cycle repeats and you cannot clear it,
take your vehicle to a dealer.
DVD Player Error Messages
Rear Entertainment System
Features
173
�\f���—�\f���—�\f���y�
�
�������\f���y���
�(���+�����\f�y�\f�
�����y
2008 Pilot
Page 178 of 329

Each headphone uses one AAA
battery. The battery is under the
cover on the lef t earpiece. To
remove the cover, insert a coin in the
slot and twist it slightly to pry the
cover away f rom the earpiece. Pull
the cover outward, and pivot it out of
the way.
Some state and local government
agencies prohibit the use of
headphones by the driver of a motor
vehicle. Always obey applicable laws
and regulations. The audio f or the rear entertainment
system is sent to the wireless
headphones that come with the
system. When using the headphones,
make sure you wear them correctly:
L (lef t) and R (right) are marked on
the sides of the frame. The antennas
are in the f ront of the earpieces. If
you wear the headphones backwards,
the antennas will be aimed away
from the system, affecting the sound
quality and range.
To use the headphones, pivot the
earpieces outward. This turns them
on. To adjust the volume, turn the
dial on the bottom of the right
earpiece. When you remove the
headphones, the earpieces
automatically pivot inward, and the
headphones turn of f . When not in
use, store the headphones in the
pocket of either f ront seat.
Replacing Bat t eriesWireless Headphones
Rear Entertainment System
174
VOLUME
DIAL
TAB
�\f���—�\f���—�\f���y�
�
�������
���y���
�(���+�����\f�y�\f�
�����y
2008 Pilot
Page 179 of 329
There are three headphone
connectors f or the third seat
passengers. Each connector has its
own volume control.
The system will accept auxiliary
inputs f rom standard video games
and video equipment.
V=Videojack
L = Lef t audio jack
R = Right audio jack
Auxiliary input jacks and headphone
connectors f or the rear
entertainment system are on the
back of the center console
compartment.
Remove the battery. Install the new
battery in the earpiece as shown in
the diagram next to the battery slot.
Slide the cover back into place on the
earpiece, then press down on the
back edge to lock it in place.
An improperly disposed of battery
can hurt the environment.
Always conf irm local regulations f or
battery disposal. Auxiliary Input Jacks
Rear Entertainment System
Features
175
AUXILIARY INPUT JACKS
BATTERY COVER
HEADPHONE CONNECTORS
VOLUME
DIALS
�\f���—�\f���—�\f���y�
�
���������
�y���
�(���+�����\f�y�\f�
���\f�y
2008 Pilot
.When you press the DISP button
again, the subtitle, audi")