Page 9 of 329
�Î�Î
�Î
�Î
�Î
�Π�ΠIf equipped.
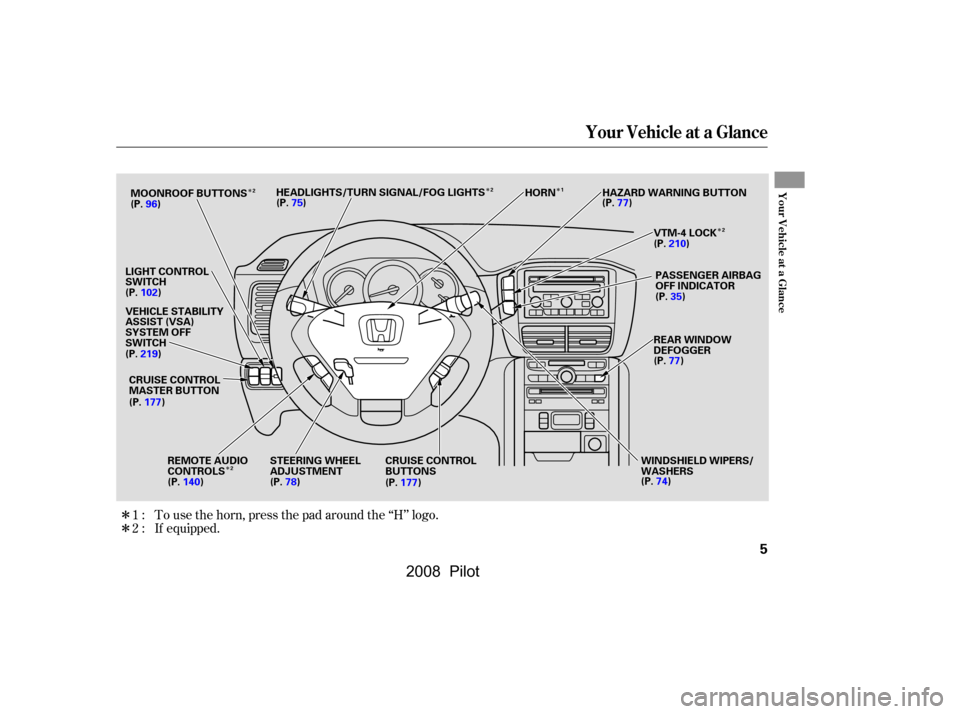
To use the horn, press the pad around the ‘‘H’’ logo.
2:
1:
Your Vehicle at a Glance
Your Vehicle at a Glance
5
LIGHT CONTROL
SWITCH
STEERING WHEEL
ADJUSTMENT WINDSHIELD WIPERS/
WASHERSREAR WINDOW
DEFOGGER
PASSENGER AIRBAG
OFF INDICATOR
(P.96)
(P.102) (P.75)
(P.35)
(P.77)
(P.74)
(P.78) CRUISE CONTROL
BUTTONS
CRUISE CONTROL
MASTER BUTTON HAZARD WARNING BUTTON
(P.77)
VEHICLE STABILITY
ASSIST (VSA)
SYSTEM OFF
SWITCH (P.177)
(P.140) (P.177) (P.210)
MOONROOF BUTTONS
HEADLIGHTS/TURN SIGNAL/FOG LIGHTS
HORN
VTM-4 LOCK
(P.219) REMOTE AUDIO
CONTROLS
2 2
1
2
2
�����—�����—�����y�
�
��
����
���y���
�(���+�������y�����
���y
2008 Pilot
Page 20 of 329

Position the lap part of the belt as
low as possible across your hips,
then pull up on the shoulder part of
the belt so the lap part f its snugly.
This lets your strong pelvic bones
take the force of a crash and reduces
the chance of internal injuries.This spreads the f orces of a crash
over the strongest bones in your
upper body.
If the seat belt touches or crosses
your neck, or if it crosses your arm
instead of your shoulder, you need to
adjust the seat belt anchor height.
The front seats have adjustable seat
belt anchors. To adjust the height of
an anchor, press and hold the release
buttons, and slide the anchor up or
down as needed (it has f our
positions).
If necessary, pull up on the belt again
to remove any slack, then check that
the belt rests across the center of
your chest and over your shoulder.
Protecting A dults and Teens
16
RELEASE
BUTTONS
Improperly positioning the seat
belts can cause serious injury
or death in a crash.
Make sure all seat belts are
properly positioned before
driving.
�\f���—�\f���—�\f���y�
�
��
��������y���
�(���+�����\f�y�\f�\f���
�y
2008 Pilot
Page 77 of 329
�Î�Î
�Î
�Î �Î
�Î
�Î
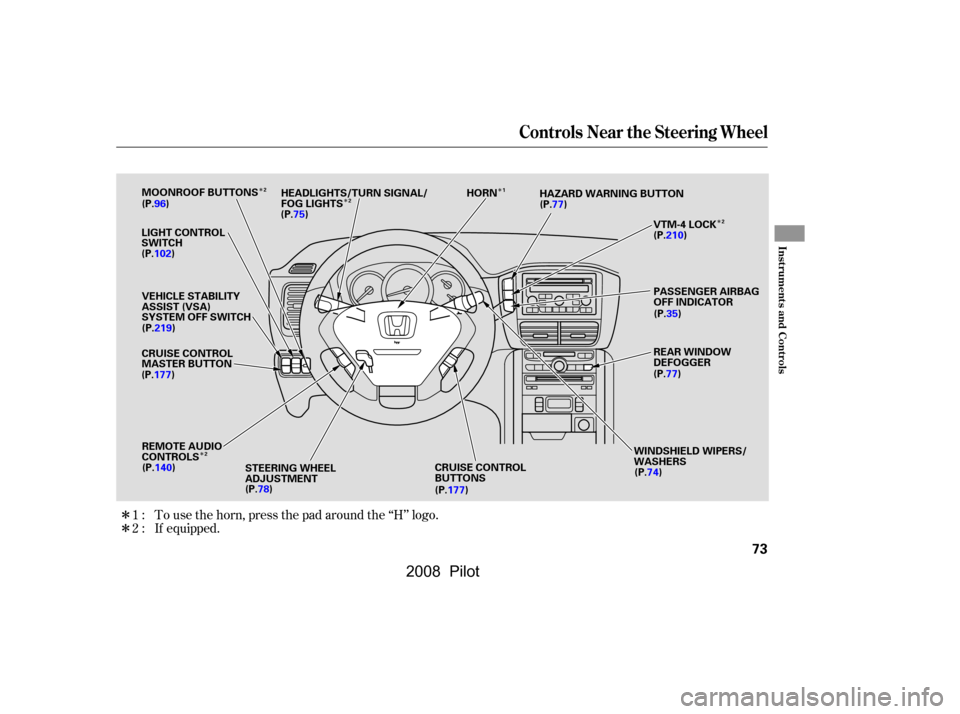
If equipped. To use the horn, press the pad around the ‘‘H’’ logo.
1:
2:
Controls Near the Steering Wheel
Inst rument s and Cont rols
73
LIGHT CONTROL
SWITCH HAZARD WARNING BUTTON
WINDSHIELD WIPERS/
WASHERS
STEERING WHEEL
ADJUSTMENT PASSENGER AIRBAG
OFF INDICATOR
(P.96)
(P.102)
CRUISE CONTROL
MASTER BUTTON
(P.78) CRUISE CONTROL
BUTTONS(P.77)
(P.35)
(P.77)
(P.74) REAR WINDOW
DEFOGGER
(P.75)
(P.177) (P.140) (P.177)(P.210)
VEHICLE STABILITY
ASSIST (VSA)
SYSTEM OFF SWITCH
MOONROOF BUTTONS
HEADLIGHTS/TURN SIGNAL/
FOG LIGHTS
VTM-4 LOCK
REMOTE AUDIO
CONTROLS (P.219) HORN
2
2
2
2 1
�����—�����—�����y�
�
�����������y���
�(���+�������y���������y
2008 Pilot
Page 90 of 329

In the HI setting, the heater turns off
when the seat gets warm, and turns
back on after the seat’s temperature
drops.
In the LO setting, the heater runs
continuously. It does not cycle with
temperature changes.
Follow these precautions whenever
you use the seat heaters:Use the HI setting only to heat the
seats quickly, because it draws
large amounts of current f rom the
battery.
Push the top of the switch, HI, to
rapidly heat up the seat. Af ter the
seat reaches a comfortable
temperature, select LO by pushing
the bottom of the switch. This will
keep the seat warm. If the engine is lef t idling f or an
extended period, do not use the
seat heaters, even on the LO
setting. It can weaken the battery,
causing hard starting.
Both f ront seats are equipped with
seat heaters. Because of the sensors
f or the side airbag cutof f system,
there is no heater in the passenger’s
seat-back. The ignition switch must
be ON (II) to use the heaters.If equipped
Seat Heaters
86
SEAT HEATER BUTTONS
SEAT HEATER BUTTONS
�\f���—�\f���—�\f���y�
�
�����������y���
�(���+�����\f�y�\f�\f���
�y
2008 Pilot
Page 94 of 329
Remove the head restraints by
pushing the release buttons and
pulling the restraints out.
Store the head restraints under
the cargo area floor. Insert the
legs into the holes in the sides of
the storage compartment.
Pull on the handle on the back of the
seat-back, move the seat-back to the
desired position, and release the
handle. Let the seat-back latch in the
new position.
To get into the third row seats, pull
uptheleveronthesideof the
passenger’s side second row seat-
back. The seat-back will tilt f orward,
and then can be slid forward.
Push the whole seat backwards until
it f ully latches. Make sure the seat is
locked and secured bef ore driving. 1.
2.
Seats
Folding the T hird Row Seat
A djusting the T hird Row Seat
T hird Seat A ccess
90
THIRD ROW
SEAT
HANDLE
RELEASE LEVER
�\f���—�\f���—�\f���y�
�
�������\f���y���
�(���+�����\f�y�\f�\f�����y
2008 Pilot
Page 110 of 329
Vents, Heating, and A/C
106
TEMPERATURE
CONTROL DIALRECIRCULATION
BUTTON FAN CONTROL
DIAL
REAR WINDOW
DEFOGGER BUTTON
MODE CONTROL DIAL AIR CONDITIONING BUTTON
MODE BUTTON FAN SPEED
INDICATORFAN CONTROL
BUTTONS
TEMPERATURE CONTROL DIAL
AUTO BUTTON
REAR WINDOW
DEFOGGER BUTTON
OFF BUTTON
RECIRCULATION
BUTTON WINDSHIELD
DEFROST
BUTTON
AIR CONDITIONING BUTTON
TEMPERATURE
DISPLAY
REAR A/C
MANUAL BUTTON
LX and LX-VP MODELS
EX, EX-L, and EX-SE MODELS
�\f���—�\f���—�\f���y�
�
�������\f�
�y���
�(���+�����\f�y�\f�
�
�
�y
2008 Pilot
Page 111 of 329

Press the RR A/C MANUAL button
to adjust the temperature of the rear
passenger compartment
independently. See page f or
inf ormation using the rear A/C unit.
This button turns the air
conditioning on and of f . On LX and
LX-VP models, the indicator in the
buttonisonwhentheA/Cison.On
EX, EX-L, and EX-SE models, you
will see A/C ON or A/C OFF in the
display.
The temperature setting is shown in
the display.
Turning this dial clockwise increases
the temperature of the airflow.
Select the f an speed by pressing the
fan control buttons ( or ).
The f an speed is shown in vertical
bars on the display.
Turn the dial clockwise to increase
the fan speed and airflow. Turn the
dial counterclockwise to decrease it.
The climate control system can also
be operated by voice control. See the
Navi section in your quick start
guide f or an overview of this system,
and the navigation system manual
f or complete details.
On EX, EX-L and EX-SE models, see
page f or inf ormation on
automatic climate control and semi-
automatic operation. When you turn the A/C of f , the
system cannot regulate the inside
temperature if you set the dial below
the outside air temperature. 113
112
On vehicles with navigation system
On LX and LX-VP models On EX, EX-L, and EX-SE models
On EX, EX-L, and EX-SE models On EX, EX-L, and EX-SE models
On EX, EX-L, and EX-SE models
Vents, Heating, and A/C
RR A/C MANUAL Button
Air Conditioning (A/C) Button
T emperature Control Dial
Fan Control
Voice Control System
Features
107
�\f���—�\f���—�\f���y�
�
�������
���y���
�(���+�����\f�y�\f�
�
���y
2008 Pilot
Page 121 of 329
Playing the Radio
Features
117
PRESET BUTTONSSCAN BUTTON
AUTO SELECT BUTTON
STEREO INDICATOR
TUNE/MODE KNOB
AM/FM BUTTON
PWR/VOL KNOB
SEEK/SKIP BAR
PRESET BUTTONSSTEREO INDICATOR
TUNE/SOUND
KNOB
AM BUTTON FM BUTTON
PWR/VOL KNOB
SCAN BUTTON
AM BUTTON
AUTO SELECT BUTTON AUTO SELECT BUTTON
PWR/VOL KNOB
Canadian
models
AM/FM
BUTTON
SCAN BUTTON
SOUND KNOB
FM BUTTON
PRESET BUTTONSTUNE KNOB
U.S. models
(Canadian LX models)
AM/FM
BUTTON
U.S. EX model is shown
(U.S. LX-VP, EX, EX-L, and
Canadian EX-L models)
U.S. LX-VP and
EX-L models
U.S. EX and
Canadian
EX-L models
SEEK BAR SEEK BAR
(U.S. EX-L, EX-SE, and Canadian EX, EX-L models
with rear entertainment system)
STEREO INDICATOR
�\f���—�\f���—�\f���y�
�
�����������y���
�(���+�����\f�y�\f�
�����y
2008 Pilot