Page 258 of 524
�µ
�µ
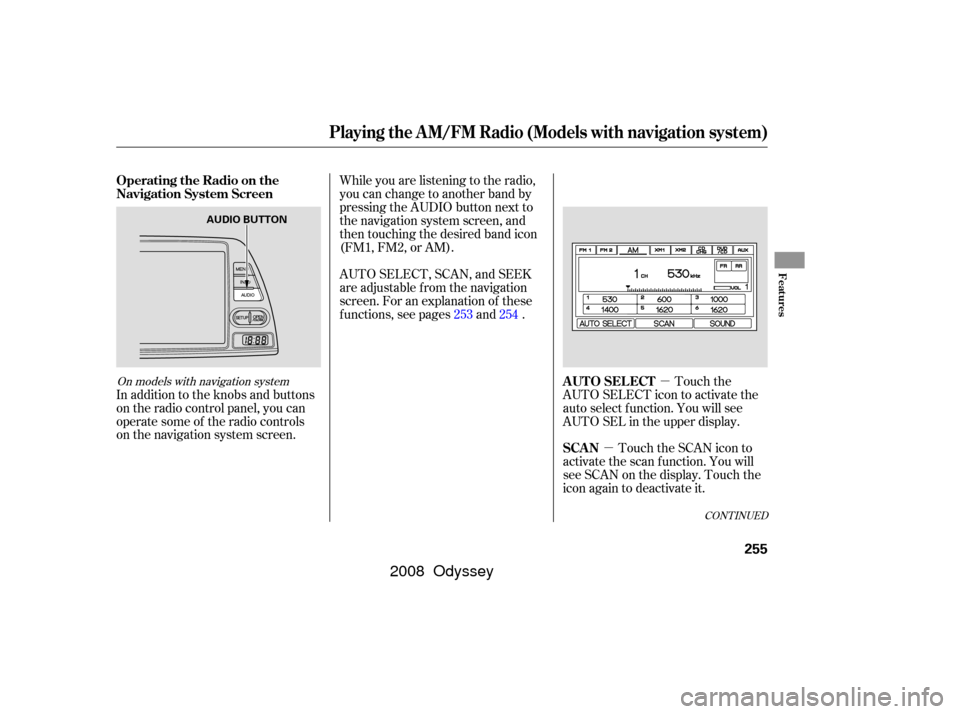
In addition to the knobs and buttons
on the radio control panel, you can
operate some of the radio controls
on the navigation system screen. While you are listening to the radio,
you can change to another band by
pressing the AUDIO button next to
the navigation system screen, and
then touching the desired band icon
(FM1, FM2, or AM).
AUTO SELECT, SCAN, and SEEK
are adjustable f rom the navigation
screen. For an explanation of these
f unctions, see pages and .
Touch the
AUTO SELECT icon to activate the
auto select f unction. You will see
AUTO SEL in the upper display.
Touch the SCAN icon to
activate the scan function. You will
see SCAN on the display. Touch the
icon again to deactivate it.
253 254
CONT INUED
On models with navigation system
Operating the Radio on the
Navigation System Screen
AUTO SELECT
SCAN
Playing the A M/FM Radio (Models with navigation system)
Features
255
AUDIO BUTTON
�����—�����—�����y���������������y���
�(�����������y���������y
2008 Odyssey
Page 260 of 524
CONT INUED
Playing the XMSatellite Radio (Models with navigation system)
Features
257
AM/FM BUTTONPRESET BUTTONS
AUTO SELECT BUTTON
TUNE KNOB
PWR/VOL KNOB SCAN/RPT BUTTON
XM BUTTON SEEK BAR
DISP/MODE BUTTON
�����—�����—�����y���������������y���
�(�����������y���������y
2008 Odyssey
Page 262 of 524

�µ�µ
�µ�´ �µ
�µ
On models with a rear entertainment
system and a navigation system, you
cannot listen to XM Radio and a disc
at the same time. For example, when
XM Radio is playing on the f ront
speakers, you cannot listen to a disc
on the rear speakers, or vice versa.
The scan f unction gives
you a sampling of all channels while
in the channel mode. In the category
mode, only the channels within that
category are scanned. To activate
scan, press the SCAN/RPT button or
touch the SCAN icon on the audio
display. The system plays each
channel in numerical order f or a f ew seconds, then selects the next
channel. When you hear a channel
you want to continue listening to,
press the button or touch the icon
again.
Press either side of
the bar ( or ) to select another
category. To store a channel:Youcanstoreupto12
preset channels using the six preset
buttons or preset icons on the audio
display. Each button stores one
channel f rom the XM1 band and one
channel f rom the XM2 band.
Turn the tune knob lef t or
right to select channels. In the
category mode, you can only select
channels within that category. In category mode, only channels
within that category can be selected.
In channel mode, all channels can be
selected.
Pick the preset button (icon) you
want f or that channel. Press and
hold the button (icon) until you
hear a beep.
Use the TUNE knob, the
CATEGORY bar, or the SCAN
button to tune to a desired channel.
You can also touch the SCAN icon
on the audio display. Repeat steps 2 and 3 to store the
f irst six channels.
Once a channel is stored, press and
release the proper preset button
(icon) to tune to it.
Press the button. Either
XM1 or XM2 will show in the
display. Press the button again or
touch the other XM icon (XM1 or
XM2) on the audio display. Store
the next six channels using steps 2
and 3.
1.
2. 3.
4.
5.
SCAN CATEGORY Preset
TUNE
Playing the XMSatellite Radio (Models with navigation system)
Features
259
�����—�����—�����y�����������
�
�y���
�(�����������y���������y
2008 Odyssey
Page 268 of 524

The CD changer is behind the
navigation system screen. To use the
CD changer, press the OPEN button
beside the screen. The screen f olds
back, and the CD changer appears.To load multiple discs in one
operation:Press and hold the LOAD button
beside the CD slot until you see
‘‘LOAD’’ in the display, then
release the button. The indicators above the disc
buttons of the empty positions will
blink, and the green load indicator
above the CD slot comes on.
Insert a disc into the CD slot.
Insert it only about halfway; the
drive will pull it in the rest of the
way. You will see ‘‘BUSY’’ in the
display. The CD load indicator
turns red and blinks as the disc is
loaded.
Repeat this until all six positions
are loaded. The system will then
begin playing the f irst disc loaded. When ‘‘LOAD’’ appears again in
the display, insert the next disc
into the CD slot.
If you stop loading discs bef ore all
six positions are f illed, the system
will wait f or 10 seconds, then stop
the load operation and begin playing
the last disc loaded.
To return the screen to the upright
position, press the OPEN button
again. Do not use the f olded screen
as a tray. If you put a cup, f or
example, on the screen, the liquid
inside the cup may spill on the
screen when you go over a bump.
1.2.
3.
4.
5.
CONT INUED
Playing Discs (Models with navigation system)
L oading Discs in the In-dash Disc
Changer
Features
265
LOAD BUTTON LOAD INDICATOR
OPEN BUTTON
�����—�����—�����y���������������y���
�(�����������y���������y
2008 Odyssey
Page 269 of 524

To load a single disc:Press and release the LOAD
button.
TheindicatorsabovetheDisc
buttons of the empty positions will
blink, and the green CD load
indicator comes on. When you see
‘‘LOAD’’ in the display, insert the
disc into the CD slot. Insert it only
about half way; the drive will pull it
in the rest of the way.
The system will load the disc and
begin playing it. If you press the LOAD button while
a disc is playing, the system will stop
playing that disc and start the
loading sequence. It will then play
the disc just loaded.
You can also load a disc into an
empty position while a disc is playing
by pressing the appropriate disc
button. Select an empty disc button
(the indicator above the button is
of f ), and press the button. The
system will stop playing the current
disc and start the loading sequence.
It will then play the disc just loaded.
You cannot load and play 3-inch
(8-cm)discsinthissystem. Each time you press the DISP button,
the display shows you the text data
on a disc, if the disc was recorded
with text data.
You can see the album, artist, and
track name in the display. If a disc is
recorded in MP3 or WMA, you can
see the f older and f ile name, and the
album, artist, and track tag.
With the f older name, you will see
the FOLDER indicator in the display.
The TRACK indicator is shown with
the file or track name.
When you press and release the
DISP button while a disc without text
data is playing, you will see ‘‘NO
INFO’’ on the display.
The display shows up to about 16
characters of selected text data (the
f older name, f ile name, etc.).
2. 1.
3.
Playing Discs (Models with navigation system)
T ext Data Display Function
266
�����—�����—�����y�����������
�
�y���
�(�����������y�������
�y
2008 Odyssey
Page 280 of 524
CONT INUED
Playing a T ape (Optional)
Features
277
FF BUTTONSKIP BAR
DOLBY
NR BUTTON
DOLBY
NR BUTTON
REW BUTTON REW BUTTON
FF BUTTON
SKIP BAR EX and EX-L models without Rear
Entertainment System
RPT BUTTON PLAY/PROG
BUTTON
PLAY/PROG
BUTTON
RPT BUTTON U.S. EX-L model is shown.
LX and Canadian DX models
�����—�
�
�—�����y�
����
����
���y���
�(�����������y���������y
2008 Odyssey
Page 281 of 524
Playing a T ape (Optional)
278
FF BUTTONSKIP BAR SKIP BAR
DOLBY
NR BUTTON
REPEAT BUTTON PLAY/PROG BUTTON
REW BUTTON
PLAY/PROG
BUTTONREW BUTTON
DOLBYNRBUTTON
FF BUTTON
EX-L and Touring models with Rear Entertainment System
and Navigation System
EX-L model with Rear Entertainment System without
Navigation System
�����—�����—�����y��������
������y���
�(�����������y���������y
2008 Odyssey
Page 287 of 524

Your vehicle’s audio system may
disable itself if it is disconnected
f rom electrical power f or any reason.
To make it work again, you must
enter a specif ic f ive-digit code with
the preset buttons. Because there
are hundreds of number
combinations possible f rom the f ive
digits, making the system work
without knowing the exact code is
nearly impossible.
Youshouldhavereceivedacardthat
lists your audio system code number
and serial number. It is best to store
this card in a saf e place at home. In
addition, you should write the audio
system’s serial number in this owner’s
manual.If you make a mistake entering the
code, do not start over; complete the
f ive-digit sequence, then enter the
correct code. You have 10 tries to
enter the correct code. If you are
unsuccessf ul in 10 attempts, you
must then leave the system on for 1
hour bef ore trying again.
If you lose the card, you must obtain
the code number f rom your dealer.
To do this, you will need the audio
system’s serial number.
If your vehicle’s battery is
disconnected or goes dead, or the
radio f use is removed, the audio
system will disable itself . If this
happens, you will see CODE in the
frequencydisplaythenexttimeyou
turn on the system. Use the preset
buttons to enter the five-digit code.
Thecodeisontheradiocodecard
included in your owner’s manual kit.
When it is entered correctly, the
radio will start playing.
On EX, EX-L and Touring models
Radio T hef t Protection
284
�����—�����—�����y���������������y���
�(�����������y���������y
2008 Odyssey

Features
257
AM/FM BUTTONPRESET BUTTONS
AUTO SELECT BUTTON
TUNE KNOB
PWR/VOL KNOB SCAN/RPT BUTTON
XM BUTTON SEEK BAR
DISP/MODE")

Features
277
FF BUTTONSKIP BAR
DOLBY
NR BUTTON
DOLBY
NR BUTTON
REW BUTTON REW BUTTON
FF BUTTON
SKIP BAR EX and EX-L models without Rear
Entertainment System
RPT B")

278
FF BUTTONSKIP BAR SKIP BAR
DOLBY
NR BUTTON
REPEAT BUTTON PLAY/PROG BUTTON
REW BUTTON
PLAY/PROG
BUTTONREW BUTTON
DOLBYNRBUTTON
FF BUTTON
EX-L and Touring models with Rear")