Page 209 of 280
Disconnect the blade assembly
from the wiper arm:Press and hold the lock tab.
Slide the blade assembly toward
the lock tab until it releases
from the wiper arm.
When replacing a wiper blade,
make sure not to drop the wiper
blade or wiper arm down on the
windshield. Examine the new wiper blades. If
they have no plastic or metal
reinf orcement along the back
edge, remove the metal
reinf orcement strips f rom the old
wiper blade, and install them in
the slots along the edge of the new
blade.
Remove the blade f rom its holder
by grasping the tabbed end of the
blade. Pull f irmly until the tabs
come out of the holder.
Make sure the three rubber tabs
inside the blade f it to each notch
of the reinf orcement, as shown.
2. 3. 4.
Wiper Blades
206
LOCK TAB BLADE
REINFORCEMENT
BLADE
TOP
�\f���—�\f���—�����y���\f�����������y���
�(�������
�\f�y�\f���
�
�y
2008 Fit
Page 210 of 280
To replace the rear wiper blade:Raise the wiper arm of f the glass.
Slide the blade out of the wiper
arm.
Examine the new wiper blade. If it
has no plastic or metal
reinf orcement along the back
edge, remove the metal
reinf orcement strips f rom the old
wiper blade and install them in the
slots along the edge of the new
blade.
Slide the wiper blade assembly
onto the wiper arm. Make sure it
locks in place.
Lower the wiper arm down against
the windshield, the passenger’s
side first, then the driver’s side.
Place the top of the wiper blade on
the end of the blade assembly, and
slide the blade onto the assembly
in the direction pointed to by the
arrow.
Make sure the blade is completely
installed. 2.
3.
1.
5. 6.
7.
CONT INUED
Wiper Blades
Maint enance
207
�\f���—�\f���—�����y���\f�������\f���y���
�(�������
�\f�y�\f���
���y
2008 Fit
Page 219 of 280

Cover the vehicle with a
‘‘breathable’’ cover, one made
f rom a porous material such as
cotton. Non-porous materials, such
as plastic sheeting, trap moisture,
which can damage the paint.
If possible, periodically run the
engine until it reaches f ull
operating temperature (the
cooling f ans cycle on and of f
twice). Pref erably, do this once a
month.
If you need to park your vehicle f or
an extended period (more than 1
month), there are several things you
should do to prepare it f or storage.
Proper preparation helps prevent
deterioration and makes it easier to
get your vehicle back on the road. If
possible, store your vehicle indoors.
Fill the f uel tank.
Wash and dry the exterior
completely.
Cleantheinterior.Makesurethe
carpeting, floor mats, etc., are
completely dry.
Leave the parking brake off. Put
the transmission in reverse
(manual) or Park (automatic).
Block the rear wheels. If the vehicle is to be stored f or a
longer period, it should be
supported on jackstands so the
tires are of f the ground.
Leave one window open slightly (if
the vehicle is being stored
indoors).
Disconnect the battery.
Support the f ront and rear wiper
blade arms with a f olded towel or
ragsotheydonottouchthe
windshield.
To minimize sticking, apply a
silicone spray lubricant to all door
and tailgate seals. Also, apply a
vehiclebodywaxtothepainted
surfaces that mate with the door
and tailgate seals.
Vehicle Storage
216
�\f���—�\f���—�����y���\f�����������y���
�(�������
�\f�y�\f�����
�y
2008 Fit
Page 222 of 280

If you have a f lat tire while driving,
stop in a saf e place to change it.
Drive slowly along the shoulder until
you get to an exit or an area to stop
that is far away from the traffic lanes.Turn on the hazard warning lights,
and turn the ignition switch to the
LOCK (0) position. Have all
passengers get out of the vehicle
while you change the tire.
Park the vehicle on f irm, level, and
non-slippery ground. Put the
transmission in Park (automatic)
or reverse (manual). Apply the
parking brake.Open the tailgate. Raise the cargo
area f loor lid by lif ting it up with
the strap that has a loop. To keep
the f loor lid open, hook the loop of
the strap to a leg of the rear center
head restraint.
Take the tool kit out of the spare
tire.
4.
3.
2.
1.
CONT INUED
Changing a Flat Tire
T aking Care of t he Unexpect ed
219
JACK STRAP
TOOL KIT
SPARE
TIRE
LOOP
The vehicle can easily roll off
the jack, seriously injuring
anyone underneath.
Follow the directions for
changing a tire exactly, and
never get under the vehicle
when it is supported only by the
jack.
�\f���—�\f���—�����y���\f�����������y���
�(�������
�\f�y�\f�������y
2008 Fit
Page 223 of 280
Take the jack out of the cargo
area.
Turn the jack’s end bracket
counterclockwise to loosen it, then
remove the jack by lif ting it straight
up. Unscrew the wing bolt and take
the spare tire out of its well. Loosen each wheel nut 1/2 turn
with the wheel nut wrench.
On all models except Sport,
remove the wheel cover by
caref ully prying under its edge
with the flat tip of the extension.
5.
6. 7. 8.
Changing a Flat Tire
220
WHEEL NUT WRENCH
WHEEL NUT
WHEEL COVER EXTENSION
�\f���—�\f���—�����y���\f�����������y���
�(�������
�\f�y�\f�������y
2008 Fit
Page 224 of 280
�Ú
CONT INUED
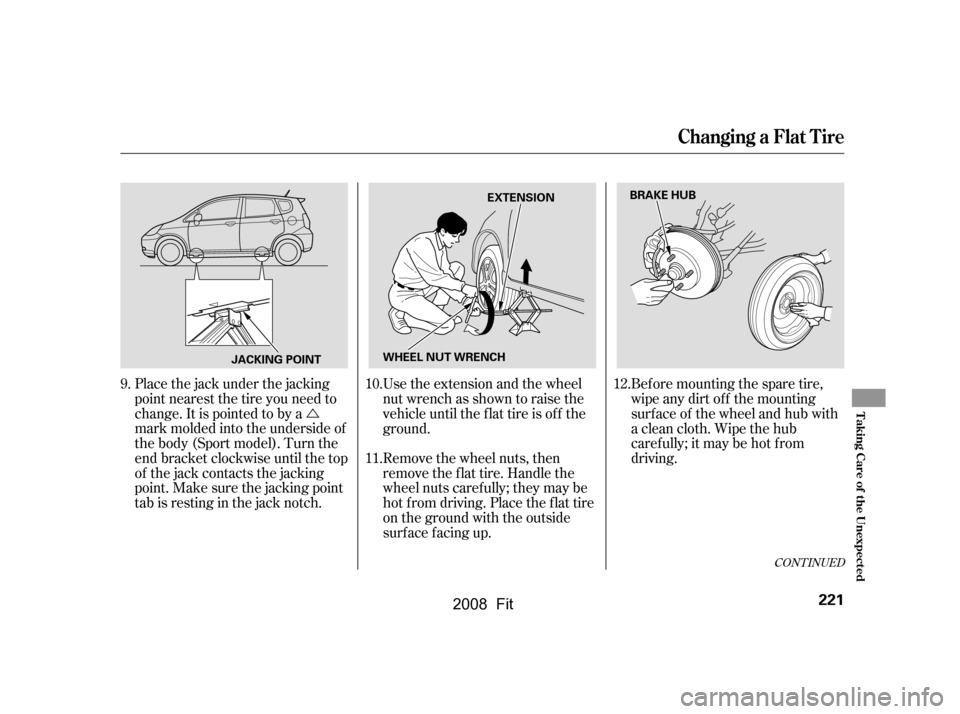
Use the extension and the wheel
nut wrench as shown to raise the
vehicle until the f lat tire is of f the
ground.
Remove the wheel nuts, then
removetheflattire.Handlethe
wheel nuts caref ully; they may be
hot from driving. Place the flat tire
on the ground with the outside
surface facing up.Bef ore mounting the spare tire,
wipeanydirtoff themounting
surface of the wheel and hub with
a clean cloth. Wipe the hub
carefully;itmaybehotfrom
driving.
Place the jack under the jacking
point nearest the tire you need to
change. It is pointed to by a
mark molded into the underside of
the body (Sport model). Turn the
end bracket clockwise until the top
of the jack contacts the jacking
point. Make sure the jacking point
tab is resting in the jack notch.
9.
11. 12.
10.
Changing a Flat Tire
T aking Care of t he Unexpect ed
221
WHEEL NUT WRENCH BRAKE HUB
JACKING POINT EXTENSION
�\f���—�\f���—�����y���\f�������\f���y���
�(�������
�\f�y�\f�������y
2008 Fit
Page 227 of 280
 position, you do not
hear the normal noise of the engine
trying to start. You may hear a
clicking sound, a series of clicks, or
nothing at all.")
When you turn the ignition switch to
the START (III) position, you do not
hear the normal noise of the engine
trying to start. You may hear a
clicking sound, a series of clicks, or
nothing at all.
Check these things:Check the transmission interlock.
If you have a manual transmission,
the clutch pedal must be pushed
all the way to the f loor or the
starter will not operate. With an
automatic transmission, it must be
in Park or neutral.
Turn the ignition switch to the ON
(II) position. Turn on the
headlights, and check their
brightness. If the headlights are
very dim or do not come on at all,
the battery is discharged. See on page .
You can hear the starter motor
operating normally, or the starter
motor sounds like it is spinning
f aster than normal, but the engine
does not start up and run.
You hear nothing, or almost
nothing. The engine’s starter
motor does not operate at all, or
operates very slowly.
Diagnosing why the engine won’t
start f alls into two areas, depending
on what you hear when you turn the
ignition switch to the START (III)
position:
Make sure the wire support ring is
ontheoutersideof thetirevalve
as shown.
3.
226
Changing a Flat Tire, If the Engine Won’t Start
Nothing Happens or the Starter
Motor Operates Very Slowly
Jump Starting
If the Engine Won’t Start
224
WIRE SUPPORT RING
�\f���—�\f���—�����y���\f�����������y���
�(�������
�\f�y�\f�������y
2008 Fit
Page 232 of 280

Look f or any obvious coolant leaks,
such as a split radiator hose.
Everything is still extremely hot,
so use caution. If you f ind a leak, it
must be repaired bef ore you
continue driving (seeon page ).
Using gloves or a large heavy
cloth, turn the radiator cap
counterclockwise, without pushing
down, to the f irst stop. Af ter the
pressure releases, push down on
the cap, and turn it until it comes
off. Start the engine, and set the
temperature control dial to
maximum heat. Add coolant to the
radiator up to the base of the f iller
neck. If you do not have the
proper coolant mixture available,
you can add plain water.
Remember to have the cooling
system drained and ref illed with
the proper mixture as soon as you
can.
If you don’t f ind an obvious leak,
check the coolant level in the
radiator reserve tank. Add coolant
if the level is below the MIN mark.
If there was no coolant in the
reserve tank, you may need to add
coolant to the radiator. Let the
engine cool down until the high
temperature indicator goes of f
bef ore checking the radiator. Put the radiator cap back on
tightly. Run the engine, and check
the high temperature indicator. If
it begins to blink or comes on
again, the engine needs repair
(see on page
).
If the temperature stays normal,
check the coolant level in the
radiator reserve tank. If it has
gone down, add coolant to the
MAX mark. Put the cap back on
tightly.
9.
8.
7.
6.
5.
10.
11.
238
238
Emergency
Towing
Emergency T owing
If theEngineOverheats
T aking Care of t he Unexpect ed
229
Removing the radiator cap
while the engine is hot can
cause the coolant to spray out,
seriously scalding you.
Always let the engine and
radiator cool down before
removing the radiator cap.
�\f���—�\f���—�����y���\f�������\f���y���
�(�������
�\f�y�\f�������y
2008 Fit