Page 73 of 280
�Î
�Î
�Î
�Î
�Î
�Î�Î
�Î
�Î
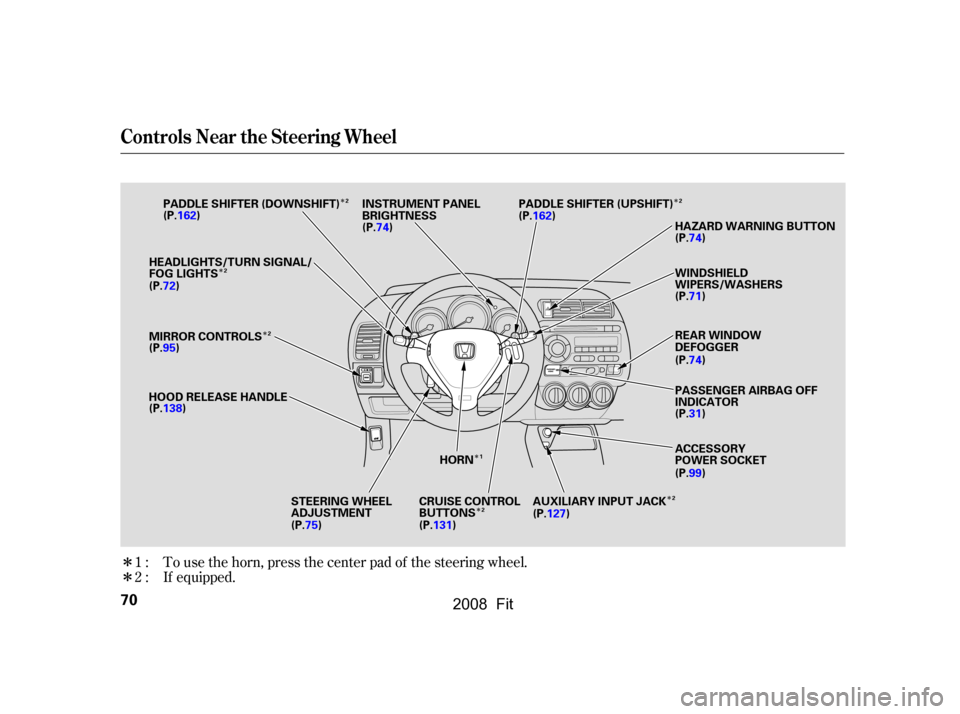
To use the horn, press the center pad of the steering wheel.
If equipped.
1:
2:
Controls Near the Steering Wheel
70
HORN
MIRROR CONTROLS
WINDSHIELD
WIPERS/WASHERS
REAR WINDOW
DEFOGGER
PASSENGER AIRBAG OFF
INDICATOR
(P.31)
ACCESSORY
POWER SOCKET
HEADLIGHTS/TURN SIGNAL/
FOG LIGHTS
(P.72)
(P.95)
HOOD RELEASE HANDLE (P.138)
(P.99) (P.71)
(P.74) HAZARD WARNING BUTTON
(P.74)
CRUISE CONTROL
BUTTONS AUXILIARY INPUT JACK
STEERING WHEEL
ADJUSTMENT
PADDLE SHIFTER (DOWNSHIFT) PADDLE SHIFTER (UPSHIFT)
INSTRUMENT PANEL
BRIGHTNESS
(P.75) (P.131) (P.127)
(P.162)
(P.74)(P.162)1
2
2
22
2
2
�����—�����—�����y���������������y���
�(�������
���y���������y
2008 Fit
Page 75 of 280
�µ
Hold past ON to turn the rear
window wiper on and to spray the
rear window washer.
Rotate the switch
counterclockwise to spray the
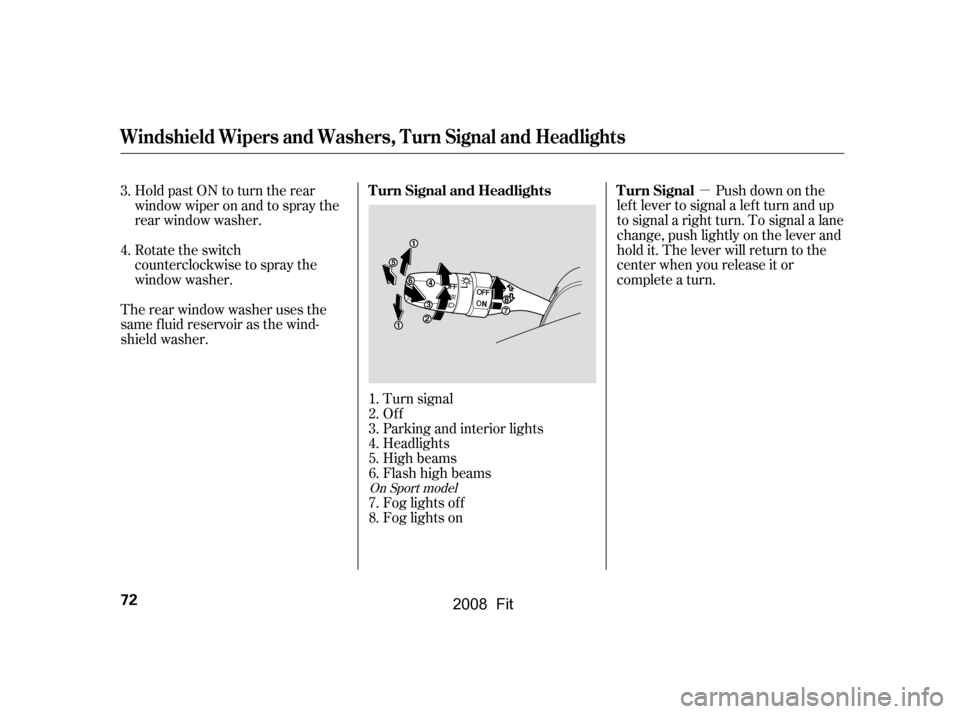
window washer. Push down on the
lef t lever to signal a lef t turn and up
to signal a right turn. To signal a lane
change, push lightly on the lever and
hold it. The lever will return to the
center when you release it or
complete a turn.
Therearwindowwasherusesthe
same f luid reservoir as the wind-
shield washer.
Turn signal
Of f
Parking and interior lights
Headlights
High beams
Flashhighbeams
Fog lights of f
Fog lights on
3.
4.
1.
2.
3.
4.
5.
6.
7.
8.
On Sport model
Turn Signal and Headlights Turn Signal
Windshield Wipers and Washers, Turn Signal and Headlights
72
�\f���—�\f���—�����y���\f�����������y���
�(�������
�\f�y�\f�\f�����y
2008 Fit
Page 76 of 280

�µ�µTurning the switch to
the ‘‘ ’’ position turns on the
parking lights, taillights, instrument
panel lights, side-marker lights, and
rear license plate lights.
Turning the switch to the ‘‘ ’’
position turns on the headlights.
When the light switch is in the
‘‘ ’’ or ‘‘ ’’ position, the
lights on indicator comes on as a
reminder. This indicator stays on if
you leave the light switch on and
turn the ignition switch to the
ACCESSORY (I) or the LOCK (0)
position.
If you leave the lights on with the
key removed f rom the ignition
switch, you will hear a reminder
chime when you open the driver’s
door. Turn the f og lights on and of f by
turning the switch next to the
headlight switch.
You can use the f og lights only when
the headlights are on low beam.
They will go of f when the headlights
are turned of f .
The headlights revert to normal
operation when you turn them on
with the switch.
With the headlight switch off or in
the position, the high beam
headlights and the high beam
indicator come on with reduced
brightness when you turn the
ignition switch to the ON (II)
position and release the parking
brake. They remain on until you turn
the ignition switch of f , even if you
set the parking brake.
To f lash the high beams, pull the
lever back lightly, then release it.
The high beams will stay on as long
as you hold the lever back. Push the lever
f orward and the high beam indicator
will come on (see page ). Pull it
back to return to low beams. 65
Canadian models only
On Sport model
Headlights Daytime Running L ights Fog Lights
High Beams
Headlights
Inst rument s and Cont rols
73
�\f���—�\f���—�����y���\f�������\f���y���
�(�������
�\f�y�\f�\f�����y
2008 Fit
Page 77 of 280
. This causes all four
outside turn signals and both turn
indicators in the instrument panel to
f lash. Use the hazard warning lig")
Pushthebuttontoturnonthe
hazard warning lights (f our-way
flashers). This causes all four
outside turn signals and both turn
indicators in the instrument panel to
f lash. Use the hazard warning lights
if you need to park in a dangerous
area near heavy traffic, or if your
vehicle is disabled.
You can change the instrument panel
brightness only when the light
switch is on.
The rear window def ogger will clear
fog,frost,andthinicefromthe
window. Push the def ogger button to
turn it on and of f . The indicator in
the button comes on to show the
def ogger is on. You must manually
shut of f the rear window def ogger
when it is no longer needed.
Turntheknobontheupperpartof
the instrument panel to adjust the
brightness.
You will hear a beep when maximum
or minimum brightness is reached.
You will also hear a beep when the
maximum level is canceled by
turning the knob a click to the lef t. Rear Window Def ogger
Hazard Warning Button
Instrument Panel Brightness
Instrument Panel Brightness, Hazard Warning Button, Rear Window Def ogger
74
INSTRUMENT PANEL BRIGHTNESS
CONTROL KNOB
�\f���—�\f���—�����y���\f�������
�\f�y���
�(�������
�\f�y�\f�\f�����y
2008 Fit
Page 79 of 280
Youshouldhavereceivedakey
number tag with your keys. You will
need this key number if you ever
have to get a lost key replaced. Use
only Honda-approved key blanks.
These keys contain electronic
circuits that are activated by the
immobilizer system. They will not
work to start the engine if the
circuits are damaged.Protect the keys f rom direct
sunlight, high temperature, and
high humidity.
Donotdropthekeysorsetheavy
objects on them.
Keep the keys away f rom liquids.
If they get wet, dry them
immediately with a sof t cloth.
The keys do not contain batteries.
Do not try to take them apart.
Your vehicle comes with the two
ignition keys.On Sport model All models except Sport
All models except Sport
Keys and Locks
76
KEY NUMBER TAGKEY NUMBER TAG
KEYS WITH
TRANSMITTER KEYS
�\f���—�\f���—�����y���\f�����������y���
�(�������
�\f�y�\f�\f���
�y
2008 Fit
Page 81 of 280
, ACCESSORY
(I), ON (II), and START (III). You can insert or
remove the key only in this position.
To turn the key, push it in slightly.")
�µ�µ
�µ�µ
The ignition switch has f our
positions: LOCK (0), ACCESSORY
(I), ON (II), and START (III). You can insert or
remove the key only in this position.
To turn the key, push it in slightly. If
your vehicle has an automatic
transmission, the shif t lever must
also be in park. If the f ront wheels are turned, the
anti-thef t lock may make it dif f icult
to turn the key. Firmly turn the
steering wheel to the lef t or right as
you turn the key.
This is the normal key
position when driving. Several of the
indicators on the instrument panel
come on as a test when you turn the
ignition switch f rom the
ACCESSORY (I) to the ON (II)
position.
Use this position
only to start the engine. The switch
returns to the ON (II) position when
you let go of the key. You will hear a reminder beeper if
you leave the key in the LOCK (0) or
the ACCESSORY (I) position and
open the driver’s door. Remove the
key to turn of f the beeper.
If your vehicle has an automatic
transmission, the shif t lever must be
in Park bef ore you can remove the
key f rom the ignition switch.
You can
operate the audio system and the
accessory power socket in this
position.
LOCK (0) ON (II)
ST A RT (III)
A CCESSORY (I)
Ignition Switch
78
Removing the key from the
ignition switch while driving
locks the steering. This can
cause you to lose control of the
vehicle.
Remove the key from the
ignition switch only when
parked.
�\f���—�\f���—�����y���\f�����������y���
�(�������
�\f�y�\f�\f�����y
2008 Fit
Page 86 of 280

�µ�µ
�µ Press this button once
to unlock the driver’s door. Push it
twice to unlock the remaining doors
and the tailgate. Some exterior lights
will f lash twice each time you press
the button.
The ceiling light (if the ceiling light
switch is in the door activated
position) will come on when you
press the UNLOCK button. If you do
not open any door or the tailgate
within 30 seconds, the light f ades out.
If you relock the doors and the
tailgate with the remote transmitter
bef ore 30 seconds have elapsed, the
light will go of f immediately.
If you do not open any door or the
tailgate within 30 seconds, they will
automatically relock and the security
system will set. Pressthisbuttonfor
about 2 seconds to attract attention:
the horn will sound, and the exterior
lights will f lash f or about 30 seconds.
To cancel panic mode, press any
other button on the remote
transmitter, or turn the ignition
switch to the ON (II) position.
Press this button once to
lock all doors and the tailgate. Some
exterior lights will f lash once. When
you push LOCK twice within 5
seconds, the horn will sound to
verify that the doors and the tailgate
arelockedandthesecuritysystem
has set. You cannot lock the doors
and the tailgate if any door or the
tailgate is not f ully closed or the key
is in the ignition switch.
CONT INUED
On Sport model
UNL OCK PA NIC
LOCK
Remote Transmitter
Inst rument s and Cont rols
83
LED
UNLOCK
BUTTON LOCK
BUTTON
PANIC
BUTTON
�\f���—�\f���—�����y���\f�������
���y���
�(�������
�\f�y�\f�\f�����y
2008 Fit
Page 98 of 280
 position.
Move the selector switch to L
(driver’s side) or R (passenger’s
side).
Keeptheinsideandoutsidemirrors
clean and adjusted f or best visibility.")
Turn the ignition switch to the ON
(II) position.
Move the selector switch to L
(driver’s side) or R (passenger’s
side).
Keeptheinsideandoutsidemirrors
clean and adjusted f or best visibility.
Be sure to adjust the mirrors bef ore
you start driving.
The inside mirror has day and night
positions. The night position reduces
glare f rom headlights behind you.
Flip the tab on the bottom edge of
the mirror to select the day or night
position.
When you push the MAIN switch in,
the switch is off, and the passenger
windows cannot be raised or lowered.
To cancel this f eature, push on the
switch again to get it to pop out.
Keep the MAIN switch of f when you
have children in the vehicle so they
do not injure themselves by
operating the windows
unintentionally.
2.
1.
CONT INUED
All models except Canadian DX
Adjusting the Power Mirrors
Mirrors
Power Windows, Mirrors
Inst rument s and Cont rols
95
SELECTOR SWITCH
ADJUSTMENT SWITCH
TAB
�\f���—�\f���—�����y���\f�����������y���
�(�������
�\f�y�\f�
�\f�\f�y
2008 Fit