Page 201 of 281

The coolant level should be up to
the base of the f iller neck. Add
coolant if it is low.
Pourthecoolantslowlyand
caref ully so you do not spill any.
Clean up any spill immediately; it
could damage components in the
engine compartment.
Put the radiator cap back on and
tighten it.
Pour coolant into the reserve tank.
Fill it to half way between the MAX
and MIN marks. Put the cap back
on the reserve tank.
Do not add any rust inhibitors or
other additives to your vehicle’s
cooling system. They may not be
compatible with the coolant or
engine components. Fill the reservoir with a good-quality
windshield washer f luid. This
increases the cleaning capability and
prevents f reezing in cold weather.
Check the f luid level in the
windshield washer reservoir at least
monthly during normal use.
The low washer
level indicator comes on when the
level is low (see page ).
When you ref ill the reservoir, clean
the edges of the windshield wiper
blades with windshield washer f luid
on a clean cloth. This will help to
condition them.
Remove the radiator cap by
pushing down and turning
counterclockwise.
Make sure the engine and radiator
are cool.
Relieve any pressure in the cooling
system by turning the radiator cap
counterclockwise, without
pressing down. 4.
5.
2.
1.
3. 6.
63
On Canadian models:
Windshield Washers
Engine Coolant, Windshield Washers
Maint enance
197
RADIATOR CAP
Do not use engine antif reeze or a
vinegar/water solution in the
windshield washer reservoir. Antif reeze
can damage your vehicle’s paint, while
a vinegar/water solution can damage
the windshield washer pump. Use only
commercially-available windshield
washer f luid.
\f—\f—y
\f
y
(+\fy\f\fy
2008 Element
Page 202 of 281

Check the f luid level with the engine
at normal operating temperature.Remove the dipstick (yellow loop)
f rom the transmission, and wipe it
with a clean cloth.
Park the vehicle on level ground.
Start the engine, let it run until the
radiator f an comes on, then shut
of f the engine. For accurate
results, wait about 60 seconds (but
no longer than 90 seconds) bef ore
doing step 2. Insert the dipstick all the way into
the transmission securely as
shown in the illustration.
Remove the dipstick and check
the f luid level. It should be
between the upper and lower
marks.If the level is below the lower
mark, add f luid into the dipstick
hole to bring it to the level
between the upper and lower
marks.
Pour the f luid slowly and caref ully
so you do not spill any. Clean up
any spill immediately; it could
damage components in the engine
compartment.
Always use Honda ATF-Z1
(automatic transmission f luid).
3.
4.
2.
1. 5.
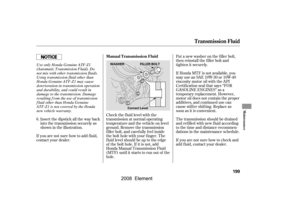
T ransmission Fluid
Automatic Transmission Fluid
198
DIPSTICKLOWER
MARK
UPPER
MARK
HOT
MARK
\f—\f—y
\fy
(+\fy\f\fy
2008 Element
Page 203 of 281

Put a new washer on the f iller bolt,
then reinstall the f iller bolt and
tighten it securely.
If Honda MTF is not available, you
may use an SAE 10W-30 or 10W-40
viscosity motor oil with the API
Certif ication seal that says ‘‘FOR
GASOLINE ENGINES’’ as a
temporary replacement. However,
motor oil does not contain the proper
additives, and continued use can
cause stif f er shif ting. Replace as
soon as it is convenient.
The transmission should be drained
and ref illed with new f luid according
to the time and distance recommen-
dations in the maintenance schedule.
Check the f luid level with the
transmission at normal operating
temperature and the vehicle on level
ground. Remove the transmission
f iller bolt, and caref ully f eel inside
the bolt hole with your f inger. The
f luid level should be up to the edge
of the bolt hole. If it is not, add
Honda Manual Transmission Fluid
(MTF) until it starts to run out of the
hole. If you are not sure how to check and
add f luid, contact your dealer.
Insert the dipstick all the way back
into the transmission securely as
If you are not sure how to add f luid,
contact your dealer.
6.
T ransmission Fluid
Manual Transmission Fluid
Maint enance
199
Correct Level
WASHER FILLER BOLT
(Automatic Transmission Fluid). Do
\f—\f—y
\f
y
(+\fy\f\fy
Useonly Honda Genuine ATF-Z1
notmixwithothertransmission fluids.
Using transmission fluid other than
Honda Genuine ATF-Z1 may cause
deterioration in transmission operation
and durability, and could result in
damage to the transmission. Damage
resulting f rom the use of transmission
f luid other than Honda Genuine
ATF-Z1 is not covered by the Honda
shownintheillustration.
new vehicle warranty.
2008 Element
Page 204 of 281

Use Honda Dual Pump Fluid II only.
Do not use automatic transmission
fluid (ATF).
The rear dif f erential should be
drained and ref illed with new f luid
accordingtothetimeanddistance
recommendations shown on the
maintenance minder display. Have
your dealer replace the rear
dif f erential f luid.Brake f luid marked DOT 5 is not
compatible with your vehicle’s
braking system and can cause
extensive damage.
Using any non-Honda brake f luid can
cause corrosion and decrease the lif e
of the system. Have the brake
system f lushed and ref illed with
Honda Heavy Duty Brake Fluid
DOT 3 as soon as possible.
Always use Honda Heavy Duty
Brake Fluid DOT 3. If it is not
available, you should use only DOT 3
or DOT 4 f luid, f rom a sealed
container, as a temporary
replacement.
Replace the brake f luid according to
the time recommendation shown on
the maintenance minder display.
Check the brake f luid level in the
reservoirs monthly.The f luid level should be between
theMINandMAXmarksontheside
of the reservoir. If the level is at or
below the MIN mark, your brake
system needs attention. Have the
brake system inspected f or leaks or
worn brake pads.
4WD model only
Rear Dif f erential Fluid Brake Fluid
Rear Dif f erential Fluid, Brake and Clutch Fluid
200
MAX
MIN
\f—\f—y
\f\fy
(+\fy\f\fy
2008 Element
Page 205 of 281

A low power steering f luid level can
indicate a leak in the system. Check
the f luid level f requently, and have
the system inspected as soon as
possible.
To clean the gray composite body
panels, wash them with soap and
water only. Do not apply wax to the
panels; it will cause discoloration.
Always use Honda Power Steering
Fluid. You may use another power
steering f luid as an emergency
replacement, but have the power
steering system f lushed and ref illed
with Honda PSF as soon as possible.
Check the level on the side of the
reservoir when the engine is cold.
The f luid should be between the
UPPER LEVEL and LOWER LEVEL.
If not, add power steering f luid to the
UPPER LEVEL.
Pour the f luid slowly and caref ully so
you do not spill any. Clean up any
spill immediately; it could damage
components in the engine
compartment.
The f luid level should be between
theMINandMAXmarksontheside
of the reservoir. If it is not, add
brake f luid to bring it up to that level.
Use the same fluid specified for the
brake system.
A low f luid level can indicate a leak
in the clutch system. Have this
system inspected as soon as possible.
If equipped with body panels
Manual Transmission only
Cleaning the Body Panels
Power Steering Fluid
Clutch Fluid
Brake and Clutch Fluid, Power Steering Fluid, Cleaning the Body Panels
Maint enance
201
UPPER LEVEL
LOWER LEVEL
MAX
MAX
Turning the steering wheel to f ull lef t
or right lock and holding it there can
damage the power steering pump.
\f—\f—y
\f
y
(+\fy\f\fy
2008 Element
Page 206 of 281

Theheadlightswereproperlyaimed
when your vehicle was new. If you
regularly carry heavy items in the
cargo area or pull a trailer,
readjustment may be required.
Adjustmentsshouldbedonebyyour
dealer or other qualif ied technician.Your vehicle has halogen headlight
bulbs. Handle it by its steel base and
protect the glass f rom contact with
your skin or hard objects. If you
touch the glass, clean it with
denaturedalcoholandacleancloth.
Your vehicle has halogen headlight
bulbs, two on each side. When
replacing a bulb, handle it by its base
and protect the glass from contact
with your skin or hard objects. If you
touch the glass, clean it with
denaturedalcoholandacleancloth.
Open the hood.
If you need to change the
headlight bulb on the driver’s side,
remove the f ront end of the air
intake duct by pulling it out.
1.
On SC model
On all models except SC
Headlight A iming Replacing a Headlight Bulb
Lights
202
AIR INTAKE DUCT
Halogen headlight bulbs get very hot
when lit. Oil, perspiration, or a scratch
on the glass can cause the bulb to
overheat and shatter.
\f—\f—y
\fy
(+\fy\f\fy
2008 Element
Page 207 of 281

Reinstall the rubber weather seal.
Make sure it is right side up; it is
marked ‘‘TOP.’’
Install the new bulb into the hole,
making sure the tabs are in their
slots. Pivot the hold-down wire
back in place, and clip the end into
the slot.
Push the electrical connector onto
the new bulb. Make sure it is
connected securely. Turn on the
headlights to test the new bulb.
(Driver’s side)
Install the f ront end of the air
intake duct.
Remove the rubber weather seal
by pulling on the tab.
Remove the electrical connector
f rom the bulb by pulling the
connector straight back.
Unclip the end of the hold-down
wire f rom its slot. Pivot the wire
out of the way, then remove the
bulb. The high beam headlight bulb and
the low beam headlight bulb are
replaced the same way.
Open the hood.
If you need to change the
headlight bulb on the driver’s side,
remove the f ront end of the air
intake duct by pulling it out.
1.
2.
3.
4. 5.
6.
7.
8.
CONT INUED
On SC model
Lights
Maint enance
203
AIR INTAKE DUCT
\f—\f—y
\f
\fy
(+\fy\f\fy
2008 Element
Page 208 of 281
Push the electrical connector back
onto the bulb. Make sure it is on
all the way.
Turn on the headlights to test the
new bulb.
(Driver’s side)
Install the f ront end of the air
intake duct.
Insert the new bulb into the hole,
and turn it one-quarter turn
clockwise to lock it in place.
Remove the bulb by turning it one-
quarter turn counterclockwise.
Remove the electrical connector
f rom the bulb by pushing on the
tab and pulling the connector
down.
3.
4. 5.
6.
7.
2.
Lights
Replacing a Front Parking/Turn
Signal Light Bulb
204
TAB
On all models except SC
On SC model
\f—\f—y
\f
y
(+\fy\f\fy
2008 Element