Page 1 of 413

�µAdjust the driver’s seat as far to the
rear as possible while allowing you to
maintain f ull control of the vehicle.
Have a front passenger adjust their
seat as far to the rear as possible.
See pages f or important
guidelines on how to properly
protect inf ants, small children, and
larger children who ride in your
vehicle.
The f ollowing pages provide
instructions on how to properly
protect the driver, adult passengers,
and teenage children who are large
enough and mature enough to drive
or ride in the f ront.
Af ter everyone has entered the
vehicle, be sure the doors are closed
and locked.
Your vehicle has a door-
openindicatoronthe
instrument panel to indicate when
either door is not tightly closed. Locking the doors also helps prevent
an outsider f rom unexpectedly
opening a door when you come to a
stop.
Locking the doors reduces the
chance of someone being thrown out
of the vehicle during a crash, and it
helps prevent passengers f rom
accidentally opening a door and
f alling out.
Some models have the auto door
locking/unlocking f eature. For more
inf ormation, see page .
See page f or how to lock the
doors, and page f or how the door-
open indicator works.
32 36
63
79
81
CONT INUED
Protecting A dults and Teens
Adjust the Front Seats
Introduction
Close and L ock the Doors
1. 2.
Driver and Passenger Saf ety
11
�����—�����—�
�
�y�
�����������
�y���
�(�+���������y�����
���y
Page 3 of 413

The lap and shoulder belt goes over
your shoulder, across your chest,
and across your hips.
To fasten the belt, insert the latch
plate into the buckle, then tug on the
belt to make sure the buckle is
latched (see page f or how to
properly position the belt).
To unlock the belt, press the red
PRESSbuttononthebuckle.Guide
the belt across your body so that it
retracts completely. Af ter exiting the
vehicle, be sure the belt is out of the
way and will not get closed in the
door.All seat belts have an emergency
locking retractor. In normal driving,
the retractor lets you move f reely in
your seat while it keeps some
tension on the belt. During a collision
or sudden stop, the retractor
automatically locks the belt to help
restrain your body.
If the shoulder part of the belt is
pulled all the way out, the lockable
retractor will activate. The belt will
retract, but it will not allow the
passenger to move f reely.
To deactivate the lockable retractor,
unlatch the buckle and let the seat
belt fully retract. To refasten the
seat belt, pull it out only as f ar as
needed.
For added protection, the f ront seat
belts are equipped with automatic
seat belt tensioners. When activated,
the tensioners immediately tighten
the belts to help hold the driver and
a f ront passenger in position.
In addition, the lap/shoulder belts in
all seating positions except the
driver’s have a lockable retractor
that must be activated to secure a
child seat (see page ).
14
43
CONT INUED
L ap/Shoulder Belt A utomatic Seat Belt T ensioners
Additional Inf ormation About Your Seat Belts
Driver and Passenger Saf ety
19
�����—�����—�
�
�y�
�������������y���
�(�+���������y���������y
Page 25 of 413
 position and release the parking
brake, it means there is a problem
withtheDRL.Theremayalsobea
problem with the high beam
h")
If this indicator comes on when you
turn the ignition switch to the ON
(II) position and release the parking
brake, it means there is a problem
withtheDRL.Theremayalsobea
problem with the high beam
headlights. Have your vehicle
checked by your dealer.
This indicator comes on with the
high beam headlights. For more
inf ormation, see page .
This indicator also comes on with
reduced brightness when the
daytime running lights (DRL) are on
(see page ).This indicator comes on if either
door is not closed tightly.
This indicator comes on when the
washer f luid level is low. Add washer
f luid when you see this indicator
(see page ).
This indicator comes on if the trunk
lid is not closed tightly.
This indicator reminds you that the
exterior lights are on. It comes on
when the light switch is in either the
or position. If you turn the
ignition switch to the ACCESSORY
(I) or LOCK (0) position without
turning of f the light switch, this
indicator will stay on. A reminder
chime will also sound when you open
the driver’s door.
72 241
73
Canadian models only
High Beam Indicator Door-open Indicator
T runk-open Indicator L ights On Indicator
Washer Level Indicator
Daytime Running L ights
Indicator
Instrument Panel Indicators
Inst rument s and Cont rols
63
�����—�����—�
�
�y�
����
��������y���
�(�+���������y���������y
Page 29 of 413
Af ter both doors are closed tightly,
the light dims slightly, then f ades out
in about 30 seconds.
The ceiling light (with the switch in
the center position) comes on when
you remove the key f rom the ignition
switch. If you do not open a door, the
light stays on, then f ades out in
about 30 seconds.
If you leave either door open without
the key in the ignition switch, the
ceiling light goes of f af ter 3 minutes.
The ceiling light has a three-position
switch; ON, Door Activated, and
OFF. In the Door Activated (center)
position, the light comes on when
you:
Open either door.
Unlock the doors with the key or
the remote transmitter. Turn on a spotlight by pushing the
lens. Push the lens again to turn it
of f . You can use the spotlights at all
times.
CONT INUED
Spotlights
Ceiling L ight
Interior Lights
Inst rument s and Cont rols
111
DOOR ACTIVATED
ON
OFF
On models without moonroof
�����—�����—�
�
�y�
���������
���y���
�(�+���������y���
�
���y
Page 30 of 413
The spotlights have a two-position
switch. In the DOOR position, the
lights come on when you open either
door. In the OFF position, the lights
do not come on.
The spotlights (with the switch in
the DOOR position) also come on
when you unlock the door with the
key or the remote transmitter, and
when you remove the key f rom the
ignition switch.The courtesy light between the
spotlights comes on when you turn
the parking lights on. To adjust its
brightness, push the instrument
panel brightness control buttons
under the driver’s side vent with the
ignition switch in the ON (II)
position.
On models with moonroof
On models with moonroofCourtesy L ight
Interior Lights
112
DOOR ACTIVATEDOFF POSITION
SPOTLIGHT
COURTESY LIGHT
�����—�����—�
�
�y�
�������������y���
�(�+���������y���
�
���y
Page 46 of 413
Fasten your seat belt. Check that
your passengers have f astened
their seat belts (see page ).
Make sure the doors are securely
closed and locked.
Check the steering wheel
adjustment (see page ).
Check the adjustment of the
inside and outside mirrors (see
page ).
Check that any items you may be
carrying are stored properly or
f astened down securely.
Check the seat adjustment (see
page ).
Make sure all windows, mirrors,
and outside lights are clean and
unobstructed. Remove f rost, snow,
or ice.
Youshoulddothefollowingchecks
and adjustments bef ore you drive
your vehicle.
Check that the hood is f ully closed.
Check that the trunk is f ully
closed. When you start the engine, check
the gauges and indicators in the
instrument panel (see page ).
Visually check the tires. If a tire
looks low, use a gauge to check its
pressure.
1. 2.
14
3. 4. 5. 6. 7. 8. 9.
11.
10.
55
92
104 75
Preparing to Drive
Driving
203
�����—�����—�
�
�y�
�������������y���
�(�+���������y���������y
Page 66 of 413
�Î
�Î�Î
�Î
�Î
�Î �Î
CONT INUED: If equipped
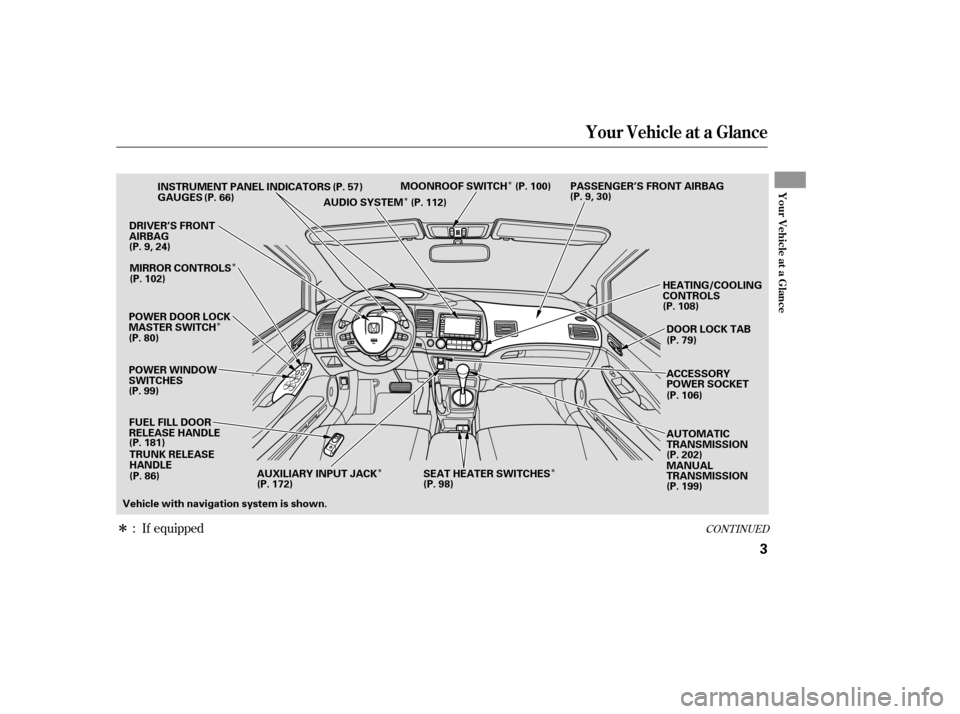
Your Vehicle at a Glance
Your Vehicle at a Glance
3
POWER WINDOW
SWITCHESGAUGES
POWER DOOR LOCK
MASTER SWITCH FUEL FILL DOOR
RELEASE HANDLE TRUNK RELEASE
HANDLE
DRIVER’S FRONT
AIRBAG
HEATING/COOLING
CONTROLS
INSTRUMENT PANEL INDICATORS
AUDIO SYSTEMMOONROOF SWITCH PASSENGER’S FRONT AIRBAG
(P. 57)
(P. 66)
(P.9,24)
(P. 80) MIRROR CONTROLS
(P. 181) (P.9,30)
(P. 108)
(P. 199)
(P. 112)
Vehicle with navigation system is shown. DOOR LOCK TAB
(P. 79)
ACCESSORY
POWER SOCKET
AUTOMATIC
TRANSMISSION
(P. 202)
MANUAL
TRANSMISSION
(P. 102)
(P. 99) (P. 86) (P. 106)
(P. 100)
AUXILIARY INPUT JACK SEAT HEATER SWITCHES
(P. 172) (P. 98)
�����—�����—�����y��������
������y���
�(�#���������y���������y
Page 69 of 413

Your vehicle is equipped with many
features that work together to
protect you and your passengers
during a crash.
However, you and your passengers
can’t take f ull advantage of these
f eatures unless you remain sitting in
a proper position and. In fact, some safety
f eatures can contribute to injuries if
they are not used properly.
The f ollowing pages explain how you
cantakeanactiveroleinprotecting
yourself and your passengers.
Some f eatures do not require any
action on your part. These include a
strong steel f ramework that f orms a
saf ety cage around the passenger
compartment, front and rear crush
zones, a collapsible steering column,
and tensioners that tighten the f ront
seat belts in a crash.
Your Vehicle’s Saf ety Features
always wear
your seat belt s
Driver and Passenger Saf ety
7
(2)
(2)
(8)
(8)
(7)
(9)
(9)
(3) (1) (4)
(6)
(10)
(5)
(11) (12)
(1) Safety Cage
(2) Crush Zones
(3) Seats and Seat-Backs
(4) Head Restraints
(5) Collapsible Steering Column
(6) Seat Belts
(7) Front Airbags(8) Side Airbags
(9) Side Curtain Airbags
(10) Front Seat Belt Tensioners
(11) Door Locks
(12) Front Seat Belt Buckle Tensioners
�����—�����—�����y���������������y���
�(�#���������y�����
���y
 comes on when
you remove the key f rom")

.
Make sure the doors are securely
closed and locked.
Check the steering wheel
adjustment (see page ).
Che")