Page 315 of 413

�Î �Î
�Ì �Ì
�Ì
�Î
Maintenance Minder
229
:See information on maintenance and emissions warranty on page .
Independent of the maintenance minder display, replace the brake fluid
every 3 years.
Inspect idle speed every 160,000 miles (256,000 km).
Adjust the valves during services A, B, 1, 2, or 3 only if they are noisy.
If the message ‘‘SERVICE’’ does not appear more than 12 months after the
display is reset, change the engine oil every year.
NOTE: 228
1:
Maintenance Sub Items
Rotate tires
Replace air cleaner element If you drive in dusty conditions, replace
every 15,000 miles (24,000 km).
Replace dust and pollen filter If you drive primarily in urban areas that have high
concentrations of soot in the air from industry and
from diesel-powered vehicles, replace every 15,000
miles (24,000 km).
Inspect drive belt
Replace transmission fluid
Replace spark plugs
Inspect valve clearance
Replace engine coolant
Maintenance Main Items
Replace engine oil
Replace engine oil and oil filter
Inspect front and rear brakes
Check parking brake adjustment
Inspect these items:
Tie rod ends, steering gear box, and boots
Suspension components
Driveshaft boots
Brake hoses and lines (including ABS)
All fluid levels and condition of fluids
Exhaust system
Fuel lines and connections
AB
Symbol
Symbol
12 3 4 51 1
Maintenance Minder
�����—�����—�����y���
��
��������y���
�(�#���������y���������y
Page 316 of 413
�Î
�Î
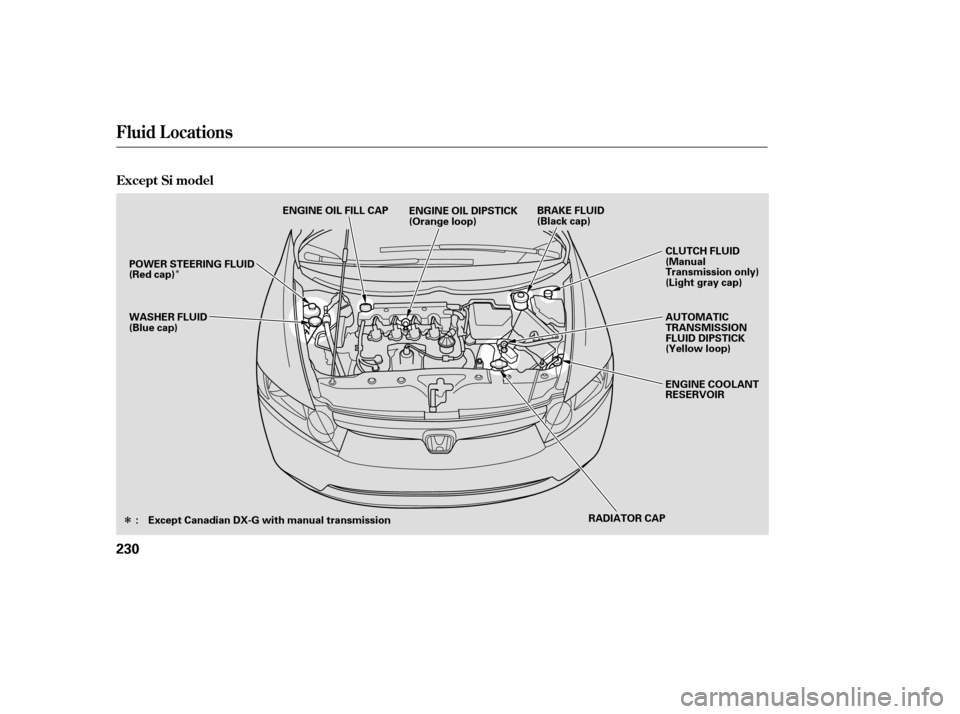
Fluid Locations
Except Si model
230
RADIATOR CAP AUTOMATIC
TRANSMISSION
FLUID DIPSTICK
(Yellow loop)
ENGINE COOLANT
RESERVOIR
CLUTCH FLUID
(Manual
Transmission only)
(Light gray cap)
WASHER FLUID
(Blue cap) BRAKE FLUID
(Black cap)
ENGINE OIL DIPSTICK
(Orange loop)
ENGINE OIL FILL CAP
POWER STEERING FLUID
(Red cap)
: Except Canadian DX-G with manual transmission
�����—�
���—�����y�
����
��������y���
�(�#���������y���������y
Page 332 of 413

Check the level on the side of the
reservoir when the engine is cold.
The f luid should be between the
UPPER LEVEL and LOWER LEVEL.
If not add power steering f luid to the
UPPER LEVEL mark.
Pour the f luid slowly and caref ully so
you do not spill any. Clean up any
spill immediately; it could damage
components in the enginecompartment.
Always use Honda Power Steering
Fluid. You may use another power
steering f luid as an emergency
replacement, but have the power
steering system f lushed and ref illed
with Honda PSF as soon as possible.
A low power steering f luid level can
indicate a leak in the system. Check
the f luid level f requently, and have
the system inspected as soon as
possible.
The f luid level should be between
theMINandMAXmarksontheside
of the reservoir. If it is not, add
brake f luid to bring it up to that level.
Use the same fluid specified for the
brake system.
A low f luid level can indicate a leak
in the clutch system. Have this
system inspected as soon as possible.
Manual Transmission only
All models except Si
Brake and Clutch Fluid, Power Steering Fluid
Power Steering Fluid
Clutch Fluid
Maint enance
243
LOWER LEVEL
UPPER LEVEL
MAX
MIN
T urning the steering wheel to f ull lef t
or right lock and holding it there can
damage the power steering pump.
�����—�����—�����y���
��
��������y���
�(�#���������y���������y
Page 333 of 413

Manual Transmission onlyAll models except Si and Canadian DX-Gwith manual transmission
The f luid level should be between
theMINandMAXmarksontheside
of the reservoir. If it is not, add
brake f luid to bring it up to that level.
Use the same fluid specified for the
brake system.
A low f luid level can indicate a leak
in the clutch system. Have this
system inspected as soon as possible. Pour the f luid slowly and caref ully so
you do not spill any. Clean up any
spill immediately; it could damage
components in the engine
compartment.
Always use Honda Power Steering
Fluid. You may use another power
steering f luid as an emergency
replacement, but have the power
steering system f lushed and ref illed
with Honda PSF as soon as possible.
A low power steering f luid level can
indicate a leak in the system. Check
the f luid level f requently, and have
the system inspected as soon as
possible.
Check the level on the side of the
reservoir when the engine is cold.
The f luid should be between the
UPPER LEVEL and LOWER LEVEL.
If not add power steering f luid to the
UPPER LEVEL mark.
Brake and Clutch Fluid, Power Steering Fluid
Power Steering Fluid
Clutch Fluid
Maint enance
243
LOWER LEVEL
UPPER LEVEL
MAX
MIN
T urning the steering wheel to f ull lef t
or right lock and holding it there can
damage the power steering pump.
�����—�
���—�����y�
����
��������y���
�(�#���������y���������y
Page 335 of 413

If youreplacedaheadlightbulbon
the driver’s side, reinstall the
engine coolant reserve tank. To change the bulb on the driver’sside, start the engine, turn the
steering wheel all the way to the
right, then turn off the engine. To
change the bulb on the passenger’s
side, turn the steering wheel to the
lef t.
Use a f lat-tipped screwdriver to
remove the two holding clips f rom
the inner f ender, and pull the inner
f ender cover back.
Remove the bulb by turning it one-
quarter turn counterclockwise. Push the electrical connector back
onto the bulb. Make sure it is on
all the way.
Insert the new bulb into the hole,
and turn it one-quarter turn
clockwise to lock it in place.
Turn on the headlights to test the
new bulb.
Remove the electrical connector
f rom the bulb by pushing on the
tab and pulling the connector
down.
2. 3.
2.
4. 5.6. 7.
1.
CONT INUED
Lights
L ow Beam Headlight
Maint enance
245
TAB HOLDING CLIP
BULB
�����—�����—�����y���
��
��������y���
�(�#���������y���������y
Page 336 of 413
To change the bulb on the driver’s
side, start the engine, turn the
steering wheel all the way to the
right, then turn off the engine. To
change the bulb on the passenger’s
side, turn the steering wheel to the
lef t.
Reinstall the inner f ender cover.
Then reinstall the holding clips,
andlocktheminplacebypushing
on their centers.
Insert the new bulb into the hole,
and turn it one-quarter turn
clockwise to lock it in place.
Push the electrical connector back
onto the bulb. Make sure it is on
all the way.
Turn on the headlights to test the
new bulb.
Remove the electrical connector
f rom the bulb by pushing on the
tab and pulling the connector
down.
Remove the bulb by turning it one-
quarter turn counterclockwise. 5. 6.
1.
7. 8.
3. 4.
Lights
Replacing the Front Side Marker/
Parking/Turn Signal Light Bulb
246
TAB HOLDING CLIP
SOCKET
�����—�����—�����y���
��
��������y���
�(�#���������y�������
�y
Page 350 of 413

Themileageyoucanexpectfrom
yourvehicletiresisthesameas
comparable mid-and rear-engine
sports cars, and it will vary greatly
with your driving habits.
If you drive moderately, the f ront
tires could last more than 10,000
miles (16,000 km). However, the
mileage will be substantially less if
you tend to drive your vehicle at the
upper limits of its capabilities.
You should caref ully inspect your
vehicle’s tires f or wear, damage, and
proper inf lation every 7,500 miles
(12,000 km).Replace your tires with radial tires of
the same size, load range, speed
rating, and maximum cold tire
pressure rating (as shown on the
tire’s sidewall).
Mixing radial and bias-ply tires on
your vehicle can reduce braking
ability, traction, and steering
accuracy. Using tires of a dif f erent
size or construction can cause the
ABS and vehicle stability assist
system (VSA) to work inconsistently.
It is best to replace all f our tires at
thesametime.If thatisnotpossible
or necessary, replace the two f ront
tires or two rear tires as a pair.
Replacing just one tire can seriously
af f ect your vehicle’s handling.The ABS and VSA system work by
comparing the speed of the wheels.
When replacing tires, use the same
size originally supplied with the
vehicle. Tire size and construction
can af f ect wheel speed and may
cause the ABS or VSA system to
activate.
Replacement wheels are available at
your dealer.
If you ever replace a wheel, make
sure that the wheel’s specif ications
match those of the original wheels.
Also be sure you use only TPMS
specif ic wheels (if equipped). If you
do not, the tire pressure monitoring
system will not work.
CONT INUED
Tires
Replacing T ires and Wheels
Maint enance
259
�����—�
���—�����y�
����
��������y���
�(�#���������y���������y
Page 374 of 413
The under-hood f use box is on the
driver’s side, next to the brake f luid
reservoir. To open it, push the tabs
as shown.If something electrical in your
vehicle stops working, the first thing
youshouldcheckforisablownfuse.
Determine f rom the chart on pages
and , or the diagram on the
f use box lid, which f use or f uses
control that device. Check those
f uses f irst, but check all the f uses
bef ore deciding that a blown f use is
the cause. Replace any blown f uses,
and check if the device works.
Thefusesareintwofuseboxes.The
interior f use box is underneath the
steering column. 284 285
Fuses
Checking and Replacing Fuses
280
INTERIOR
UNDER-HOOD
TAB
FUSE LABEL
�����—�����—�����y���
�����������y���
�(�#���������y���������y