Page 190 of 413
�Î�Î
�Î
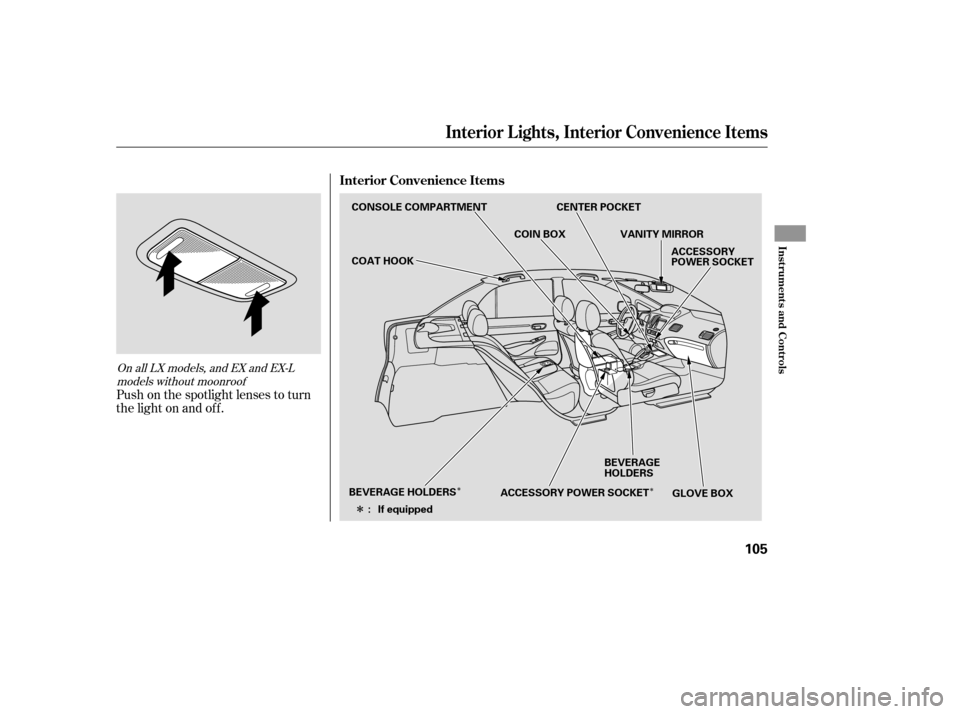
Push on the spotlight lenses to turn
the light on and of f .
On all LX models, and EX and EX-L models without moonroof
Interior Convenience Items
Interior L ights, Interior Convenience Items
Inst rument s and Cont rols
105
CONSOLE COMPARTMENT CENTER POCKET
COAT HOOK
GLOVE BOX
ACCESSORY
POWER SOCKET
BEVERAGE
HOLDERS
BEVERAGE HOLDERS ACCESSORY POWER SOCKETVANITY MIRROR
COIN BOX
If equipped
:
�����—�����—�����y�������������
�y���
�(�#���������y���
�
���y
Page 191 of 413

Be caref ul when you are using the
beverage holders. A spilled liquid
that is very hot can scald you or your
passengers. Spilled liquids can
damage the upholstery, carpeting,
and electrical components in the
interior.To close, lower the lid, and push it
down until it latches.
To open the console compartment,
pull up on the lever, and lif t the lid.
Open the f ront beverage holder by
sliding its cover backward.
The rear seat also has a beverage
holder in the center armrest. To use
it, pivot the armrest down.
This socket is intended to supply
power f or 12 volt DC accessories
that are rated 120 watts or less (10
amps). It will not power an
automotive type cigarette lighter
element.
To use an accessory power socket,
the ignition switch must be in the
ACCESSORY (I) or ON (II) position. Open the glove box by pulling the
handle to the lef t. Close it with a f irm
push.
The EX, EX-L, and Si models have
another accessory power socket in
the center console compartment.
When more than one socket is being
used, the combined power rating of
the accessories should be 120 watts
or less (10 amps).
If equipped
Beverage Holders
Console Compartment
A ccessory Power Socket Glove Box
Interior Convenience Items
106
LEVER
ACCESSORY
POWER SOCKET CONSOLE
COMPARTMENT
An open glove box can cause
serious injury to your passenger
inacrash,evenifthe
passenger is wearing the seatbelt.
Always keep the glove box
closed while driving.
�����—�����—�����y���������������y���
�(�#���������y���
�
�
�y
Page 203 of 413

�µ�µ
�µ
These two
modes adjust the strength of the
sound coming f rom each speaker.
BALANCE adjusts the side-to-side
strength, while FADER adjusts the
front-to-back strength. You can use the instrument panel
brightness control buttons to adjust
the illumination of the audio system
(see page ). The audio system
illuminates when the parking lights
are on, even if the radio is of f .
The SVC
mode controls the volume based on
vehicle speed. The f aster you go, the
louder the audio volume becomes.
As you slow down, the audio volume
decreases.
The SVC has f our modes; SVC OFF,
SVC LOW, SVC MID, and SVC
HIGH. The def ault setting is MID.
Turn the SOUND (TUNE) knob to
adjust the setting to your liking.
If you f eel the sound is too loud,
choose low. If you f eel the sound is
too quiet, choose high.
Use the TREBLE/
BASS modes to adjust the tone to
your liking.
73
Balance/Fader A udio System L ighting
Speed-sensitive volume
compensation (SVC)
Treble/Bass
Audio System (Models without navigation system)
118
�����—�����—�����y���������������y���
�(�#���������y���
�����y
Page 228 of 413
. The audio system
illuminates when the parking lights
are on, even if the radio")
You can use the instrument panel
brightness control buttons to adjust
the illumination of the audio system
(see page ). The audio system
illuminates when the parking lights
are on, even if the radio is of f .
You can select the background
screen to display the sound level.
There are three screen modes: level
(the sound level is shown with the
vertical bars), spectrum analysis (the
sound level appears as ripples of
water), and off. Each time you touch
the background icon, the display
changes.
The system will return to the audio
display about 5 seconds af ter you
stop adjusting a mode.
You can also select the icon with the
joystick. Move it up and down to
move the highlighting and scroll
through lists. Select the icon, then
move the joystick to lef t or right to
change the setting.
This f unction is set to MID as the
def ault setting when the vehicle
leaves the f actory. If you f eel the
sound is too loud, choose low. If you
f eel the sound is too quiet, choose Hi.
73
A udio System L ighting
Audio System (Models with navigation system)
Screen Mode
Features
143
�����—�����—�����y���
����
��
���y���
�(�#���������y���
�����y
Page 232 of 413

�µ�µ
Push the AUDIO button beside the
screen to show the audio display and
operate the disc player.
You can also operate the audio
system without using the control
icons on the audio screen. Press the
CD button. The status bar appears
on the bottom of the screen. On the
navigation screen, you can see the
audio inf ormation whenever you
touch the AUDIO INFO icon on the
lower portion of the screen.
When playing a CD recorded with
text data, the track, album, and artist
name are shown on the audio display.
When playing a disc in MP3 or WMA,
the f older number and name, the f ile
number and name, the artist name,
and the elapsed time are shown. The
system will continuously play a disc
until you change modes. If the disc
was not recorded with text data, it
will not be displayed. You can also select an icon with the
joystick. Move it to left, right, up, or
down to change the highlighting and
scroll through lists. Then press the
ENT on the top of the joystick to
select the icon.
Each time you press and
release (preset 6), the player
skips forward to the beginning of the
next track (f ile in MP3 or WMA
mode). Press and release (preset 5), to skip backward to
the beginning of the current track.
Press it again to skip to the
beginning of the previous track.
You can use the preset buttons while
a disc is playing to select passages
and change tracks (files in MP3 or
WMA mode). Each preset button’s
f unction is shown on the bottom of
the screen. To move rapidly within
a track/f ile, press and hold (preset 4) or (preset 3).
CONT INUED
Audio System (Models with navigation system)
T o Change or Select T racks/Files
SK IP
FF/REWFeatures
147
PRESET BUTTONS
PRESET BUTTON’S FUNCTION
�����—�����—�����y���
����
������y���
�(�#���������y���
�����y
Page 235 of 413
. Press
the disc eject button ( ) to
remove the disc. If you eject the disc,
but do not remov")
�Û�ÝTo remove a disc f rom the audio unit,
f old back the screen by pressing the
OPEN button (see page ). Press
the disc eject button ( ) to
remove the disc. If you eject the disc,
but do not remove it f rom the slot,
the system will automatically reload
it af ter 10 seconds and put it in pause
mode. To begin playing, press the
CD button.
To return the screen to the upright
position, press the CLOSE button.
When playing a CD recorded with
text data, each track name is shown
on the audio display. With a disc
recorded in MP3 or WMA, the f older
number and the location are also
displayed.
You cannot close the screen if a disc
is partially inserted into its slot.
You can also eject the disc when the
ignition switch is of f .
If the disc was not recorded with text
data, only the track number is shown.
To scroll through the display, touch
the or icononthesideof the
screen.Togobacktotheprevious
display, touch the Return icon on the
screen.
Select the desired track/f ile by
touching the icon on the display. The
selected icon will be highlighted in
blue. The system begins to play the
selected track/f ile. With a disc in
MP3 or WMA, touch the f older icon
on the upper lef t of the screen to
move to the parent folder. The
current f older is highlighted in blue. To play the radio when a disc is
playing, press the AM/FM button or
touch the FM1, FM2, AM, XM1, or
XM2 icon. If a PC card is in the audio
unit, touch the CARD icon to play
the PC card. Press the CD button
again or touch the CD icon to switch
back to the disc player.
If you turn the system of f while a
disc is playing, either with the
power/volume knob or by turning
of f the ignition switch, the disc will
stay in the drive. When you turn the
system back on, the disc will begin
playing where it lef t of f .
146
Audio System (Models with navigation system)
Removing a DiscTo Stop Playing a Disc
150
�����—�����—�����y���
�������
���y���
�(�#���������y���
�����y
Page 239 of 413
 or ON (II)
posi")
�µ �µ �µ �µ
You operate the PC card player with
the same controls used f or the radio
and the disc player. To load or play a
card, the ignition switch must be in
the ACCESSORY (I) or ON (II)
position.
The PC card player reads and plays
cards in MP3 or WMA f ormats.
Depending on the f ormat, the screen
will indicate ‘‘MP3’’ or ‘‘WMA’’ when
a card is playing. The card limit of
the player is 99 f olders and 999
tracks. If the card has a complex
structure, it takes some time f or the
system to begin playing it.
Based on PCMCIA 2.1/JEIDA 4.2,
the recommended PC cards f or the
PC card reader are: Always use the recommended
memory card with the appropriate
adapter (if an adapter is needed).
Some memory cards will not work in
this unit.
When you insert a PC card into
the slot, make sure you put it in
straight. If you cannot insert it,
remove it, and insert again.
Do not keep PC cards in the
vehicle. Direct sunlight and high
heat will damage them.
To avoid damaging the card
reader, do not insert hard disc
drive cards into the PC card slot.
You cannot close the screen
(move it to the upright position)
until the PC card is inserted all the
way into its slot or removed. Never insert f oreign objects into
the PC card slot.
The specif ications f or compatible
MP3 f iles are:
Compatible with variable bit rate
and multi-session
Maximum layers
(including ROOT): 8 layers
SD memory card
CompactFlash
Flash ATA Sampling f requency:
32/44.1/48 kHz (MPEG1)
24/22.05/16 kHz (MPEG2)
Bit rate:
32/40/48/56/64/80/96/112/128/
160/192/224/256/320 kbps
(MPEG1)
8/16/24/32/40/48/56/64/80/96/
112/128/160 kbps (MPEG2)
Audio System (Models with navigation system)
To Play a PC card
154
NOTE:
�����—�����—�����y���
�����������y���
�(�#���������y���
�����y
Page 241 of 413
Therearethreeplaymodes:Folder,
Artist, and Album. Touch the PLAY
MODE icon, then choose one of the
modes by touching its icon. When a
mode is selected, it is highlighted in
blue.
If play mode information was not
includedinthetrackswhenthey
were added to the card, it will not be
displayed on the screen.Foldermodeplaystracksinthe
order they were added to the card.
Artistmodeplaystracksin
alphabetical order, by artist and
song title.
Album mode plays albums
(f olders) in alphabetical order.
Audio System (Models with navigation system)
T o Select a Play Mode
156
FOLDER MODE
MODE INDICATOR
PLAY MODE ICON
PLAY MODE ICON PLAY MODE ICON
MODE INDICATOR MODE INDICATOR
ARTIST MODE ALBUM MODE
�����—�����—�����y���
�����������y���
�(�#���������y���
���
�y