Page 136 of 413

When you press the hazard warning
button, both turn signal indicators
and all turn signals on the outside of
the vehicle f lash.If this indicator comes on when the
ignition switch is turned to the ON
(II) position and the parking brake is
released, it means there is a problem
in the circuit. Have your vehicle
checked by your dealer.
This indicator comes on with the
high beam headlights. For more
inf ormation, see page .
This indicator also comes on with
reduced brightness when the
daytime running lights (DRL) are on
(see page ).This indicator reminds you that the
exterior lights are on. It comes on
when the light switch is in either the
or position. If you turn the
ignition switch to the ACCESSORY
(I) or the LOCK (0) position without
turning of f the light switch, this
indicator will remain on. A reminder
chime will also sound when you open
the driver’s door and remove the key
from the ignition switch.
The lef t or right turn signal indicator
blinks when you signal a lane change
or turn. If an indicator does not blink
or blinks rapidly, it usually means
one of the turn signal bulbs is
burned out (see pages and ).
Replace the bulb as soon as possible,
since other drivers cannot see that
you are signaling.
This indicator comes on if the trunk
lid is not closed tightly.
This indicator comes on if any door
is not closed tightly.
247
246
72
73
Turn Signal and
Hazard Warning
Indicators
Lights On Indicator
‘‘Daytime Running
Lights’’ Indicator
High Beam Indicator
Trunk-open Indicator
Door-open Indicator
Instrument Panel Indicators
Inst rument s and Cont rols
61
�����—�����—�����y���������������y���
�(�#���������y���������y
Page 146 of 413
�Î
�Î
�Î �Î �Î
�Î
�Π��ΠOnly on vehicles equipped with navigation system. Ref er to the navigati on system manual.
To use the horn, press the center pad of the steering wheel.
If equipped
1:2:3:
Controls Near the Steering Wheel
70
HEADLIGHTS/
TURN SIGNALS
HAZARD WARNING
BUTTON
PASSENGER AIRBAG
OFF INDICATOR
SEL/RESET BUTTON WINDSHIELD
WIPERS/WASHERS
INSTRUMENT PANEL BRIGHTNESS
DISPLAY CHANGE BUTTON
REAR WINDOW
DEFOGGER
(P. 73)
(P. 66)
(P. 66)
(P. 74)
(P. 74)
(P. 30)
(P. 72)
(P. 71)
STEERING WHEEL
ADJUSTMENT HORN
(P. 75)
Vehicle with navigation system is shown. HOOD RELEASE HANDLE
(P. 182)VEHICLE STABILITY ASSIST
(VSA) SYSTEM OFF SWITCH
REMOTE AUDIO CONTROLS
VOICE CONTROL SWITCHES HEATED MIRRORS
(P. 211)
(P. 171)
(P. 103)CRUISE CONTROL
BUTTONS
(P. 176)
1
2
2 3 2
2
�����—�����—�����y��������
������y���
�(�#���������y���������y
Page 150 of 413

Make sure the rear window is clear
and you have good visibility bef ore
starting to drive.
The def ogger and antenna wires on
the inside of the rear window can be
accidentally damaged. When
cleaning the glass, always wipe side-
to-side.
The rear window def ogger will clear
fog, frost, and thin ice from the
window. Push the def ogger button to
turn it on and off. The indicator in
the button comes on to show the
def ogger is on. If you do not turn it
of f , the def ogger will shut itself of f
af ter about 15 minutes. It also shuts
of f when you turn of f the ignition
switch. You have to turn the
def ogger on again when you restart
the vehicle.
Pushthebuttontoturnonthe
hazard warning lights (f our-way
flashers). This causes all four
outside turn signals and both turn
indicators in the instrument panel to
f lash. Use the hazard warning lights
if you need to park in a dangerous
area near heavy traffic, or if your
vehicle is disabled.
Pushing this button also turns the
mirror heaters on or of f . For more
inf ormation, see page .
103
On All EX-L, Canadian LX, EX, and Si
models
Hazard Warning Button, Rear Window Def ogger
Rear Window Def ogger
Hazard Warning Button
74
EX-L,
Canadian
LX, EX,
and Si
�����—�����—�����y�
�������������y���
�(�#���������y���������y
Page 173 of 413
�µ
See pages f or important saf ety
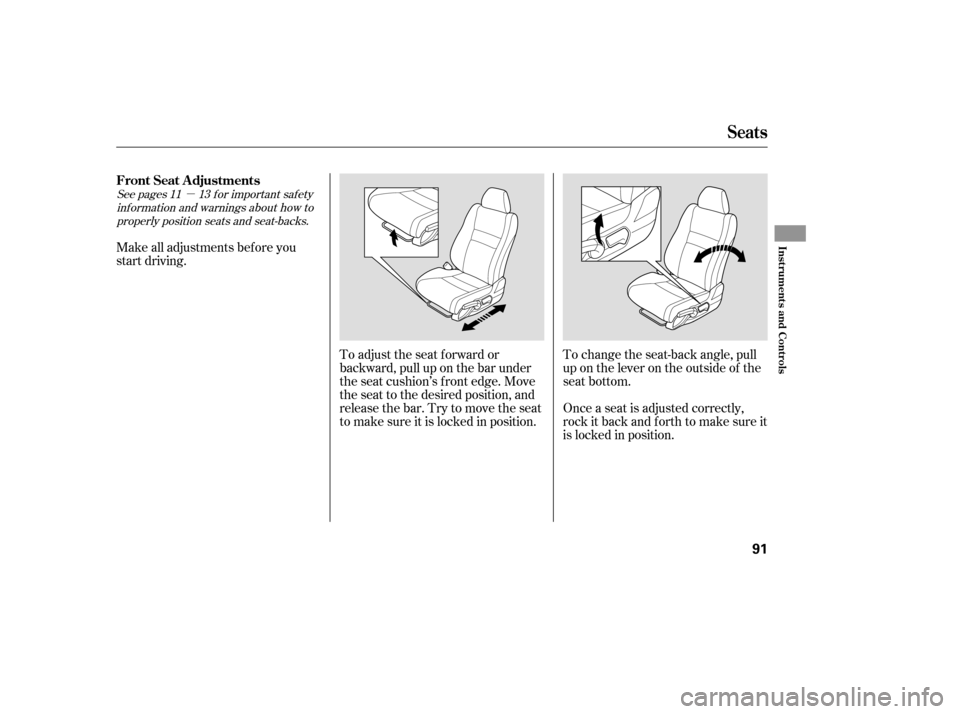
inf ormation and warnings about how toproperly position seats and seat-backs. 11 13
Make all adjustments bef ore you
start driving.
To adjust the seat f orward or
backward, pull up on the bar under
the seat cushion’s f ront edge. Move
the seat to the desired position, and
releasethebar.Trytomovetheseat
to make sure it is locked in position.Once a seat is adjusted correctly,
rock it back and f orth to make sure it
is locked in position.
To change the seat-back angle, pull
up on the lever on the outside of the
seat bottom.
FrontSeatAdjustments
Seats
Inst rument s and Cont rols
91
�����—�����—�����y���������������y���
�(�#���������y���������y
Page 174 of 413
See page f or important saf etyinf ormation and a warning aboutimproperly positioning head restraints. 13
The height of your driver’s seat is
adjustable. To raise the seat,
repeatedly pull up the lever on the
outside of the seat cushion. To lower
the seat, push the lever down
repeatedly. Your vehicle is equipped with head
restraints in all seating positions to
help protect you and your
passengers f rom whiplash and other
injuries.
They are most ef f ective when you
adjust them so the center of the back
of the occupant’s head rests against
the center of the restraint.
Driver’s Seat Height Adjustment Head Restraints
Seats
92
�����—�����—�����y�����������
���y���
�(�#���������y���������y
Page 355 of 413

�µIf your vehicle’s battery is
disconnected, or goes dead, the
audio system will disable itself . The
nexttimeyouturnontheradio,you
may see ‘‘CODE’’ in the f requency
display. Use the preset buttons to
enter the code (see page ).
The navigation system will also
disableitself.Thenexttimeyouturn
on the ignition switch, the system
will require you to enter a PIN
bef ore it can be used. Ref er to the
navigation system manual.
If you need to connect the battery to
a charger, disconnect both cables to
prevent damaging your vehicle’s
electrical system. Always disconnect
the negative ( ) cable first, and
reconnect it last.
If additional battery maintenance is
needed, see your dealer or a
qualif ied technician.
Battery posts,
terminals, and related accessories
contain lead and lead compounds. 173
On vehicles with navigation system
WARNING:
Wash your hands af ter handling.
Checking the Battery
262
The battery gives off explosive
hydrogen gas during normaloperation.
A spark or flame can cause the
battery to explode with enough
force to kill or seriously hurt you.
Wear protective clothing and a
face shield, or have a skilled
technician do the batterymaintenance.
�����—�����—�����y���
��
��������y���
�(�#���������y���������y
Page 359 of 413
 position. Have all
passengers get out of the vehicle
while you change the tire.
Park the vehicle on f irm, level, and
n")
Turn on the hazard warning lights,
and turn the ignition switch to the
LOCK (0) position. Have all
passengers get out of the vehicle
while you change the tire.
Park the vehicle on f irm, level, and
non-slippery ground. Put the
transmission in Park (automatic)
or reverse (manual). Apply the
parking brake.
Open the trunk. Raise the trunk
f loor by lif ting up on the back edge.
Take the tool case out of the spare
tire.
Unscrew the wing bolt, and take
the spare tire out of its well.
If you have a f lat tire while driving,
stop in a saf e place to change it.
Drive slowly along the shoulder until
you get to an exit or an area to stop
that is far away from the traffic lanes.
Thecompactsparetireissmaller
than a standard tire, and it will affect
the vehicle’s handling. Drive
cautiously when the spare is
mounted on your vehicle.
Thesizedifferencemayalsocause
damage to the dif f erential, so do not
mount the compact spare on the
f ront. If either f ront tire goes f lat,
removethereartireonthatsame
side, mount the compact spare tire
on the rear, then mount the rear tire
on the f ront.
5.
4.
3.
2.
1.
CONT INUED
On Si model only
Changing a Flat T ire
T aking Care of t he Unexpect ed
267
SPARE TIRE
TRUNK FLOOR JACK TOOL CASE
The vehicle can easily roll off
the jack, seriously injuring
anyone underneath.
Follow the directions for
changing a tire exactly, and
never get under the vehicle
when it is supported only by thejack.
�����—�����—�����y���
��
����
���y���
�(�#���������y���������y
Page 368 of 413

CONT INUED
Once your vehicle is running,
disconnect the negative cable f rom
your vehicle, then f rom the
booster battery. Disconnect the
positive cable f rom your vehicle,
then from the booster battery.
Keep the ends of the jumper cables
away from each other and any metal
on the vehicle until everything is
disconnected. Otherwise, you may
cause an electrical short. If the vehicle overheats, you
should take immediate action. The
only indication may be the
temperature gauge climbing to or
above the red mark. Or you may
see steam or spray coming f rom
under the hood. Saf ely pull to the side of the road.
Put the transmission in neutral
(M/T) or Park (A/T), and set the
parking brake. Turn of f all
accessories, and turn on the
hazard warning indicators.
If you see steam and/or spray
coming f rom under the hood, turn
of f the engine. Wait until you see
no more signs of steam or spray,
then open the hood.
The reading of the vehicle’s
temperature gauge should stay in
the midrange. If it climbs to the red
mark, you should determine the
reason (hot day, driving up a steep
hill, etc.).
7.
1. 2.
Jump Start ing, If t he Engine Overheat s
If the Engine Overheats
T aking Care of t he Unexpect ed
275
Steam and spray from an
overheated engine can
seriously scald you.
Do not open the hood if steam
is coming out.
Driving with the temperature gauge
reading at the red mark can cause
serious damage to the engine.
�����—�����—�����y���
��
��������y���
�(�#���������y���������y