Page 123 of 413

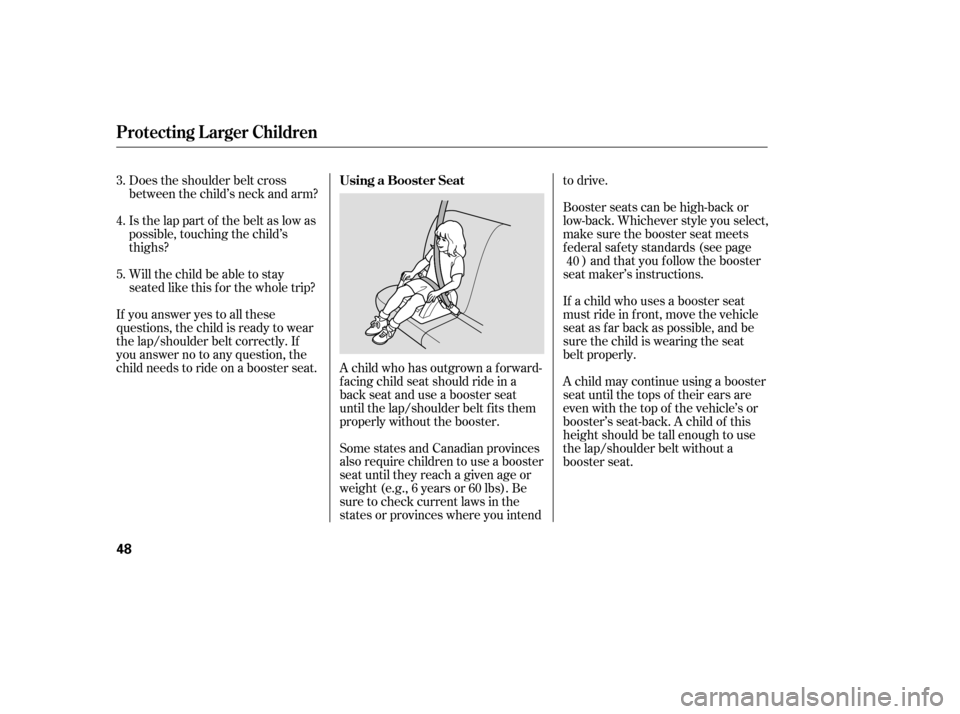
A child who has outgrown a forward-
f acing child seat should ride in a
back seat and use a booster seat
until the lap/shoulder belt f its them
properly without the booster.
Some states and Canadian provinces
also require children to use a booster
seat until they reach a given age or
weight (e.g., 6 years or 60 lbs). Be
sure to check current laws in the
states or provinces where you intendto drive.
Does the shoulder belt cross
between the child’s neck and arm?
Is the lap part of the belt as low as
possible, touching the child’s
thighs?
Will the child be able to stay
seated like this f or the whole trip?
If you answer yes to all these
questions, the child is ready to wear
the lap/shoulder belt correctly. If
you answer no to any question, the
child needs to ride on a booster seat. Booster seats can be high-back or
low-back. Whichever style you select,
make sure the booster seat meets
f ederal saf ety standards (see page
) and that you f ollow the booster
seat maker’s instructions.
If a child who uses a booster seat
must ride in f ront, move the vehicle
seat as far back as possible, and be
sure the child is wearing the seat
belt properly.
A child may continue using a booster
seat until the tops of their ears are
even with the top of the vehicle’s or
booster’s seat-back. A child of this
height should be tall enough to use
the lap/shoulder belt without a
booster seat.
3. 4. 5.
40
Using a Booster Seat
Protecting L arger Children
48
�����—�����—�����y���������������y���
�(�#���������y���������y
Page 124 of 413

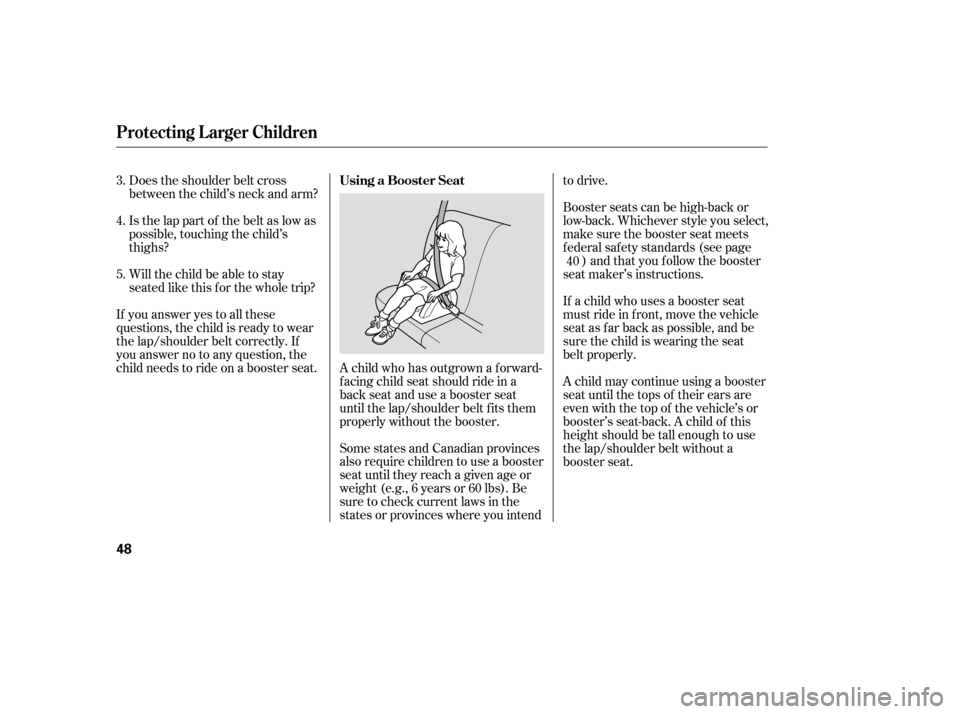
A child who has outgrown a forward-
f acing child seat should ride in a
back seat and use a booster seat
until the lap/shoulder belt f its them
properly without the booster.
Some states and Canadian provinces
also require children to use a booster
seat until they reach a given age or
weight (e.g., 6 years or 60 lbs). Be
sure to check current laws in the
states or provinces where you intendto drive.
Does the shoulder belt cross
between the child’s neck and arm?
Is the lap part of the belt as low as
possible, touching the child’s
thighs?
Will the child be able to stay
seated like this f or the whole trip?
If you answer yes to all these
questions, the child is ready to wear
the lap/shoulder belt correctly. If
you answer no to any question, the
child needs to ride on a booster seat. Booster seats can be high-back or
low-back. Whichever style you select,
make sure the booster seat meets
f ederal saf ety standards (see page
) and that you f ollow the booster
seat maker’s instructions.
If a child who uses a booster seat
must ride in f ront, move the vehicle
seat as far back as possible, and be
sure the child is wearing the seat
belt properly.
A child may continue using a booster
seat until the tops of their ears are
even with the top of the vehicle’s or
booster’s seat-back. A child of this
height should be tall enough to use
the lap/shoulder belt without a
booster seat.
3. 4. 5.
40
Using a Booster Seat
Protecting L arger Children
48
�����—�����—�����y���������������y���
�(�#���������y���������y
Page 174 of 413
See page f or important saf etyinf ormation and a warning aboutimproperly positioning head restraints. 13
The height of your driver’s seat is
adjustable. To raise the seat,
repeatedly pull up the lever on the
outside of the seat cushion. To lower
the seat, push the lever down
repeatedly. Your vehicle is equipped with head
restraints in all seating positions to
help protect you and your
passengers f rom whiplash and other
injuries.
They are most ef f ective when you
adjust them so the center of the back
of the occupant’s head rests against
the center of the restraint.
Driver’s Seat Height Adjustment Head Restraints
Seats
92
�����—�����—�����y�����������
���y���
�(�#���������y���������y
Page 175 of 413

CONT INUED
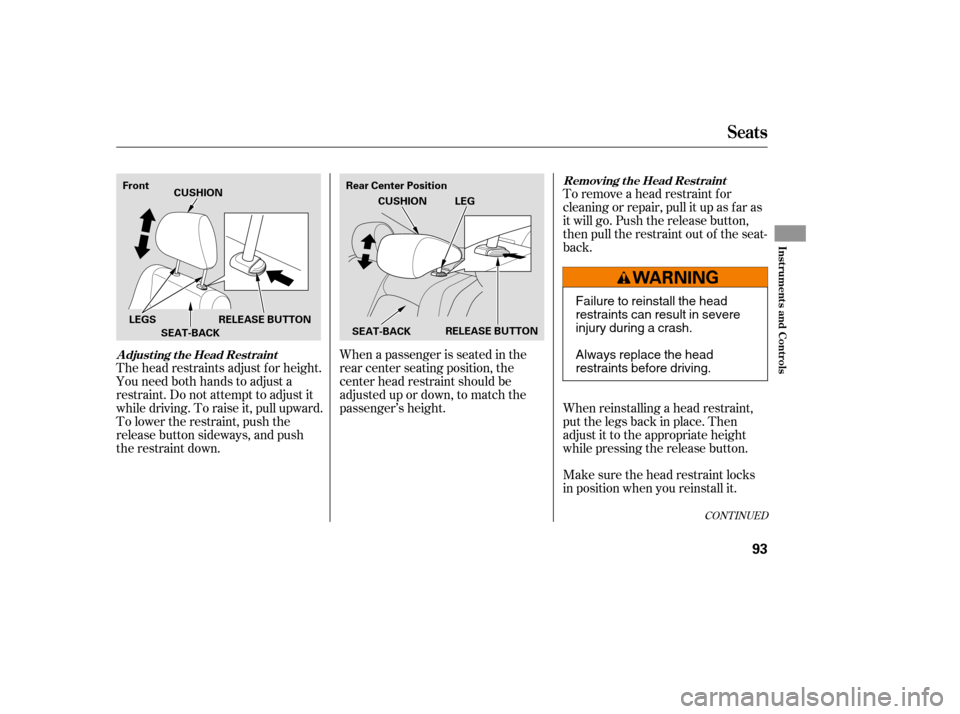
To remove a head restraint f or
cleaning or repair, pull it up as f ar as
it will go. Push the release button,
then pull the restraint out of the seat-
back.
When reinstalling a head restraint,
put the legs back in place. Then
adjust it to the appropriate height
while pressing the release button.
Make sure the head restraint locks
in position when you reinstall it.
When a passenger is seated in the
rear center seating position, the
center head restraint should be
adjusted up or down, to match the
passenger’s height.
The head restraints adjust f or height.
You need both hands to adjust a
restraint. Do not attempt to adjust it
while driving. To raise it, pull upward.
To lower the restraint, push the
release button sideways, and push
the restraint down.
Seats
Removing t he Head Rest raint
A djust ing t he Head Rest raint
Inst rument s and Cont rols
93
Rear Center Position
Front
RELEASE BUTTON
SEAT-BACK CUSHION
LEGS RELEASE BUTTON SEAT-BACKCUSHION
LEG
Failure to reinstall the head
restraints can result in severe
injury during a crash.
Always replace the head
restraints before driving.
�����—�����—�����y�������������
�y���
�(�#���������y���������y
Page 307 of 413

The added weight, length, and
height of a trailer will af f ect your
vehicle’s handling and perf ormance,
so driving with a trailer requires
some special driving skills and
techniques.
Foryoursafetyandthesafetyof
others,taketimetopracticedriving
maneuvers bef ore heading f or the
open road, and f ollow the guidelines
below.
Drive slower than normal in all
driving situations, and obey posted
speed limits f or vehicles with trailers.
If you have an automatic
transmission, use D position when
towing a trailer on level roads. D is
the proper shif t lever position to use
when towing a trailer in hilly terrain.
(See ‘‘ ’’ in the next
column f or additional gear
inf ormation.)Maketurnsmoreslowlyandwider
than normal. The trailer tracks a
smaller arc than your vehicle, and it
canhitorrunoversomethingthe
vehicle misses. Allow more time and
distance f or braking. Do not brake or
turn suddenly as this could cause the
trailer to jackknif e or turn over.
When climbing hills, closely watch
your temperature gauge. If it nears
the red (Hot) mark, turn the air
conditioning of f , reduce speed and, if
necessary, pull to the side of the
road to let the engine cool.
If the automatic transmission shifts
f requently while going up a hill, shif t
to D .
If youmuststopwhenfacinguphill,
use the f oot brake or parking brake.
Do not try to hold the vehicle in
place by pressing on the accelerator,
as this can cause the automatic
transmission to overheat.
When driving down hills, reduce
your speed, and shif t down to second
gear. Do not ‘‘ride’’ the brakes, and
remember, it will take longer to slow
downandstopwhentowingatrailer.
33
Driving Saf ely With a T railer
T owing Speeds and Gears
Driving on Hills Making T urns and Braking
Driving on Hills
Towing a Trailer
220
�����—�����—�����y���
��
�
������y���
�(�#���������y���������y
Page 385 of 413
�Î �Î�Î�Î
�Î �Î
�Î�Î �Î
�Î
�Î�Î
Specif ications
292
Dimensions
Weights Engine
Seating Capacities 176.7 in (4,489 mm)
69.0 in (1,752 mm)
56.5 in (1,435 mm)
106.3 in (2,700 mm)
59.0 in (1,499 mm)
59.9 in (1,522 mm)
Length
Width
Height
Wheelbase
Track
Gross vehicle weight rating See the certification label attached
to the driver’s doorjamb. Type
BorexStroke
Displacement
Compression ratio
Spark plugs
Spark plugsWater cooled 4-stroke
SOHC VTEC , DOHC i-VTEC
4-cylinder gasoline engine
3.19 x 3.44 in (81.0 x 87.3 mm)
3.39x3.39in(86x86mm) 110 cu-in (1,799 cm
)
122 cu-in (1,998 cm)
10.5 11.0
IZFR6K11S
NGK:
DENSO: SKJ20DR-M11S
IFR7G11KSSK22PR-M11S
Total
FrontRear 523
FrontRear
NGK:
DENSO:
1:2: Except SiSi
1 2 12
1 2
12 2
1
�����—�
���—�����y�
�������������y���
�(�#���������y���������y
Page 390 of 413

�µ �µ �µ �µ
�µ �µ �µ �µ �µ �µ �µ
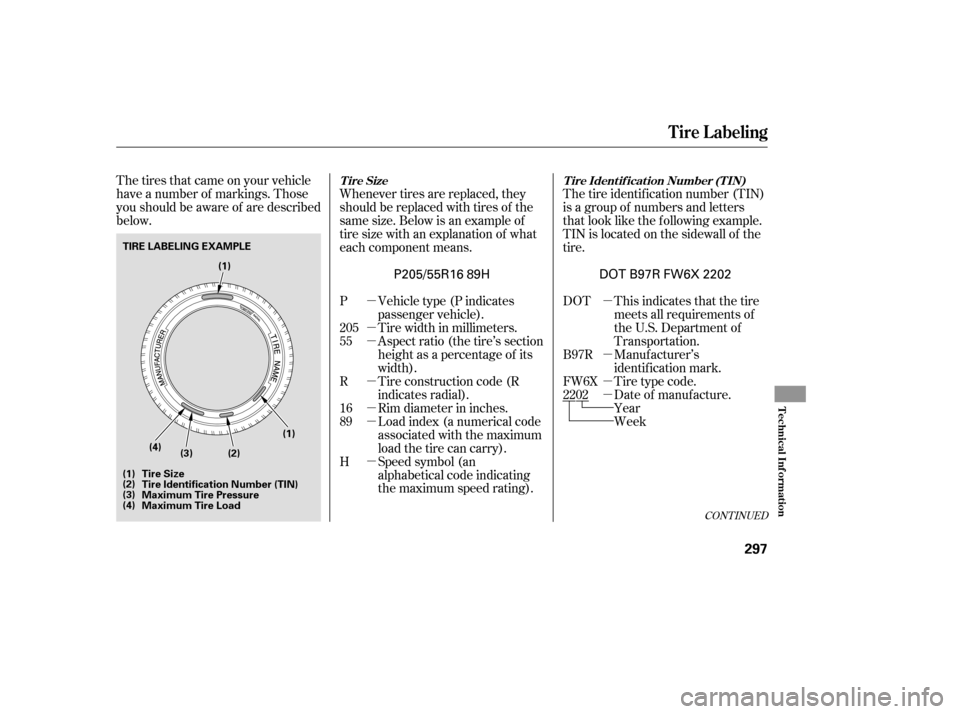
The tires that came on your vehicle
have a number of markings. Those
you should be aware of are described
below.
The tire identif ication number (TIN)
is a group of numbers and letters
that look like the f ollowing example.
TIN is located on the sidewall of the
tire.
This indicates that the tire
meets all requirements of
the U.S. Department of
Transportation.
Manuf acturer’s
identification mark.
Tire type code.
Date of manuf acture.
Whenever tires are replaced, they
should be replaced with tires of the
same size. Below is an example of
tire size with an explanation of what
each component means.
Vehicletype(Pindicates
passenger vehicle).
Tire width in millimeters.
Aspect ratio (the tire’s section
height as a percentage of its
width).
Tire construction code (R
indicates radial).
Rim diameter in inches.
Load index (a numerical code
associated with the maximum
load the tire can carry).
Speed symbol (an
alphabetical code indicating
the maximum speed rating). Year
Week
P 55R 16
DOT B97R
FW6X 2202
205 89 H
CONT INUED
T ire Ident if icat ion Number (T IN)
Tire Size
Tire Labeling
T echnical Inf ormation
297
TIRE LABELING EXAMPLE
(1)
(2)
(3)
(4) Tire Size
Maximum Tire Load
Tire Identification Number (TIN)
Maximum Tire Pressure (3)
(1)
(1)
(2)
(4)
DOT B97R FW6X 2202
P205/55R16 89H
�����—�����—�����y���
�����������y���
�(�#���������y���������y