Page 56 of 303
�Î
�Î
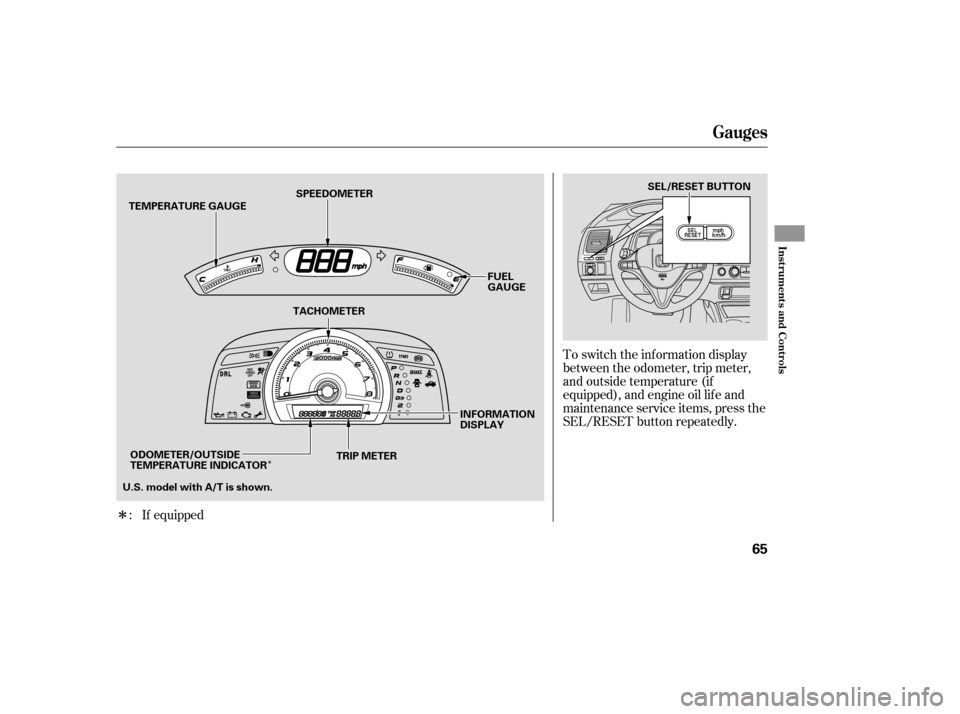
To switch the information display
between the odometer, trip meter,
and outside temperature (if
equipped), and engine oil lif e and
maintenance service items, press the
SEL/RESET button repeatedly.
If equipped
:
Gauges
Inst rument s and Cont rols
65
SPEEDOMETER
TRIP METER INFORMATION
DISPLAYFUEL
GAUGE
TACHOMETER
TEMPERATURE GAUGE
U.S. model with A/T is shown. SEL/RESET BUTTON
ODOMETER/OUTSIDE
TEMPERATURE INDICATOR
�����—�����—�
�
�y�
����
����
���y���
�(�+���������y���������y
Page 64 of 303

positio")
�´�µ
With the headlight switch of f or in
the position, the high beam
headlights and the high beam
indicator come on with reduced
brightness when you turn the
ignition switch to the ON (II)
position and release the parking
brake. They remain on until you turn
the ignition switch of f , even if you
set the parking brake.
The headlights revert to normal
operation when you turn them on
with the switch. The buttons under the lef t side vent
control the brightness of the
instrument panel. Push the or
button to adjust the brightness.
Separate adjustments can be made
when the headlights are on and of f .
There are six brightness levels.
When you push either button, the
inf ormation display indicates the
current level. You will hear a tonewhen you reach the maximum or
minimum brightness. The display
returns to the odometer 5 seconds
af ter you stop adjusting the
brightness.
To reduce glare at night, the
instrument panel illumination dims
when you turn the light switch to the
or position.
The center of each meter (upper and
lower) illuminates with reduced
brightness when you unlock and
open the driver’s door, and then goes
back to the selected brightness when
you turn the ignition switch to the
ON (II) position.
If you insert the key but do not turn
the ignition switch to the ON (II)
position, the illumination turns of f in
about 10 seconds.
Daytime Running L ights Instrument Panel Brightness
Headlights, Instrument Panel Brightness
Inst rument s and Cont rols
73
CONTROL BUTTONS
�����—�����—�
�
�y�
����
����
���y���
�(�+���������y���������y
Page 65 of 303

positio")
�´�µ
With the headlight switch of f or in
the position, the high beam
headlights and the high beam
indicator come on with reduced
brightness when you turn the
ignition switch to the ON (II)
position and release the parking
brake. They remain on until you turn
the ignition switch of f , even if you
set the parking brake.
The headlights revert to normal
operation when you turn them on
with the switch. The buttons under the lef t side vent
control the brightness of the
instrument panel. Push the or
button to adjust the brightness.
Separate adjustments can be made
when the headlights are on and of f .
There are six brightness levels.
When you push either button, the
inf ormation display indicates the
current level. You will hear a tonewhen you reach the maximum or
minimum brightness. The display
returns to the odometer 5 seconds
af ter you stop adjusting the
brightness.
To reduce glare at night, the
instrument panel illumination dims
when you turn the light switch to the
or position.
The center of each meter (upper and
lower) illuminates with reduced
brightness when you unlock and
open the driver’s door, and then goes
back to the selected brightness when
you turn the ignition switch to the
ON (II) position.
If you insert the key but do not turn
the ignition switch to the ON (II)
position, the illumination turns of f in
about 10 seconds.
Daytime Running L ights Instrument Panel Brightness
Headlights, Instrument Panel Brightness
Inst rument s and Cont rols
73
CONTROL BUTTONS
�����—�����—�
�
�y�
����
����
���y���
�(�+���������y���������y
Page 298 of 303

..................................
Maintenance . 223
..................................
Items . 228, 231
........................................
Minder . 225
.................
Minder Indicator . 60, 225
Owner’s Maintenance
...................................
Checks . 230
..........................................
Saf ety . 224
.
Malf unction Indicator Lamp . 57, 282
...................
Manual Transmission . 205
...............
Checking Fluid Level . 243
.......................................
Shif ting . 205
........
Manual Transmission Fluid . 243
....................................
Mats, Floor . 252
...............................
Meters, Gauges . 65
...................
Methanol in Gasoline . 187
........................
Mirrors, Adjusting . 104
...............
Modif ying Your Vehicle . 196
.......................................
Moonroof . 102
................................
MP3 . 131, 151, 160
...................
Neutral Gear Position . 209
..................
New Vehicle Break-in . 186 .....................
Normal Shif t Speeds . 206
...................
NOTICE, Explanation of . i
...............
Numbers, Identif ication . 294
...
Octane Requirement, Gasoline . 186
.........................................
Odometer . 66
...............................
Odometer, Trip . 66
Oil
........................
Change, How to . 236
......................
Change, When to . 225
......................
Checking Engine . 189
..............
Pressure Indicator . 57, 281
Selecting Proper Viscosity
......................................
Chart . 235
...........
ON (Ignition Key Position) . 78
Onboard Ref ueling Vapor
....................................
Recovery . 305
............................
Outside Mirrors . 104
....................
Overheating, Engine . 279
....
Owner’s Maintenance Checks . 230
.........................
Oxygenated Fuels . 187 ..............
Panel Brightness Control . 73
........................
Park Gear Position . 209
...........................................
Parking . 212
...............................
Parking Brake . 105
Parking Brake and Brake
.................
System Indicator . 58, 283
........................
Parking Lights . 72, 249
Parking Over Things that
....................................
Burn . 212, 307
..........................................
PC Card . 159
.............
PC Card Error Messages . 171
.............................
PGM-FI System . 306
........................
Playing a Disc . 130, 150
.........................
Playing a PC Card . 159
...................................
Pollen Filter . 253
..........................
Power Door Locks . 80
......
Power Socket Locations . 106, 108
....................
Power Steering Fluid . 245
............................
Power Windows . 100
.........
Pregnancy, Using Seat Belts . 16
........................
Preparing to Drive . 203
.........
Protecting Adults and Teens . 11
...
Additional Safety Precautions . 16
.....
Advice f or Pregnant Women . 16
Index
N O
P
M
VI
�����—�����—�
�
�y�
�������������y���
�(�+���������y���������y