Page 7 of 303
�Î
�Î
�Î
�Î �Î
�Î
�Î
�Î
If equipped
:
Your Vehicle at a Glance
Your Vehicle at a Glance
3
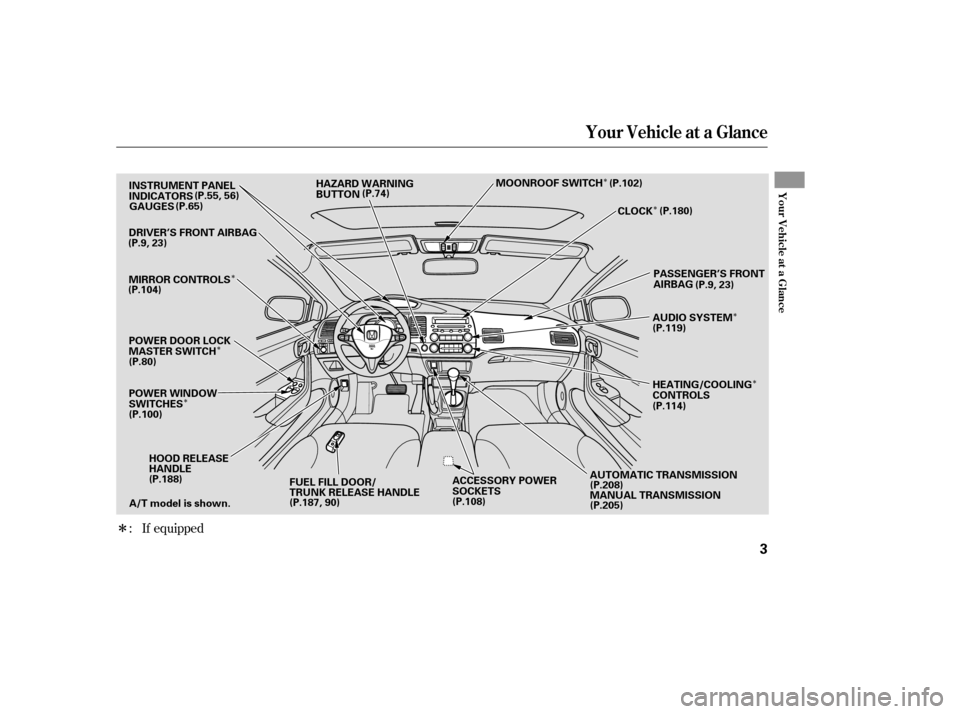
HOOD RELEASE
HANDLE
AUTOMATIC TRANSMISSION
MANUAL TRANSMISSION
GAUGES
INSTRUMENT PANEL
INDICATORS
HAZARD WARNING
BUTTON
(P.9, 23)
(P.9, 23)
ACCESSORY POWER
SOCKETS
DRIVER’S FRONT AIRBAG
FUEL FILL DOOR/
TRUNK RELEASE HANDLE PASSENGER’S FRONT
AIRBAG
A/T model is shown. (P.55, 56)
(P.65)
(P.104) (P.80)
(P.100) (P.188) (P.187, 90) (P.108)(P.208)
(P.205)(P.114)
(P.119)
(P.74)
MIRROR CONTROLS
POWER DOOR LOCK
MASTER SWITCH
POWER WINDOW
SWITCHES HEATING/COOLING
CONTROLS
AUDIO SYSTEM
CLOCK
MOONROOF SWITCH (P.102)
(P.180)
�����—�����—�
�
�y�
�������������y���
�(�+���������y���������y
Page 10 of 303

Your vehicle is equipped with many
features that work together to
protect you and your passengers
during a crash.
However, you and your passengers
can’t take f ull advantage of these
f eatures unless you remain sitting in
a proper position and. In fact, some safety
f eatures can contribute to injuries if
they are not used properly.
The f ollowing pages explain how you
cantakeanactiveroleinprotecting
yourself and your passengers.
Some f eatures do not require any
action on your part. These include a
strong steel f ramework that f orms a
saf ety cage around the passenger
compartment, front and rear crush
zones, a collapsible steering column,
and tensioners that tighten the f ront
seat belts in a crash.
Your Vehicle’s Saf ety Features
always wear
your seat belt s
Driver and Passenger Saf ety
7
(7) (2)
(6)
(4)
(7)
(5)
(2)
(11)
(9)
(10)
(12)
(8)
(1) (3)
(8)
(1) Safety Cage
(2) Crush Zone
(3) Seats and Seat-Backs
(4) Head Restraints
(5) Collapsible Steering Column
(6) Seat Belts
(7) Front Airbags
(8) Side Airbags
(9) Side Curtain Airbags
(10) Front Seat Belt Tensioners
(11) Door Locks
(12) Front Seat Belt Buckle Tensioners
�����—�����—�
�
�y�
�������������y���
�(�+���������y�����
���y
Page 38 of 303

�µ
Children who play in vehicles can
accidentally get trapped inside.
Teach your children not to play in
or around vehicles. Know how to
operate the emergency trunk
opener and decide if your children
should be shown how to use this
feature(seepage ).Even very young
children learn how to unlock
vehicle doors, turn on the ignition
switch, and open the trunk, which
can lead to accidental injury or
death.
For example, infants and small
childrenleftinavehicleonahot
day can die f rom heatstroke. A
child lef t alone with the key in the
ignition switch can accidentally set
the vehicle in motion, possibly
injuring themselves or others. Leaving children without
adult supervision is illegal in most
states and Canadian provinces,
and can be very hazardous. If a child wraps a loose
seat belt around their neck, they
can be seriously or f atally injured.
(See pages and f or how to
activate and deactivate the
lockable retractor.) 43 44
91
Protecting Children General Guidelines
Lock both doors and the trunkwhen your vehicle is not in use.
K eep vehicle keys/remot etransmitters out of the reach ofchildren.
Do not leave children alone in a
vehicle.
Make sure any unused seat belt
t hat a child can reach is buckled,the lockable retractor is activated,
and the belt is f ully retracted and locked.
36
�����—�����—�
�
�y�
����
����
���y���
�(�+���������y�������
�y
Page 53 of 303
�Î
�Î
�Î
�Î
�Î �Î�Î
�Î
If equipped
:
Control L ocations
54
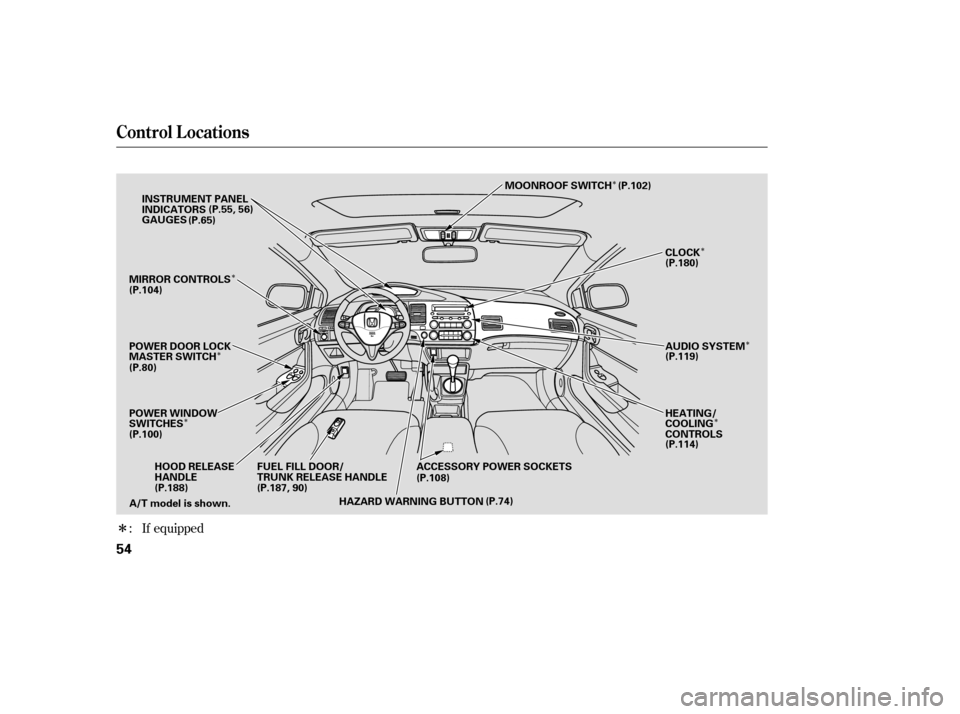
A/T model is shown. INSTRUMENT PANEL
INDICATORS
ACCESSORY POWER SOCKETS
HOOD RELEASE
HANDLE FUEL FILL DOOR/
TRUNK RELEASE HANDLE
HAZARD WARNING BUTTON
GAUGES
(P.55, 56)
(P.65)
(P.104)
(P.80)
(P.100) (P.188) (P.187, 90) (P.108)
(P.74) (P.114)
(P.119)
(P.180)
MOONROOF SWITCH
MIRROR CONTROLS
POWER DOOR LOCK
MASTER SWITCH
POWER WINDOW
SWITCHES HEATING/COOLING
CONTROLS
AUDIO SYSTEM
CLOCK
(P.102)
�����—�����—�
�
�y�
����
��������y���
�(�+���������y���������y
Page 54 of 303
 indicator (see page 60 ) next to the immobilizer system indicator.
The U.S. instrument panel is shown. Dif")
�Î
�Î
�Î
�Î
CONT INUED
Canadian DX-G model with M/T has the electric power steering (EPS) indicator (see page 60 ) next to the immobilizer system indicator.
The U.S. instrument panel is shown. Dif f erences f or Canadian models are noted in the text.
Instrument Panel
Inst rument s and Cont rols
DX,DX-G(Canada),LX,EX,EX-L
55
IMMOBILIZER SYSTEM
INDICATOR
LOW OIL PRESSURE
INDICATOR DAYTIMERUNNING
LIGHTS
INDICATOR
LOW FUEL
INDICATOR
SUPPLEMENTAL
RESTRAINT SYSTEM
INDICATOR
SEAT BELT REMINDER
INDICATORANTI-LOCK BRAKE
SYSTEM INDICATOR
LIGHTS ON
INDICATOR
HIGH BEAM
INDICATOR
SECURITY SYSTEM INDICATOR
SIDE AIRBAG
OFF INDICATOR
(P.58)
(P.59) (P.63)
(P.57, 281) (P.60, 225)(P.63)
(P.57)
(P.58) (P.64)
(P.58)
(P.63)
PARKING BRAKE AND
BRAKE SYSTEM INDICATOR
(P.59)
MALFUNCTION INDICATOR LAMP (P.57, 282) MAINTENANCE MINDER
INDICATOR TRUNK-OPEN INDICATOR
(P.63)
DOOR-OPEN INDICATOR
CHARGING SYSTEM
INDICATOR
(P.57, 281)
(P.61)
LOW TIRE PRESSURE INDICATOR
: If equipped (P.64)
(P.63) TIRE PRESSURE MONITORING
SYSTEM (TPMS) INDICATOR
(P.61)
CRUISE CONTROL
INDICATOR
CRUISE MAIN
INDICATOR
(P.62)
(P.62)
�����—�
���—�����y�
����
��������y���
�(�+���������y���������y
Page 55 of 303

�Î
�Î�Î
The U.S. instrument panel is shown. Dif f erences f or Canadian models are noted in the text.
Instrument Panel
Si
56
REV LIMIT INDICATOR
DOOR-OPEN INDICATOR
ANTI-LOCK BRAKE SYSTEM
INDICATOR
SEAT BELT REMINDER
INDICATOR
TRUNK-OPEN INDICATOR
CHARGING SYSTEM
INDICATOR
LOW OIL PRESSURE
INDICATOR
ELECTRIC POWER STEERING
(EPS) INDICATOR DAYTIME RUNNING
LIGHTS INDICATOR
SECURITY SYSTEM INDICATOR
LIGHTS ON INDICATOR
SUPPLEMENTAL
RESTRAINT SYSTEM
INDICATOR
HIGH BEAM INDICATOR
: If equipped PARKING BRAKE AND BRAKE
SYSTEM INDICATOR
LOW FUEL
INDICATOR
(P.63)
(P.63)
SIDE AIRBAG OFF
INDICATOR
(P.58)
VSA ACTIVATION
INDICATOR
(P.63)
VEHICLE STABILITY ASSIST
(VSA) SYSTEM INDICATOR
(P.62)
(P.60)
(P.57, 281)
(P.57, 281) (P.64)
(P.61)
(P.64)
CRUISE MAIN INDICATOR LOW TIRE PRESSURE INDICATOR
MALFUNCTION
INDICATOR LAMP IMMOBILIZER SYSTEM
INDICATOR
(P.62)
(P.62)
(P.61) (P.58)
(P.59) (P.57)
(P.63)
(P.63)
(P.57, 282) (P.58)
(P.61)
(P.62)
MAINTENANCE MINDER
INDICATOR (P.60, 225)(P.59)
CRUISE CONTROL
INDICATOR TIRE PRESSURE
MONITORING SYSTEM
(TPMS) INDICATOR
�����—�����—�
�
�y�
����
��������y���
�(�+���������y�������
�y
Page 63 of 303

�µ�µ �µ
Push down on the
lever to signal a lef t turn and up to
signal a right turn. To signal a lane
change, push lightly on the lever,
and hold it. The lever will return to
center when you release it or
complete a turn.
Turning the
switch to the ‘‘ ’’ position turns
on the parking lights, taillights,
instrument panel lights, side-marker
lights, and rear license plate lights.
Turn signal
Of f
Parking and indicator lights
Headlights on
High beams
Flashhighbeams Turning the switch to the ‘‘ ’’
position turns on the headlights.
If you leave the lights on with the
key removed f rom the ignition
switch, you will hear a reminder
chime when you open the driver’s
door. To f lash the high beams, pull the
lever back lightly, then release it.
The high beams will stay on as long
as you hold the lever back.Push the lever
f orward until you hear a click. The
high beam indicator will come on
(see page ). Pull the lever back to
return to the low beams.
This indicator stays on if you leave
the lights on and turn the ignition
switch to the ACCESSORY (I) or
LOCK (0) position.
When the light switch is in the
‘‘ ’’ or ‘‘ ’’ position, the
lights on indicator comes on as a
reminder.
1.2.3.4.5.6. 63
Turn Signal
Headlights On
High Beams
Turn Signals and Headlights
72
�����—�����—�
�
�y�
����
��������y���
�(�+���������y���������y
Page 64 of 303

positio")
�´�µ
With the headlight switch of f or in
the position, the high beam
headlights and the high beam
indicator come on with reduced
brightness when you turn the
ignition switch to the ON (II)
position and release the parking
brake. They remain on until you turn
the ignition switch of f , even if you
set the parking brake.
The headlights revert to normal
operation when you turn them on
with the switch. The buttons under the lef t side vent
control the brightness of the
instrument panel. Push the or
button to adjust the brightness.
Separate adjustments can be made
when the headlights are on and of f .
There are six brightness levels.
When you push either button, the
inf ormation display indicates the
current level. You will hear a tonewhen you reach the maximum or
minimum brightness. The display
returns to the odometer 5 seconds
af ter you stop adjusting the
brightness.
To reduce glare at night, the
instrument panel illumination dims
when you turn the light switch to the
or position.
The center of each meter (upper and
lower) illuminates with reduced
brightness when you unlock and
open the driver’s door, and then goes
back to the selected brightness when
you turn the ignition switch to the
ON (II) position.
If you insert the key but do not turn
the ignition switch to the ON (II)
position, the illumination turns of f in
about 10 seconds.
Daytime Running L ights Instrument Panel Brightness
Headlights, Instrument Panel Brightness
Inst rument s and Cont rols
73
CONTROL BUTTONS
�����—�����—�
�
�y�
����
����
���y���
�(�+���������y���������y