Page 8 of 303
�Î �Î�Î
�Î
�Î
�Î �Î
�Î
�Î �Î�Î
Only on vehicles equipped with navigation system. Ref er to the navigati
on system manual.
To use the horn, press the center pad of the steering wheel.
If equipped.
1:2:3:
Your Vehicle at a Glance
4
HEADLIGHTS/TURN SIGNALS
REAR WINDOW
DEFOGGER
WINDSHIELD WIPERS/WASHERS
INSTRUMENT PANEL
BRIGHTNESS
SEL/RESET BUTTON
HAZARD WARNING
BUTTON
ACCESSORY POWER
SOCKET
PASSENGER AIRBAG OFF
INDICATOR
(P.29)
DISPLAY CHANGE
BUTTON
HEATED MIRRORS
CRUISE
CONTROL
BUTTONS (P.178)
NAVIGATION SYSTEM VOICE CONTROL BUTTONS
(P.72)
(P.73)(P.66)
(P.65)
(P.104)
(P.217) (P.71)
(P.177)(P.75)
(P.182) (P.105)
(P.74)
AUXILIARY INPUT JACK
MIRROR CONTROLS
VEHICLE
STABILITY
ASSIST (VSA)
SYSTEM OFF
SWITCH
STEERING WHEEL
ADJUSTMENTS
REMOTE AUDIO
CONTROLS HORN
(P.108)(P.74) 3
3
1 3
3
3 32
�����—�����—�
�
�y�
�������������y���
�(�+���������y���������y
Page 61 of 303
�Î�Î
�Î
�Î
�Î
�Î �Î
�Î
�Î
�Î �Î�Î
To use the horn, press the center pad of the steering wheel.
If equipped.
Only on vehicles equipped with navigation system. Ref er to the navigati
on system manual.
1:2:3:
Controls Near the Steering Wheel
70
WINDSHIELD WIPERS/WASHERS
INSTRUMENT PANEL
BRIGHTNESS HEADLIGHTS/ TURN SIGNALS
HORN HEATED MIRRORS
AUDIO SYSTEM
Vehicle without navigation system is shown. REMOTE
AUDIO
CONTROLSPASSENGER’S AIRBAG OFF
INDICATOR
MIRROR CONTROLS
NAVIGATION SYSTEM
VOICE CONTROL
BUTTONS REAR WINDOW
DEFOGGER
ACCESSORY POWER
SOCKET
HAZARD WARNING
BUTTON
AUXILIARY INPUT JACK
STEERING WHEEL
ADJUSTMENTS CRUISE CONTROL
BUTTONS
(P.72)
(P.71)
(P.73)
(P.104)
(P.217) (P.177)(P.75) (P.182)
(P.178)(P.74)
(P.105)
(P.74) (P.119)
(P.29)
VEHICLE STABILITY
ASSIST (VSA) SYSTEM
OFF SWITCH (P.108)
1
2
2
2
2
3 2
2
�����—�����—�
�
�y�
����
������
�y���
�(�+���������y���������y
Page 105 of 303
�Î
�Î �Î
�Î
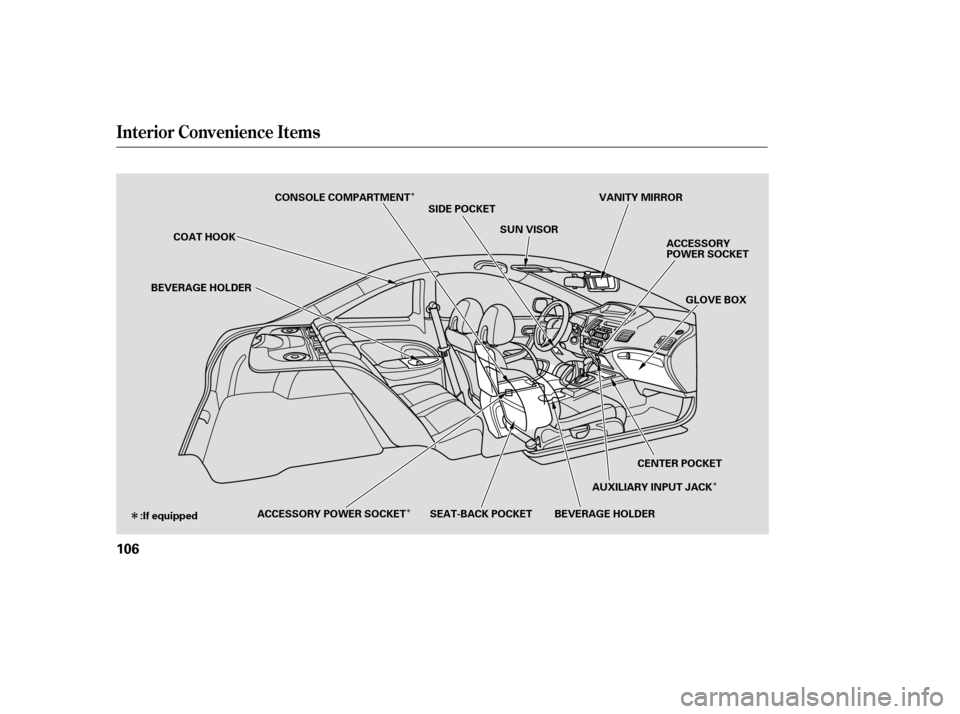
Interior Convenience Items
106
VANITY MIRROR
GLOVE BOX
ACCESSORY
POWER SOCKET
COAT HOOK CONSOLE COMPARTMENT
:If equipped BEVERAGE HOLDER
SUN VISOR
CENTER POCKET
SIDE POCKET
ACCESSORY POWER SOCKET BEVERAGE HOLDER SEAT-BACK POCKETAUXILIARY INPUT JACK
�����—�����—�
�
�y�
������
������y���
�(�+���������y���
�
�
�y
Page 122 of 303

�µ
�µ
�µ
You may experience periods when
XM Radio does not transmit the
artist’s name and song title
inf ormation. If this happens, there is
nothing wrong with your system.
Turn the TUNE knob to
change channel selections. Turn the
knob right f or higher numbered
channels and lef t f or lower
numbered channels. In the category
mode, you can only select channels
within that category.
In channel mode, you can select all
of the available channels. In category
mode, such as Jazz, Rock, Classical,
etc., you can select all of the
channels within that category.
To switch between
channel mode and category mode,
press and hold the DISP button until
themodechanges.
Each time you press and release the
DISP button, the display changes in
the f ollowing sequence: Channel
name, channel number, category,
artist name, and music title.
Press either side of the SEEK/SKIP
button ( or ) to select
another category.
To listen to XM radio, turn the
ignition switch to the ACCESSORY
(I) or the ON (II) position. Press the
AUX button to select XM satellite
radio mode. Adjust the volume by
turning the knob. The last channel
you listened to will show in the
display.
Operating the XM Radio
TUNE
MODE
SEEK /SK IP (CA T EGORY)
Audio System (Models without navigation system)
126
�����—�����—�
�
�y�
�����������
�y���
�(�+���������y���
���
�y
Page 123 of 303

�µ�µ �µ
�µ
�µ
�µ
The scan f unction gives
you a sampling of all channels while
in the channel mode. In the category
mode, only the channels within that
category are scanned. To activate
scan, press the SCAN button. The
system plays each channel in
numerical order f or a f ew seconds,
then selects the next channel. When
you hear a channel you want to
continue listening to, press the
button again.
Youcanstoreupto12
preset channels using each side of
the preset button. Each side of the
button stores one channel f rom the
XM1 band and one channel f rom the
XM2 band.
To store a channel: Usethetune,seek,orscan
function to tune to a desired
channel.
In category mode, only channels
within that category can be selected.
In channel mode, all channels can be
selected. XM is loading the
audio or program inf ormation.
The channel
currently selected is no longer
broadcasting.
The encryption
code is being updated. Wait until the
encryption code is f ully updated.
Channels 0 and 1 should still work
normally.
The signal is
currently too weak. Move the vehicle
to an area away from tall buildings,
and with an unobstructed view of the
southern horizon.
Pick a preset number you want f or
that channel. Press and hold the
button until you hear a beep.
Repeat steps 2 and 3 to store the
f irst six channels.
Once a channel is stored, press and
release the proper side of the preset
button to tune to it.
Press the AUX button. Either XM1
or XM2 will show in the display. Press the AUX button again. Store
the next six channels using steps 2
and 3.
1. 2. 3. 4. 5.
CONT INUED
SCAN
Preset
XM Radio Display Messages
‘‘L OA DING’’
‘‘OFF A IR’’
‘‘UPDA T ING’’
‘‘NO SIGNA L ’’
Audio System (Models without navigation system)
Features
127
�����—�����—�
�
�y�
�������������y���
�(�+���������y���
�����y
Page 125 of 303

Depending on where you drive, you
may experience reception problems.
Interf erence can be caused by any of
these conditions:Driving on the north side of a
large commercial truck on an
east/west road.
Driving in tunnels.
Driving on a road beside a vertical
wall, steep clif f , or hill to the south
of you.
Driving on the lower level of a
multi-tiered road.
Driving on a single lane road
alongside dense trees taller than
50 ft. (15 m) to the south of you.
Driving on the north side of an
east/west mountain road.
Large items carried on a roof rack.
There may be other geographic
situations that could af f ect XM radio
reception. If your XM Radio service has expired
or you purchased your vehicle f rom
a previous owner, you can listen to a
sampling of the broadcasts available
on XM Satellite Radio. With the
ignition switch in the ACCESSORY
(I) or ON (II) position, push the
power/volume knob to turn on the
audio system and press the AUX
button. A variety of music types and
styles will play.
If you decide to purchase XM
satellite radio service, contact XM
Radio at , or at
1-800-852-9696. You will need to give
them your radio I.D. number and
your credit card number. To get your
radio I.D. number, turn the TUNEknob until ‘‘0’’ appears in the display.
Your I.D. will appear in the display.
After you’ve registered with XM
Radio, keep your audio system in the
satellite radio mode while you wait
f or activation. This should take about
30 minutes.
While waiting f or activation, make
sure your vehicle remains in an open
area with good reception. Once your
audio system is activated, you’ll be
able to listen to XM radio broadcasts.
XM Radio will continue to send an
activation signal to your vehicle f or
at least 12 hours from the activation
request. If the service has not been
activated after 36 hours, contact XM
Radio.As required by the FCC:
Changes or modif ications not expresslyapproved by the party responsible f or
compliance could void the user’sauthority to operate the equipment.
www.xmradio.com
Receiving Satellite Radio Service
Audio System (Models without navigation system)
Features
129
�����—�����—�
�
�y�
�������������y���
�(�+���������y���
�����y
Page 143 of 303
�Û�Ý
Load the desired discs in the
magazine, and load the magazine in
the changer according to the
instructions that came with the unit.
To select the disc changer, press the
CD/AUX button. The disc and track
numbers will be displayed. To select
a dif f erent disc, use either side of the
TUNE bar. To select the previous
disc, press the side. To select the
next disc, press the side.
If you select an empty slot in the
magazine, the changer will search
f or the next available disc to load and
play. For inf ormation on how to handle
and protect discs, see page .
An optional six or eight disc changer
is available f or your vehicle. This
disc changer uses the same controls
used f or the in-dash disc player or
the radio. 174
Operating the Optional Disc
Changer
Protecting Discs
Audio System (Models with navigation system)
Features
157
�����—�����—�
�
�y�
�������������y���
�(�+���������y���
�����y
Page 164 of 303
�´�µ
�´�µ
If you are playing a PC card, press
the top ( ) of the CH button to
advance to the next file. Press the
bottom( )togobacktothe
previous f ile.
In MP3 or WMA mode, you can use
the seek function to select folders.
Press and hold the top ( ) of the
CH button until you hear a beep, to
skip f orward to the f irst f ile of the
next folder. Press the bottom ( ) to
skip backward to the previous f older.
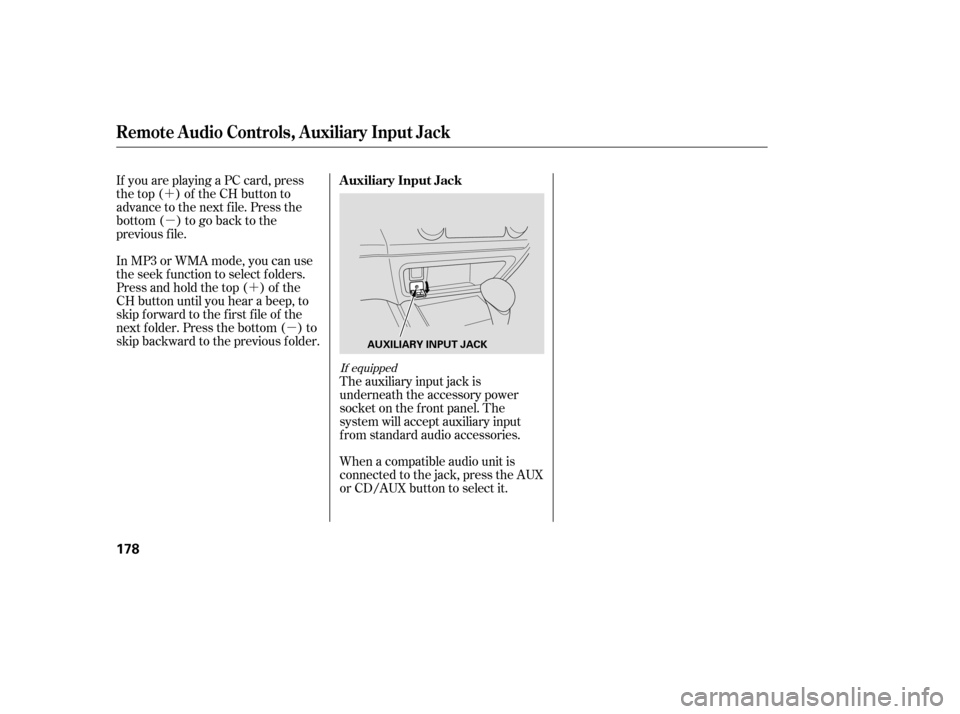
The auxiliary input jack is
underneath the accessory power
socket on the f ront panel. The
system will accept auxiliary input
f rom standard audio accessories.
When a compatible audio unit is
connected to the jack, press the AUX
or CD/AUX button to select it.
If equipped
Auxiliary Input Jack
Remote Audio Controls, Auxiliary Input Jack
178
AUXILIARY INPUT JACK
�����—�����—�
�
�y�
�������������y���
�(�+���������y���
�����y