2008 GREAT WALL FLORID charging
[x] Cancel search: chargingPage 6 of 281

Downloaded from www.Manualslib.com manuals search engine Technical Requirements ..................................................................................\
........141
Chapter Nine: Vehicle Body Electrical System ........................................................................\
.142
Basic Information on the Electrical System .............................................................143
Fuse Box ...................................................................................\
...............................144
Overall Vehicle’s Grounding Point Schematics ........................................................150
Key Electrical Component’s Module Schematics for the Overall Vehicle ................151
Wire Harness Distribution Chart for the Overall Vehicle ..........................................152
Wire Harness Relationship and Plug-in Connections Numbered Diagram ..............155
Wire Harness Plug-in Connectors and Pin Function Diagram .................................156
Electrical Wiring Diagram for the Overall Vehicle ....................................................167
Chapter Ten: Electrical Accessories ........................................................................\
.................177
Reverse Sensor ..................................................................................\
.....................178
Combination Meter ..................................................................................\
................180
Central Door Lock ...................................................................................\
.................181
Power Windows ..................................................................................\
.....................184
Immobilizer System ..................................................................................\
...............186
CD Player ..................................................................................\
..............................193
DVD Player ..................................................................................\
............................195
Chapter Eleven: Air Conditioning System........................................................................\
........202
Areas of Importance ..................................................................................\
..............203
Technical Parameters ..................................................................................\
............203
Troubleshooting ..................................................................................\
.....................204
Air Conditioning System’s Structure Diagram and Fundamentals ...........................207
Air Conditioning System Overview ..........................................................................207
Air Conditioning System Terminal Definition ............................................................208
Compressor ..................................................................................\
...........................208
Electromagnetic Clutch ...................................................................................\
.........210
Vacuuming and Charging Refrigerant ......................................................................211
Filling Quantity and Method for Refrigerant Oil ........................................................212
Daily Maintenance of the Air Conditioning System .................................................212
Chapter Twelve: Airbags ........................................................................\
...................................213
Airbag Electronic Control Unit ..................................................................................214
Diagnostic Scanner ...................................................................................\
...............215
Troubleshooting ..................................................................................\
.....................216
Vehicle Collision Diagnostics ..................................................................................\
.226
Removal Method for Individual Components ...........................................................227
Driver Side Airbag Module (DAB), Front Passenger Side
Airbag Module (PAB), Clock Spring, and Steering Wheel .......................................228
Airbag Module Disposal ...................................................................................\
........230
Page 13 of 281

Downloaded from www.Manualslib.com manuals search engine GWFLORID Maintenance Manual6
2. Inspection procedures for related fuses or fuses in re- Inspection procedures for related fuses or fuses in re-Inspection procedures for related fuses or fuses in re-
lay boxes. Inspect the battery for damage, the battery's
charging state, cleanness, and tightening with the
connectors.
Before changing a fuse, make sure to check if the fuse's cur-
rent rating meets the required standards. You must not use a
fuse with a current rate that is higher or lower than required
standards.
Same current rating
3. Binding wire harness connectors.
(a) When disconnecting the connections, first press the two
ends of the connectors together, then loosen the lock
and press the lock pawl to release the connector.
(b) When disconnecting the connector, do not pull on its
wire harness. Grasp the joint directly.
(c) Check if the joint is deformed, damaged, or port lost
before connecting the connector.
(d) The connector is not successfully connected until it
makes a click sound.
4. Wire harness connector inspection.
(a) Check while connecting the connectors.
Squeeze both ends of the connectors to make sure it is com-
pletely plugged in and tightly locked.
(b) Check when disconnecting the connectors.
Check by lightly pulling the wire harness behind the connec-
tor's joint. Look for any unconnected or dropped terminals,
loose clamps, or broken wires.
Visually inspect for instances of corrosion, metal fragments,
oddities, and water, as well as bending, rust, overheating,
pollution or deformed terminals, etc.
(c) Check the contact pressure of the terminals.
Prepare a plug that matches the connector's port, plug it into
the socket, then check for the proper rate of tension after
they are fully engaged.
Loosen crimp
Core
Deformed terminal
Pull lightly
The terminal is similar to a plug
Incorrect
Page 23 of 281

Downloaded from www.Manualslib.com manuals search engine GWFLORID Maintenance Manual16
Air Conditioning System Structure and Parameters
ItemStructure and parameters
Structure typeVapor compression refrigeration, water warmer, and water heater
Performance parametersAir conditioner refrigerating capacity is 5 kW. Blower's air volume is 450 m3/h. Air
conditioner heating capacity is 4.5 kW.
Controls
Control panel knob, button, manual shift lever control, position gate and temperature
threshold cable drive, new damper micro-motor drive, able to select and adjust air
outlet position, heating/cooling mode, air inner/outer circulation mode and wind speed,
temperature, and more advanced selections and adjustables.
RefrigerantR134a, 510±10g
CompressorModel number: JSS-96TV4-4
CondenserAdvective and subcooling structure with flat tube thickness of 16 mm and dry reservoir
Φ34 mm × L280 mm.
Heating, Ventilating
and Air Conditioning
(HVAC)
Heating, Ventilating and Air Conditioning (HVAC): Of a three-box type consisting of
a layered evaporator, advective heater, H-shaped expansion valve, centrifugal blower,
and air outlet distributing box. Contains cooling, heating, defrosting and air freshening
functions, and operated by a link mechanism driving air valve.
Refrigeration line &
water heating tube
Refrigeration line: a compound structure using a rubber cooling pipe and an aluminum
pipe. Water heating pipe: molded rubber pipe.
SensorsEvaporator temperature sensor
Pressure switchHigh/Mid/Low three position pressure switch
Electrical System Structure and Parameters
ItemStructure and parameters
Power, start
up, and
electronic
charging
system
CircuitSingle wire system, voltage of DC12 V, negative ground
Battery12 V/60 Ah, maintenance-free battery
Starter1.2 kW
Alternator14 V/90 A
Lighting and
signaling
system
Headlight2 white (high beam 55 W, low beam 60 W) H4, height is electrically
adjustable.
Parking lamp2 front parking lamp: white, 5 W. 2 rear parking lamp: red, 5W
Turn signal lampAmber colored. 21W, 2 in the front and 21W, 2 in the back. Turn signal
lamps: 0.3W, 4 LED.
Fog lamp2 front fog lamps: 55W. 2 rear fog lamps: 7.5 W
Brake lamp2 red 21 W. high mounted brake lamps 3 W
License plate lamp2 white 5 W
Reverse lamp2 white 21 W
Hazard warning signal
lampAll turn signal lamps and switch controls
Rear reflectorsRed and non-triangular, inside the rear combination lamps.
Front reading lamp &
interior dome lamp
Front reading lamp: one white 10 W or one white 10 W, two 5 W (with
sunroof).
Interior dome lamp: White, 10 W.
Cigarette lighter
lightingBlue, 3 W, one
Page 24 of 281

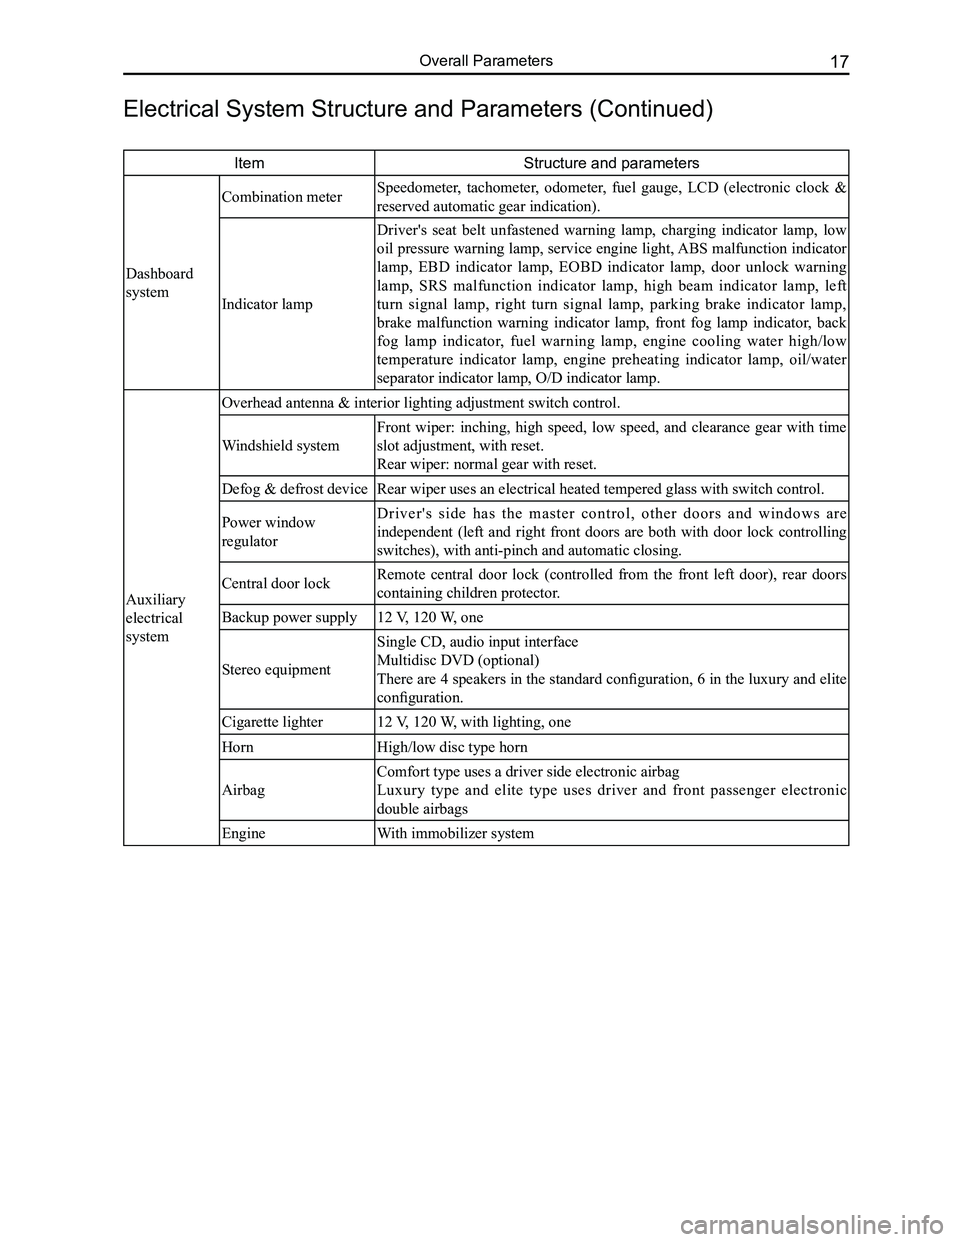
Downloaded from www.Manualslib.com manuals search engine 17Overall Parameters
ItemStructure and parameters
Dashboard
system
Combination meter Speedometer, tachometer, odometer, fuel gauge, LCD (electronic clock &
reserved automatic gear indication).
Indicator lamp
Driver's seat belt unfastened warning lamp, charging indicator lamp, low
oil pressure warning lamp, service engine light, ABS malfunction indicator
lamp, EBD indicator lamp, EOBD indicator lamp, door unlock warning
lamp, SRS malfunction indicator lamp, high beam indicator lamp, left
turn signal lamp, right turn signal lamp, parking brake indicator lamp,
brake malfunction warning indicator lamp, front fog lamp indicator, back
fog lamp indicator, fuel warning lamp, engine cooling water high/low
temperature indicator lamp, engine preheating indicator lamp, oil/water
separator indicator lamp, O/D indicator lamp.
Auxiliary
electrical
system
Overhead antenna & interior lighting adjustment switch control.
Windshield system
Front wiper: inching, high speed, low speed, and clearance gear with time
slot adjustment, with reset.
Rear wiper: normal gear with reset.
Defog & defrost deviceRear wiper uses an electrical heated tempered glass with switch control.\
Power window
regulator
D r i v e r ' s s i d e h a s t h e m a s t e r c o n t r o l , o t h e r d o o r s a n d w i n d o w s a r e
independent (left and right front doors are both with door lock controlling
switches), with anti-pinch and automatic closing.
Central door lockRemote central door lock (controlled from the front left door), rear doors
containing children protector.
Backup power supply12 V, 120 W, one
Stereo equipment
Single CD, audio input interface
Multidisc DVD (optional)
There are 4 speakers in the standard configuration, 6 in the luxury and elite
configuration.
Cigarette lighter12 V, 120 W, with lighting, one
HornHigh/low disc type horn
Airbag
Comfort type uses a driver side electronic airbag
Luxury type and elite type uses driver and front passenger electronic
double airbags
EngineWith immobilizer system
Electrical System Structure and Parameters (Continued)
Page 187 of 281

Downloaded from www.Manualslib.com manuals search engine GWFLORID Maintenance Manual180
Combination Meter
If something is wrong with the meter, check the relevant component and circuit according to the connector defi-
nition. If the failure still cannot be eliminated, check whether the instrument itself has malfunctioned in the fur-
ther steps. The following diagram shows the view of the meter connector and its numb\
er.
Pin definition of each combination meter
32-core connector
Pin No.FunctionPin No.Function
1Meter ground17Signal ground
2Speed signal input18Internal lighting (+)
3Vehicle speed signal input19Airbag indicator lamp
4Fuel gauge input20Door open warning lamp
5Water temperature gauge input21Seat belt unfastened indicator lamp
6Vehicle speed signal output22Battery
7Central door lock signal23Ignition
8Clock test24High beam ( - )
9Meter interior communication25High beam (+)
10Empty26Right turn signal lamp
11ABS failure indicator27Left turn signal lamp
12Engine failure indicator28Charging indicator
13Brake system failure indicator29Engine maintenance indicator
14Oil pressure indicator30EBD indicator
15Rear fog lamp indicator31O/D switch indicator
16Parking brake indicator32Front fog lamp indicator
12-core connector
Pin No.FunctionPin No.Function
1P position7Master lighting switch indicator
2R position8Rear deforster indicator
3N position9CAN H
4D position10CAN L
52nd gear11Oil/water separator indicator
61st gear12Diesel engine preheating indicator
12-core connector32-core connector
Page 209 of 281

Downloaded from www.Manualslib.com manuals search engine GWFLORID Maintenance Manual202
Air Conditioning System
Areas of Importance ...........................................................203
Technical Parameters .........................................................203
Troubleshooting ..................................................................204
Air Conditioning System's Structure Diagram and
Fundamentals .....................................................................207
Air Conditioning System Overview .....................................207
Air Conditioning System Terminal Definition .......................208
Compressor ........................................................................\
208
Electromagnetic Clutch.......................................................210
Vacuuming and Charging Refrigerant ................................211
Filling Quantity and Method for Refrigerant Oil ..................212
Daily Maintenance of the Air Conditioning System ............212
Page 218 of 281

Downloaded from www.Manualslib.com manuals search engine 211Air Conditioning System
Clutch Installation
1. Install the solenoid coil at the place pressing up against the head cover's end surface and pay atten-
tion to insert the dowel pin of the solenoid coil into the bottom hole of the head cover. Put the retaining
ring into the groove with circlip pliers, and press the solenoid coil's connecting wire onto the pressing
line plate on the head cover with a SST.
2. Put the compressor on a specially designed fixture or platform, with its head cover facing upwards.
Press the pulley into the head cover shaft, and put the pulley bearing's retaining ring into the groove
with circlip pliers.
3. Install the armature onto the main shaft's spline and seize the clutch's triangular piece with a clamp.
Then tighten the inner hexagon lock screws and washers with a torque wrench. Screw torque should
be between 150-180 N·m. After installation is done, make sure to check if the clutch's pulley and
armature are able to operate freely, and also check the clearance between the pulley and armature,
which should be 0.3-0.6 mm.
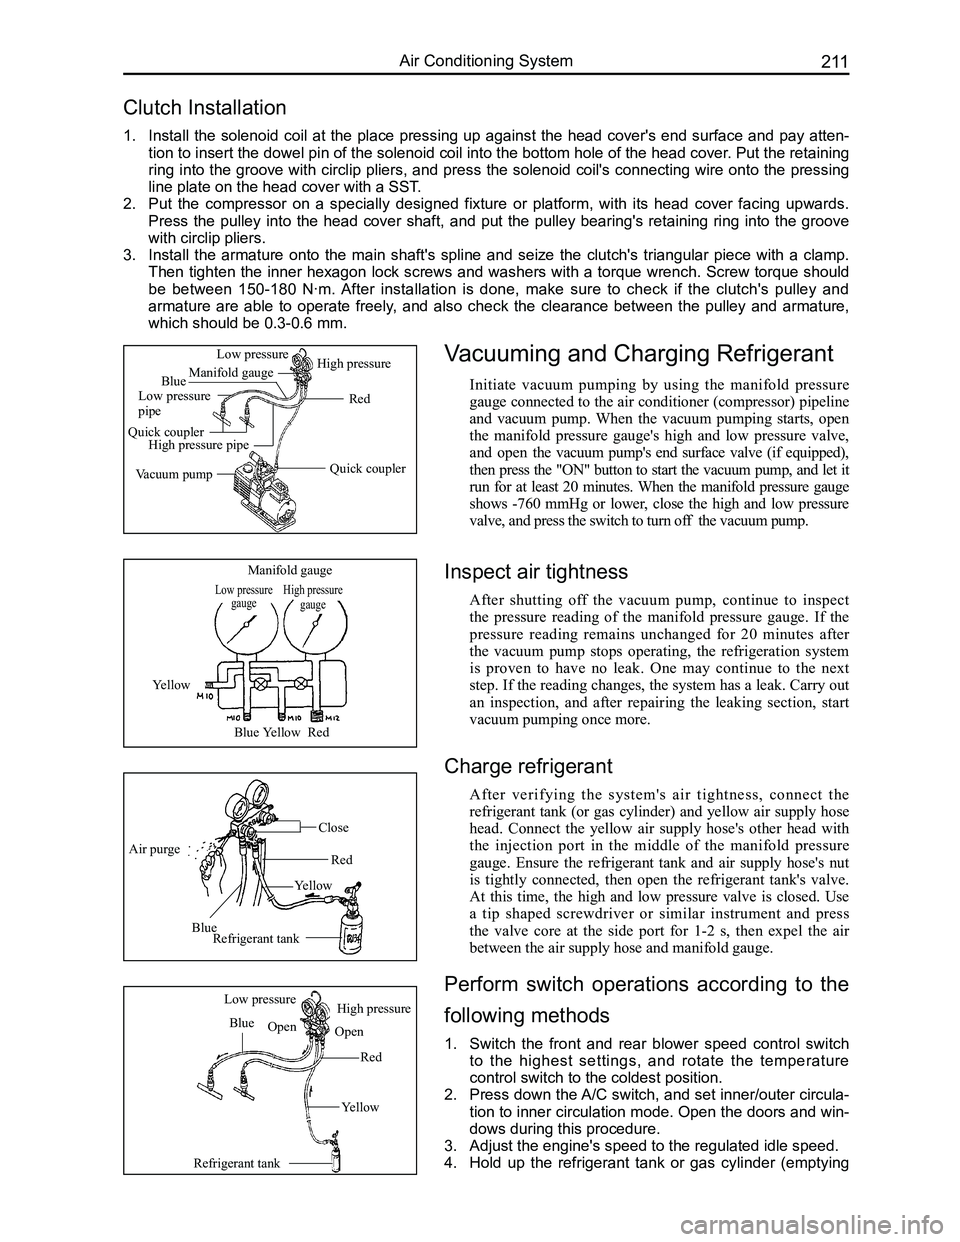
Vacuuming and Charging Refrigerant
Initiate vacuum pumping by using the manifold pressure
gauge connected to the air conditioner (compressor) pipeline
and vacuum pump. When the vacuum pumping starts, open
the manifold pressure gauge's high and low pressure valve,
and open the vacuum pump's end surface valve (if equipped),
then press the "ON" button to start the vacuum pump, and let it
run for at least 20 minutes. When the manifold pressure gauge
shows -760 mmHg or lower, close the high and low pressure
valve, and press the switch to turn off the vacuum pump.
Low pressure gaugeHigh pressure gauge
Manifold gauge
Yellow
BlueYellowRed
Air purge
Blue
Yellow
Red
Close
Refrigerant tank
Refrigerant tank
Blue
Red
Yellow
Low pressureHigh pressure
OpenOpen
Quick coupler
Red
Manifold gauge
Low pressure pipe
Quick couplerHigh pressure pipe
Vacuum pump
Low pressureHigh pressure
Blue
Inspect air tightness
After shutting off the vacuum pump, continue to inspect
the pressure reading of the manifold pressure gauge. If the
pressure reading remains unchanged for 20 minutes after
the vacuum pump stops operating, the refrigeration system
is proven to have no leak. One may continue to the next
step. If the reading changes, the system has a leak. Carry out
an inspection, and after repairing the leaking section, start
vacuum pumping once more.
Charge refrigerant
After verifying the system's air tightness, connect the
refrigerant tank (or gas cylinder) and yellow air supply hose
head. Connect the yellow air supply hose's other head with
the injection port in the middle of the manifold pressure
gauge. Ensure the refrigerant tank and air supply hose's nut
is tightly connected, then open the refrigerant tank's valve.
At this time, the high and low pressure valve is closed. Use
a tip shaped screwdriver or similar instrument and press
the valve core at the side port for 1-2 s, then expel the air
between the air supply hose and manifold gauge.
Perform switch operations according to the
following methods
1. Switch the front and rear blower speed control switch
to the highest settings, and rotate the temperature
control switch to the coldest position.
2. Press down the A/C switch, and set inner/outer circula-
tion to inner circulation mode. Open the doors and win-
dows during this procedure.
3. Adjust the engine's speed to the regulated idle speed.
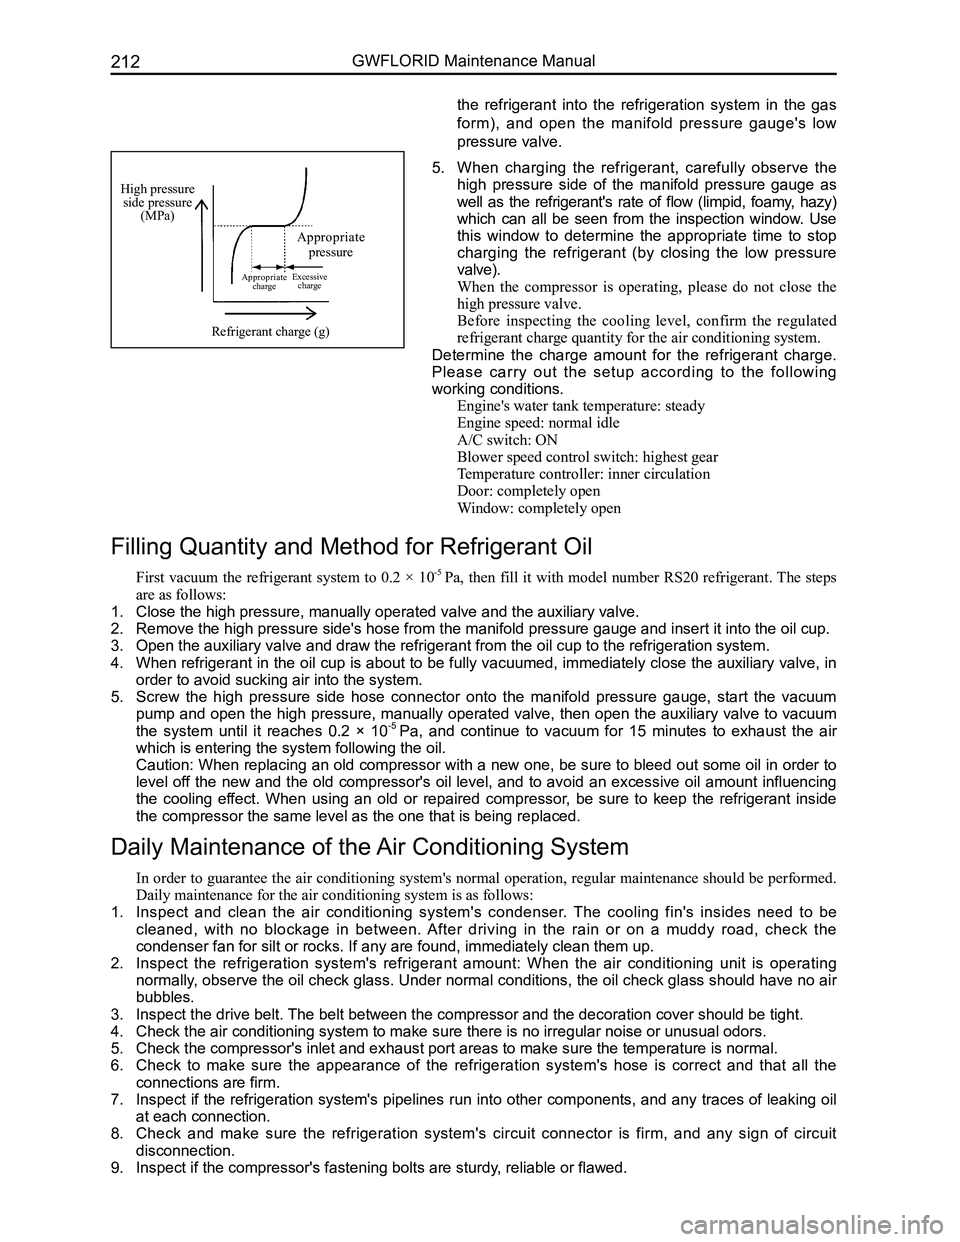
4. Hold up the refrigerant tank or gas cylinder (emptying
Page 219 of 281

Downloaded from www.Manualslib.com manuals search engine GWFLORID Maintenance Manual212
High pressure side pressure(MPa)
Appropriate pressure
Appropriate chargeExcessive charge
Refrigerant charge (g)
5. When charging the refrigerant, carefully observe the
high pressure side of the manifold pressure gauge as
well as the refrigerant's rate of flow (limpid, foamy, hazy)
which can all be seen from the inspection window. Use
this window to determine the appropriate time to stop
charging the refrigerant (by closing the low pressure
valve).
When the compressor is operating, please do not close the
high pressure valve.
Before inspecting the cooling level, confirm the regulated
refrigerant charge quantity for the air conditioning system.
Determine the charge amount for the refrigerant charge.
Please carry out the setup according to the following
working conditions.
Engine's water tank temperature: steady
Engine speed: normal idle
A/C switch: ON
Blower speed control switch: highest gear
Temperature controller: inner circulation
Door: completely open
Window: completely open
Filling Quantity and Method for Refrigerant Oil
First vacuum the refrigerant system to 0.2 × 10⁻⁵ Pa, then fill it with model number RS20 refrigerant. The steps
are as follows:
1. Close the high pressure, manually operated valve and the auxiliary valve\
.
2. Remove the high pressure side's hose from the manifold pressure gauge an\
d insert it into the oil cup.
3. Open the auxiliary valve and draw the refrigerant from the oil cup to th\
e refrigeration system.
4. When refrigerant in the oil cup is about to be fully vacuumed, immediately close the auxiliary valve, in
order to avoid sucking air into the system.
5. Screw the high pressure side hose connector onto the manifold pressure gauge, start the vacuum
pump and open the high pressure, manually operated valve, then open the auxiliary valve to vacuum
the system until it reaches 0.2 × 10⁻⁵ Pa, and continue to vacuum for 15 minutes to exhaust the air
which is entering the system following the oil.
Caution: When replacing an old compressor with a new one, be sure to bleed out some oil in order to
level off the new and the old compressor's oil level, and to avoid an excessive oil amount influencing
the cooling effect. When using an old or repaired compressor, be sure to keep the refrigerant inside
the compressor the same level as the one that is being replaced.
Daily Maintenance of the Air Conditioning System
In order to guarantee the air conditioning system's normal operation, regular maintenance should be performed.
Daily maintenance for the air conditioning system is as follows:
1. Inspect and clean the air conditioning system's condenser. The cooling fin's insides need to be
cleaned, with no blockage in between. After driving in the rain or on a muddy road, check the
condenser fan for silt or rocks. If any are found, immediately clean the\
m up.
2. Inspect the refrigeration system's refrigerant amount: When the air conditioning unit is operating
normally, observe the oil check glass. Under normal conditions, the oil check glass should have no air
bubbles.
3. Inspect the drive belt. The belt between the compressor and the decoration cover should be tight\
.
4. Check the air conditioning system to make sure there is no irregular noi\
se or unusual odors.
5. Check the compressor's inlet and exhaust port areas to make sure the tem\
perature is normal.
6. Check to make sure the appearance of the refrigeration system's hose is correct and that all the
connections are firm.
7. Inspect if the refrigeration system's pipelines run into other components, and any traces of leaking oil
at each connection.
8. Check and make sure the refrigeration system's circuit connector is firm, and any sign of circuit
disconnection.
9. Inspect if the compressor's fastening bolts are sturdy, reliable or flawed.
the refrigerant into the refrigeration system in the gas
form), and open the manifold pressure gauge's low
pressure valve.