2008 GMC SIERRA steering wheel
[x] Cancel search: steering wheelPage 181 of 578
Tilt Wheel
The tilt wheel lets you adjust the steering wheel before
you drive. Raise it to the highest level to give your
legs more room when exiting or entering the vehicle.
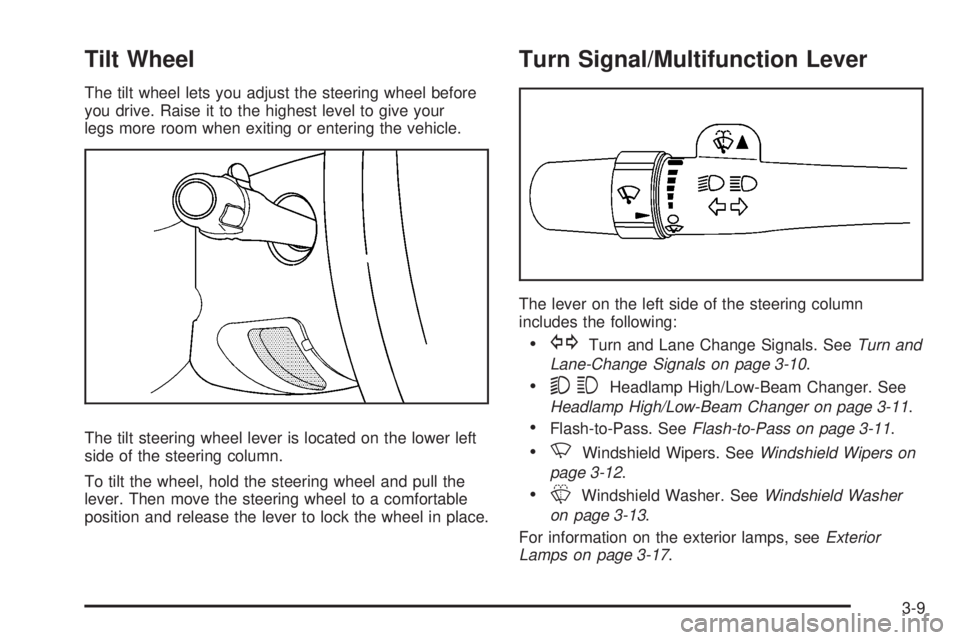
The tilt steering wheel lever is located on the lower left
side of the steering column.
To tilt the wheel, hold the steering wheel and pull the
lever. Then move the steering wheel to a comfortable
position and release the lever to lock the wheel in place.
Turn Signal/Multifunction Lever
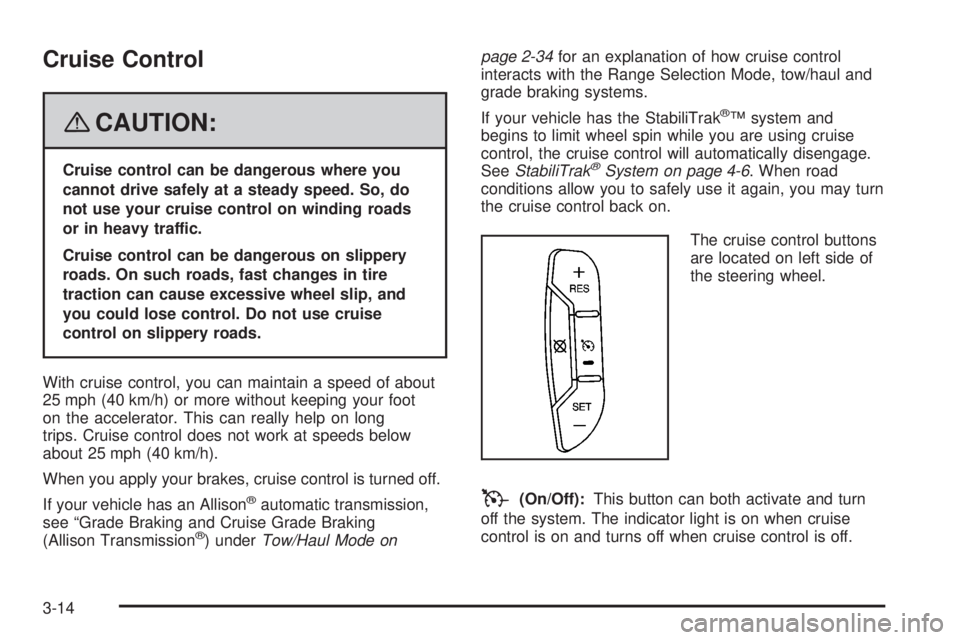
The lever on the left side of the steering column
includes the following:
GTurn and Lane Change Signals. SeeTurn and
Lane-Change Signals on page 3-10.
53Headlamp High/Low-Beam Changer. See
Headlamp High/Low-Beam Changer on page 3-11.
Flash-to-Pass. SeeFlash-to-Pass on page 3-11.
NWindshield Wipers. SeeWindshield Wipers on
page 3-12.
LWindshield Washer. SeeWindshield Washer
on page 3-13.
For information on the exterior lamps, seeExterior
Lamps on page 3-17.
3-9
Page 186 of 578
Cruise Control
{CAUTION:
Cruise control can be dangerous where you
cannot drive safely at a steady speed. So, do
not use your cruise control on winding roads
or in heavy traffic.
Cruise control can be dangerous on slippery
roads. On such roads, fast changes in tire
traction can cause excessive wheel slip, and
you could lose control. Do not use cruise
control on slippery roads.
With cruise control, you can maintain a speed of about
25 mph (40 km/h) or more without keeping your foot
on the accelerator. This can really help on long
trips. Cruise control does not work at speeds below
about 25 mph (40 km/h).
When you apply your brakes, cruise control is turned off.
If your vehicle has an Allison
®automatic transmission,
see “Grade Braking and Cruise Grade Braking
(Allison Transmission
®) underTow/Haul Mode onpage 2-34for an explanation of how cruise control
interacts with the Range Selection Mode, tow/haul and
grade braking systems.
If your vehicle has the StabiliTrak
®™ system and
begins to limit wheel spin while you are using cruise
control, the cruise control will automatically disengage.
SeeStabiliTrak
®System on page 4-6. When road
conditions allow you to safely use it again, you may turn
the cruise control back on.
The cruise control buttons
are located on left side of
the steering wheel.
T(On/Off):This button can both activate and turn
off the system. The indicator light is on when cruise
control is on and turns off when cruise control is off.
3-14
Page 187 of 578
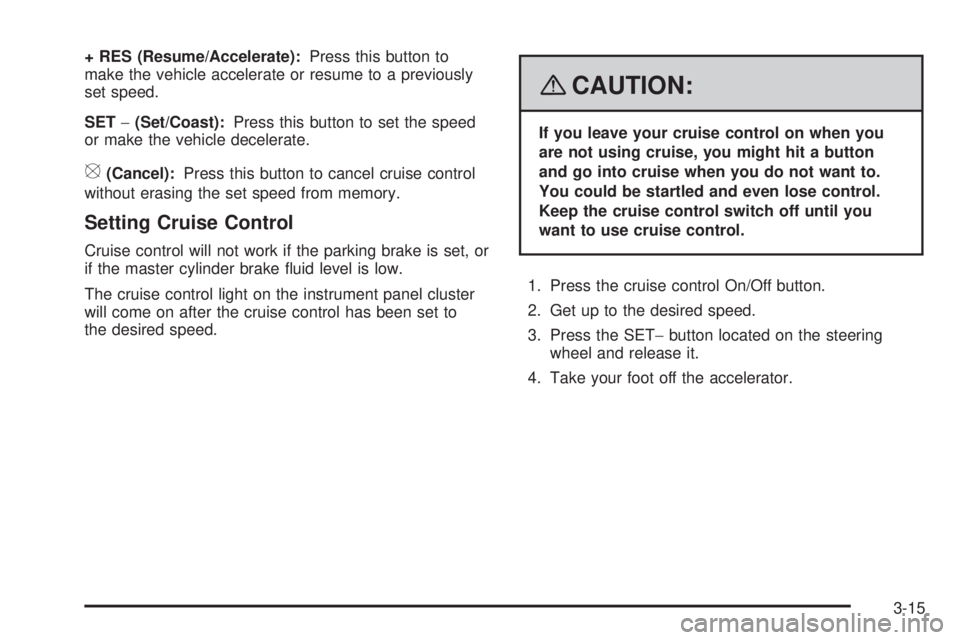
+ RES (Resume/Accelerate):Press this button to
make the vehicle accelerate or resume to a previously
set speed.
SET−(Set/Coast):Press this button to set the speed
or make the vehicle decelerate.
[(Cancel):Press this button to cancel cruise control
without erasing the set speed from memory.
Setting Cruise Control
Cruise control will not work if the parking brake is set, or
if the master cylinder brake �uid level is low.
The cruise control light on the instrument panel cluster
will come on after the cruise control has been set to
the desired speed.
{CAUTION:
If you leave your cruise control on when you
are not using cruise, you might hit a button
and go into cruise when you do not want to.
You could be startled and even lose control.
Keep the cruise control switch off until you
want to use cruise control.
1. Press the cruise control On/Off button.
2. Get up to the desired speed.
3. Press the SET−button located on the steering
wheel and release it.
4. Take your foot off the accelerator.
3-15
Page 188 of 578
Resuming a Set Speed
If you apply the brakes while the cruise control is set,
the cruise control is disengaged. But it does not need to
be reset.
Once the vehicle speed reaches about 25 mph
(40 km/h) or more, press the +RES button on the
steering wheel. The vehicle will go back to the previous
set speed and stay there.
Increasing Speed While Using Cruise
Control
To increase the cruise speed while using cruise control:
Press and hold the +RES button on the steering
wheel until you reach your new desired speed,
then release it.
To increase vehicle speed in small increments,
press the +RES button. Each time this is done,
the vehicle will go about 1 mph (1.6 km/h) faster.
Reducing Speed While Using Cruise
Control
To reduce the vehicle speed while using cruise control:
Press and hold the SET– button on the steering
wheel until the desired lower speed is reached,
then release it.
To slow down in very small amounts, press the
SET– button on the steering wheel brie�y. Each
time this is done, the vehicle will go about 1 mph
(1.6 km/h) slower.
Passing Another Vehicle While Using
Cruise Control
Use the accelerator pedal to increase the vehicle speed.
When you take your foot off the pedal, the vehicle will
slow down to the previous set cruise speed.
Using Cruise Control on Hills
How well the cruise control will work on hills depends
upon the vehicle speed, load, and the steepness of the
hills. While going up steep hills, you might have to
step on the accelerator pedal to maintain the vehicle’s
speed. While going downhill, you might have to brake or
shift to a lower gear to keep the vehicle’s speed
down. Of course, applying the brake turns off the cruise
control. Many drivers �nd this to be too much trouble
and do not use cruise control on steep hills.
Ending Cruise Control
There are three ways to end cruise control:
Step lightly on the brake pedal.
Press the cancel button on the steering wheel.
Press the On/Off button on the steering wheel.
3-16
Page 189 of 578

Erasing Speed Memory
When the cruise control or the ignition is turned off, the
cruise control set speed memory is erased.
Exterior Lamps
The exterior lamps control
is located on the
instrument panel to the left
of the steering wheel.
It controls the following systems:
Headlamps
Taillamps
Parking Lamps
License Plate Lamps
Instrument Panel LightsThe exterior lamps control has four positions:
O(Off):Turn the control to this position to turn off the
automatic headlamps and daytime running lamps
(DRL). Turn the headlamp control to the off position
again to turn the automatic headlamps or DRL back on.
For vehicles �rst sold in Canada, the off position will
only work when the vehicle is shifted into PARK (P).
AUTO (Automatic):Turn the control to this position to
automatically turn on the headlamps at normal
brightness, together with the following:
Parking Lamps
Instrument Panel Lights
Taillamps
License Plate Lamps
When the vehicle is turned off and the headlamps are in
AUTO, the headlamps may automatically remain on
for a set time. The time of the delay can be changed
using the DIC. SeeDriver Information Center (DIC) on
page 3-54.
3-17
Page 227 of 578

DIC Operation and Displays (With
DIC Buttons)
If your vehicle has DIC buttons, the information below
explains the operation of this system.
The DIC has different displays which can be accessed
by pressing the DIC buttons located on the instrument
panel, next to the steering wheel.
The DIC displays trip, fuel, and vehicle system
information, and warning messages if a system problem
is detected.
The DIC also allows some features to be customized.
SeeDIC Vehicle Customization (With DIC Buttons)
on page 3-72for more information.
If your vehicle has DIC buttons, you can also use the
trip odometer reset stem to view some of the DIC
displays. See “DIC Operation and Displays (Without DIC
Buttons)” later in this section.
DIC Buttons
The buttons are the
trip/fuel, vehicle
information, customization,
and set/reset buttons.
The button functions are
detailed in the following
pages.
3(Trip/Fuel):Press this button to display the
odometer, trip odometer, fuel range, average economy,
fuel used, timer, and transmission temperature.
Some vehicles also display instantaneous economy and
an Active Fuel Management™ indicator.
T(Vehicle Information):Press this button to display
the oil life, units, tire pressure readings for vehicles
with the Tire Pressure Monitor System (TPMS), trailer
brake gain and output information for vehicles with
the Integrated Trailer Brake Control (ITBC) system,
engine hours, and Remote Keyless Entry (RKE)
transmitter programming.
3-55
Page 252 of 578

Exiting the Feature Settings Menu
The feature settings menu will be exited when any of
the following occurs:
The vehicle is no longer in ON/RUN.
The trip/fuel or vehicle information DIC buttons are
pressed.
The end of the feature settings menu is reached
and exited.
A 40 second time period has elapsed with no
selection made.
Audio System(s)
Determine which radio your vehicle has and then read
the pages following to familiarize yourself with its
features.
{CAUTION:
This system provides you with far greater
access to audio stations and song listings.
Giving extended attention to entertainment
tasks while driving can cause a crash and you
or others can be injured or killed. Always keep
your eyes on the road and your mind on the
drive — avoid engaging in extended searching
while driving.
Keeping your mind on the drive is important for safe
driving. SeeDefensive Driving on page 4-2. Here
are some ways in which you can help avoid distraction
while driving.
While your vehicle is parked:
Familiarize yourself with all of its controls.
Familiarize yourself with its operation.
Set up your audio system by presetting your
favorite radio stations, setting the tone, and
adjusting the speakers. Then, when driving
conditions permit, you can tune to your favorite
radio stations using the presets and steering wheel
controls if the vehicle has them.
3-80
Page 259 of 578
To scan stations, press and hold either arrow for a
few seconds until a beep sounds. The radio goes to a
station, plays for a few seconds, then goes to the
next station.
For AM-FM Radio, the station frequency �ashes while
the radio is in the scan mode.
Press either arrow again to stop scanning.
The radio only seeks and scans stations with a strong
signal that are in the selected band.
For the AM-FM Radio, scan presets within the current
selected band by pressing and holding either seek arrow
for four seconds until a double beep sounds. The
radio goes to a stored preset, plays for a few seconds if
a strong signal is present, then goes to the next
stored preset. The station frequency �ashes while the
radio is in the scan mode.
4(Information) (XM™ Satellite Radio Service, MP3,
and RDS Features):Press to display additional
text information related to the current FM-RDS or XM™
station, or MP3 song. A choice of additional information
such as: Channel, Song, Artist, and CAT (category)
can display. Continue pressing to highlight the desired
label, or press the pushbutton positioned under any one
of the labels and the information about that label
displays.
When information is not available, No Info displays.
Setting Preset Stations (AM-FM Radio)
If your radio does not have XM™, up to 18 stations
(six FM1, six FM2, and six AM), can be programmed on
the six numbered pushbuttons, by performing the
following steps:
1. Turn the radio on.
2. Press BAND to select FM1, FM2, or AM.
3. Tune in the desired station.
4. Press and hold one of the six numbered
pushbuttons for three seconds until a beep sounds.
Whenever that pushbutton is pressed and
released, the station that was set, returns.
5. Repeat the Steps 2 through 4 for each pushbutton.
Storing a Radio Station as a Favorite
Drivers are encouraged to set up their radio station
favorites while the vehicle is parked. Tune to your
favorite stations using the presets, favorites button, and
steering wheel controls, if the vehicle has this feature.
SeeDefensive Driving on page 4-2.
FAV (Favorites):If your vehicle has XM™ and has a
FAV button, a maximum of 36 stations can be
programmed as favorites using the six pushbuttons
positioned below the radio station frequency labels and
by using the radio favorites page button (FAV button).
3-87