2008 GMC SAVANA lock
[x] Cancel search: lockPage 115 of 402

Instrument Panel Overview...............................3-4
Hazard Warning Flashers................................3-6
Other Warning Devices...................................3-6
Horn.............................................................3-6
Tilt Wheel.....................................................3-7
Turn Signal/Multifunction Lever.........................3-7
Turn and Lane-Change Signals........................3-8
Headlamp High/Low-Beam Changer..................3-9
Flash-to-Pass.................................................3-9
Windshield Wipers..........................................3-9
Windshield Washer.......................................3-10
Cruise Control..............................................3-10
Exterior Lamps.............................................3-13
Headlamps on Reminder................................3-14
Daytime Running Lamps (DRL).......................3-15
Automatic Headlamp System..........................3-15
Instrument Panel Brightness...........................3-16
Dome Lamps...............................................3-16
Dome Lamp Override....................................3-16
Entry/Exit Lighting.........................................3-17
Reading Lamps............................................3-17
Electric Power Management...........................3-17
Battery Run-Down Protection..........................3-17
Accessory Power Outlet(s).............................3-18
Ashtray(s) and Cigarette Lighter......................3-18Climate Controls............................................3-19
Climate Control System.................................3-19
Outlet Adjustment.........................................3-21
Rear Heating System....................................3-22
Rear Air Conditioning and Heating System.......3-23
Warning Lights, Gages, and Indicators............3-24
Instrument Panel Cluster................................3-25
Speedometer and Odometer...........................3-26
Trip Odometer..............................................3-26
Safety Belt Reminders...................................3-26
Airbag Readiness Light..................................3-27
Airbag Off Light............................................3-28
Passenger Airbag Status Indicator...................3-30
Charging System Light..................................3-32
Voltmeter Gage............................................3-32
Brake System Warning Light..........................3-33
Antilock Brake System Warning Light...............3-34
StabiliTrak
®Indicator Light..............................3-34
Engine Coolant Temperature Gage..................3-35
Tire Pressure Light.......................................3-35
Malfunction Indicator Lamp.............................3-36
Oil Pressure Gage........................................3-38
Oil Pressure Light.........................................3-39
Security Light...............................................3-40
Cruise Control Light......................................3-40
Section 3 Instrument Panel
3-1
Page 116 of 402

Highbeam On Light.......................................3-40
Tow/Haul Mode Light....................................3-40
Fuel Gage...................................................3-41
Driver Information Center (DIC).......................3-42
DIC Operation and Displays...........................3-42
DIC Compass..............................................3-47
DIC Warnings and Messages.........................3-49
DIC Vehicle Customization.............................3-58Audio System(s).............................................3-63
Setting the Clock..........................................3-65
Radio(s)......................................................3-67
Using an MP3..............................................3-77
Theft-Deterrent Feature..................................3-82
Audio Steering Wheel Controls.......................3-82
Radio Reception...........................................3-83
Fixed Mast Antenna......................................3-83
Section 3 Instrument Panel
3-2
Page 121 of 402

Tilt Wheel
For vehicles with a tilt steering wheel, it allows you to
lower or raise the steering wheel to give your legs more
room when entering or exiting the vehicle. Do not adjust
the steering wheel while driving.
The lever is located on the lower left side of the steering
column.
To tilt the wheel, hold the steering wheel and pull
the lever. Move the steering wheel to a comfortable
level, then release the lever to lock the wheel in place.
Turn Signal/Multifunction Lever
The lever on the left side of the steering column
includes the following:
•GTurn and Lane Change Signals.Turn and
Lane-Change Signals on page 3-8.
•53Headlamp High/Low-Beam Changer.
Headlamp High/Low-Beam Changer on page 3-9.
•Flash-to-Pass Feature. SeeFlash-to-Pass on
page 3-9.
•NWindshield Wipers. SeeWindshield Wipers on
page 3-9.
•LWindshield Washer. SeeWindshield Washer
on page 3-10.
3-7
Page 124 of 402

Windshield Washer
L(Washer Fluid):There is a paddle marked with the
windshield washer symbol at the top of the multifunction
lever. To spray washer fluid on the windshield, push
the paddle. The wipers will clear the window and then
either stop or return to your preset speed.
{CAUTION:
In freezing weather, do not use your washer
until the windshield is warmed. Otherwise the
washer �uid can form ice on the windshield,
blocking your vision.
Cruise Control
{CAUTION:
Cruise control can be dangerous where you
cannot drive safely at a steady speed. So, do
not use your cruise control on winding roads
or in heavy traffic.
Cruise control can be dangerous on slippery
roads. On such roads, fast changes in tire
traction can cause excessive wheel slip, and
you could lose control. Do not use cruise
control on slippery roads.
With cruise control, you can maintain a speed of about
25 mph (40 km/h) or more without keeping your foot
on the accelerator. This can really help on long
trips. Cruise control does not work at speeds below
about 25 mph (40 km/h).
When you apply your brakes, cruise control is turned off.
If your vehicle has the StabiliTrak
®system and begins
to limit wheel spin while you are using cruise control,
the cruise control will automatically disengage.
3-10
Page 128 of 402

AUTO (Automatic):Turn the control to this position
to automatically turn on the headlamps at normal
brightness, together with the following:
•Parking Lamps
•Instrument Panel Lights
•Taillamps
•License Plate Lamps
;(Parking Lamps):Turn the control to this position
to turn on the parking lamps together with the
following:
•Instrument Panel Lights
•Taillamps
•License Plate Lamps
2(Headlamps):Turn the control to this position to
turn on the headlamps together with the following lamps
listed below.
•Parking Lamps
•Instrument Panel Lights
•Taillamps
•License Plate LampsWhen the headlamps are turned on while the vehicle is
on, the headlamps will turn off automatically 10 minutes
after the ignition is turned off. When the headlamps are
turned on while the vehicle is off, the headlamps will
continue to stay on. To prevent the battery from being
drained, turn the control to the off position.
A warning chime sounds if the driver’s door is opened
while the ignition switch is off and the headlamps are on.
To change the headlamps from low beam to high
beam, push the turn signal/multifunction lever toward
the instrument panel.
Headlamps on Reminder
If a door is open, a reminder chime sounds when the
headlamps or parking lamps are manually turned on
and the key is out of the ignition. To turn off the chime,
turn the headlamp switch to off or auto and then
back on, or close and re-open the door. In the auto
mode, the headlamps turn off once the ignition is
in LOCK/OFF or may remain on until the headlamp
delay ends, if enabled in the Driver Information
Center (DIC). See “Exit Lighting” underDIC Vehicle
Customization on page 3-58.
3-14
Page 130 of 402

If the vehicle is started in a dark garage, the automatic
headlamp system will come on immediately. Once
the vehicle leaves the garage, it takes approximately
30 seconds for the automatic headlamp system to
change to DRL if it is light outside. During that delay, the
instrument panel cluster may not be as bright as usual.
Make sure the instrument panel brightness control is in
the full bright position. SeeInstrument Panel Brightness
on page 3-16.
Instrument Panel Brightness
The knob for this feature is located next to the exterior
lamps control.
D(Instrument Panel Lights):Turn the knob
clockwise or counterclockwise to brighten or dim the
instrument panel lights and the radio display. This only
works if the headlamps or parking lamps are on.
To turn on the dome lamps, with the vehicle doors
closed, turn the knob all the way clockwise.
Dome Lamps
The dome lamps come on when any door is opened.
They turn off after all the doors are closed.
The dome lamps can also be turned on by turning the
instrument panel brightness knob, located next to
the exterior lamps control, clockwise to the farthest
position. In this position, the dome lamps remain
on whether a door is opened or closed.
Dome Lamp Override
The dome lamp override button is located next to the
exterior lamps control.
The dome lamp override is used to set the dome lamps
to remain off or come on automatically when a door
is opened.
E(Dome Lamp Override):Press the button in and
the dome lamps remain off when a door is opened.
Press the button again to return it to the extended
position so that the dome lamps come on when a
door is opened.
3-16
Page 131 of 402

Entry/Exit Lighting
Your vehicle has an illuminated entry/exit feature.
When a door is opened or the key is removed from
the ignition, the dome lamps will come on if the dome
override button is in the out position.
Reading Lamps
For vehicles with reading lamps, press the button
located next to each lamp to turn it on or off.
Your vehicle may also have reading lamps in other
locations. To turn each one on or off, press the button
located next to the lamp. The lamps cannot be adjusted.
Electric Power Management
The vehicle has Electric Power Management (EPM)
that estimates the battery’s temperature and state
of charge. It then adjusts the voltage for best
performance and extended life of the battery.
When the battery’s state of charge is low, the voltage is
raised slightly to quickly put the charge back in. When
the state of charge is high, the voltage is lowered slightly
to prevent overcharging. If the vehicle has a voltmetergage or voltage display on the Driver Information
Center (DIC), you may see the voltage move up or
down. This is normal. If there is a problem, an alert
will be displayed.
The battery can be discharged at idle if the electrical
loads are very high. This is true for all vehicles.
This is because the generator (alternator) may not
be spinning fast enough at idle to produce all the
power that is needed for very high electrical loads.
A high electrical load occurs when several of the
following loads are on: headlamps, high beams, rear
window defogger, climate control fan at high speed,
engine cooling fans, trailer loads, and loads plugged
into accessory power outlets.
EPM works to prevent excessive discharge of the battery.
It does this by balancing the generator’s output and the
vehicle’s electrical needs. It can increase engine idle
speed to generate more power, whenever needed.
Battery Run-Down Protection
This feature shuts off the dome lamps if they are left on
for more than 10 minutes when the ignition is in LOCK.
This will help prevent the battery from running down.
3-17
Page 133 of 402

Climate Controls
Climate Control System
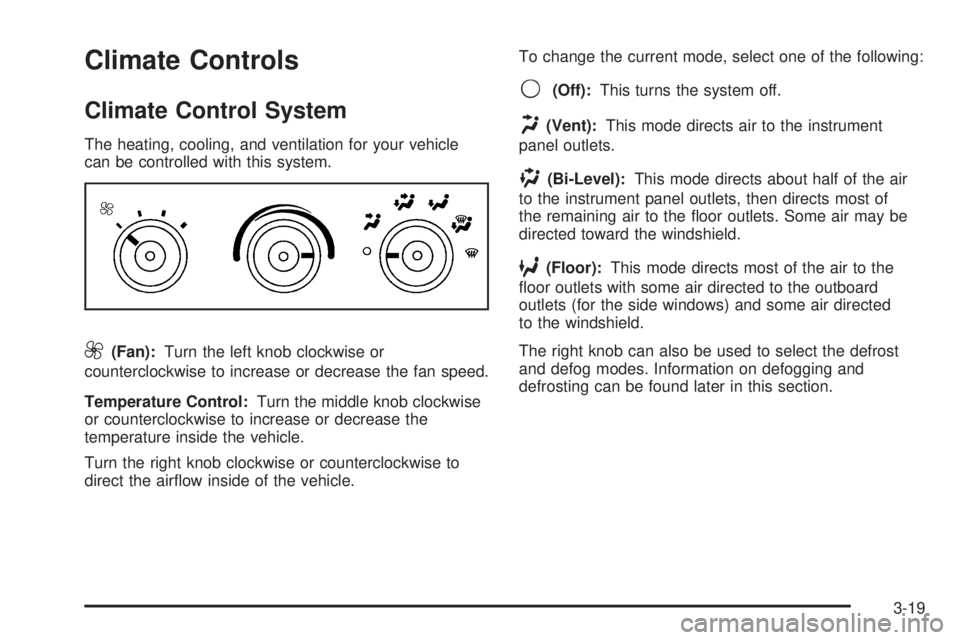
The heating, cooling, and ventilation for your vehicle
can be controlled with this system.
9(Fan):Turn the left knob clockwise or
counterclockwise to increase or decrease the fan speed.
Temperature Control:Turn the middle knob clockwise
or counterclockwise to increase or decrease the
temperature inside the vehicle.
Turn the right knob clockwise or counterclockwise to
direct the airflow inside of the vehicle.To change the current mode, select one of the following:
9(Off):This turns the system off.
H(Vent):This mode directs air to the instrument
panel outlets.
)(Bi-Level):This mode directs about half of the air
to the instrument panel outlets, then directs most of
the remaining air to the floor outlets. Some air may be
directed toward the windshield.
6(Floor):This mode directs most of the air to the
floor outlets with some air directed to the outboard
outlets (for the side windows) and some air directed
to the windshield.
The right knob can also be used to select the defrost
and defog modes. Information on defogging and
defrosting can be found later in this section.
3-19