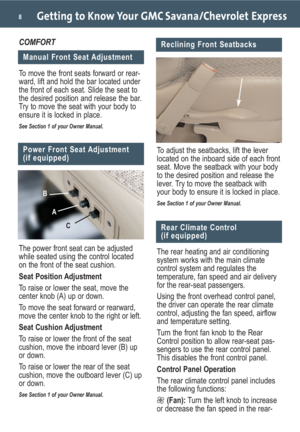
Page 9 of 20

to turn off the fan.
(Vent):Turn the center knob to this
mode to direct most of the air to the
upper outlets.
(Floor):Turn the center knob to this
mode to direc")
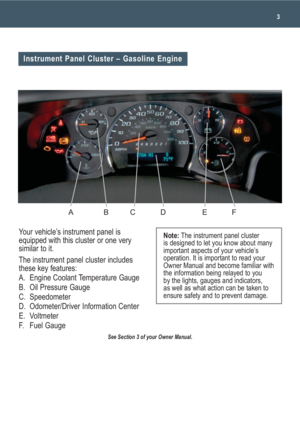
9
seating area. Turn the knob to (OFF)
to turn off the fan.
(Vent):Turn the center knob to this
mode to direct most of the air to the
upper outlets.
(Floor):Turn the center knob to this
mode to direct most of the air to the
floor outlets.
Turn the knob to any position between
these two modes to blend the airflow.
Temperature Control:Turn the right
knob to increase or decrease the
temperature for the rear-seating area.
The air conditioning system on the main
climate control panel must be turned on
to direct cooled air to the rear-seating
area; otherwise, the rear of the vehicle
will remain at cabin temperature.
See Section 3 of your Owner Manual.
Audio System Features
(Information):Press this button to
switch the display between the radio
station frequency and the time. Also,
press this button to display additional
text information related to the current
FM-RDS or XM station, or MP3 song
(if equipped).
(Tune):Turn this knob to select radio
stations or, when a CD is playing, to
select a track or MP3 file (if equipped).
Press the knob to adjust the tone
(bass/treble) or speakers (balance/fade).
BAND:Press this button to switch to
AM, FM, or XM (if equipped). With a CD
playing, press this button to switch to
the radio.
CD/AUX (if equipped): With the radio
playing, press this button to switch to a
CD or an auxiliary input device such as
a portable audio player.
FAV (Favorite) (if equipped): Press this
button to go through up to six pages of
preset favorite radio stations. Select a
preset station using the pushbuttons
below the radio display.
EQ (Equalization):Press this button to
select preset equalization settings.
CAT (Category)(if equipped): Press this
button to find XM stations (if equipped)
within a desired category.
ENTERTAINMENT
While most of the features on your radio
will look familiar, some of the following
may be new:
(Power/Volume):Press this knob to
turn the system on or off. Turn the knob
to adjust the volume.
Base radio shown
Page 10 of 20
: A
portable audio player (such as an iPod®
or MP3 player) can be connected to
the auxiliary input jack located on")
Getting to Know Your GMC Savana/Chevrolet Express10
Auxiliary Input Jack(if equipped): A
portable audio player (such as an iPod®
or MP3 player) can be connected to
the auxiliary input jack located on the
radio. Press the CD/AUX button to begin
playing audio from the player over the
vehicle speakers. To optimize speaker
volume, fully increase the volume on the
portable audio player.
Radio Data System
When you tune to a Radio Data System
(RDS) station, the station name and call
letters will appear on the display instead
of the frequency. RDS stations may also
provide the time of day, a program type
for current programming and the name
of the program being broadcast.
RDS features are available for use only
on FM stations that broadcast RDS
information. RDS relies on receiving
specific information from these stations
and will work only when the information
is available.
Setting Preset/Favorite Stations
Before setting your preset or favorite
stations, park the vehicle.
Note:Searching for audio stations or
songs — or giving extended attention to
entertainment tasks — while driving can
lead you to look away from the road for
prolonged periods, which may cause
you to miss seeing things on the road
that you need to see. Always keep your
eyes on the road and your mind on the
drive — and avoid engaging in extend-
ed searching for specific items while
driving.
Setting Preset Stations (Base Radio)
To set up to 18 preset stations:
1. Turn on the radio.
2. Press BAND to select FM1, FM2
or AM.
3. Tune in the desired radio station.
4. Press and hold one of the six push-
buttons until a beep sounds.
5. Repeat steps 2–4 for each push-
button on each band.
Setting Favorite Stations (Uplevel
Radio, if equipped)
You can set up to six pages of favorite
radio stations. Each page can contain
any combination of up to six AM, FM, or
XM (if equipped) stations.
To set the number of favorite station
pages:
1. Press the MENU button to display the
radio setup menu.
2. Press the pushbutton located below
the FAV 1–6 label on the radio
display.
3. Select the desired number of favorite
station pages.
4. Press the FAV button. You may now
begin storing your favorite stations for
the chosen number of pages.
To store favorite stations:
1. Press the BAND button to select AM,
FM, or XM (if equipped).
Page 11 of 20

11
2. Tune in the desired radio station.
3. Press the FAV button to display the
page where the station is to be
stored.
4. Press and hold one of the six push-
buttons until a beep sounds.
5. Repeat the steps for each pushbutton
on each page.
Setting the Time
To set the time (without Date Display):
1. Turn on the radio.
2. Press the (Clock) button until the
hour numbers begin flashing on the
radio display. Press the button again
to adjust the minute numbers.
3. With either the hour or minute num-
bers flashing, use the (Tune) knob
to adjust the time.
4. Press the Clock button again to set
the currently displayed time.
To set the time (with Date Display,
if equipped):
1. Turn on the radio.
2. Press the (Clock) button. Or, if
equipped, press the MENU button
until the clock option is displayed;
and then press the pushbutton locat-
ed under the clock option label. The
HR, MIN, MM, DD, YYYY labels will
appear on the display.3. Press the pushbutton under any of
the labels to be changed.
4. Press the pushbutton again, the right
SEEK arrow or the FWD button to
increase the numbers. Press the left
SEEK arrow or the REV button to
decrease the numbers. Rotating the
(Tune) knob also will increase or
decrease the selected label.
5. Press the Clock or MENU button
again to set the currently displayed
time and date.
Playing MP3 Files (if equipped)
Your audio system has the capability of
playing a CD-R or CD-RW disc contain-
ing MP3 audio files. When playing, an
MP3 label will be displayed.
See Section 3 of your Owner Manual.
Multiple-Disc CD Player
(if equipped)
To load a CD(s) in the in-dash 6-disc
CD player:
• Press and release the LOAD
button. To load multiple CDs, press
and hold the LOAD button for
two seconds. Follow the display
prompts to load each CD.
To play a CD:
• Press the pushbutton below the arrow
label on the display to select the
desired CD number.
To eject a CD(s):
• Press the EJECT button once to
eject the CD that is currently playing.
To eject all CDs, press and hold the
EJECT button for two seconds.
Page 12 of 20

Getting to Know Your GMC Savana/Chevrolet Express12
If a CD is not removed after several
seconds, it will be pulled back into the
player automatically.
Refer to the Audio System Features
section for information about the radio
features of the multiple-disc CD player.
See Section 3 of your Owner Manual.
Note:CDs with any affixed labels may
jam in the CD player. Label a CD using
a permanent marker. If more than one
CD is inserted into the slot at a time,
or if scratched or damaged CDs are
played, the CD player could be dam-
aged. When using the CD player, use
only CDs in good condition without
labels; load one CD at a time; and keep
the CD player and the loading slot free
of foreign materials, liquids or debris.
Audio Steering Wheel Controls
(if equipped)
The following
audio controls
are located on
the steering
wheel:
+ – (Volume):
Pull up on the
+ or – button
to increase or
decrease the
volume.
(Next/Previous): Press the up or
down arrow to go to the next or previous
radio station stored as a favorite or,
when a CD is playing, to the next or
previous track.
SRCE (Source): Press this button
to switch between AM, FM, XM
(if equipped), CD, and AUX.
(Seek):Press this button to go to
the next radio station on the same band.
(Mute):Press this button to mute the
vehicle speakers. Press it again to turn
on the sound.
See Section 3 of your Owner Manual.
CONVENIENCE
Exterior Lamps
Automatic Headlamp System
Your vehicle is equipped with an
Automatic Headlamp System, which
turns on the Daytime Running Lamps
(DRLs) during the day and the head-
lamps and other exterior lamps at night
or when necessary.
The system uses a light sensor, located
on top of the instrument panel, to deter-
mine light conditions. For proper system
operation, avoid placing any objects on
or near the sensor.
Exterior Lamp Controls
The exterior lamp control knob, located
on the left side of the instrument panel,
can be rotated to the following positions:
(On/Off):Turn the knob to this posi-
tion to turn off the Automatic Headlamp
System and DRLs. Turn the knob to this
position again to turn them on.
AUTO (Automatic):Turn the knob to
this position to turn on the Automatic
Headlamp System and DRLs.
Page 13 of 20
: Turn the knob to
this position to turn on the parking lamps
and taillamps.
(Headlamps):Turn the knob to this
position to turn on the headlamps and
other exterior lamps.
(Fog Lamp")
13
(Parking Lamps): Turn the knob to
this position to turn on the parking lamps
and taillamps.
(Headlamps):Turn the knob to this
position to turn on the headlamps and
other exterior lamps.
(Fog Lamps)(if equipped): Press
this button to turn the fog lamps on
or off.
See Section 3 of your Owner Manual.
Interior Lamps
The following inte-
rior lamp controls
are located on the
left side of the
instrument panel:
(Dome Lamp
Override):Press
in this button to
have the dome
lamps remain off
when the doors are open.
Press the button again so it returns to
the extended position to have the dome
lamps turn on automatically when a door
is open.
(Instrument Panel Brightness):
Turn this pop-out knob to adjust the
brightness of the instrument panel lights.
Turn the knob fully clockwise to turn on
the dome lamps.
See Section 3 of your Owner Manual.
Cruise Control
The following
cruise control
buttons are locat-
ed on the steering
wheel:
(On/Off):
Press this button
to turn the cruise
control system on
or off.
– SET (Set):
Press this button
to set a speed, or
to decrease the speed if the system is
active. When the cruise control speed is
set, the cruise control light will illuminate
on the instrument panel cluster.
+ RES (Resume):Press this button to
resume a set speed, or to increase the
speed if the system is active.
(Cancel):Press this button to can-
cel the cruise control but retain the set
speed in memory.
See Section 3 of your Owner Manual.
Page 14 of 20
:For a single wipe, twist the
band down to this")
Getting to Know Your GMC Savana/Chevrolet Express14
The following windshield wiper functions
are located on the turn signal/multifunc-
tion lever:
(Mist):For a single wipe, twist the
band down to this position and release.
For additional wipes, hold the band at
this position.
(Off):Twist the band to this position
to turn off the wipers.
(Delay):Twist the band up to set the
delay time between wipes. The
wipers activate more often as the band
is rotated upward.
(Low):Twist the band up to this
position for steady wiping at low speed.
(High):Twist the band up to this
position for rapid wiping at high speed.
(Washer):To spray washer fluid,
turn the paddle at the top of the turn
signal/multifunction lever toward the
windshield and release. There will be a
slight delay before the wipers are acti-
vated. This is normal and allows the
washer to clean the entire windshield.
See Section 3 of your Owner Manual.
Outside Power Mirrors
(if equipped)
The outside power mirrors control is
located on the driver’s door. Turn the
knob to select the desired mirror, and
then move the knob in the desired
direction to adjust the mirror angle.
The lower convex (spotter) mirror (if
equipped) can be adjusted manually
to provide a better viewing angle.
See Section 2 of your Owner Manual.
The front swing-out side door has a
check strap in the doorframe to keep the
door from opening beyond 90 degrees.
To open the door beyond 90 degrees:
1. Close the door partially.
2. Pull the check strap toward you.
3. Open the door.
Use care not to overextend the door
when the check strap is not engaged.
When the door is closed, the check
strap will automatically re-engage.
See Section 2 of your Owner Manual.
60/40 Swing-Out Side Door
(if equipped)
Windshield Wipers
Page 15 of 20

15
To install the rear seats:
1. Position the seat into the open slots in
the floor rails and push the seat for-
ward, hooking the seat onto the rails.
2. Install the locking pins into the seat
base on the inboard sides of the seat
floor latch. Move the seat to line up
with the pins in the seat base.
3. Install the pin marked “R” on the pas-
senger’s side and the pin marked “L”
on the driver’s side.
4. Push the pins down into the retaining
clips. Check that the pins are locked
in place.
5. Connect each shoulder belt by insert-
ing the latch plate into the buckle
attached at each outboard position of
the bench seat.
See Section 1 of your Owner Manual.
Rear Seat Removal and
Installation (if equipped)
To remove the rear seats:
1. Disconnect each outboard shoulder
belt on the bench seat by pressing
the tip of a key into the release hole
of the safety belt buckle while pulling
up on the safety belt.
2. Locate the two locking pins on the
inboard sides of the seat floor latch.
If there are floormats, the pins are
under a flap cut into the mat. The
driver-side pin has a gray handle
marked with an “L.” The passenger-
side pin has a black handle marked
with an “R.”
3. Pull each pin handle up to disengage
the pins. Pull out the pins.
4. Pull the seat rearward about two inch-
es and lift the seat from the floor rails.
5. Remove the seat.
Page 16 of 20

StabiliTrak®is an advanced computer-
controlled vehicle stability enhancement
system that automatically uses the func-
tions of the antilock brakes, traction con-
trol and stability control to help you keep
the vehicle continuing in the same direc-
tion that the steering wheel is pointed.
When activated, the system may reduce
engine power to the wheels and apply
braking to individual wheels as neces-
sary to help you maintain directional
control of the vehicle.
When you first start your vehicle and
begin driving, you may hear or feel the
system going through several diagnostic
checks. You may also feel a reduction in
acceleration or hear a noise or vibration
while the system is active. This is normal.
StabiliTrak Button
Parts of the
StabiliTrak
system can
be turned
off at vehicle
speeds below
20 mph. The
system auto-
matically will
turn back on when vehicle speed
exceeds 20 mph. It is recommended to
leave the system on at all times for nor-
mal driving. It may be necessary to turn
off the system if the vehicle is stuck in
sand, mud or snow.
Getting to Know Your GMC Savana/Chevrolet Express16
Tire Pressure Monitor
The Tire Pressure Monitor alerts you
when a significant reduction in pressure
occurs in one or more of your vehicle’s
tires by illuminating the (Low Tire
Pressure) warning light on the instru-
ment panel cluster. The low tire pressure
warning light will remain on until you
correct the tire pressure. A CHECK TIRE
PRESSURE message may also appear
on the DIC.
Correcting the Tire Pressure
When the low tire pressure warning light
illuminates, you must inflate the tire to
the proper tire pressure (just as you
must refuel the vehicle when the low
fuel warning light illuminates). The Tire
and Loading Information label shows the
correct tire pressure for the tires when
they’re cold. “Cold” means your vehicle
has been sitting for at least three hours
or driven no more than one mile.
You can temporarily clear the DIC
message by acknowledging it with your
DIC controls. However, at the next vehi-
cle start-up, the DIC message will reap-
pear if the tire pressure has not been
corrected.
During cooler conditions, the low tire
pressure warning light may appear when
the vehicle is first started and then turn
PERFORMANCE & MAINTENANCE
StabiliTrak®– Stability Control
System
To disable the system, press and hold
the (StabiliTrak) button, located on
the instrument panel, for more than five
seconds. The StabiliTrak Off message
will be displayed and the StabiliTrak light
will illuminate. Press the button
again to turn the system back on.
See Section 4 of your Owner Manual.