Page 282 of 468

4. Follow the dolly manufacturer’s instructions to
attach and secure the vehicle being towed to
the dolly and then the loaded dolly to the tow
vehicle. Use an adequate clamping device to ensure
that the front wheels are locked into the straight
position.
5. Release the parking brake only after the vehicle
being towed is �rmly attached to the towing
vehicle.
6. Turn the ignition to LOCK.
If the tow vehicle will not be started or driven for
six weeks or more, remove the battery cable
from the negative terminal (post) of the battery.
Electronically Controlled Air
Suspension System
Your vehicle may be equipped with an electronically
controlled air suspension system that automatically
keeps your vehicle level as you load and unload.
The system includes a compressor, two height
sensors and two air springs supporting the rear axle.The system also has an internal clock to prevent
overheating if the in�ator is used for prolonged periods.
If the system overheats, all leveling function stops
until the system cools down. During this time, the
indicator light on the air in�ator switch will be �ashing.
The ignition has to be on for the system to in�ate,
in order to raise the vehicle to the standard ride height
after loading. The system can lower the vehicle to
the standard ride height after unloading with the ignition
on and also for up to 30 minutes after the ignition
has been turned off.
You may hear the compressor operating when you load
your vehicle, and periodically as the system adjusts
the vehicle to the standard ride height.
Load leveling will not function normally with the in�ator
hose attached to the in�ator outlet. Remove the in�ator
hose from the outlet during loading and unloading.
If the vehicle is parked for an extended period of time,
some bleed down of the suspension is normal. Upon
starting the vehicle, proper height will be achieved.
4-44
Page 290 of 468

Driving with a Trailer
{CAUTION:
If you have a rear-most window open and you
pull a trailer with your vehicle, carbon monoxide
(CO) could come into your vehicle. You can not
see or smell CO. It can cause unconsciousness
or death. SeeEngine Exhaust on page 2-37.
To maximize your safety when towing a trailer:
Have your exhaust system inspected for
leaks, and make necessary repairs before
starting on your trip.
Keep the rear-most windows closed.
If exhaust does come into your vehicle
through a window in the rear or another
opening, drive with your front, main heating
or cooling system on and with the fan on
any speed. This will bring fresh, outside air
into your vehicle. Do not use the climate
control setting for maximum air because it
only recirculates the air inside your vehicle.
SeeDual Climate Control System on
page 3-21.Towing a trailer requires a certain amount of
experience. Before setting out for the open road, you’ll
want to get to know your rig. Acquaint yourself with the
feel of handling and braking with the added weight of the
trailer. And always keep in mind that the vehicle you are
driving is now a good deal longer and not nearly as
responsive as your vehicle is by itself.
Before you start, check all trailer hitch parts and
attachments, safety chains, electrical connection, lamps,
tires and mirror adjustment. If the trailer has electric
brakes, start your vehicle and trailer moving and then
apply the trailer brake controller by hand to be sure
the brakes are working. This lets you check your
electrical connection at the same time.
During your trip, check occasionally to be sure that
the load is secure, and that the lamps and any trailer
brakes are still working.
Following Distance
Stay at least twice as far behind the vehicle ahead as
you would when driving your vehicle without a trailer.
This can help you avoid situations that require
heavy braking and sudden turns.
4-52
Page 322 of 468

Adding Coolant
If you need more coolant, add the proper DEX-COOL®
coolant mixture at the coolant recovery tank.
{CAUTION:
Turning the radiator pressure cap when the
engine and radiator are hot can allow steam
and scalding liquids to blow out and burn you
badly. With the coolant recovery tank, you will
almost never have to add coolant at the
radiator. Never turn the radiator pressure
cap — even a little — when the engine and
radiator are hot.
Add coolant mixture at the recovery tank, but be careful
not to spill it.
{CAUTION:
You can be burned if you spill coolant on hot
engine parts. Coolant contains ethylene glycol,
and it will burn if the engine parts are hot
enough. Do not spill coolant on a hot engine.Occasionally check the coolant level in the radiator.
For information on how to add coolant to the radiator,
seeCooling System on page 5-30.
Radiator Pressure Cap
Notice:If the pressure cap is not tightly installed,
coolant loss and possible engine damage may
occur. Be sure the cap is properly and tightly
secured.
SeeEngine Compartment Overview on page 5-12for
information on location.
Engine Overheating
You will �nd a coolant temperature gage on your
vehicle’s instrument panel. SeeEngine Coolant
Temperature Gage on page 3-40for more information.
If your vehicle has a Driver Information Center (DIC),
the display will show an Engine Coolant Hot/Engine
Overheated message. SeeDIC Warnings and Messages
on page 3-53for more information.
5-28
Page 344 of 468
Headlamps
To replace one of these bulbs:
1. Open the hood.Hood Release on page 5-11for
more information.
2. Lift the two headlamp retaining clips.
3. Pull the headlamp assembly away from the vehicle
to access the electrical connectors.4. Remove the cover from the headlamp bulb.
5. Remove the bulb socket that needs to be replaced
by turning it counterclockwise.
6. Disconnect the electrical connector from the
old bulb.
7. Plug the electrical connector into the new bulb
using care not to touch the glass with your
�ngers.
8. Install the new bulb into the socket and turn it
clockwise to secure.
9. Reinstall by reversing Steps 1 through 6.
10. Press down on the headlamp retaining clips to
secure the headlamp assembly.
5-50
Page 345 of 468
Front Turn Signal, Sidemarker and
Parking Lamps
To replace one of these bulbs:
1. Follow Steps 1 through 3 underHeadlamps on
page 5-50to access the front turn signal,
sidemarker or parking lamp.
2. Turn the bulb socket counterclockwise and remove
it from the lamp assembly.
3. Holding the socket, pull the old bulb to release it
from the socket.
4. Push the new bulb into the socket until it clicks.
5. Insert the bulb socket into the lamp assembly and
turn it clockwise to secure.
6. Reinstall the headlamp assembly by lining up the
headlamp assembly with the slots in the headlamp
retaining clips.
7. Press down on the headlamp retaining clips to
secure the headlamp assembly.
Taillamps, Turn Signal, and
Stoplamps
To replace a stoplamp/taillamp or turn signal bulb:
1. Open the liftgate. SeeLiftgate/Liftglass on
page 2-12for more information.
2. Remove the
two screws from the
taillamp assembly.
3. Pull the assembly away from the vehicle.
5-51
Page 347 of 468
Back-Up Lamps
The back-up lamps are
located in the rear bumper.
To replace a bulb:
1. Reach behind the rear bumper and locate the bulb
socket.
2. Turn it counterclockwise to remove from the lamp
assembly.
3. Holding the socket, pull the old bulb to release it
from the socket.
4. Push in a new bulb into the bulb socket until it
clicks.
5. Reinstall the bulb socket into the lamp assembly
and turn it clockwise to secure.
License Plate Lamp
1. Remove the two screws holding the license plate
lamp lens.
2. Pull the lens away from the lamp assembly.
3. Pull the old bulb straight out from the bulb socket.
4. Install the new bulb.
5. Replace the lamp assembly lens and tighten the
screws.
5-53
Page 367 of 468

Reset the Tire Pressure Monitor System. SeeTire
Pressure Monitor Operation on page 5-69.
Make certain that all wheel nuts are properly
tightened. See “Wheel Nut Torque” under
Capacities and Specifications on page 5-120.
{CAUTION:
Rust or dirt on a wheel, or on the parts to
which it is fastened, can make wheel nuts
become loose after time. The wheel could
come off and cause an accident. When
you change a wheel, remove any rust or
dirt from places where the wheel attaches
to the vehicle. In an emergency, you can
use a cloth or a paper towel to do this;
but be sure to use a scraper or wire brush
later, if needed, to get all the rust or dirt
off. SeeChanging a Flat Tire on page 5-82.
Make sure the spare tire is stored securely. Push,
pull, and then try to rotate or turn the tire. If it
moves, tighten the cable. SeeStoring a Flat or
Spare Tire and Tools on page 5-96.
When It Is Time for New Tires
Various factors, such as maintenance, temperatures,
driving speeds, vehicle loading, and road conditions,
in�uence when you need new tires.
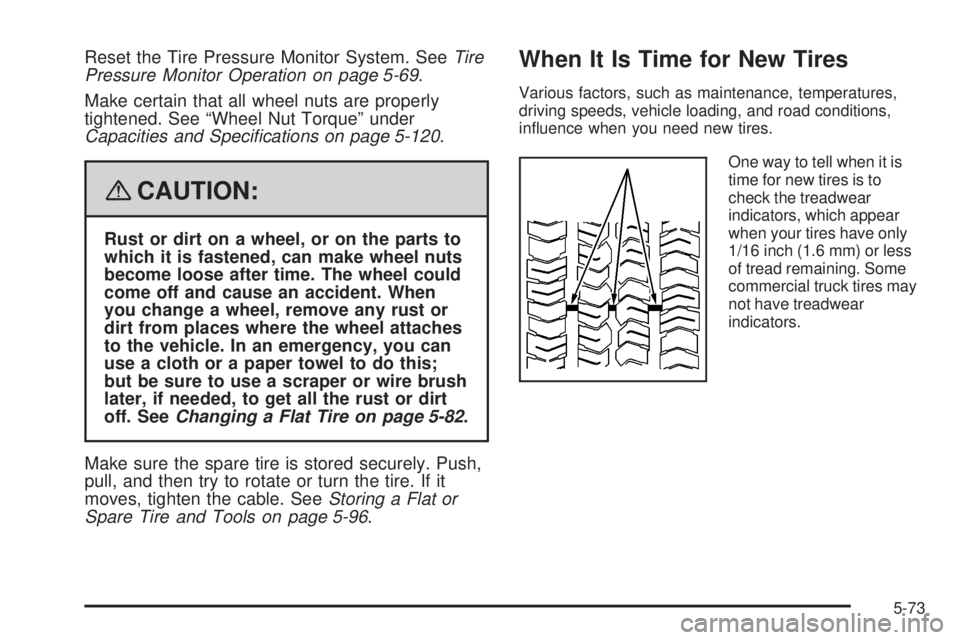
One way to tell when it is
time for new tires is to
check the treadwear
indicators, which appear
when your tires have only
1/16 inch (1.6 mm) or less
of tread remaining. Some
commercial truck tires may
not have treadwear
indicators.
5-73
Page 391 of 468

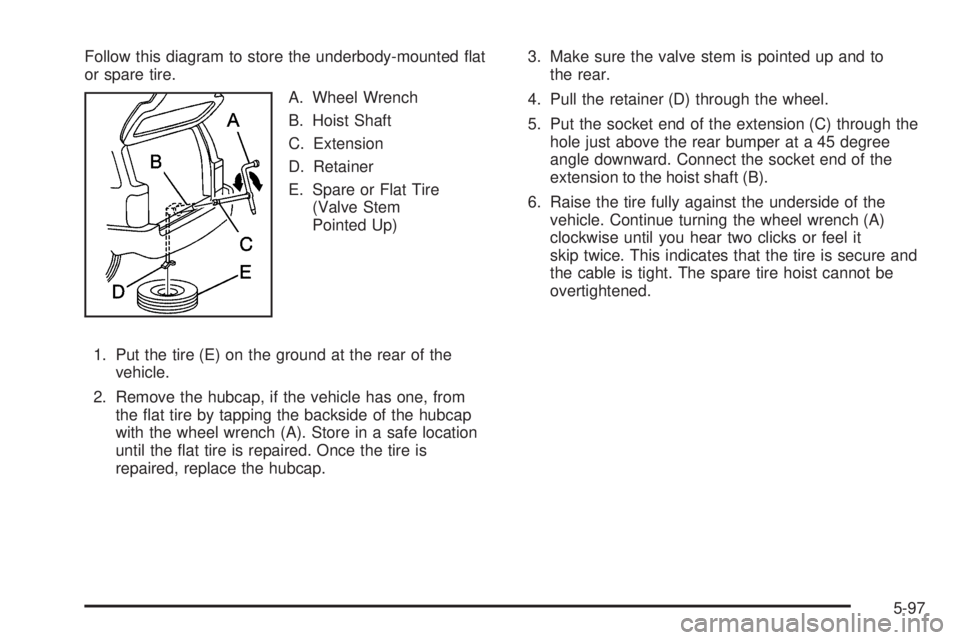
Follow this diagram to store the underbody-mounted �at
or spare tire.
A. Wheel Wrench
B. Hoist Shaft
C. Extension
D. Retainer
E. Spare or Flat Tire
(Valve Stem
Pointed Up)
1. Put the tire (E) on the ground at the rear of the
vehicle.
2. Remove the hubcap, if the vehicle has one, from
the �at tire by tapping the backside of the hubcap
with the wheel wrench (A). Store in a safe location
until the �at tire is repaired. Once the tire is
repaired, replace the hubcap.3. Make sure the valve stem is pointed up and to
the rear.
4. Pull the retainer (D) through the wheel.
5. Put the socket end of the extension (C) through the
hole just above the rear bumper at a 45 degree
angle downward. Connect the socket end of the
extension to the hoist shaft (B).
6. Raise the tire fully against the underside of the
vehicle. Continue turning the wheel wrench (A)
clockwise until you hear two clicks or feel it
skip twice. This indicates that the tire is secure and
the cable is tight. The spare tire hoist cannot be
overtightened.
5-97