2008 FORD FREESTYLE ECU
[x] Cancel search: ECUPage 199 of 352
SAFETY SEATS FOR CHILDREN
Child and infant or child safety seats
Use a safety seat that is recommended for the size and weight of the
child. Carefully follow all of the manufacturer’s instructions with the
safety seat you put in your vehicle. If you do not install and use the
safety seat properly, the child may be injured in a sudden stop or
collision.
When installing a child safety seat:
•Review and follow the information
presented in theAirbag
supplemental restraint system
(SRS) section in this chapter.
•Use the correct safety belt buckle
for that seating position (the
buckle closest to the direction the
tongue is coming from).
•Insert the belt tongue into the
proper buckle until you hear a
snap and feel it latch. Make sure the tongue is securely fastened in the
buckle.
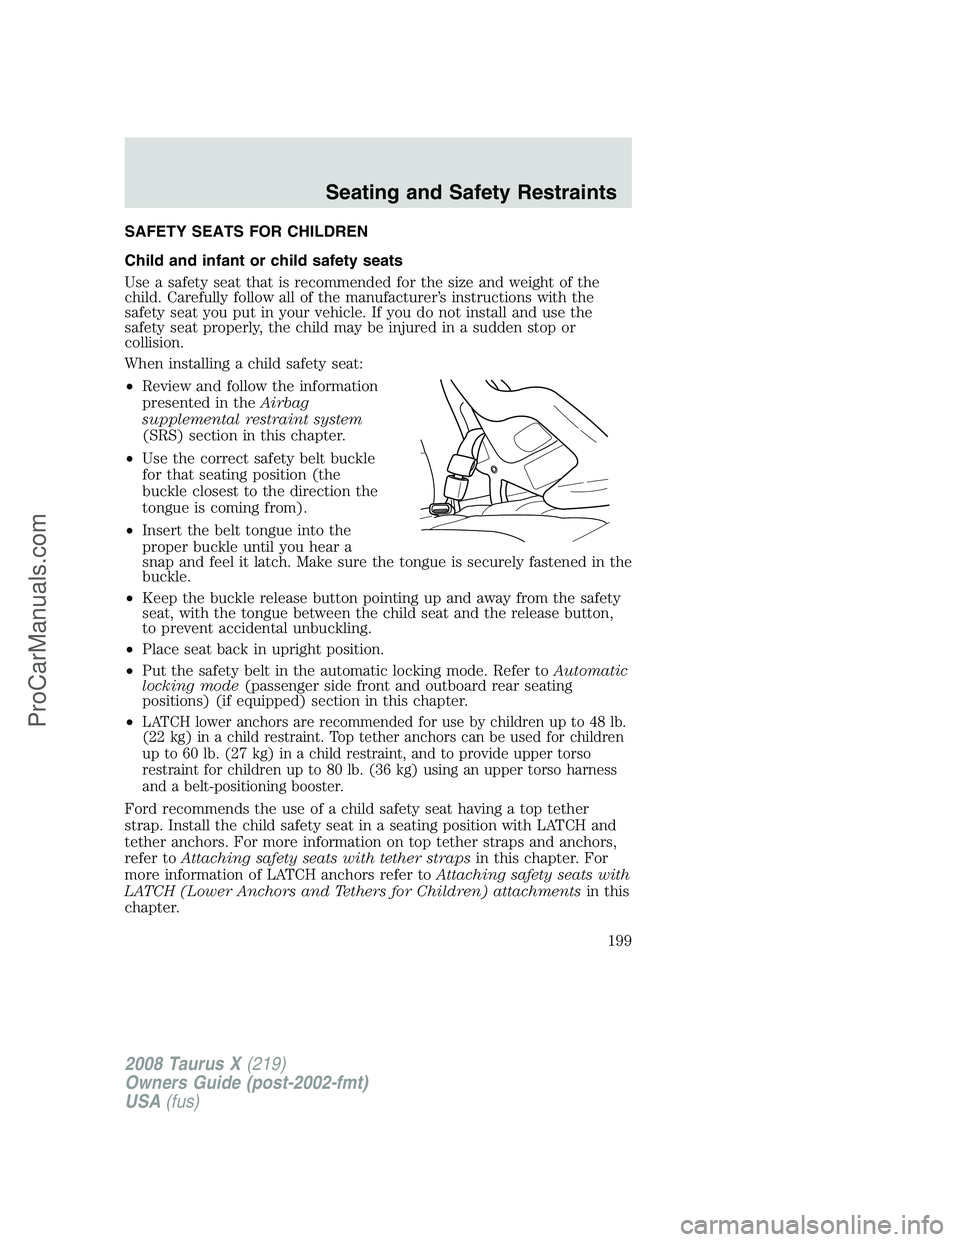
•Keep the buckle release button pointing up and away from the safety
seat, with the tongue between the child seat and the release button,
to prevent accidental unbuckling.
•Place seat back in upright position.
•Put the safety belt in the automatic locking mode. Refer toAutomatic
locking mode(passenger side front and outboard rear seating
positions) (if equipped) section in this chapter.
•
LATCH lower anchors are recommended for use by children up to 48 lb.
(22 kg) in a child restraint. Top tether anchors can be used for children
up to 60 lb. (27 kg) in a child restraint, and to provide upper torso
restraint for children up to 80 lb. (36 kg) using an upper torso harness
and a belt-positioning booster.
Ford recommends the use of a child safety seat having a top tether
strap. Install the child safety seat in a seating position with LATCH and
tether anchors. For more information on top tether straps and anchors,
refer toAttaching safety seats with tether strapsin this chapter. For
more information of LATCH anchors refer toAttaching safety seats with
LATCH (Lower Anchors and Tethers for Children) attachmentsin this
chapter.
2008 Taurus X(219)
Owners Guide (post-2002-fmt)
USA(fus)
Seating and Safety Restraints
199
ProCarManuals.com
Page 201 of 352
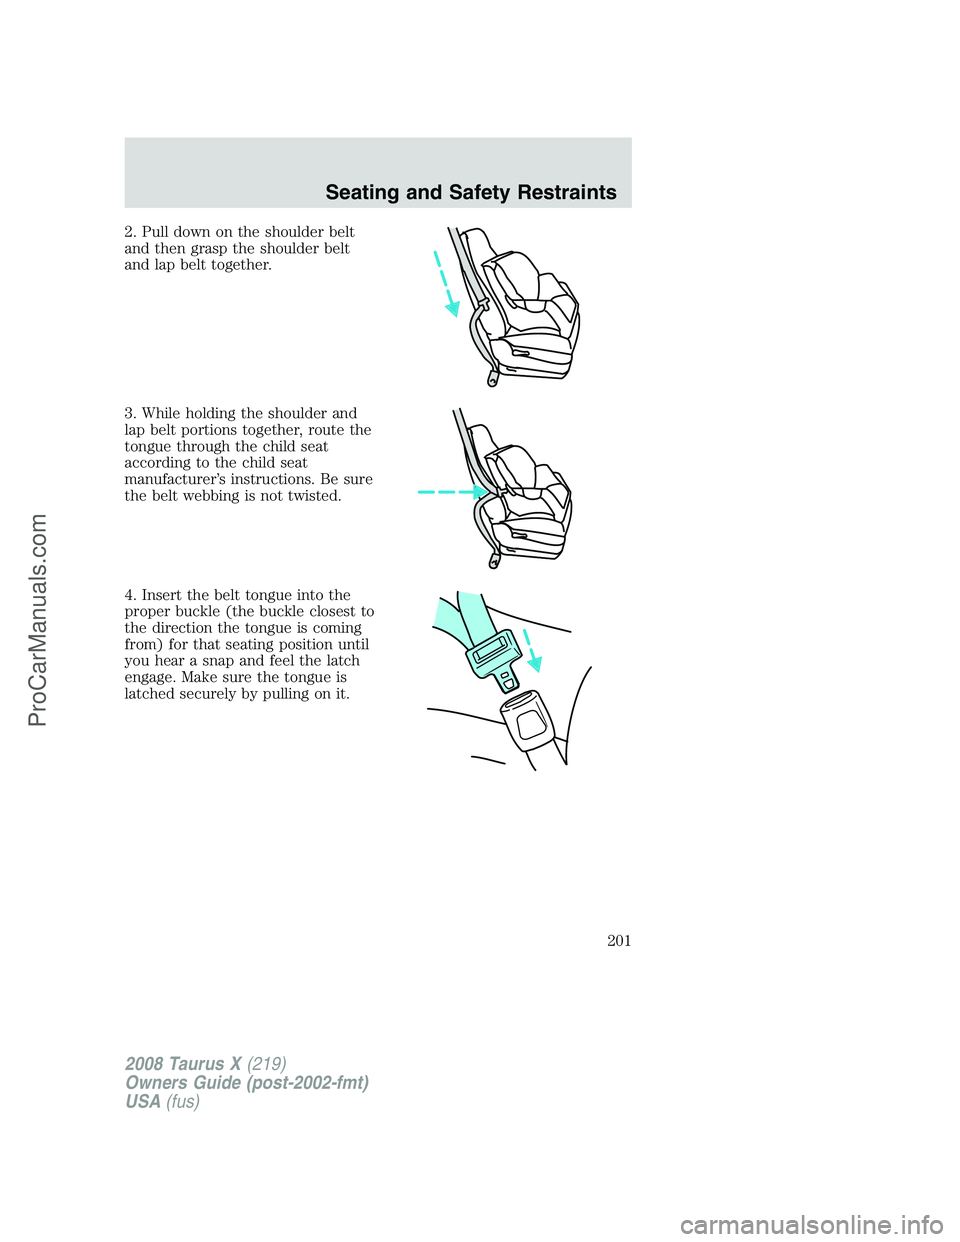
2. Pull down on the shoulder belt
and then grasp the shoulder belt
and lap belt together.
3. While holding the shoulder and
lap belt portions together, route the
tongue through the child seat
according to the child seat
manufacturer’s instructions. Be sure
the belt webbing is not twisted.
4. Insert the belt tongue into the
proper buckle (the buckle closest to
the direction the tongue is coming
from) for that seating position until
you hear a snap and feel the latch
engage. Make sure the tongue is
latched securely by pulling on it.
2008 Taurus X(219)
Owners Guide (post-2002-fmt)
USA(fus)
Seating and Safety Restraints
201
ProCarManuals.com
Page 202 of 352
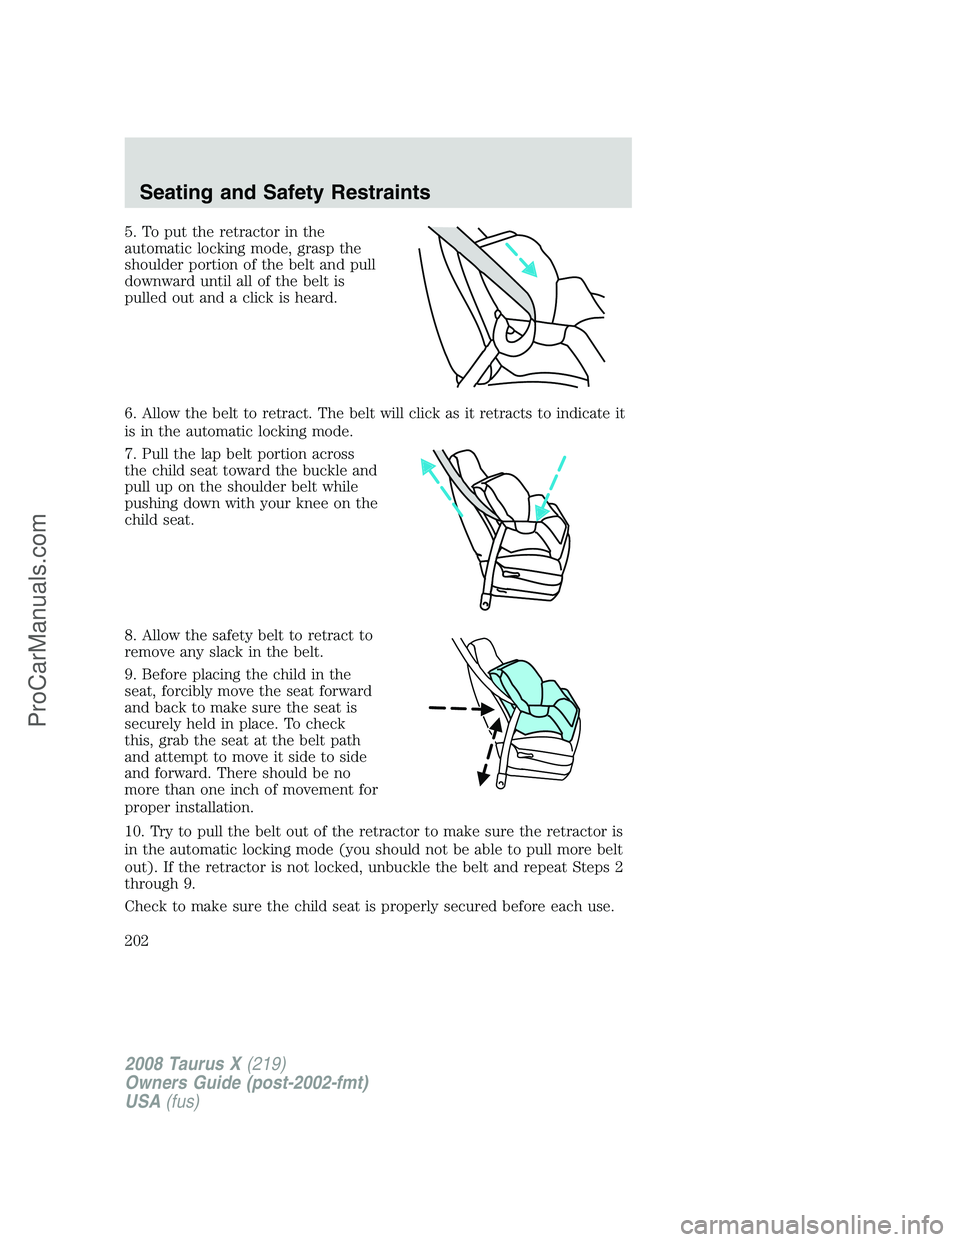
5. To put the retractor in the
automatic locking mode, grasp the
shoulder portion of the belt and pull
downward until all of the belt is
pulled out and a click is heard.
6. Allow the belt to retract. The belt will click as it retracts to indicate it
is in the automatic locking mode.
7. Pull the lap belt portion across
the child seat toward the buckle and
pull up on the shoulder belt while
pushing down with your knee on the
child seat.
8. Allow the safety belt to retract to
remove any slack in the belt.
9. Before placing the child in the
seat, forcibly move the seat forward
and back to make sure the seat is
securely held in place. To check
this, grab the seat at the belt path
and attempt to move it side to side
and forward. There should be no
more than one inch of movement for
proper installation.
10. Try to pull the belt out of the retractor to make sure the retractor is
in the automatic locking mode (you should not be able to pull more belt
out). If the retractor is not locked, unbuckle the belt and repeat Steps 2
through 9.
Check to make sure the child seat is properly secured before each use.
2008 Taurus X(219)
Owners Guide (post-2002-fmt)
USA(fus)
Seating and Safety Restraints
202
ProCarManuals.com
Page 203 of 352
Attaching child safety seats with tether straps
Most new forward-facing child safety seats include a tether strap which
goes over the back of the seat and hooks to an anchoring point. Tether
straps are available as an accessory for many older safety seats. Contact
the manufacturer of your child seat for information about ordering a
tether strap.
Children should be placed in the rear in an appropriate child
safety seat that is properly secured to the vehicle.
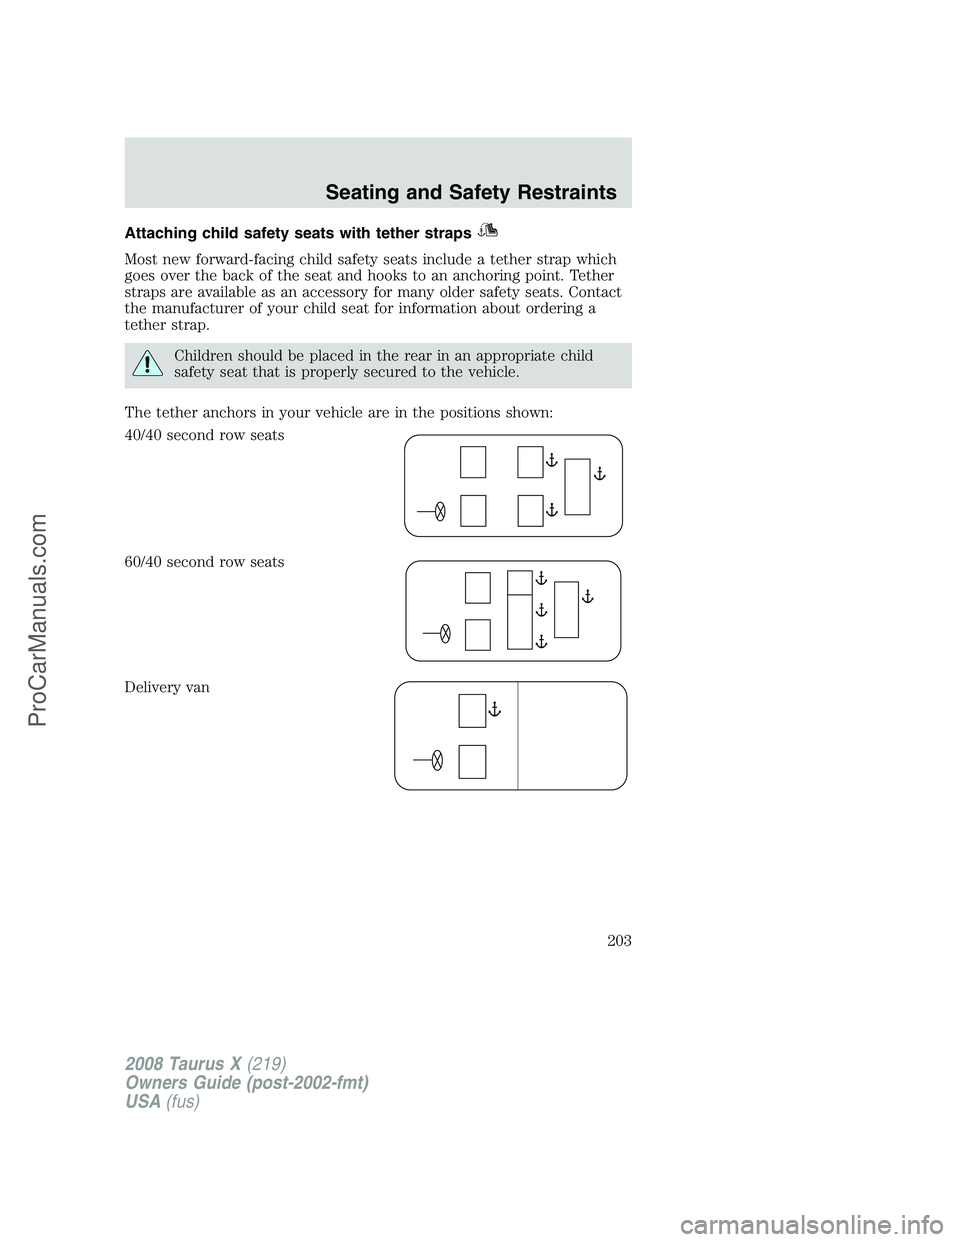
The tether anchors in your vehicle are in the positions shown:
40/40 second row seats
60/40 second row seats
Delivery van
2008 Taurus X(219)
Owners Guide (post-2002-fmt)
USA(fus)
Seating and Safety Restraints
203
ProCarManuals.com
Page 229 of 352
When your temporary spare tire is installed
When one of your road tires needs to be replaced with the temporary spare,
the TPMS system will continue to identify an issue to remind you that the
damaged road wheel/tire needs to be repaired and put back on your vehicle.
To restore the full functionality of the Tire Pressure Monitoring System,
have the damaged road wheel/tire repaired and remounted on your
vehicle. For additional information, refer toChanging tires with TPMS
in this section.
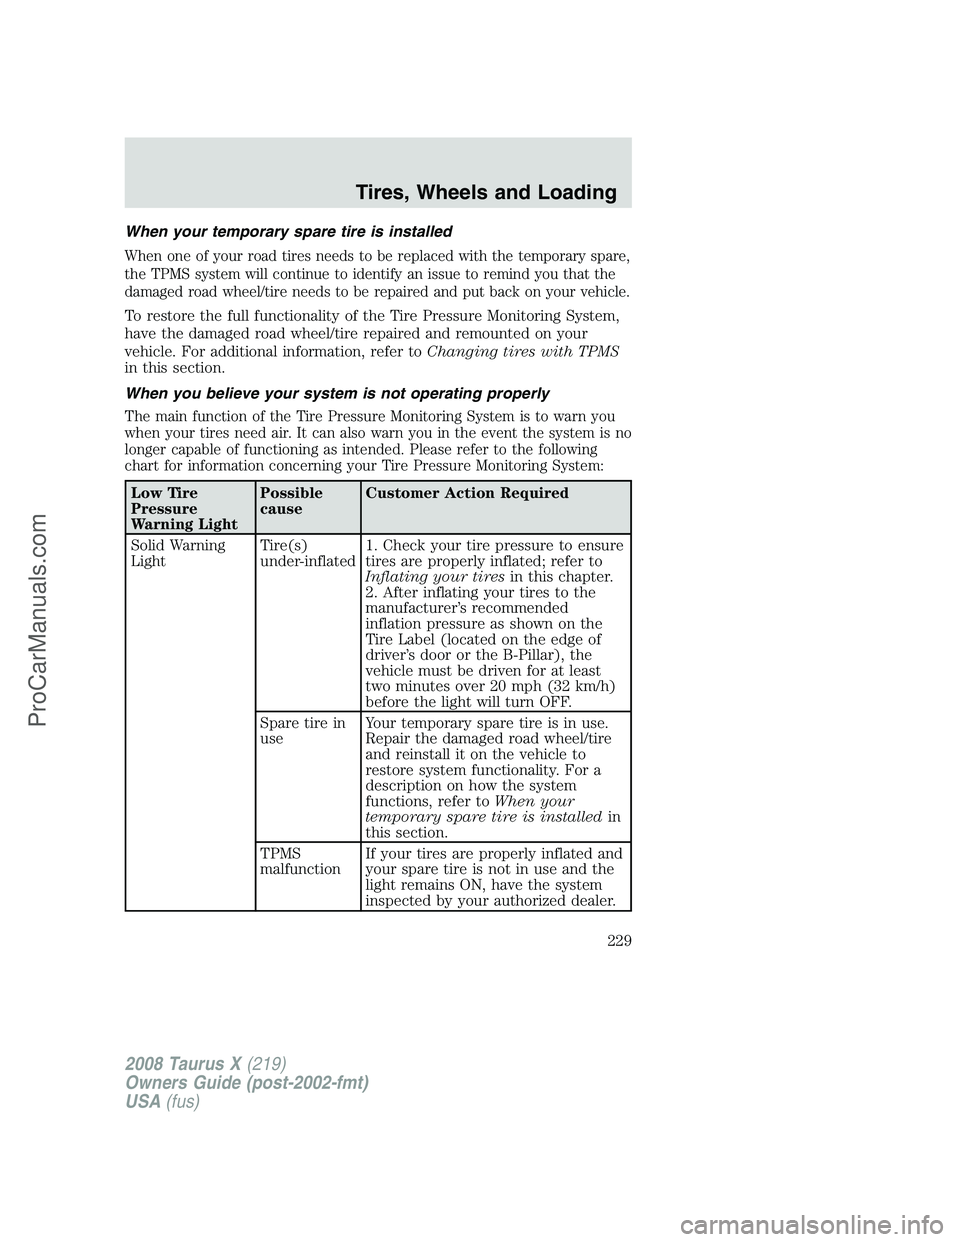
When you believe your system is not operating properly
The main function of the Tire Pressure Monitoring System is to warn you
when your tires need air. It can also warn you in the event the system is no
longer capable of functioning as intended. Please refer to the following
chart for information concerning your Tire Pressure Monitoring System:
Low Tire
Pressure
Warning LightPossible
causeCustomer Action Required
Solid Warning
LightTire(s)
under-inflated1. Check your tire pressure to ensure
tires are properly inflated; refer to
Inflating your tiresin this chapter.
2. After inflating your tires to the
manufacturer’s recommended
inflation pressure as shown on the
Tire Label (located on the edge of
driver’s door or the B-Pillar), the
vehicle must be driven for at least
two minutes over 20 mph (32 km/h)
before the light will turn OFF.
Spare tire in
useYour temporary spare tire is in use.
Repair the damaged road wheel/tire
and reinstall it on the vehicle to
restore system functionality. For a
description on how the system
functions, refer toWhen your
temporary spare tire is installedin
this section.
TPMS
malfunctionIf your tires are properly inflated and
your spare tire is not in use and the
light remains ON, have the system
inspected by your authorized dealer.
2008 Taurus X(219)
Owners Guide (post-2002-fmt)
USA(fus)
Tires, Wheels and Loading
229
ProCarManuals.com
Page 230 of 352
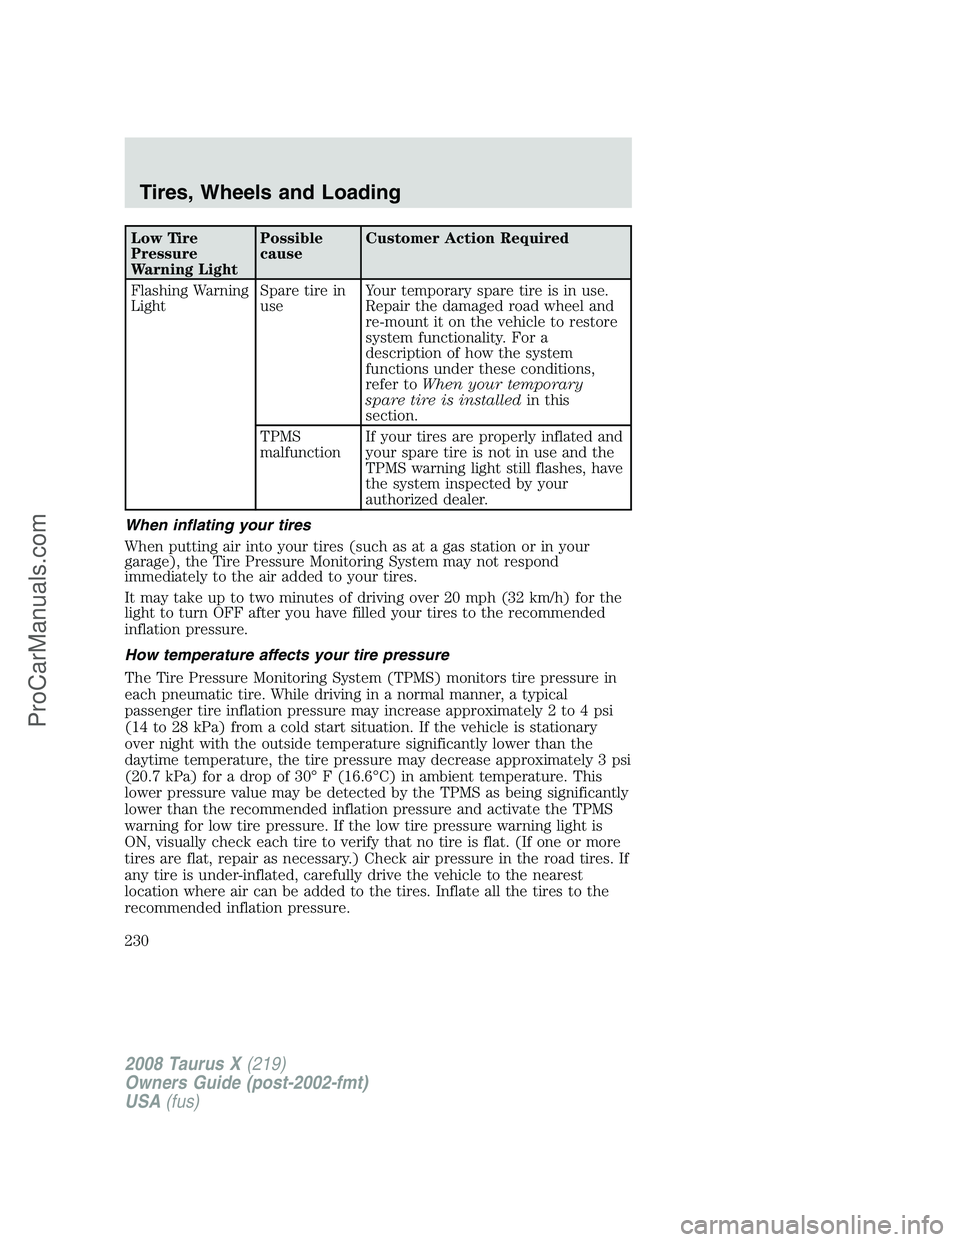
Low Tire
Pressure
Warning LightPossible
causeCustomer Action Required
Flashing Warning
LightSpare tire in
useYour temporary spare tire is in use.
Repair the damaged road wheel and
re-mount it on the vehicle to restore
system functionality. For a
description of how the system
functions under these conditions,
refer toWhen your temporary
spare tire is installedin this
section.
TPMS
malfunctionIf your tires are properly inflated and
your spare tire is not in use and the
TPMS warning light still flashes, have
the system inspected by your
authorized dealer.
When inflating your tires
When putting air into your tires (such as at a gas station or in your
garage), the Tire Pressure Monitoring System may not respond
immediately to the air added to your tires.
It may take up to two minutes of driving over 20 mph (32 km/h) for the
light to turn OFF after you have filled your tires to the recommended
inflation pressure.
How temperature affects your tire pressure
The Tire Pressure Monitoring System (TPMS) monitors tire pressure in
each pneumatic tire. While driving in a normal manner, a typical
passenger tire inflation pressure may increase approximately 2 to 4 psi
(14 to 28 kPa) from a cold start situation. If the vehicle is stationary
over night with the outside temperature significantly lower than the
daytime temperature, the tire pressure may decrease approximately 3 psi
(20.7 kPa) for a drop of 30° F (16.6°C) in ambient temperature. This
lower pressure value may be detected by the TPMS as being significantly
lower than the recommended inflation pressure and activate the TPMS
warning for low tire pressure. If the low tire pressure warning light is
ON, visually check each tire to verify that no tire is flat. (If one or more
tires are flat, repair as necessary.) Check air pressure in the road tires. If
any tire is under-inflated, carefully drive the vehicle to the nearest
location where air can be added to the tires. Inflate all the tires to the
recommended inflation pressure.
2008 Taurus X(219)
Owners Guide (post-2002-fmt)
USA(fus)
Tires, Wheels and Loading
230
ProCarManuals.com
Page 231 of 352
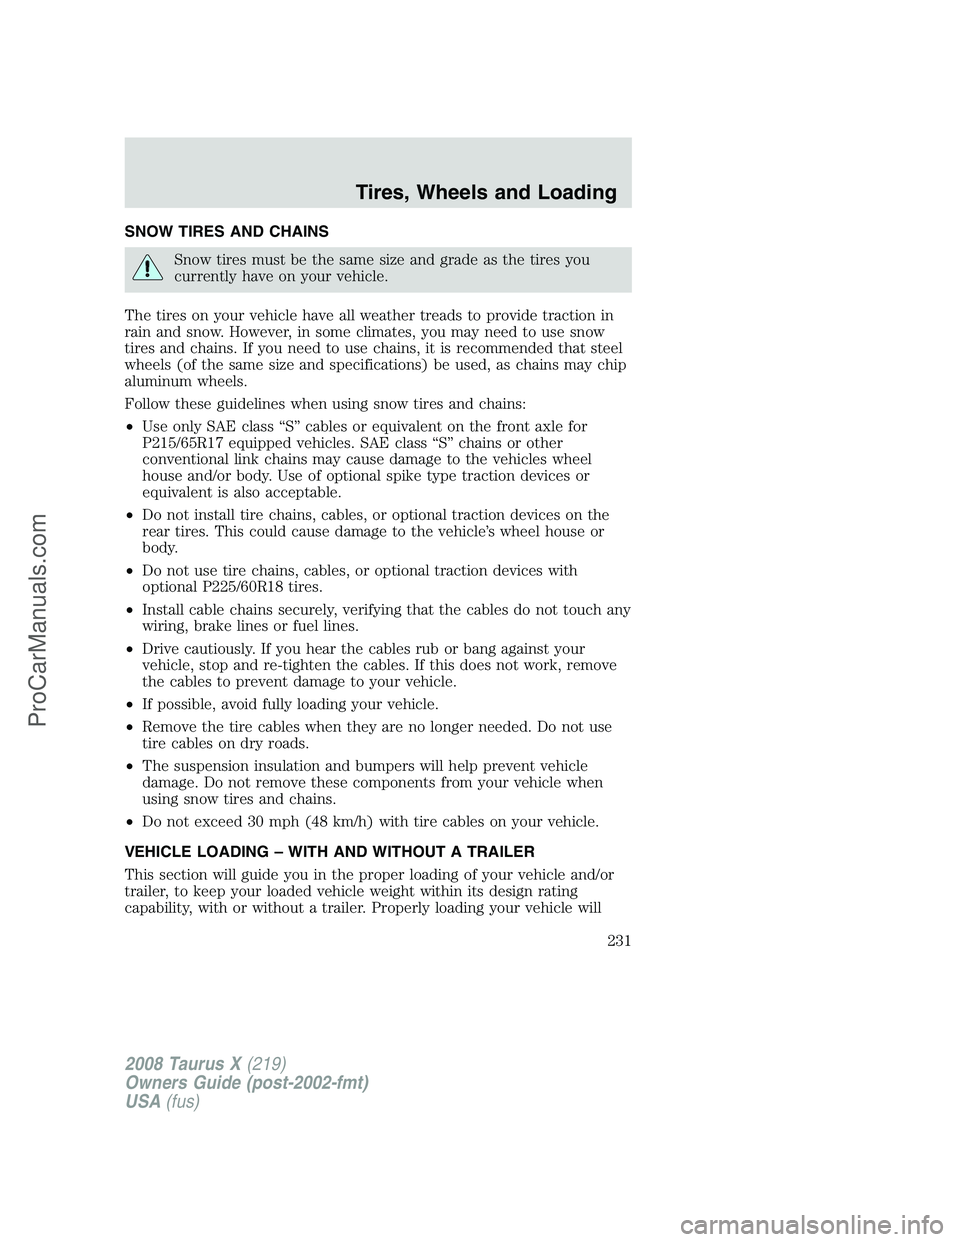
SNOW TIRES AND CHAINS
Snow tires must be the same size and grade as the tires you
currently have on your vehicle.
The tires on your vehicle have all weather treads to provide traction in
rain and snow. However, in some climates, you may need to use snow
tires and chains. If you need to use chains, it is recommended that steel
wheels (of the same size and specifications) be used, as chains may chip
aluminum wheels.
Follow these guidelines when using snow tires and chains:
•Use only SAE class “S” cables or equivalent on the front axle for
P215/65R17 equipped vehicles. SAE class “S” chains or other
conventional link chains may cause damage to the vehicles wheel
house and/or body. Use of optional spike type traction devices or
equivalent is also acceptable.
•Do not install tire chains, cables, or optional traction devices on the
rear tires. This could cause damage to the vehicle’s wheel house or
body.
•Do not use tire chains, cables, or optional traction devices with
optional P225/60R18 tires.
•Install cable chains securely, verifying that the cables do not touch any
wiring, brake lines or fuel lines.
•Drive cautiously. If you hear the cables rub or bang against your
vehicle, stop and re-tighten the cables. If this does not work, remove
the cables to prevent damage to your vehicle.
•If possible, avoid fully loading your vehicle.
•Remove the tire cables when they are no longer needed. Do not use
tire cables on dry roads.
•The suspension insulation and bumpers will help prevent vehicle
damage. Do not remove these components from your vehicle when
using snow tires and chains.
•Do not exceed 30 mph (48 km/h) with tire cables on your vehicle.
VEHICLE LOADING – WITH AND WITHOUT A TRAILER
This section will guide you in the proper loading of your vehicle and/or
trailer, to keep your loaded vehicle weight within its design rating
capability, with or without a trailer. Properly loading your vehicle will
2008 Taurus X(219)
Owners Guide (post-2002-fmt)
USA(fus)
Tires, Wheels and Loading
231
ProCarManuals.com
Page 247 of 352
Even when the ABS is disabled,
normal braking is still effective. (If
your BRAKE warning lamp
illuminates with the parking brake
released, have your brake system
serviced immediately.)
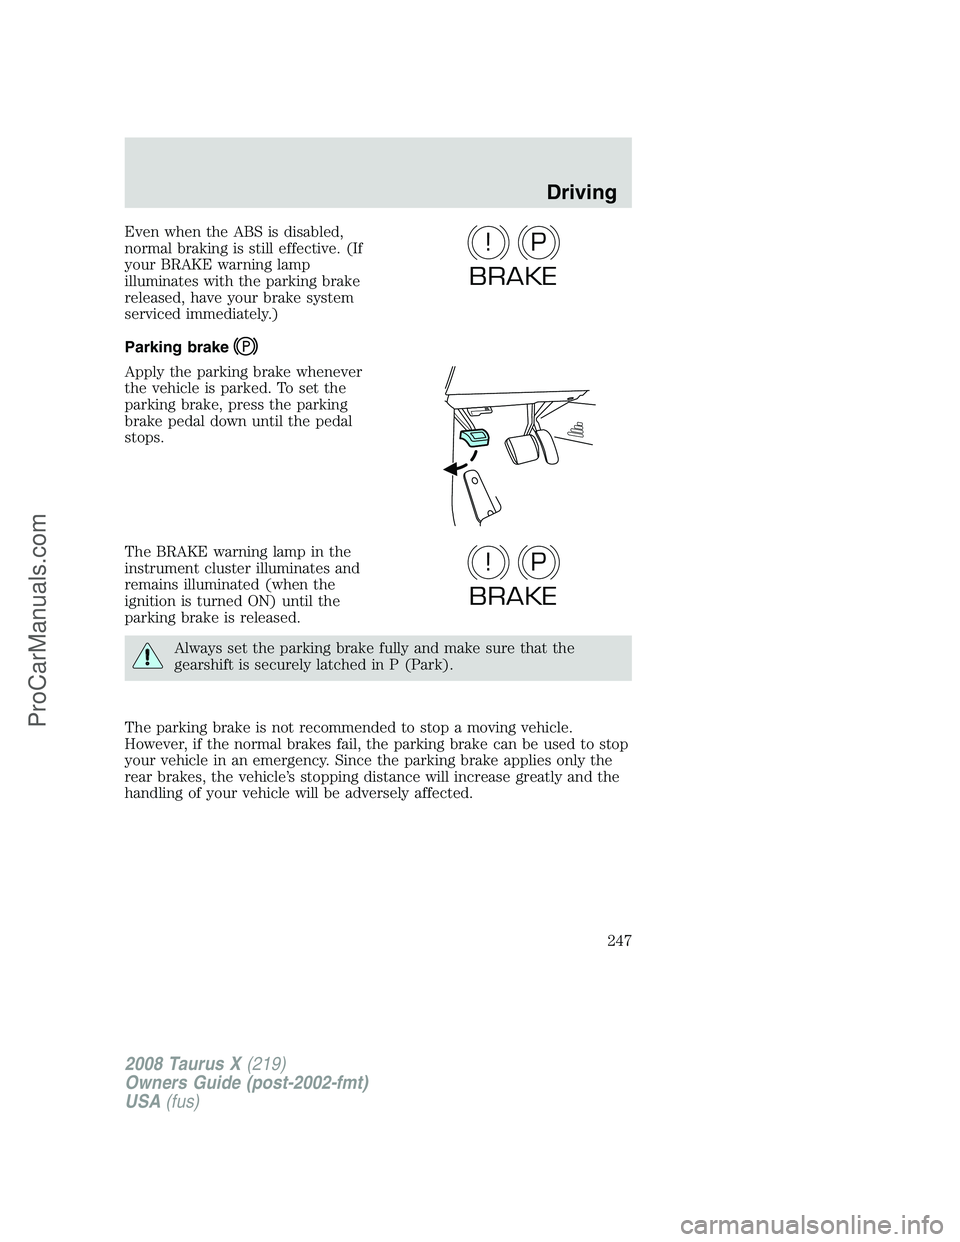
Parking brake
Apply the parking brake whenever
the vehicle is parked. To set the
parking brake, press the parking
brake pedal down until the pedal
stops.
The BRAKE warning lamp in the
instrument cluster illuminates and
remains illuminated (when the
ignition is turned ON) until the
parking brake is released.
Always set the parking brake fully and make sure that the
gearshift is securely latched in P (Park).
The parking brake is not recommended to stop a moving vehicle.
However, if the normal brakes fail, the parking brake can be used to stop
your vehicle in an emergency. Since the parking brake applies only the
rear brakes, the vehicle’s stopping distance will increase greatly and the
handling of your vehicle will be adversely affected.
P!
BRAKE
P!
BRAKE
2008 Taurus X(219)
Owners Guide (post-2002-fmt)
USA(fus)
Driving
247
ProCarManuals.com