Page 266 of 400
Parking brake
To set the parking brake (1), press
the parking brake pedal down until
the pedal stops.
The BRAKE warning lamp will illuminate and will remain illuminated
until the parking brake is released.
Base, Base with Tachometer and
Family Carrier instrument
cluster
Mid, Luxury, Limited and
Harley-Davidson instrument
cluster
To release, pull the lever (2).
Always set the parking brake fully and make sure that the
gearshift is securely latched in P (Park) (automatic
transmission) or in 1 (First) (manual transmission).
TRACTION CONTROL™ (IF EQUIPPED)
Your vehicle may be equipped with a Traction Control™ system. This
system helps you maintain the stability and steerability of your vehicle,
especially on slippery road surfaces such as snow- or ice-covered roads
and gravel roads. The system will allow your vehicle to make better use
of available traction in these conditions.
!
BRAKE
P!
BRAKE
2008 F-150(f12)
Owners Guide (post-2002-fmt)
USA(fus)
Driving
266
Page 273 of 400
To put your vehicle in P (Park):
•Come to a complete stop
•Move the gearshift lever and securely latch it in P (Park)
Always set the parking brake fully and make sure the gearshift is
latched in P (Park). Turn the ignition to the LOCK position and
remove the key whenever you leave your vehicle.
R (Reverse)
With the gearshift lever in R (Reverse), the vehicle will move backward.
Always come to a complete stop before shifting into and out of R (Reverse).
N (Neutral)
With the gearshift lever in N (Neutral), the vehicle can be started and is
free to roll. Hold the brake pedal down while in this position.
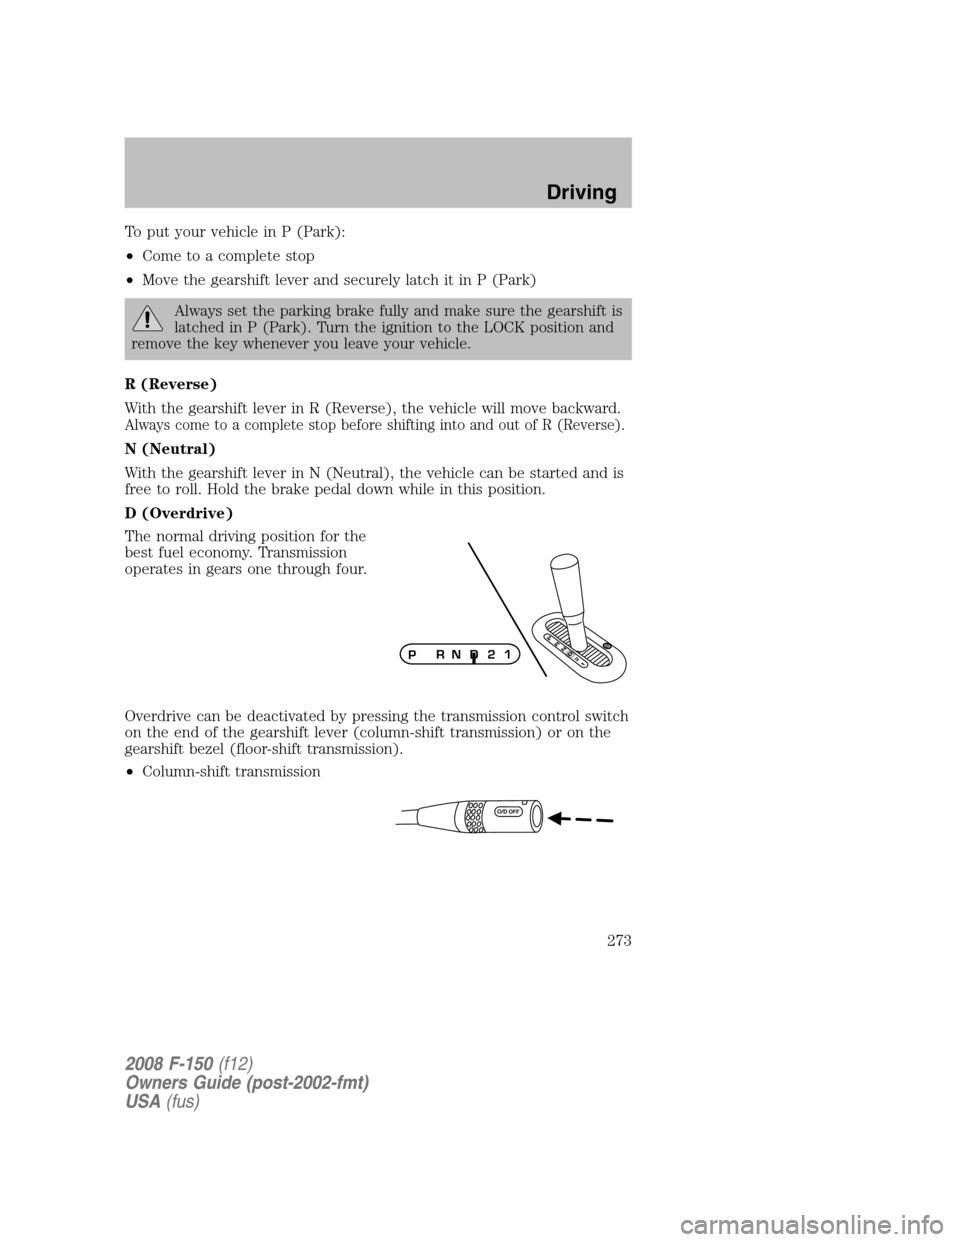
D (Overdrive)
The normal driving position for the
best fuel economy. Transmission
operates in gears one through four.
Overdrive can be deactivated by pressing the transmission control switch
on the end of the gearshift lever (column-shift transmission) or on the
gearshift bezel (floor-shift transmission).
•Column-shift transmission
P
R
N
D
2
1O/DPRN D 2 1
2008 F-150(f12)
Owners Guide (post-2002-fmt)
USA(fus)
Driving
273
Page 297 of 400
Canadian customers refer to your Customer Information Guide
for information on:
•coverage period
•exact fuel amounts
•towing of your disabled vehicle
•emergency travel expense reimbursement
•travel planning benefits
Using roadside assistance
Complete the roadside assistance identification card and place it in your
wallet for quick reference. In the United States, this card is found in the
Owner Guide portfolio in the glove compartment. In Canada, the card is
found in theCustomer Information Guidein the glove compartment.
U.S. Ford or Mercury vehicle customers who require roadside assistance,
call 1–800–241–3673; Lincoln vehicle customers call 1–800–521–4140.
Canadian customers who require roadside assistance, call
1–800–665–2006.
If you need to arrange roadside assistance for yourself, Ford Motor
Company will reimburse a reasonable amount for towing to the nearest
dealership within 35 miles. To obtain reimbursement information, U.S.
Ford or Mercury vehicle customers call 1–800–241–3673; Lincoln vehicle
customers call 1–800–521–4140. Customers will be asked to submit their
original receipts.
Canadian customers who need to obtain reimbursement information, call
1–800–665–2006.
Roadside coverage beyond basic warranty
In the United States, you may purchase additional roadside assistance
coverage beyond this period through the Ford Auto Club by contacting
your authorized dealer or by calling 1–800–FORD–CLUB.
Similarly in Canada, for uninterrupted Roadside Assistance coverage, you
may purchase extended coverage prior to your Basic Warranty’s Roadside
Assistance expiring. For more information and enrollment, contact
1–877–294–2582 or visit our website at www.ford.ca.
2008 F-150(f12)
Owners Guide (post-2002-fmt)
USA(fus)
Roadside Emergencies
297
Page 302 of 400
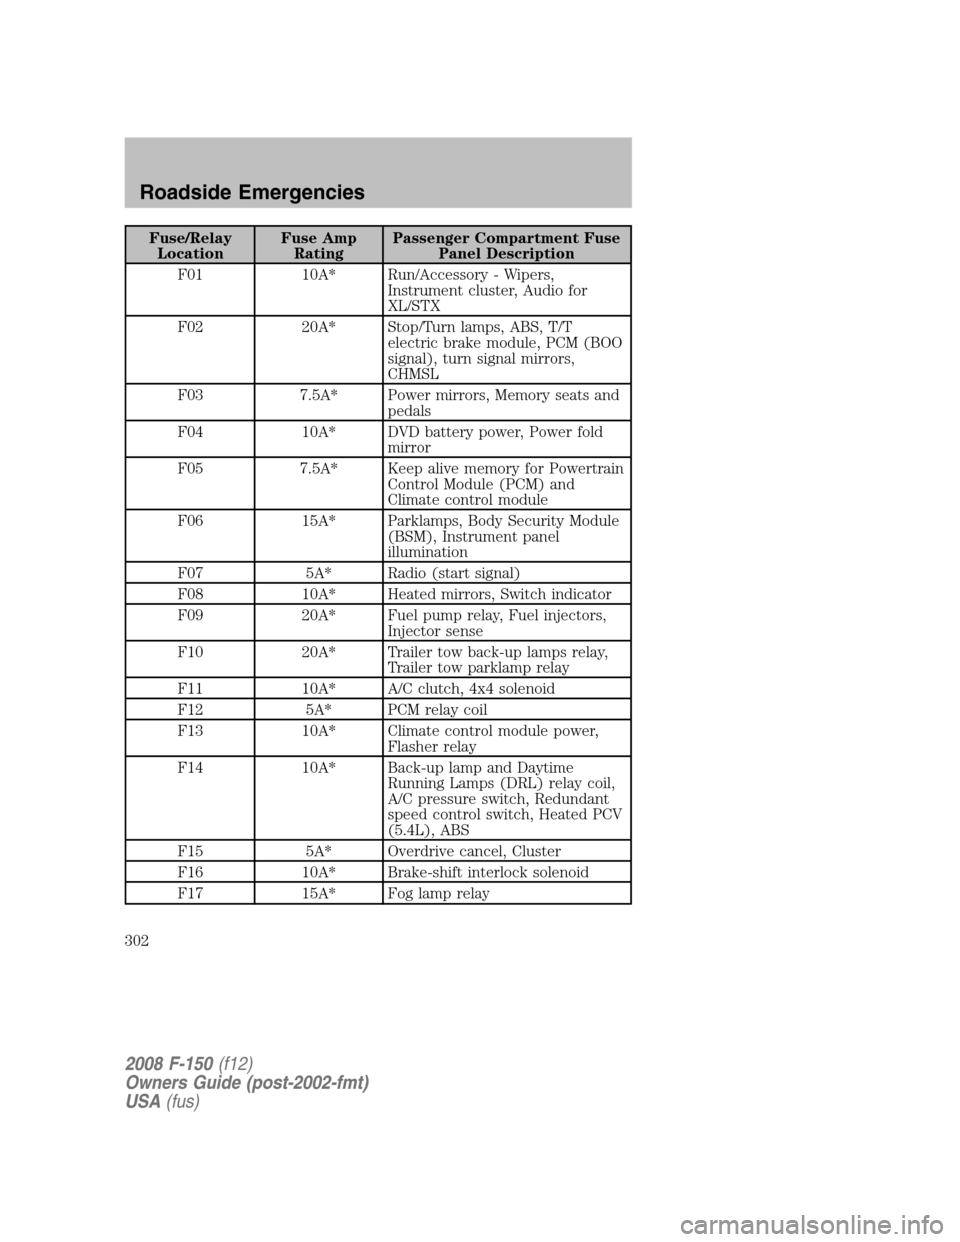
Fuse/Relay
LocationFuse Amp
RatingPassenger Compartment Fuse
Panel Description
F01 10A* Run/Accessory - Wipers,
Instrument cluster, Audio for
XL/STX
F02 20A* Stop/Turn lamps, ABS, T/T
electric brake module, PCM (BOO
signal), turn signal mirrors,
CHMSL
F03 7.5A* Power mirrors, Memory seats and
pedals
F04 10A* DVD battery power, Power fold
mirror
F05 7.5A* Keep alive memory for Powertrain
Control Module (PCM) and
Climate control module
F06 15A* Parklamps, Body Security Module
(BSM), Instrument panel
illumination
F07 5A* Radio (start signal)
F08 10A* Heated mirrors, Switch indicator
F09 20A* Fuel pump relay, Fuel injectors,
Injector sense
F10 20A* Trailer tow back-up lamps relay,
Trailer tow parklamp relay
F11 10A* A/C clutch, 4x4 solenoid
F12 5A* PCM relay coil
F13 10A* Climate control module power,
Flasher relay
F14 10A* Back-up lamp and Daytime
Running Lamps (DRL) relay coil,
A/C pressure switch, Redundant
speed control switch, Heated PCV
(5.4L), ABS
F15 5A* Overdrive cancel, Cluster
F16 10A* Brake-shift interlock solenoid
F17 15A* Fog lamp relay
2008 F-150(f12)
Owners Guide (post-2002-fmt)
USA(fus)
Roadside Emergencies
302
Page 303 of 400

Fuse/Relay
LocationFuse Amp
RatingPassenger Compartment Fuse
Panel Description
F18 10A* Electrochromatic mirror, Heated
seats, BSM, Compass, RSS
(Reverse Sensing System), Power
rail
F19 10A* Restraints (Airbag module)
F20 10A* Power rail
F21 15A* Cluster keep alive power
F22 10A* Delayed accessory power for
audio, power door lock switch and
moon roof switch illumination
F23 10A* RH low beam headlamp
F24 15A* Battery saver power for demand
lamps, Flex fuel
F25 10A* LH low beam headlamp
F26 20A* Horn
F27 5A* Passenger Airbag Deactivation
(PAD) warning lamp, Cluster
airbag warning lamp
F28 5A* SecuriLock transceiver (PATS),
PCM IGN monitor
F29 15A* PCM 4x4 power
F30 15A* PCM 4x4 power
F31 20A* Radio power, Satellite radio
module
F32 15A* Vapor Management Valve (VMV),
A/C clutch relay, Canister vent,
Heated Exhaust Gas Oxygen
(HEGO) sensors #11 and #21,
CMCV, Mass Air Flow (MAF)
sensor, Variable Cam Timing
(VCT), Heated Positive Crankcase
Ventilation (PCV) valve (4.2L
engine), CID sensor (4.2L
engine), 4.6L/4.2L EGR
2008 F-150(f12)
Owners Guide (post-2002-fmt)
USA(fus)
Roadside Emergencies
303
Page 314 of 400
6. If removed, install the spare tire lock (if equipped) into the bumper
drive tube with the spare tire lock key (if equipped) and jack handle.
WHEEL LUG NUT TORQUE SPECIFICATIONS
Retighten the lug nuts to the specified torque within 100 miles (160 km)
after any wheel disturbance (rotation, flat tire, wheel removal, etc.).
Bolt size Wheel lug nut torque*
lb.ft. N•m
M14 x 2.0 150 200
* Torque specifications are for nut and bolt threads free of dirt and
rust. Use only Ford recommended replacement fasteners.
When a wheel is installed, always remove any corrosion, dirt or
foreign materials present on the mounting surfaces of the wheel
or the surface of the wheel hub, brake drum or brake disc that
contacts the wheel. Ensure that any fasteners that attach the rotor to
the hub are secured so they do not interfere with the mounting
surfaces of the wheel. Installing wheels without correct metal-to-metal
contact at the wheel mounting surfaces can cause the wheel nuts to
loosen and the wheel to come off while the vehicle is in motion,
resulting in loss of control.
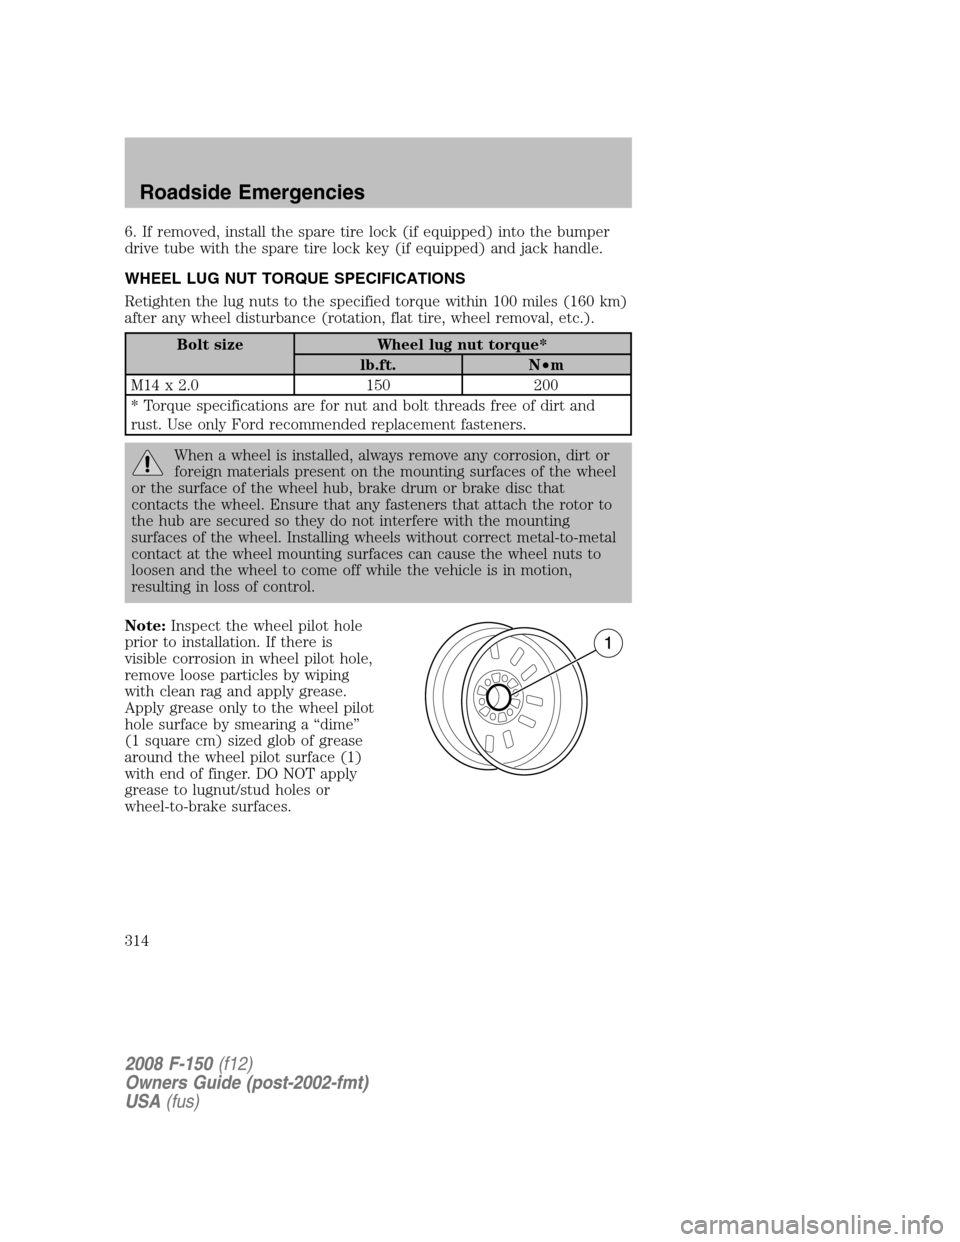
Note:Inspect the wheel pilot hole
prior to installation. If there is
visible corrosion in wheel pilot hole,
remove loose particles by wiping
with clean rag and apply grease.
Apply grease only to the wheel pilot
hole surface by smearing a “dime”
(1 square cm) sized glob of grease
around the wheel pilot surface (1)
with end of finger. DO NOT apply
grease to lugnut/stud holes or
wheel-to-brake surfaces.
2008 F-150(f12)
Owners Guide (post-2002-fmt)
USA(fus)
Roadside Emergencies
314
Page 323 of 400
In some states (in the U.S.) you must directly notify Ford in writing
before pursuing remedies under your state’s warranty laws. Ford is also
allowed a final repair attempt in some states.
In the United States, a warranty dispute must be submitted to the BBB
AUTO LINE before taking action under the Magnuson-Moss Warranty
Act, or to the extent allowed by state law, before pursuing replacement
or repurchase remedies provided by certain state laws. This dispute
handling procedure is not required prior to enforcing state created rights
or other rights which are independent of the Magnuson-Moss Warranty
Act or state replacement or repurchase laws.
IN CALIFORNIA (U.S. ONLY)
California Civil Code Section 1793.2(d) requires that, if a manufacturer
or its representative is unable to repair a motor vehicle to conform to the
vehicle’s applicable express warranty after a reasonable number of
attempts, the manufacturer shall be required to either replace the
vehicle with one substantially identical or repurchase the vehicle and
reimburse the buyer in an amount equal to the actual price paid or
payable by the consumer (less a reasonable allowance for consumer
use). The consumer has the right to choose whether to receive a refund
or replacement vehicle.
California Civil Code Section 1793.22(b) presumes that the manufacturer
has had a reasonable number of attempts to conform the vehicle to its
applicable express warranties if, within the first 18 months of ownership
of a new vehicle or the first 18,000 miles (29,000 km), whichever occurs
first:
1. Two or more repair attempts are made on the same non-conformity
likely to cause death or serious bodily injury OR
2. Four or more repair attempts are made on the same nonconformity (a
defect or condition that substantially impairs the use, value or safety of
the vehicle) OR
3. The vehicle is out of service for repair of nonconformities for a total of
more than 30 calendar days (not necessarily all at one time)
In the case of 1 or 2 above, the consumer must also notify the
manufacturer of the need for the repair of the nonconformity at the
following address:
Ford Motor Company
16800 Executive Plaza Drive
Mail Drop 3NE-B
Dearborn, MI 48126
2008 F-150(f12)
Owners Guide (post-2002-fmt)
USA(fus)
Customer Assistance
323
Page 345 of 400
Poor wiper quality can be improved by cleaning the wiper blades and the
windshield, refer toWindows and wiper bladesin theCleaning
chapter.
To prolong the life of the wiper blades, it is highly recommended to
scrape off the ice on the windshield before turning on the wipers. The
layer of ice has many sharp edges and can damage the micro edge of the
wiper rubber element.
ENGINE OIL
Checking the engine oil
Refer to thescheduled maintenance informationfor the appropriate
intervals for checking the engine oil.
1. Make sure the vehicle is on level ground.
2. Turn the engine off and wait a few minutes for the oil to drain into the
oil pan.
3. Set the parking brake and ensure the gearshift is securely latched in
P (Park) (automatic transmission) or 1 (First) (manual transmission).
4. Open the hood. Protect yourself from engine heat.
•4.2L V6 engine
2008 F-150(f12)
Owners Guide (post-2002-fmt)
USA(fus)
Maintenance and Specifications
345