Page 196 of 400
SAFETY SEATS FOR CHILDREN
Child and infant or child safety seats
Use a safety seat that is recommended for the size and weight of the
child. Carefully follow all of the manufacturer’s instructions with the
safety seat you put in your vehicle. If you do not install and use the
safety seat properly, the child may be injured in a sudden stop or
collision.
When installing a child safety seat:
•Review and follow the information
presented in theAirbag
Supplemental Restraint System
section in this chapter.
•Use the correct safety belt buckle
for that seating position (the
buckle closest to the direction the
tongue is coming from).
•Insert the belt tongue into the
proper buckle until you hear a
snap and feel it latch. Make sure
the tongue is securely fastened in
the buckle.
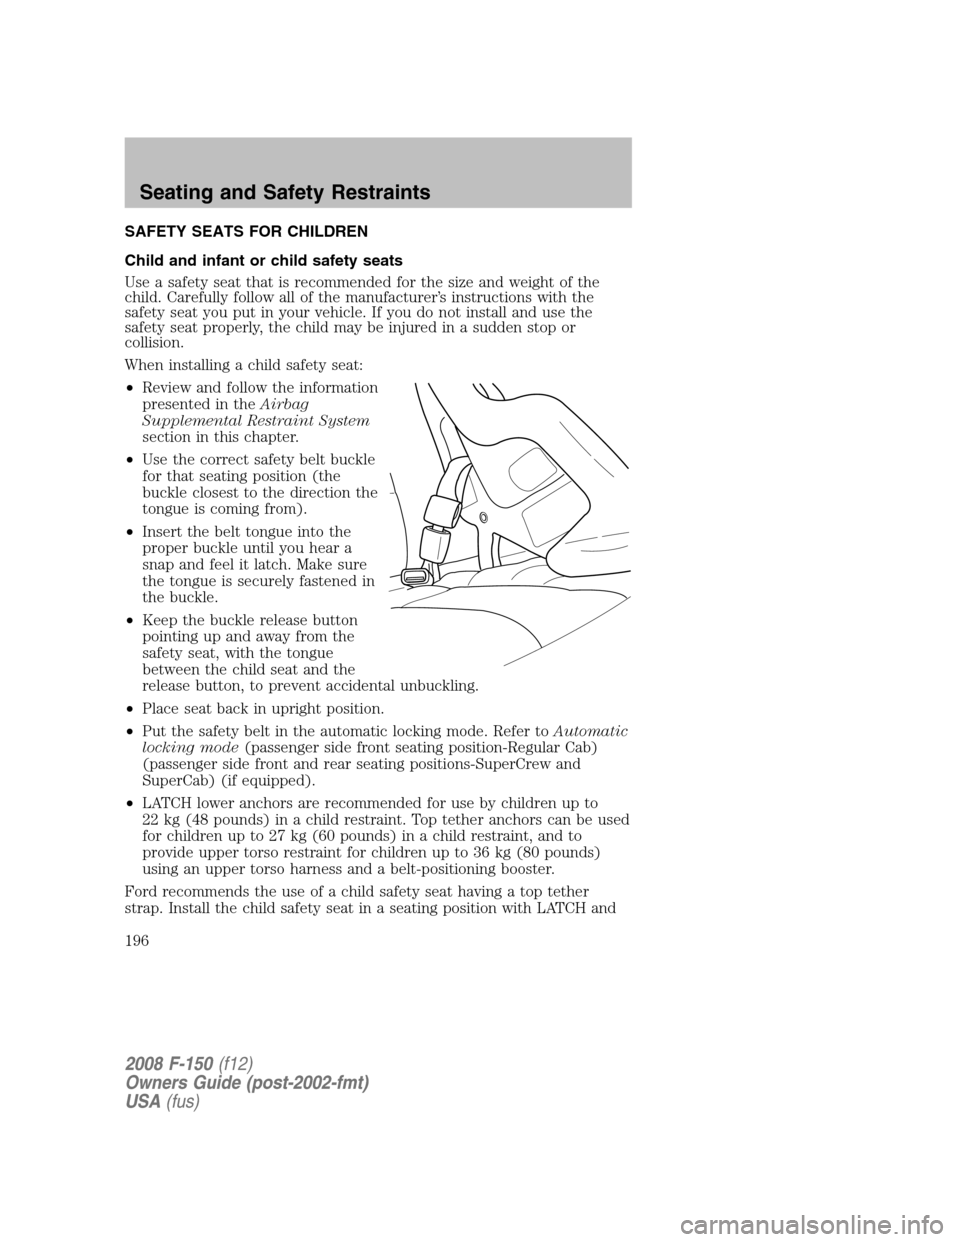
•Keep the buckle release button
pointing up and away from the
safety seat, with the tongue
between the child seat and the
release button, to prevent accidental unbuckling.
•Place seat back in upright position.
•Put the safety belt in the automatic locking mode. Refer toAutomatic
locking mode(passenger side front seating position-Regular Cab)
(passenger side front and rear seating positions-SuperCrew and
SuperCab) (if equipped).
•LATCH lower anchors are recommended for use by children up to
22 kg (48 pounds) in a child restraint. Top tether anchors can be used
for children up to 27 kg (60 pounds) in a child restraint, and to
provide upper torso restraint for children up to 36 kg (80 pounds)
using an upper torso harness and a belt-positioning booster.
Ford recommends the use of a child safety seat having a top tether
strap. Install the child safety seat in a seating position with LATCH and
2008 F-150(f12)
Owners Guide (post-2002-fmt)
USA(fus)
Seating and Safety Restraints
196
Page 198 of 400
2. Pull down on the shoulder belt
and then grasp the shoulder belt
and lap belt together.
3. While holding the shoulder and
lap belt portions together, route the
tongue through the child seat
according to the child seat
manufacturer’s instructions. Be sure
the belt webbing is not twisted.
4. Insert the belt tongue into the
proper buckle (the buckle closest to
the direction the tongue is coming
from) for that seating position until
you hear a snap and feel the latch
engage. Make sure the tongue is
latched securely by pulling on it.
2008 F-150(f12)
Owners Guide (post-2002-fmt)
USA(fus)
Seating and Safety Restraints
198
Page 199 of 400
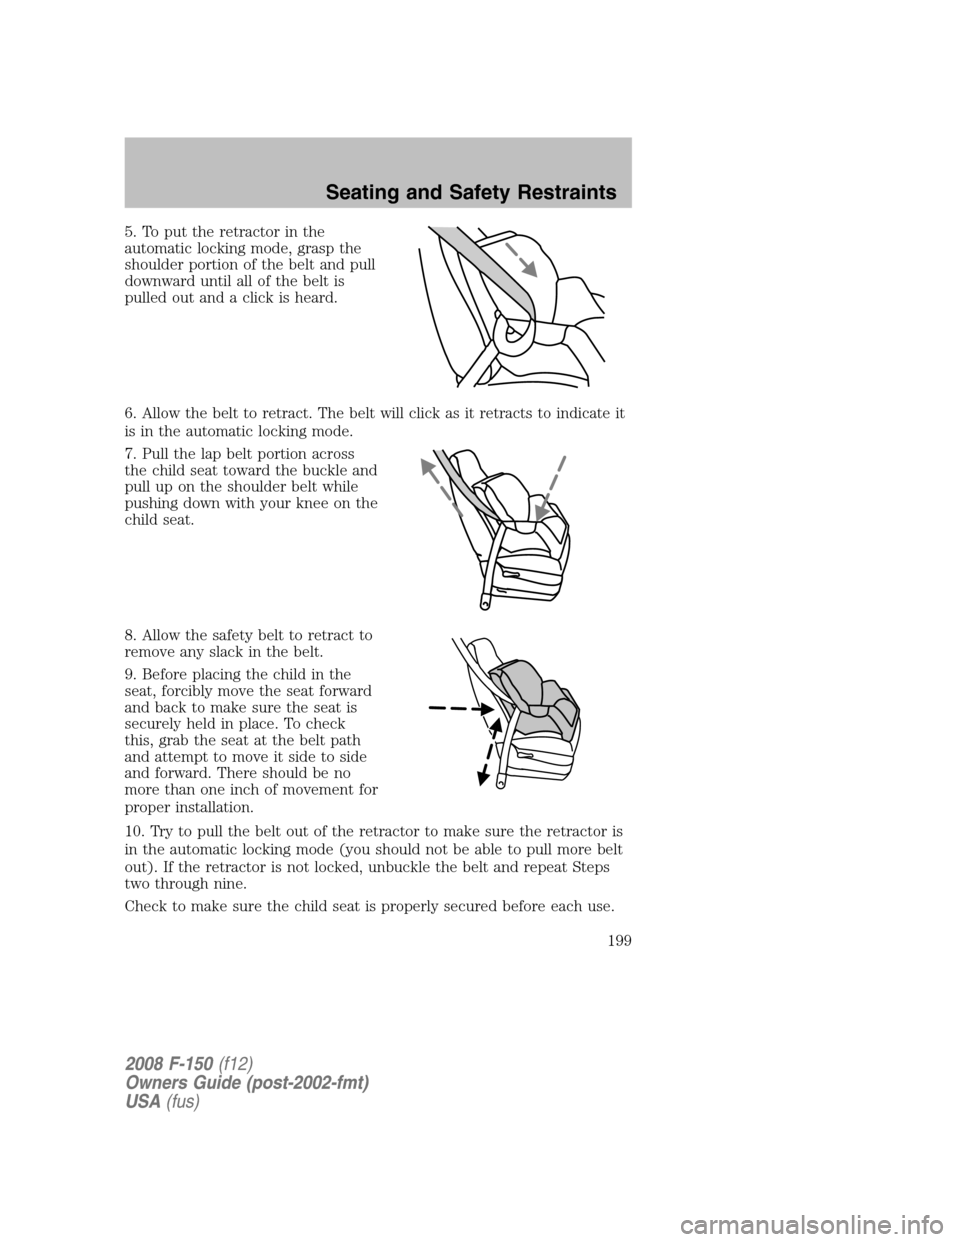
5. To put the retractor in the
automatic locking mode, grasp the
shoulder portion of the belt and pull
downward until all of the belt is
pulled out and a click is heard.
6. Allow the belt to retract. The belt will click as it retracts to indicate it
is in the automatic locking mode.
7. Pull the lap belt portion across
the child seat toward the buckle and
pull up on the shoulder belt while
pushing down with your knee on the
child seat.
8. Allow the safety belt to retract to
remove any slack in the belt.
9. Before placing the child in the
seat, forcibly move the seat forward
and back to make sure the seat is
securely held in place. To check
this, grab the seat at the belt path
and attempt to move it side to side
and forward. There should be no
more than one inch of movement for
proper installation.
10. Try to pull the belt out of the retractor to make sure the retractor is
in the automatic locking mode (you should not be able to pull more belt
out). If the retractor is not locked, unbuckle the belt and repeat Steps
two through nine.
Check to make sure the child seat is properly secured before each use.
2008 F-150(f12)
Owners Guide (post-2002-fmt)
USA(fus)
Seating and Safety Restraints
199
Page 201 of 400
Rear facing child seats should NEVER be placed in front of an
active airbag.
3. Slide the tongue up the webbing.
4. While holding both shoulder and
lap portions next to the tongue,
route the tongue and webbing
through the child seat according to
the child seat manufacturer’s
instructions. Be sure that the belt
webbing is not twisted.
5. Insert the belt tongue into the
proper buckle for that seating
positions until you hear a snap and
feel it latch. Make sure the tongue is
securely latched to the buckle by
pulling on the tongue.
2008 F-150(f12)
Owners Guide (post-2002-fmt)
USA(fus)
Seating and Safety Restraints
201
Page 202 of 400
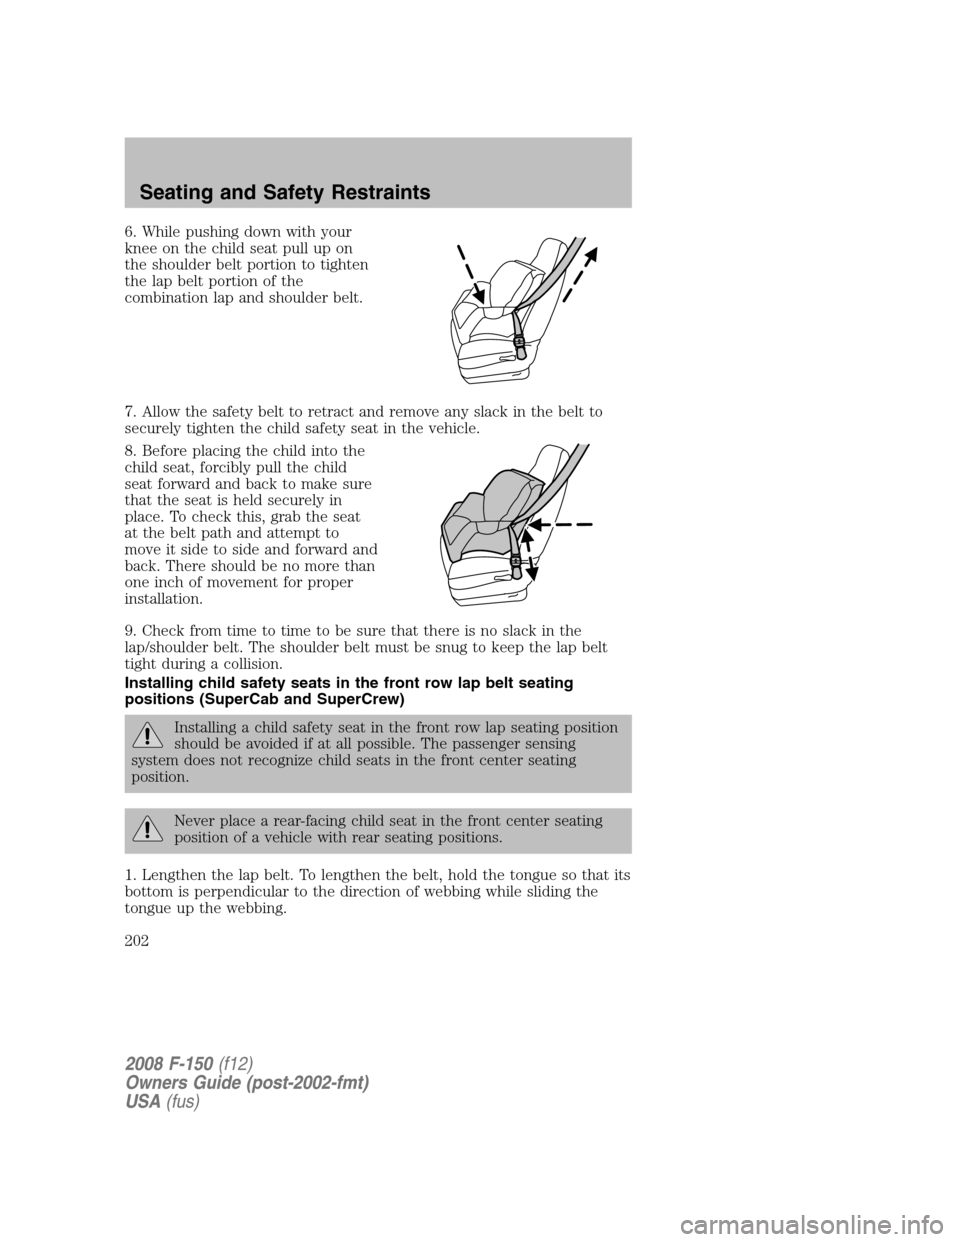
6. While pushing down with your
knee on the child seat pull up on
the shoulder belt portion to tighten
the lap belt portion of the
combination lap and shoulder belt.
7. Allow the safety belt to retract and remove any slack in the belt to
securely tighten the child safety seat in the vehicle.
8. Before placing the child into the
child seat, forcibly pull the child
seat forward and back to make sure
that the seat is held securely in
place. To check this, grab the seat
at the belt path and attempt to
move it side to side and forward and
back. There should be no more than
one inch of movement for proper
installation.
9. Check from time to time to be sure that there is no slack in the
lap/shoulder belt. The shoulder belt must be snug to keep the lap belt
tight during a collision.
Installing child safety seats in the front row lap belt seating
positions (SuperCab and SuperCrew)
Installing a child safety seat in the front row lap seating position
should be avoided if at all possible. The passenger sensing
system does not recognize child seats in the front center seating
position.
Never place a rear-facing child seat in the front center seating
position of a vehicle with rear seating positions.
1. Lengthen the lap belt. To lengthen the belt, hold the tongue so that its
bottom is perpendicular to the direction of webbing while sliding the
tongue up the webbing.
2008 F-150(f12)
Owners Guide (post-2002-fmt)
USA(fus)
Seating and Safety Restraints
202
Page 203 of 400
2. Place the child safety seat in the center seating position.
3. Route the tongue and webbing through the child seat according to the
child seat manufacturer’s instructions.
4. Insert the belt tongue into the proper buckle for the center seating
position until you hear a snap and feel it latch. Make sure the tongue is
securely fastened to the buckle by pulling on tongue.
5. Push down on the child seat while pulling on the loose end of the lap
belt webbing to tighten the belt.
6. If you are installing a forward facing child seat, attach and tighten any
top tether strap.
7. Before placing the child into the child seat, forcibly tilt the child seat
from side to side and in forward direction to make sure that the seat is
held securely in place. If the child seat moves excessively, repeat Steps 5
through 7, try a different child safety seat, or properly install the child
seat in a different position.
Attaching child safety seats with tether straps
Most new forward-facing child safety seats include a tether strap which
goes over the back of the seat and hooks to an anchoring point. Tether
straps are available as an accessory for many older safety seats. Contact
the manufacturer of your child seat for information about ordering a
tether strap.
The passenger seats of your vehicle are equipped with built-in tether
strap anchors located behind the seats as described below.
The tether anchors in your vehicle may be loops of webbing above the
seatback or an anchor bracket behind the seat on the rear edge of the
seat cushion.
The rear seat in the SuperCab and SuperCrew has three straps along the
top of the seatback that function as both routing loops for the tether
straps and anchor loops.
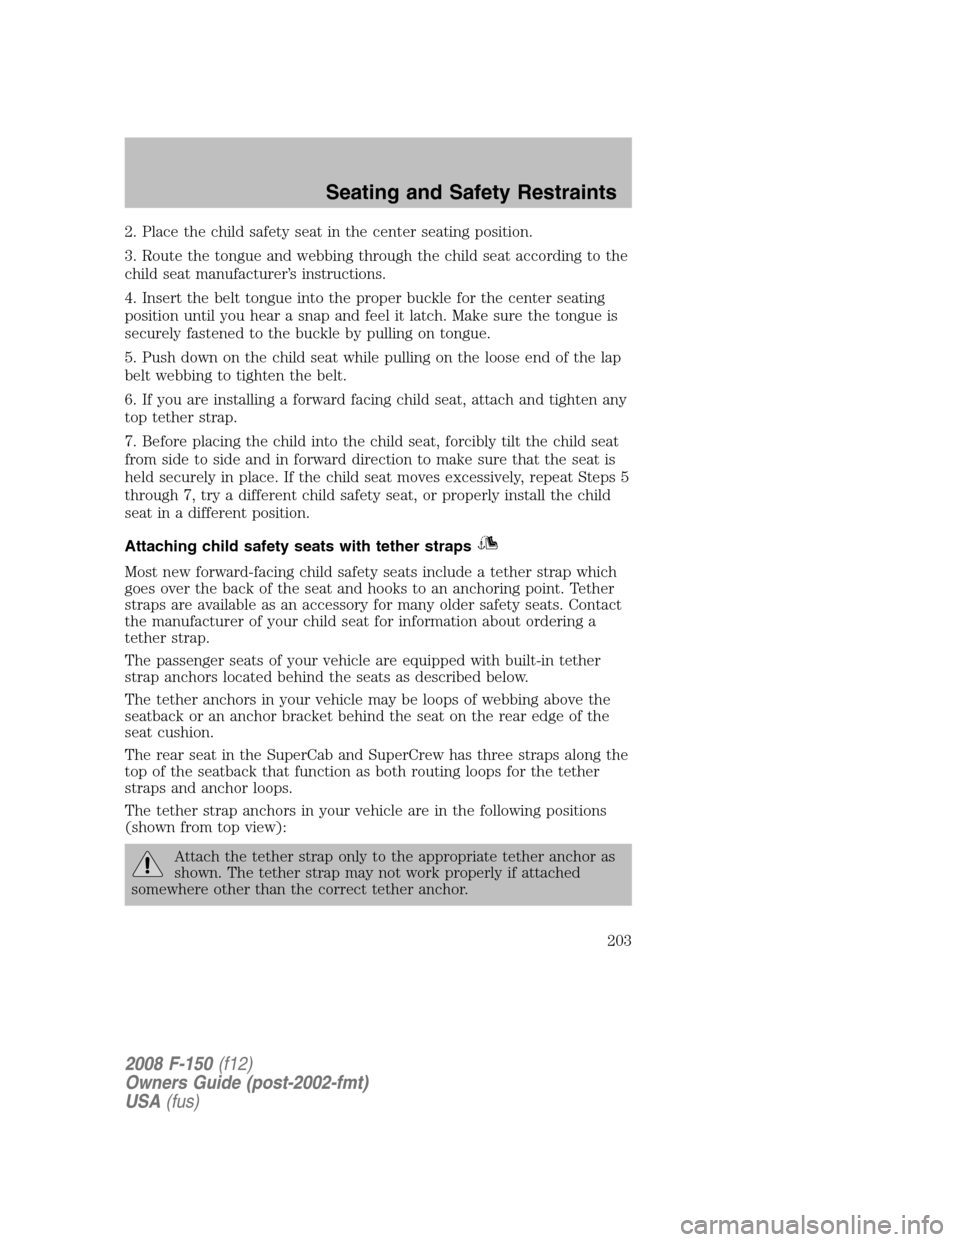
The tether strap anchors in your vehicle are in the following positions
(shown from top view):
Attach the tether strap only to the appropriate tether anchor as
shown. The tether strap may not work properly if attached
somewhere other than the correct tether anchor.
2008 F-150(f12)
Owners Guide (post-2002-fmt)
USA(fus)
Seating and Safety Restraints
203
Page 236 of 400

As in this example, the rear tires rotated to the front and properly
inflated to 50 psi (345 kPa) for the front axle would falsely illuminate the
low tire warning indicator as they are still trained for the rear positions
which require 80 psi (552 kPa).
Rotation, pressure adjustment
and successful completion of the
TPMS reset procedure
Sensor 1: 80 psi
Sensor 2: 80 psi
Sensor 3: 50 psi
Sensor 4: 50 psi
Tire rotation and air pressure
adjustment followed by sensor
resetting will ensure the system is properly programmed for vehicles
with different front and rear tire pressures and reduce the risk of a false
low tire warning.
In this situation, the TPMS warning light will be off.
SNOW TIRES AND CHAINS
Snow tires must be the same size and grade as the tires you
currently have on your vehicle.
The tires on your vehicle have all weather treads to provide traction in
rain and snow. However, in some climates, you may need to use snow
tires and chains. If you need to use chains, it is recommended that steel
wheels (of the same size and specifications) be used, as chains may chip
aluminum wheels.
Note: Do not place chains on the following tires sizes: P265/60R18,
P275/65R18, LT275/65R18, P275/55R20, and P275/45R22.
Follow these guidelines when using snow tires and chains:
•Use only SAE Class S chains.
•Install chains securely, verifying that the chains do not touch any
wiring, brake lines or fuel lines.
•Drive cautiously. If you hear the chains rub or bang against your
vehicle, stop and re-tighten the chains. If this does not work, remove
the chains to prevent damage to your vehicle.
•If possible, avoid fully loading your vehicle.
2008 F-150(f12)
Owners Guide (post-2002-fmt)
USA(fus)
Tires, Wheels and Loading
236
Page 258 of 400
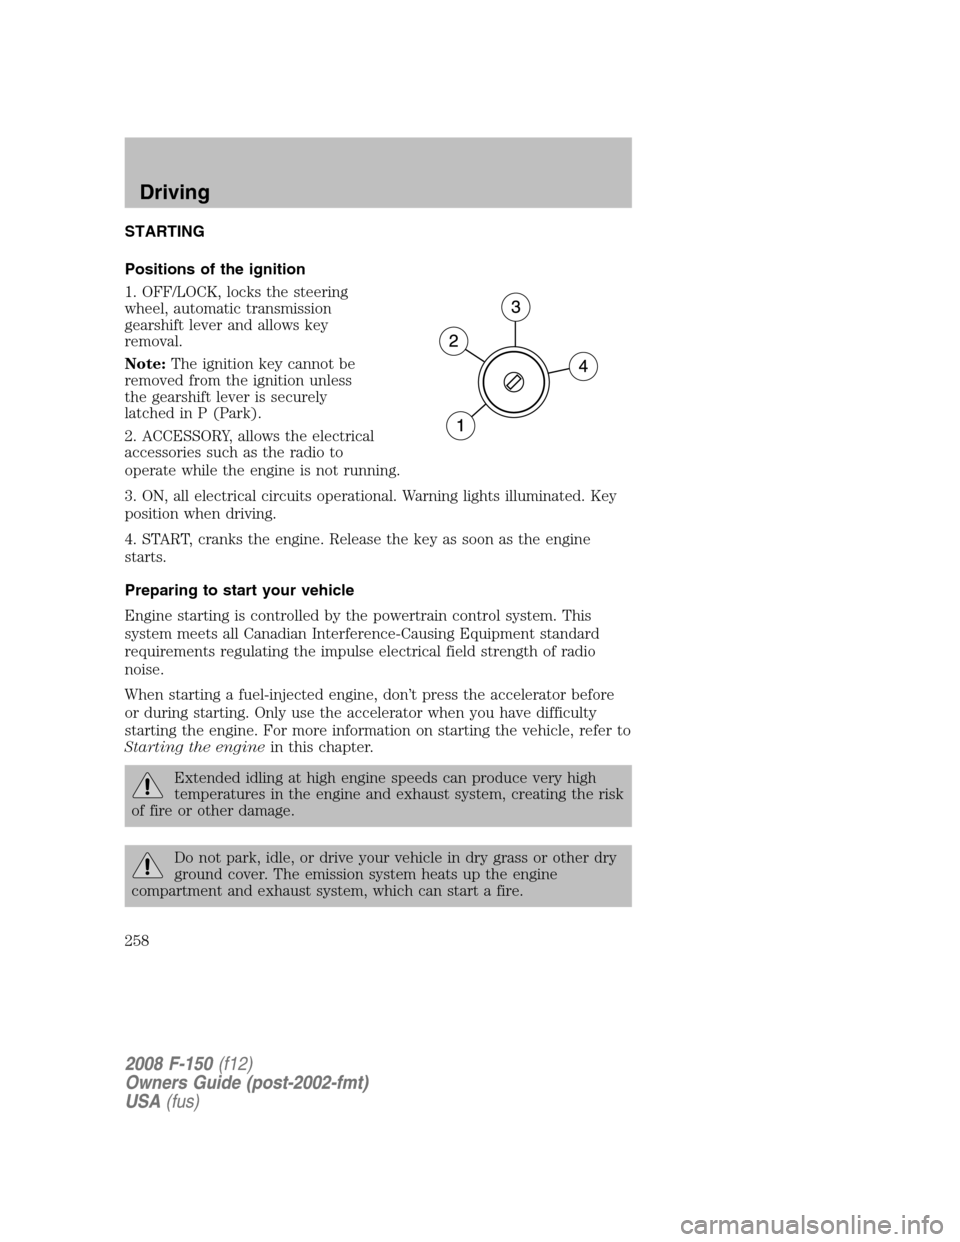
STARTING
Positions of the ignition
1. OFF/LOCK, locks the steering
wheel, automatic transmission
gearshift lever and allows key
removal.
Note:The ignition key cannot be
removed from the ignition unless
the gearshift lever is securely
latched in P (Park).
2. ACCESSORY, allows the electrical
accessories such as the radio to
operate while the engine is not running.
3. ON, all electrical circuits operational. Warning lights illuminated. Key
position when driving.
4. START, cranks the engine. Release the key as soon as the engine
starts.
Preparing to start your vehicle
Engine starting is controlled by the powertrain control system. This
system meets all Canadian Interference-Causing Equipment standard
requirements regulating the impulse electrical field strength of radio
noise.
When starting a fuel-injected engine, don’t press the accelerator before
or during starting. Only use the accelerator when you have difficulty
starting the engine. For more information on starting the vehicle, refer to
Starting the enginein this chapter.
Extended idling at high engine speeds can produce very high
temperatures in the engine and exhaust system, creating the risk
of fire or other damage.
Do not park, idle, or drive your vehicle in dry grass or other dry
ground cover. The emission system heats up the engine
compartment and exhaust system, which can start a fire.
2008 F-150(f12)
Owners Guide (post-2002-fmt)
USA(fus)
Driving
258