Page 89 of 258

88
SAFETY
DEVICES
CORRECT USE
OF THE CAR
WARNING
LIGHTS AND
MESSAGES
IN AN
EMERGENCY
CAR
MAINTENANCE
TECHNICAL
SPECIFICATIONS
INDEX
DASHBOARD
AND CONTROLS
TO RETURN THE REAR SEAT
BACK TO ITS ORIGINAL
POSITION fig. 108
Raise the seat backrests and push them
back until hearing the locking click of both
retainers.
IMPORTANT Correct backrest fastening
is guaranteed when the “red band” Baside
levers Ais no longer visible. The “red
band” actually indicates that the backrest
is not properly secured. When setting the
backrest to travelling position, always
make sure it is properly secured by hear-
ing the locking click.IMPORTANT After putting the seats back
to their travelling position, restore the
seat belt position to make them ready for
use.
DOUBLE LOADING
COMPARTMENT
(where provided)
In addition to fully or partially folding seats,
the car can also be fitted with a loading
surface to be adjusted at two different
heights in order to make the loading sur-
face flat and to increase or decrease the
boot volume as required.
Keeping the loading surface up it will be
possible to make use of the space obtained
below as additional compartment for frag-
ile or small objects.
fig. 108F0L0233mMake sure the backrest is
properly secured at both
sides (red bands B not visible) to pre-
vent it moves forward in the event of
sharp braking causing injuries to pas-
sengers.
WARNING
fig. 109F0L0142m
fig. 110F0L0241m
To access the compartment set under-
neath the loading surface, proceed as fol-
lows:
❒raise handle A-fig. 109pressing in the
point shown by the arrow at “PUSH”,
lift the loading surface and secure it by
the proper wire to the upper hook on
the roof as shown in the figure
fig. 110.
070-106 Croma TRW GB 29-05-2008 8:57 Pagina 88
Page 90 of 258

89
SAFETY
DEVICES
CORRECT USE
OF THE CAR
WARNING
LIGHTS AND
MESSAGES
IN AN
EMERGENCY
CAR
MAINTENANCE
TECHNICAL
SPECIFICATIONS
INDEX
DASHBOARD
AND CONTROLS
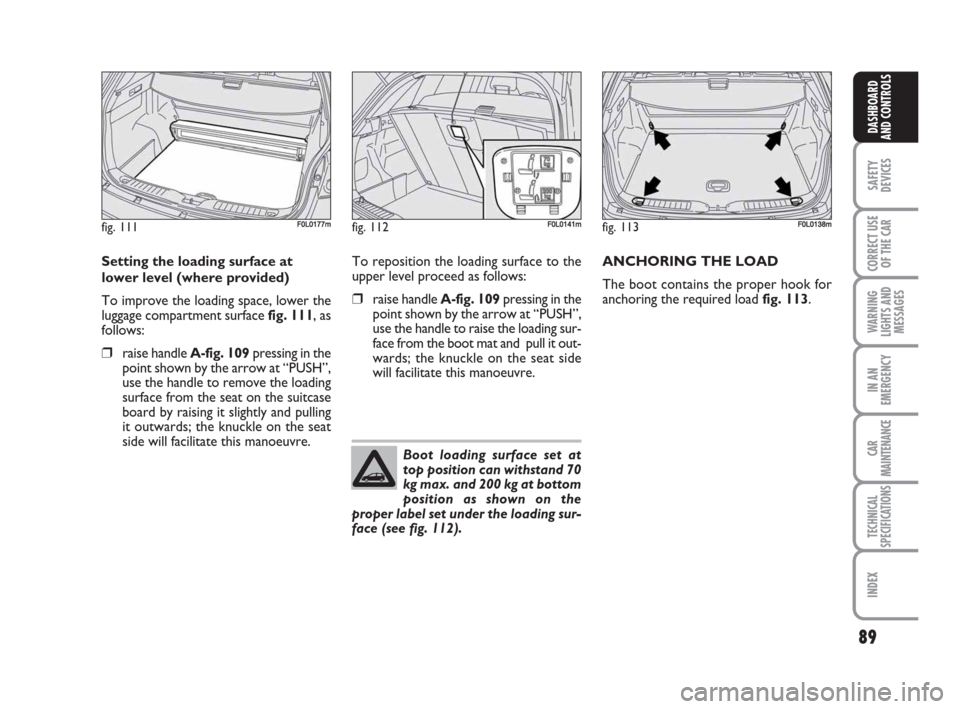
Setting the loading surface at
lower level (where provided)
To improve the loading space, lower the
luggage compartment surface fig. 111, as
follows:
❒raise handle A-fig. 109pressing in the
point shown by the arrow at “PUSH”,
use the handle to remove the loading
surface from the seat on the suitcase
board by raising it slightly and pulling
it outwards; the knuckle on the seat
side will facilitate this manoeuvre.To reposition the loading surface to the
upper level proceed as follows:
❒raise handle A-fig. 109pressing in the
point shown by the arrow at “PUSH”,
use the handle to raise the loading sur-
face from the boot mat and pull it out-
wards; the knuckle on the seat side
will facilitate this manoeuvre.ANCHORING THE LOAD
The boot contains the proper hook for
anchoring the required load fig. 113.
fig. 111F0L0177mfig. 112F0L0141mfig. 113F0L0138m
Boot loading surface set at
top position can withstand 70
kg max. and 200 kg at bottom
position as shown on the
proper label set under the loading sur-
face (see fig. 112).
070-106 Croma TRW GB 29-05-2008 8:57 Pagina 89
Page 91 of 258

90
SAFETY
DEVICES
CORRECT USE
OF THE CAR
WARNING
LIGHTS AND
MESSAGES
IN AN
EMERGENCY
CAR
MAINTENANCE
TECHNICAL
SPECIFICATIONS
INDEX
DASHBOARD
AND CONTROLS
Certain versions (where provided) are fit-
ted with a luggage retainer net that can be
secured to the fastening rings fig. 114.
IMPORTANT Never anchor to single
hook a load exceeding 100 kg.
Certain versions (where provided) are fit-
ted with a luggage anti-throw out safety
net secured to the roof at two side seats
fig. 115, and at the bottom to the load re-
taining rings set on the wheelhouses.
BONNET
TO OPEN THE BONNET
Proceed as follows:
❒pull the lever A-fig. 116in the direc-
tion indicated by the arrow in order
to release the lock of the engine bon-
net;
❒insert your hand between bonnet and
bumper and push the lever B-fig. 117
to the left as shown;
❒lift the bonnet and at the same time
release the rod C fig. 118from the
catch D, then fit the rod end into the
bonnet recess E.
IMPORTANT Before opening the bonnet,
check that windscreen wiper arms are not
lifted from the windscreen.
fig. 114F0L0237mfig. 115F0L0238m
If you want to carry reserve
fuel in a can, follow law reg-
ulations, only using a certified can,
suitably fastened to the load securing
eyelets. Even in this way the risk of
fire is increased in the case of an ac-
cident.
WARNING
A heavy load that has not
been secured may cause se-
rious harm.
WARNING
070-106 Croma TRW GB 29-05-2008 8:57 Pagina 90
Page 92 of 258

91
SAFETY
DEVICES
CORRECT USE
OF THE CAR
WARNING
LIGHTS AND
MESSAGES
IN AN
EMERGENCY
CAR
MAINTENANCE
TECHNICAL
SPECIFICATIONS
INDEX
DASHBOARD
AND CONTROLS
TO CLOSE THE BONNET fig. 118
Proceed as follows:
❒hold the bonnet up with one hand and
with the other remove rod Cfrom re-
cess Eand fit it back into its catch D;
❒lower the bonnet at approx. 20 cen-
timetres from the engine compart-
ment and then let it drop, ensuring
that it is fully closed and not just held
in position by the safety catch. If the
bonnet does not close properly, do
not push it down but open it again and
repeat the above procedure.
IMPORTANT Always check that the bon-
net is closed properly to avoid its opening
while the car is travelling.
fig. 116F0L0048mfig. 118F0L0116m
For safety reasons the bon-
net must be closed properly
to avoid its opening while the car is
travelling. Therefore, always check it
is properly closed and the catch en-
gaged. Should you notice that the
catch is not perfectly engaged when
travelling, stop the car immediately
and close the bonnet.
WARNING
If the supporting rod is not
positioned correctly the bon-
net may fall violently.
WARNING
Carry out operations only
when the car is stationary.
WARNING
fig. 117F0L0524m
070-106 Croma TRW GB 29-05-2008 8:57 Pagina 91
Page 93 of 258

92
SAFETY
DEVICES
CORRECT USE
OF THE CAR
WARNING
LIGHTS AND
MESSAGES
IN AN
EMERGENCY
CAR
MAINTENANCE
TECHNICAL
SPECIFICATIONS
INDEX
DASHBOARD
AND CONTROLS
ROOF RACK/
SKI RACK
The roof rack/ski rack shall be secured to
the roof at points A-fig. 119.
To mount it, lift the tabs and proceed as
follows:
❒for versions with sunroof: extract the
tabs using the screwdriver provided
in the kit to reach the fastening seats
fig. 120;
❒for versions without sunroof: lift the
tabs using the screwdriver provided
in the kit to reach the fastening seats
fig. 121;
A roof rack/ski rack specially designed for
the car is available at Lineaccessori Fiat.After few kilometres, check that the fas-
tening screws are firmly tightened.
IMPORTANT Never exceed the max.
permissible loads (see section “Technical
specifications”).
The car can be fitted with two longitudi-
nal bars that can be used, by adding spe-
cial accessories to carry various objects
(e.g.: skis, windsurf, etc..).
fig. 119F0L0222mfig. 120F0L0231m
fig. 121F0L0232m
Open the tailgate with care
when carrying objects on the
roof rack bars to prevent impacts.
WARNING
070-106 Croma TRW GB 29-05-2008 8:57 Pagina 92
Page 94 of 258

93
SAFETY
DEVICES
CORRECT USE
OF THE CAR
WARNING
LIGHTS AND
MESSAGES
IN AN
EMERGENCY
CAR
MAINTENANCE
TECHNICAL
SPECIFICATIONS
INDEX
DASHBOARD
AND CONTROLS
HEADLIGHTS
ADJUSTING THE HEADLIGHT
BEAM
Proper adjustment of the headlight beams
is of vital importance for your safety and
comfort and also for the other road users.
To ensure you and other drivers have the
best visibility conditions when travelling
with the headlights on, the headlights must
be set properly. Contact Fiat Dealership
to have the headlights properly adjusted.
IMPORTANT When turning on (Xenon)
gas discharge headlight lamps (where pro-
vided), it is normal that there should be a
vertical movement of reflectors, and con-
sequently the same will also happen to the
light beam, for the time required to
achieve the correct headlight trim stabili-
sation, equal to approx. 2 seconds.
Headlight aiming device
It works with ignition key at ONand
dipped beams on. When the car is loaded,
it slopes backwards. This means that the
headlight beam rises. In this case, it is nec-
essary to return it to the correct position.To adjust the headlight slant
fig. 122
Press button Aset on the control panel;
if the car is fitted with (Xenon) gas dis-
charge headlights, slant adjustment is elec-
tronic and therefore button Ais not pre-
sent.
The display located on the instrument pan-
el, provides the visual indication of the po-
sitions during the adjustment operation
(fig. 123: multifunctional display - fig. 124:
reconfigurable multifunctional display).
Position 0 - one or two people occupy-
ing the front seats.
Position 1 - five people.
Position 2 - five people + load in the boot.
Position 3 - driver + maximum permissi-
ble load stowed in the boot.IMPORTANT Check beam aiming every
time the load carried changes.
fig. 122F0L0050mfig. 123F0L0051m
fig. 124F0L0519m
070-106 Croma TRW GB 29-05-2008 8:57 Pagina 93
Page 95 of 258

94
SAFETY
DEVICES
CORRECT USE
OF THE CAR
WARNING
LIGHTS AND
MESSAGES
IN AN
EMERGENCY
CAR
MAINTENANCE
TECHNICAL
SPECIFICATIONS
INDEX
DASHBOARD
AND CONTROLS
FRONT FOG LIGHT
ADJUSTMENT
Contact Fiat Dealership to have the head-
lights properly adjusted.HEADLIGHT BEAM
ADJUSTMENT ABROAD
The dipped beam headlights are adjusted
for circulation in the country in which the
car is marketed. In countries with oppo-
site circulation, to avoid glaring oncom-
ing vehicles, it is necessary to cover the
areas of the headlight using a special stick-
er tape provided for the purpose and avail-
able at Lineaccessori Fiat. Contact Fiat
Dealership.ABS SYSTEM
The car is fitted with an ABS braking sys-
tem, which prevents the wheels from lock-
ing when braking, makes the most of road
grip and gives the best control when emer-
gency braking under difficulty road condi-
tions.
System is completed by EBD (Electronic
Braking Force Distribution), which dis-
tributes the braking action between front
and rear wheels.
IMPORTANT To have the maximum ef-
ficiency of the braking system, it is neces-
sary a setting period of about 500 km
(with new car after replacing brake
pads/discs): during this period it is better
to avoid sharp, repeated and prolonged
brakes.
ESP SYSTEM INTERVENTION
When the ABS cuts in, you will feel the
brake pedal pulsating slightly and the sys-
tem get noisier: it means that the speed
should be altered to fit the type of road sur-
face.
If the ABS system cuts in, it is a sign that
the grip between tyre and the road sur-
face has reached the limit: you must slow
down to match the speed to the road grip
available.
070-106 Croma TRW GB 29-05-2008 8:57 Pagina 94
Page 96 of 258

95
SAFETY
DEVICES
CORRECT USE
OF THE CAR
WARNING
LIGHTS AND
MESSAGES
IN AN
EMERGENCY
CAR
MAINTENANCE
TECHNICAL
SPECIFICATIONS
INDEX
DASHBOARD
AND CONTROLS
FAILURE WARNINGS
ABS failure
ABS failure is indicated by the turning on
of warning light
>on the instrument pan-
el together with the dedicated message on
the display (see section “Warning lights
and messages”).
In this case the braking system is still effi-
cient, though without the aid of the ABS
system. Drive carefully to the closest Fiat
Dealership to have the system checked.EBD failure
EBD failure is indicated by the turning on
of warning lights
>and xon the in-
strument panel together with the dedi-
cated message on the display (see section
“Warning lights and messages”).
In this case with sharp braking the rear
wheels might lock too early, with the pos-
sibility of skidding. Drive extremely care-
fully to the nearest Fiat Dealership to have
the system checked.
BRAKE ASSIST
(emergency braking assistance)
(where provided)
The system, which cannot be cut out, rec-
ognizes emergency braking (on the ground
of the brake pedal operation speed) and
considerably increases the pressure in the
brake circuit.
During emergency braking, the emergency
lights turn on automatically; when accel-
erating the lights turn off automatically.
Brake Assist is deactivated on the versions
equipped with ESP, in the event of ESP sys-
tem failure (indicated by warning light
áswitching on together with the message
on the display).
If the ABS system cuts in, it
is a sign that the grip be-
tween tyre and the road surface has
reached the limit: you must slow
down to match the speed to the road
grip available.
WARNING
The ABS exploits the tyre-
road grip at the best, but it
cannot improve it; you should there-
fore take every care when driving on
slippery surfaces without taking un-
necessary risks.
WARNING
When the ABS cuts in, and
you feel the brake pedal pul-
sating, do not remove your foot, but
keep it pressed; in doing so you will
stop in the shortest amount of space
possible under the current road con-
ditions.
WARNING
If the brake fluid low warn-
ing light xcomes on (to-
gether with the message on the dis-
play), stop the car immediately and
contact the nearest Fiat Dealership.
Fluid leaks from the hydraulic system,
in fact, can compromise the braking
system, both traditional systems and
systems with ABS.
WARNING
070-106 Croma TRW GB 29-05-2008 8:57 Pagina 95