Page 308 of 554
4. After the desired position indicator light is ON (not
flashing), shift transmission back into gear (release clutch
on manual transmissions).
NOTE:If steps 1 or 2 of either the Preferred or Alternate
Procedure are not satisfied prior to attempting the shift or
if they no longer are being met while the shift attempt is
in process then the desired position indicator light will
flash continuously while the original position indicator
light is ON, until all requirements have been met.
NOTE:The ignition key must be ON for a shift to take
place and for the position indicator lights to be operable.
If the key is not ON then the shift will not take place and
no position indicator lights will be on or flashing.
NOTE:If your are leaving your vehicle stored for longer
than 21 days, refer to the section on ªVehicle Storage.ºElectronically Shifted Transfer Case Operating
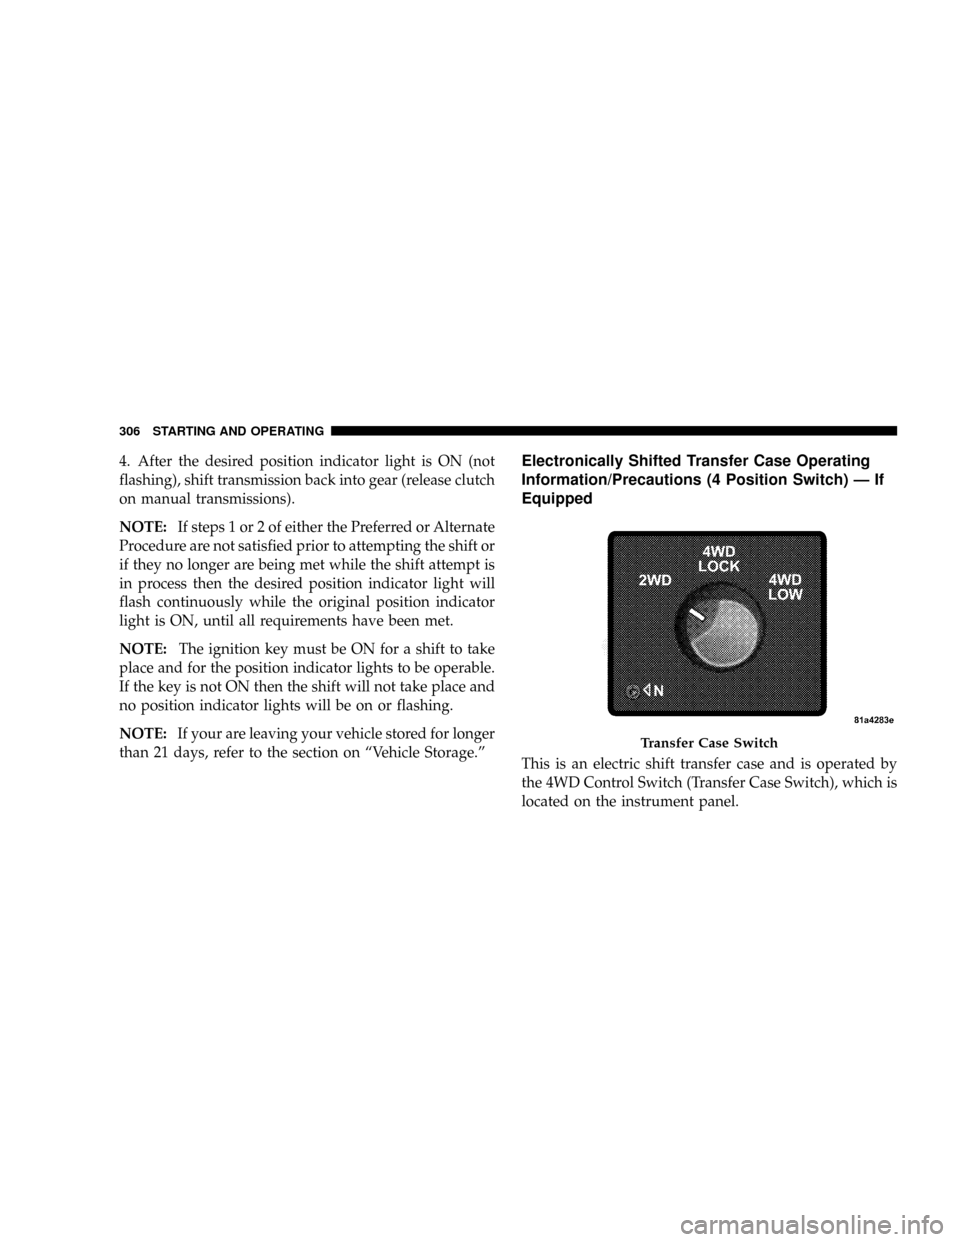
Information/Precautions (4 Position Switch) Ð If
Equipped
This is an electric shift transfer case and is operated by
the 4WD Control Switch (Transfer Case Switch), which is
located on the instrument panel.
Transfer Case Switch
306 STARTING AND OPERATING
Page 314 of 554
ignition key must be in the ON position with the engine
either running or off. This shift cannot be completed if the
key is in the ACC position.
NOTE:The 4x4 system will not allow shifts between
2WD/4WD LOCK if the front and/or rear wheels are
spinning (no traction). In this situation the selected
position indicator light will flash and the original posi-
tion indicator light will remain ON. At this time, reduce
speed and stop spinning the wheels to complete the shift.
2WD or 4WD LOCK,4WD LOW
NOTE:When shifting into or out of 4WD LOW some
gear noise may be heard. This noise is normal and is not
detrimental to the vehicle or occupants.Shifting can be performed with the vehicle rolling 2 to 3
mph (3 to 5 km/h) or completely stopped. USE EITHER
OF THE FOLLOWING PROCEDURES:
Preferred Procedure
1. With engine running, slow vehicle to 2 to 3 mph (3 to
5 km/h).
2. Shift the transmission into NEUTRAL (depress clutch
on manual transmissions).
3. While still rolling, rotate the transfer case control
switch to the desired position.
4. After the desired position indicator light is ON (not
flashing), shift transmission back into gear (release clutch
on manual transmissions).
312 STARTING AND OPERATING
Page 315 of 554
Alternate Procedure
1. Bring the vehicle to complete stop.
2. With the key ON and the engine either OFF or
running, shift the transmission into NEUTRAL (depress
clutch on manual transmissions).
3. Rotate the transfer case control switch to the desired
position.
4. After the desired position indicator light is ON (not
flashing), shift transmission back into gear (release clutch
on manual transmissions).
NOTE:If steps 1 or 2 of either the Preferred or Alternate
Procedure are not satisfied prior to attempting the shift
then the desired position indicator light will flash con-
tinuously while the original position indicator light is
ON, until all requirements have been met.NOTE:The ignition key must be ON for a shift to take
place and for the position indicator lights to be operable.
If the key is not ON then the shift will not take place and
no position indicator lights will be on or flashing.
NOTE:If your are leaving your vehicle stored for longer
than 21 days, refer to the section on ªVehicle Storage.º
LIMITED-SLIP DIFFERENTIAL ± IF EQUIPPED
The limited-slip differential provides additional traction
on snow, ice, mud, sand and gravel, particularly when
there is a difference between the traction characteristics
of the surface under the right and left rear wheels. During
normal driving and cornering, the limited-slip unit per-
forms similarly to a conventional differential. On slip-
pery surfaces, however, the differential delivers more of
the driving effort to the rear wheel having the better
traction.
The limited-slip differential is especially helpful during
slippery driving conditions. With both rear wheels on a
STARTING AND OPERATING 313
5
Page 321 of 554
WARNING!
²Always fully apply the parking brake when leaving
your vehicle, or it may roll and cause damage or
injury. Also be certain to leave an automatic trans-
mission in PARK, a manual transmission in RE-
VERSE or FIRST gear. Failure to do so may allow
the vehicle to roll and cause damage or injury.
²Never leave children alone in a vehicle. Leaving
unattended children in a vehicle is dangerous for a
number of reasons. A child or others could be
seriously or fatally injured. Don't leave the key in
the ignition. A child could operate power win-
dows, other controls, or move the vehicle.
²Be sure the parking brake is fully disengaged before
driving, failure to do so can lead to brake problems
due to excessive heating of the rear brakes.
When parking on a hill, turn the front wheels toward the
curb on a downhill grade and away from the curb on an
uphill grade.
The parking brake should always be applied whenever
the driver is not in the vehicle.
BRAKE SYSTEM
If power assist is lost for any reason (for example,
repeated brake applications with the engine off), the
brakes will still function. However, you will experience a
substantial increase in braking effort to stop the vehicle.
If either the front or rear hydraulic system loses normal
braking capability, the remaining system will still func-
tion with some loss of overall braking effectiveness. This
will be evident by increased pedal travel during applica-
tion, greater pedal force required to slow or stop, and
activation of the BRAKE warning lamp and the ABS lamp
(if equipped) during brake use.
STARTING AND OPERATING 319
5
Page 331 of 554
²Gear selection matches vehicle uphill direction (i.e.,
vehicle facing uphill is in forward gear; vehicle back-
ing uphill is in REVERSE gear).
WARNING!
There may be situations on minor hills (i.e., less than
7%), with a loaded vehicle, or while pulling a trailer
where the system will not activate and slight rolling
may occur, which could cause a collision with an-
other vehicle or object. Always remember the driver
is responsible for braking the vehicle.
The system will only work if the intended direction of the
vehicle and vehicle gear match. For example, if the
intended direction is forward up a hill and the vehicle is
in drive (automatic equipped vehicle), and the activation
criteria are met, HSA will activate.
HSA on Automatic Vehicles
The system will work in REVERSE and all forward gears
on vehicles equipped with an automatic transmission.
The system will not activate if the vehicle is placed in
neutral.
HSA on Manual Vehicles
The system will work in REVERSE, forward gears, and
NEUTRAL on manual transmission equipped vehicles.
The system does not recognize NEUTRAL on manual
vehicles, thus it will hold the vehicle on an incline for a
short period while in NEUTRAL, regardless of clutch
position. To prevent this, do not attempt to roll down a
hill simply by putting the transmission in NEUTRAL and
letting gravity act on the vehicle, as the HSA will prevent
the vehicle from rolling. Instead, use the appropriate gear
for moving in the desired direction.
STARTING AND OPERATING 329
5
Page 332 of 554
Towing and Hauling with HSA (Vehicles Equipped
with Automatic Transmissions Only)
The HSA system does not know if your vehicle is loaded
or towing a trailer, unless the TOW/HAUL button,
located on the transmission gear shift lever, is selected.
When activated, the TOW/HAUL light will illuminate in
the instrument cluster. For more information on TOW/
HAUL mode, refer to ªWhen To USE TOW/HAUL and
O/D OFF Modesº under9Automatic Transmissionº in
Section 5. In order to accommodate the extra weight
entailed under towing and hauling conditions and to
increase driver comfort while launching on a hill, the
system recognizes when the TOW/HAUL button is acti-
vated and compensates by releasing brake pressure at a
slower rate while throttle is applied in order to prevent
the vehicle from rolling down the hill.
WARNING!
If you use a trailer brake controller with your trailer,
your trailer brakes may be activated and deactivated
with the brake switch. If so, when the brake pedal is
released, there may not be enough brake pressure to
hold the vehicle and trailer on a hill and this could
cause a collision with another vehicle or object be-
hind you. In order to avoid rolling down the incline
while resuming acceleration, manually activate the
trailer brake or apply more vehicle brake pressure
prior to releasing the brake pedal. Always remember
the driver is responsible for braking the vehicle.
330 STARTING AND OPERATING
Page 333 of 554
WARNING!
HSA is not a parking brake. If you stop the vehicle on
a hill without putting the transmission in PARK or
using the parking brake, it will roll down the incline
and could cause a collision with another vehicle or
object. Always remember to use the parking brake
while parking on a hill, and that the driver is
responsible for braking the vehicle.
HSA Off
If you wish to turn off the HSA system, follow this
procedure:
1. Start with the engine off and vehicle in PARK (auto-
matic transmission) or NEUTRAL with clutch out
(manual transmission) with wheels straight. Apply park-
ing brake on manual transmission vehicle.2. Start the engine.
3. With the engine running, the brake applied, and the
clutch out, rotate the steering wheel 180É counterclock-
wise from center.
4. Press ESP button four times within twenty seconds.
The ªESP/TCS Indicator Lightº should appear and dis-
appear four times.
5. Rotate the steering wheel 360É clockwise (180É clock-
wise from center).
6. Cycle ignition switch OFF then ON.
7. If the sequence was completed properly, the ªESP/
TCS Indicator Lightº will blink several times to confirm
HSA is off.
Steps 1-7 must be completed within 90 seconds to turn off
HSA. Repeat steps 1-7 to re-enable HSA functionality.
STARTING AND OPERATING 331
5
Page 395 of 554
loss of control, poor performance or damage to brakes,
axle, engine, transmission, steering, suspension, chas-
sis structure or tires.
²Safety chains must always be used between your
vehicle and trailer. Always connect the chains to the
frame or hook retainers of the vehicle hitch. Cross the
chains under the trailer tongue and allow enough
slack for turning corners.
²Vehicles with trailers should not be parked on a grade.
When parking, apply the parking brake on the tow
vehicle. Put the tow vehicle automatic transmission in
P for Park. With a manual transmission, shift the
transmission into reverse. And with four-wheel-drive
vehicles, make sure the transfer case is not in neutral.
Always, block or9chock9the trailer wheels.
²GCWR must not be exceeded.
²Total weight must be distributed between the tow
vehicle and the trailer such that the following four
ratings are not exceeded:
1. GVWR
2. GTW
3. GAWR
4. Tongue weight rating for the trailer hitch utilized
(This requirement may limit the ability to always
achieve the 10% to 15% range of tongue weight as a
percentage of total trailer weight).
STARTING AND OPERATING 393
5