Page 446 of 527

Brake Master Cylinder
The fluid level of the master cylinder should be checked
when performing under the hood service, or immedi-
ately if the brake system warning lamp indicates system
failure.
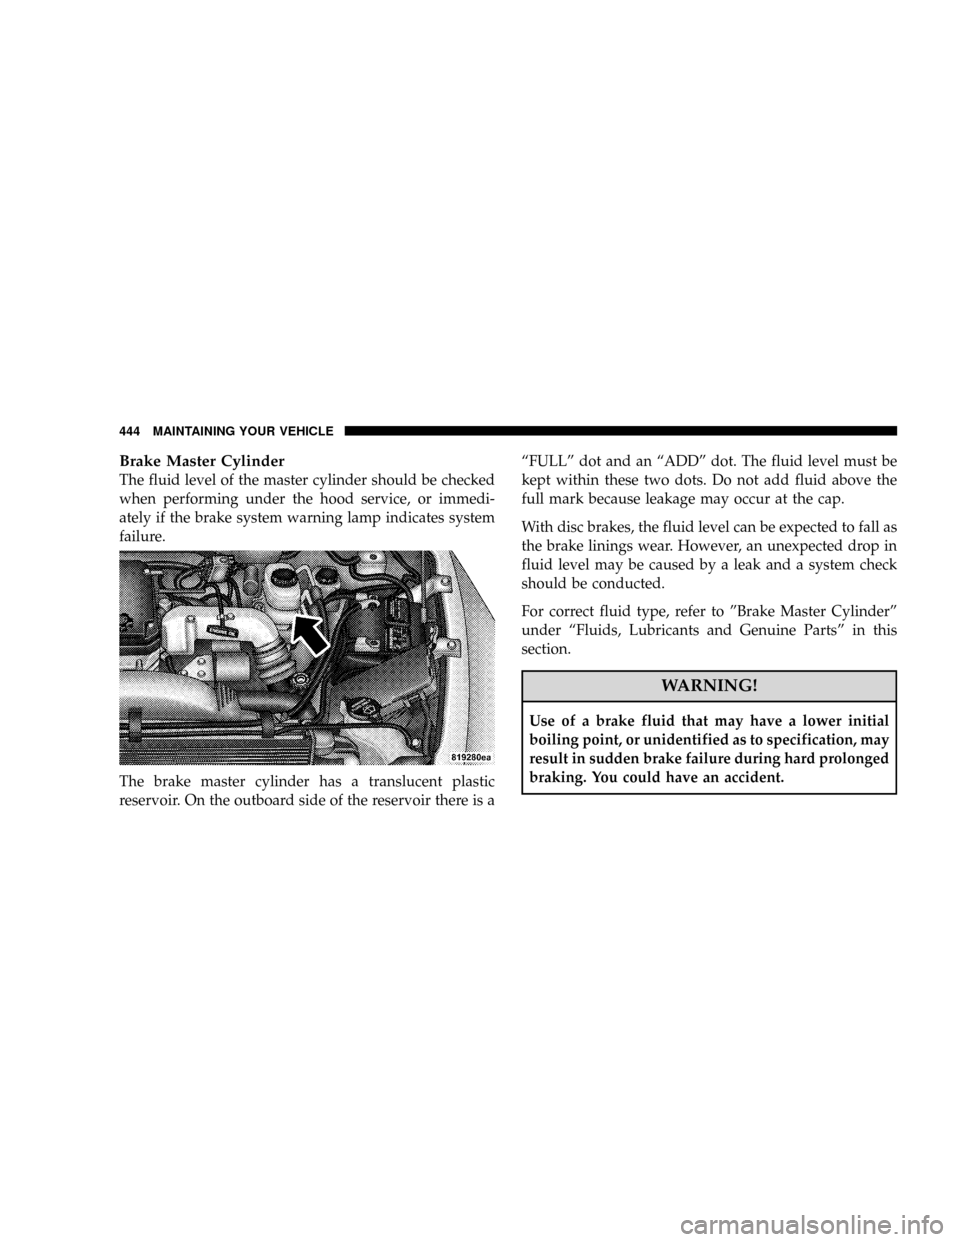
The brake master cylinder has a translucent plastic
reservoir. On the outboard side of the reservoir there is aªFULLº dot and an ªADDº dot. The fluid level must be
kept within these two dots. Do not add fluid above the
full mark because leakage may occur at the cap.
With disc brakes, the fluid level can be expected to fall as
the brake linings wear. However, an unexpected drop in
fluid level may be caused by a leak and a system check
should be conducted.
For correct fluid type, refer to ºBrake Master Cylinderº
under ªFluids, Lubricants and Genuine Partsº in this
section.
WARNING!
Use of a brake fluid that may have a lower initial
boiling point, or unidentified as to specification, may
result in sudden brake failure during hard prolonged
braking. You could have an accident.
444 MAINTAINING YOUR VEHICLE
Page 448 of 527

Rear Axle And 4x4 Front Driving Axle Fluid Level
For Model 9.25 Front Axles and 10.5º/11.5º Rear Axles
refer to Fluids, Lubricants and Genuine Parts for the
correct lubricant type. For normal service, periodic fluid
level checks are not required. When the vehicle is ser-
viced for other reasons, the exterior surfaces of the axle
assembly should be inspected.
When checking the fluid level, the vehicle should be in a
level position. The fluid level should be 1/4º 1/4º (6.4
mm 6.4 mm) below the fill hole on the 9.25º Front Axle.
The fluid level should be 3/4º 1/4º (19 mm 6.4 mm)
below the fill hole on all 10.5º and 1/4º 1/4º (6.4 mm
6.4 mm) on 11.5º Rear Axles.
Drain And Refill
Follow the Maintenance Schedule for recommended fron
and rear axle fluid change intervals.
Lubricant Selection
Refer to Fluids, Lubricants and Genuine Parts for the
correct lubricant type.
NOTE:The presence of water in the gear lubricant will
result in corrosion and possible failure of differential
components. Operation of the vehicle in water, as may be
encountered in some off-highway types of service, will
require draining and refilling the axle to avoid damage.
Limited-Slip Differentialsin vehicles equipped with
10.5º/11.5º AxlesDO NOT REQUIREany limited slip
oil additive (friction modifiers).
Transfer Case Ð If Equipped
Fluid Level Check
This fluid level can be checked by removing the filler
plug. The fluid level should be to the bottom edge of the
filler plug hole with the vehicle in a level position.
446 MAINTAINING YOUR VEHICLE
Page 460 of 527

Your leather upholstery can be best preserved by regular
cleaning with a damp soft cloth. Small particles of dirt
can act as an abrasive and damage the leather upholstery
and should be removed promptly with a damp cloth.
Stubborn soils can be removed easily with a soft cloth
and MopartTotal Clean. Care should be taken to avoid
soaking your leather upholstery with any liquid. Please
do not use polishes, oils, cleaning fluids, solvents, deter-
gents, or ammonia based cleaners to clean your leather
upholstery. Application of a leather conditioner is not
required to maintain the original condition.
WARNING!
Do not use volatile solvents for cleaning purposes.
Many are potentially flammable, and if used in
closed areas they may cause respiratory harm.
Glass Surfaces
All glass surfaces should be cleaned on a regular basis
with MopartGlass Cleaner or any commercial
household-type glass cleaner. Never use an abrasive type
cleaner. Use caution when cleaning the inside rear win-
dow equipped with electric defrosters or the right rear
quarter window equipped with the radio antenna. Do
not use scrapers or other sharp instruments which may
scratch the elements. When cleaning the rearview mirror,
spray cleaner on the towel or rag that you are using. Do
not spray cleaner directly on the mirror.
Cleaning Plastic Instrument Cluster Lenses
The lenses in front of the instruments in this vehicle are
molded in clear plastic. When cleaning the lenses, care
must be taken to avoid scratching the plastic.
458 MAINTAINING YOUR VEHICLE
Page 486 of 527

EMISSION CONTROL SYSTEM MAINTENANCE
The Scheduled maintenance services, listed inbold type
in this section (Section 8) must be done at the times or
mileages specified to assure the continued proper func-
tioning of the emission control system. These, and all
other maintenance services included in this manual,
should be done to provide best vehicle performance and
reliability. More frequent maintenance may be needed for
vehicles in severe operating conditions, such as dusty
areas and very short trip driving.
Inspection and service also should be done anytime a
malfunction is suspected.
NOTE:Maintenance, replacement, or repair of the emis-
sion control devices and systems on your vehicle may be
performed by any automotive repair establishment or
individual using any automotive part which has been
certified pursuant to U.S. EPA or, in the State of Califor-
nia, California Air Resources Board regulations.
MAINTENANCE SCHEDULES Ð 6.7L TURBO
DIESEL
CAUTION!
Failure to perform the required maintenance items
may result in damage to the vehicle.
At Each Stop for Fuel
²Check the engine oil level about 30 minutes after a
fully warmed engine is shut off. Checking the oil level
while the vehicle is on level ground will improve the
accuracy of the oil level reading. Add oil only when
the level is at or below the ADD or MIN mark.
²Check the windshield washer solvent and add if
required. When refilling the washer fluid reservoir,
484 MAINTENANCE SCHEDULES
8
M
A
I
N
T
E
N
A
N
C
E
S
C
H
E
D
U
L
E
S
Page 488 of 527

Oil Change Indicator System
Your vehicle is equipped with an engine oil change
indicator system. This system will alert you when it is
time to change your engine oil by displaying the words
ªOil Change Requiredº on your Electronic Vehicle Infor-
mation Center (EVIC). The engine oil change indicator
system is duty cycle based, which means the engine oil
change interval may fluctuate depending on your per-
sonal driving style. Driving styles such as frequent stop
and go type driving can increase the frequency of the
engine oil change. This is the result of more frequent
regeneration of the exhaust aftertreatment system, which
can decrease the life of the engine oil. Failure to change
the engine oil per the maintenance schedule can result in
internal engine damage.
For information on resetting the Oil Change Indicator
message, refer to ªOil Change Required ± If Equipped,ºunder ªSystem Status (EVIC Displays)º in the ªElectronic
Vehicle Information Center (EVIC)º Section of this
manual.
Perform Service Indicator
Your vehicle will require emissions maintenance at a set
interval. To help remind you when this maintenance is
due, the Electronic Vehicle Information Center (EVIC)
will display ªPerform Serviceº. When the ªPerform Ser-
viceº message is displayed on the EVIC it is necessary to
have the emissions maintenance performed. Emissions
maintenance includes replacing the Closed Crankcase
Ventilation (CCV) filter element, cleaning of the EGR
Cooler, and cleaning of the EGR Valve. The procedure for
clearing and resetting the9Perform Service9indicator
message is located in the appropriate Service Informa-
tion.
486 MAINTENANCE SCHEDULES
8
M
A
I
N
T
E
N
A
N
C
E
S
C
H
E
D
U
L
E
S