2008 DODGE CHARGER warning
[x] Cancel search: warningPage 149 of 466

Sunroof Fully Closed
Press the switch forward and release to ensure that the
sunroof is fully closed.
ELECTRICAL POWER OUTLETS
There are two 12-volt electrical outlets on this vehicle.
Both of the outlets are protected by a fuse.
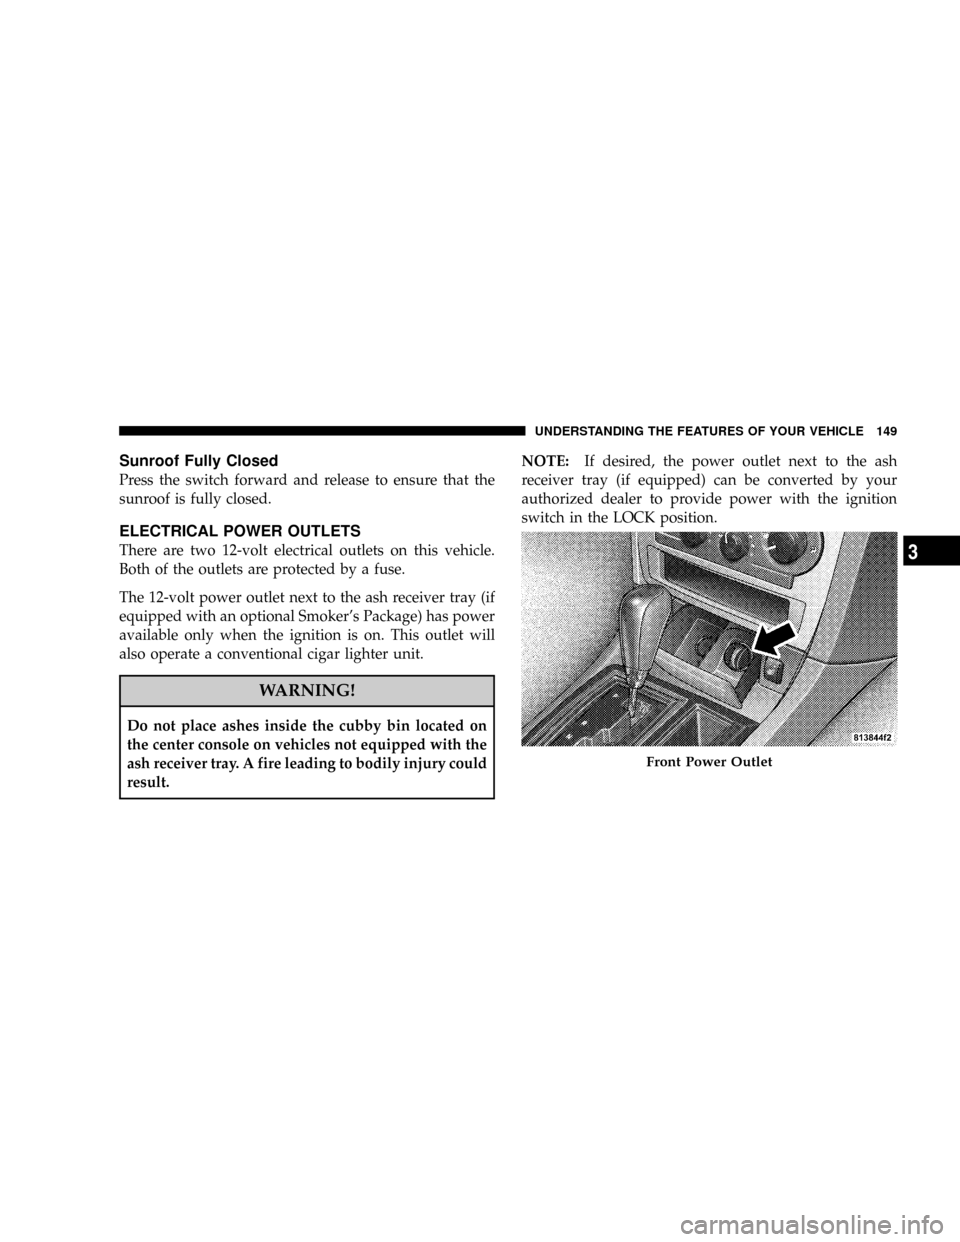
The 12-volt power outlet next to the ash receiver tray (if
equipped with an optional Smoker's Package) has power
available only when the ignition is on. This outlet will
also operate a conventional cigar lighter unit.
WARNING!
Do not place ashes inside the cubby bin located on
the center console on vehicles not equipped with the
ash receiver tray. A fire leading to bodily injury could
result.NOTE:If desired, the power outlet next to the ash
receiver tray (if equipped) can be converted by your
authorized dealer to provide power with the ignition
switch in the LOCK position.
Front Power Outlet
UNDERSTANDING THE FEATURES OF YOUR VEHICLE 149
3
Page 155 of 466

WARNING!
²Be certain that the seatback is securely locked into
position. If the seatback in not securely locked
into position, the seat will not provide the proper
stability for child seats and/or passengers. An
improperly latched seat could cause serious in-
jury.
²The cargo area in the rear of the vehicle (with the
rear seatbacks in the locked-up or folded down
position) should not be used as a play area by
children when the vehicle is in motion. They
could be seriously injured in an accident. Chil-
dren should be seated and using the proper re-
straint system.
²To help protect against personal injury, passen-
gers should not be seated in the rear cargo area.
The rear cargo space is intended for load carrying
purposes only, not for passengers, who should sit
in seats and use seat belts.
WARNING!
²The weight and position of cargo and passengers
can change the vehicle center of gravity and ve-
hicle handling. To avoid loss of control resulting
in personal injury, follow these guidelines for
loading your vehicle:
²Always place cargo evenly on the cargo floor. Put
heavier objects as low and as far forward as possible.
²Place as much cargo as possible in front of the rear
axle. Too much weight or improperly placed weight
over or behind the rear axle can cause the rear of the
vehicle to sway.
²Do not pile luggage or cargo higher than the top of the
seatback. This could impair visibility or become a
dangerous projectile in a sudden stop or collision.
UNDERSTANDING THE FEATURES OF YOUR VEHICLE 155
3
Page 166 of 466

The gauge pointer will likely indicate a higher tempera-
ture when driving in hot weather, up mountain grades,
or when towing a trailer. It should not be allowed to
exceed the upper limits of the normal operating range.
CAUTION!
Driving with a hot engine cooling system could
damage your vehicle. If temperature gauge reads (H),
pull over and stop the vehicle. Idle the vehicle with
the air conditioner turned off until the pointer drops
back into the normal range. If the pointer remains on
the ªHº, and you hear a chime, turn the engine off
immediately, and call for service.
WARNING!
A hot engine cooling system is dangerous. You or
others could be badly burned by steam or boiling
coolant. You may want to call a service center if your
vehicle overheats. If you decide to look under the
hood yourself, see Section 7 of this manual. Follow
the warnings under the Cooling System Pressure Cap
paragraph.
9. Turn Signal Indicators
The arrow will flash with the exterior turn signal
when the turn signal lever is operated.
NOTE:A continuous chime will sound if the vehicle is
driven more than 1 mile (1.6 km) with either turn signal
on.
166 UNDERSTANDING YOUR INSTRUMENT PANEL
Page 167 of 466

NOTE:Check for a defective outside light bulb if either
indicator flashes at a rapid rate. (See page 127 for more
information.)
10. Airbag Warning Light
This light will turn on for 6 to 8 seconds as a
bulb check when the ignition switch is first
turned ON. If the light is either not on during
starting, or stays on, or turns on while driving,
then have the system inspected at your authorized dealer
as soon as possible. (See page 62 for more information.)
11. Engine Temperature Warning Light
This light will turn on and a single chime will
sound to warn of an overheated engine condition.
When this light turns on, the engine temperature
is critically hot. The vehicle should be turned off imme-
diately and serviced as soon as possible. (See page 345 for
more information.)12. Electronic Stability Program (ESP)/Traction
Control System (TCS) Indicator Light Ð If Equipped
If this indicator light flashes during accelera-
tion, ease up on the accelerator and apply as
little throttle as possible. Adapt your speed and
driving to the prevailing road conditions, and
do not switch off the ESP. (See page 284 for more
information.) (See page 286 for more information.)
13. Electronic Stability Program (ESP) / Brake Assist
System (BAS) Malfunction Indicator Light Ð If
Equipped
The yellow ESP/BAS malfunction indicator
light will turn on when the key in the ignition
switch is turned to the ªONº position. The light
should go out with the engine running. The
system will turn this light on continuously while the
engine running if it detects a malfunction in either the
ESP or the BAS or both. (See page 286 for more informa-
tion.)
UNDERSTANDING YOUR INSTRUMENT PANEL 167
4
Page 168 of 466

14. Oil Pressure Warning Light
This light shows low engine oil pressure. The light
should turn on momentarily when the engine is
started. If the light turns on while driving, stop the
vehicle, and shut off the engine as soon as possible. A
single chime will sound when this light turns on.
Do not operate the vehicle until the cause is corrected.
This light does not show how much oil is in the engine.
The engine oil level must be checked using the procedure
shown in section 7. (See page 374 for more information.)
15. High Beam Light
This light will turn on when the high beam
headlights are ON. Push the Multi-Function lever
away from the steering wheel to switch the headlights to
high beam. (See page 126 for more information.)16. Seat Belt Reminder Light
This light will turn on for 5 to 8 seconds as a bulb
check when the ignition switch is first turned ON.
A chime will sound if the driver's seat belt is
unbuckled during the bulb check. The Seat Belt Warning
Light will flash or remain on continuously if the driver's
seat belt remains unbuckled after the bulb check or when
driving. (See page 47 for more information.)
17. Transmission Range Indicator
This display indicator shows the automatic transmission
gear selection.
18. Front Fog Light Indicator Ð If Equipped
This light will turn on when the front fog lights are
ON. (See page 126 for more information.)
168 UNDERSTANDING YOUR INSTRUMENT PANEL
Page 170 of 466

next scheduled oil change interval. The engine oil change
indicator system is duty cycle based, which means the
engine oil change interval may fluctuate dependent upon
your personal driving style.
Unless reset, this message will continue to display each
time you turn the ignition switch to the ªONº position.
To turn off the message temporarily, press and release the
Trip Odometer button on the instrument cluster. To reset
the oil change indicator system (after performing the
scheduled maintenance) perform the following proce-
dure:
1. Turn the ignition switch to the ON position (Do not
start the engine).
2. Fully depress the accelerator pedal slowly three
times within 10 seconds.
3. Turn the ignition switch to the LOCK position.NOTE:If the indicator message illuminates when you
start the vehicle, the oil change indicator system did not
reset. If necessary, repeat this procedure.
20. Brake System Warning Light
This light monitors various brake functions,
including brake fluid level and parking brake
application. If the brake light turns on, it may
indicate that the parking brake is applied, that
the brake fluid level is low, or that there is a problem with
the anti-lock brake system (if equipped).
The dual brake system provides a reserve braking capac-
ity to a portion of the hydraulic system in the event of a
failure. Failure of either half of the dual brake system is
indicated by the Brake Warning Light, which will turn on
when the brake fluid level in the master cylinder drops
below a specified level.
The light will remain on until the cause is corrected.
170 UNDERSTANDING YOUR INSTRUMENT PANEL
Page 171 of 466

NOTE:The light may flash momentarily during sharp
cornering maneuvers, which change fluid level condi-
tions. The vehicle should have service performed, and
the brake fluid level checked.
Immediate repair is necessary if brake failure is indicated.
WARNING!
Driving a vehicle with the brake light on is danger-
ous. Part of the brake system may have failed. It will
take longer to stop the vehicle. You could have an
accident. Have the vehicle checked immediately.
Vehicles equipped with Anti-Lock brakes (ABS) are also
equipped with Electronic Brake Force Distribution (EBD).
Both the Brake Warning Light and the ABS Light willturn on in the event of an EBD failure. Immediate repair
of the ABS system is required in the event of an EBD
failure.
The operation of the Brake Warning Light can be checked
by turning the ignition switch from the OFF position to
the ON position. The light should turn on for approxi-
mately two seconds and then turn off. The light will
remain on if the parking brake is applied or if a brake
fault is detected. If the parking brake is not applied and
the light remains on, or if the light does not turn on, have
the light inspected by an authorized dealer.
NOTE:The light will turn on when the ignition switch
in the ON position and the parking brake is applied. This
light shows only that the parking brake is applied. It does
not show the degree of brake application. (See page 280
for more information.)
UNDERSTANDING YOUR INSTRUMENT PANEL 171
4
Page 173 of 466

system detects a malfunction, the telltale will flash for
approximately one minute and then remain continuously
illuminated. This sequence will continue upon subse-
quent vehicle start-ups as long as the malfunction exists.
When the malfunction indicator is illuminated, the sys-
tem may not be able to detect or signal low tire pressure
as intended. TPMS malfunctions may occur for a variety
of reasons, including the installation of replacement or
alternate tires or wheels on the vehicle that prevent the
TPMS from functioning properly. Always check the
TPMS malfunction telltale after replacing one or more
tires or wheels on your vehicle to ensure that the replace-
ment or alternate tires and wheels allow the TPMS to
continue to function properly. (See page 309 for more
information.)CAUTION!
The TPMS has been optimized for the original
equipment tires and wheels. TPMS pressures and
warning have been established for the tire size
equipped on your vehicle. Undesirable system opera-
tion or sensor damage may result when using re-
placement equipment that is not of the same size,
type, and/or style. Aftermarket wheels can cause
sensor damage. Do not use aftermarket tire sealants
or balance beads if your vehicle is equipped with a
TPMS, as damage to the sensors may result.
23. Anti-Lock Brake Light Ð If Equipped
This light monitors the Anti-Lock Brake System.
The light will turn on when the ignition switch is
turned to the ON position and may stay on for as long as
four seconds.
UNDERSTANDING YOUR INSTRUMENT PANEL 173
4