2008 DODGE CHARGER child lock
[x] Cancel search: child lockPage 39 of 466

The trunk lid can be released from outside the vehicle by
pressing the trunk button on the Remote Keyless Entry
(RKE) transmitter twice within 5 seconds.
With the ignition switch in the ON position, the trunk
open symbol will display in the instrument cluster indi-
cating that the trunk is open. The odometer display will
reappear once the trunk is closed.
With the ignition switch in the LOCK position or the key
removed from the ignition switch, the trunk open symbol
will display until the trunk is closed.TRUNK SAFETY WARNING
WARNING!
Do not allow children to have access to the trunk,
either by climbing into the trunk from outside, or
through the inside of the vehicle. Always close the
trunk lid when your vehicle is unattended. Once in
the trunk, young children may not be able to escape,
even if they entered through the rear seat. If trapped
in the trunk, children can die from suffocation or
heat stroke.
THINGS TO KNOW BEFORE STARTING YOUR VEHICLE 39
2
Page 49 of 466

Automatic Locking Mode Ð If Equipped
In this mode, the shoulder belt is automatically pre-
locked. However, the belt will still retract to remove slack
in the shoulder belt. Use The Automatic Locking Mode
any time a child safety seat is installed in a seating
position that has a seat belt with this feature. Seat belts
that have the Automatic Locking Mode feature have a
distinctive label on the webbing. Children 12 years old
and under should be properly restrained in the rear seat
whenever possible.
How To Engage The Automatic Locking Mode
1. Buckle the combination lap and shoulder belt.
2. Grasp the shoulder portion and pull downward until
the entire belt is extracted.
3. Allow the belt to retract. As the belt retracts, you will
here a clicking sound. This indicates the safety belt is
now in the automatic locking mode.
How To Disengage The Automatic Locking Mode
Unbuckle the combination lap and shoulder belt and
allow it to retract completely to disengage the automatic
locking mode and activate the vehicle sensitive (emer-
gency) locking mode.
Seat Belts and Pregnant Women
We recommend that pregnant women use the seat belts
throughout their pregnancy. Keeping the mother safe is
the best way to keep the baby safe.
Pregnant women should wear the lap part of the belt
across the thighs and as snug across the hips as possible.
Keep the belt low so that it does not come across the
abdomen. That way the strong bones of the hips will take
the force if there is a collision.
THINGS TO KNOW BEFORE STARTING YOUR VEHICLE 49
2
Page 72 of 466

Installing Child Restraints Using the Vehicle Seat
belt
The passenger seat belts are equipped with either cinch-
ing latch plates or automatic locking retractors, which are
designed to keep the lap portion tight around the child
restraint so that it is not necessary to use a locking clip.
Pulling up on the shoulder portion of the lap/shoulder
belt will tighten the belt. The cinching latch plate will
keep the belt tight; however, any seat belt system will
loosen with time, so check the belt occasionally, and pull
it tight if necessary.
Seat belts with an automatic locking retractor have a
distinctive label on the seat belt webbing. The seat belt
must be in the automatic locking mode in order to enable
a child restraint to be tightly installed. Refer to ªAuto-
matic Locking Modeº in this section for details. A locking
clip should not be necessary once the automatic locking
feature is enabled. Position the shoulder and lap belt on
the child restraint. The automatic locking retractor isactivated by first attaching the child seat, then pulling all
of the webbing out of the retractor, then allowing back in.
Tighten webbing. To release, simply unbuckle the seat
belt by depressing the button, allowing the webbing to
retract into the retractor.
In the rear seat, you may have trouble tightening the
lap/shoulder belt on the child restraint because the
buckle or latch plate is too close to the belt path opening
on the restraint. Disconnect the latch plate from the
buckle and twist the short buckle-end belt several times
to shorten it. Insert the latch plate into the buckle with the
release button facing out.
If the belt still can't be tightened, or if by pulling and
pushing on the restraint loosens the belt, you may need
to do something more. Disconnect the latch plate from
the buckle, turn the buckle around, and insert the latch
plate into the buckle again. If you still can't make the
child restraint secure, try a different seating position.
72 THINGS TO KNOW BEFORE STARTING YOUR VEHICLE
Page 121 of 466

When the seatback is folded to the upright position, make
sure it is latched by strongly pulling on the top of the
seatback above the seat strap.
WARNING!
²Be certain that the seatback is securely locked into
position. If the seatback in not securely locked
into position the seat will not provide the proper
stability for child seats and/or passengers. An
improperly latched seat could cause serious injury.
²The cargo area in the rear of the vehicle (with the
rear seatbacks in the locked-up or folded down
position) should not be used as a play area by
children when the vehicle is in motion. They could
be seriously injured in an accident. Children
should be seated and using the proper restraint
system.
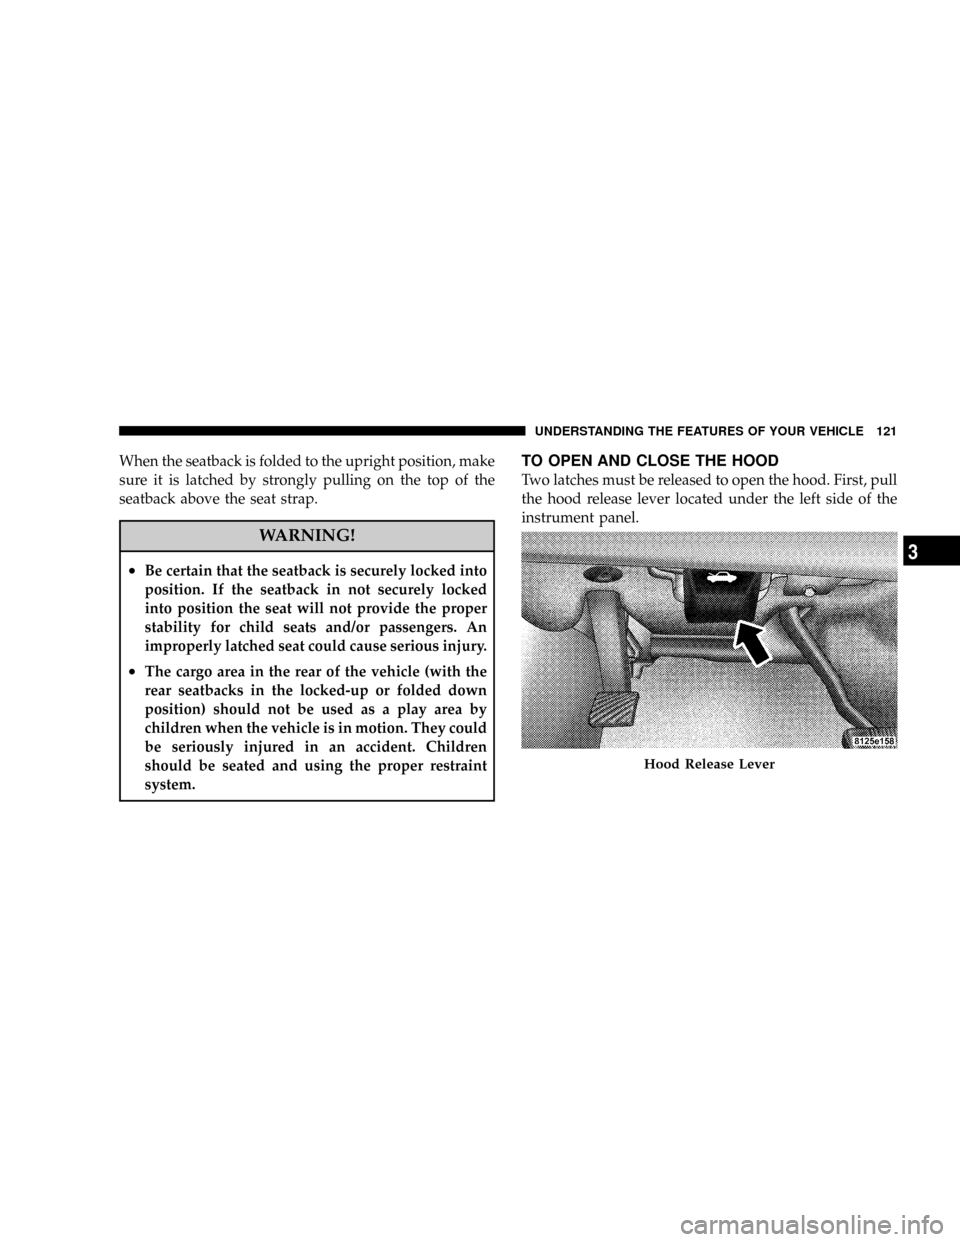
TO OPEN AND CLOSE THE HOOD
Two latches must be released to open the hood. First, pull
the hood release lever located under the left side of the
instrument panel.
Hood Release Lever
UNDERSTANDING THE FEATURES OF YOUR VEHICLE 121
3
Page 155 of 466

WARNING!
²Be certain that the seatback is securely locked into
position. If the seatback in not securely locked
into position, the seat will not provide the proper
stability for child seats and/or passengers. An
improperly latched seat could cause serious in-
jury.
²The cargo area in the rear of the vehicle (with the
rear seatbacks in the locked-up or folded down
position) should not be used as a play area by
children when the vehicle is in motion. They
could be seriously injured in an accident. Chil-
dren should be seated and using the proper re-
straint system.
²To help protect against personal injury, passen-
gers should not be seated in the rear cargo area.
The rear cargo space is intended for load carrying
purposes only, not for passengers, who should sit
in seats and use seat belts.
WARNING!
²The weight and position of cargo and passengers
can change the vehicle center of gravity and ve-
hicle handling. To avoid loss of control resulting
in personal injury, follow these guidelines for
loading your vehicle:
²Always place cargo evenly on the cargo floor. Put
heavier objects as low and as far forward as possible.
²Place as much cargo as possible in front of the rear
axle. Too much weight or improperly placed weight
over or behind the rear axle can cause the rear of the
vehicle to sway.
²Do not pile luggage or cargo higher than the top of the
seatback. This could impair visibility or become a
dangerous projectile in a sudden stop or collision.
UNDERSTANDING THE FEATURES OF YOUR VEHICLE 155
3
Page 260 of 466

²The electronically controlled transmission provides a
precise shift schedule. The transmission electronics are
self-calibrating. Therefore, the first few shifts on a new
vehicle may be somewhat abrupt or soft until after the
break-in period. This is a normal condition, and pre-
cision shifts will develop within a few shift cycles.
The selector lever is automatically locked while in the
ªPº (Park) position. To move the selector lever out of the
ªPº (Park) position, the brake pedal must be firmly
depressed before the shift lock will release.
Shift the selector lever to the desired position only when
the engine is idling normally and the brake pedal is
applied. Do not release the brake until ready to drive. The
vehicle may otherwise accelerate quickly when the selec-
tor lever is in ªDº (Drive) or ªRº (Reverse) position.WARNING!
Unintended movement of a vehicle could injure
those in and near the vehicle. As with all vehicles,
you should never exit a vehicle while the engine is
running. Before exiting a vehicle, you should always
shift the vehicle into ªPº (Park), remove the key from
the ignition, and apply the parking brake. Once the
key is removed from the ignition, the transmission
selector lever is locked in the ªPº (Park) position,
securing the vehicle against unwanted movement.
Furthermore, you should never leave children unat-
tended inside a vehicle.
Over Temperature Mode
The transmission electronics constantly monitor the
transmission oil temperature. If the transmission exceeds
normal operating temperature, the transmission will
260 STARTING AND OPERATING
Page 447 of 466

Checks, Safety........................... 75
Child Restraint..................65,66,67,70,72
Child Restraint Tether Anchors.............68,70
Child Safety Locks........................ 32
Clean Air Gasoline....................... 320
Cleaning
Wheels............................. 401
Windshield Wiper Blades................. 386
Climate Control......................... 239
Clock........................192,196,211,215
Coin Holder........................... 153
Cold Weather Operation................... 256
Compact Disc (CD) Maintenance............. 238
Compact Spare Tire...................... 302
Compass.............................. 181
Compass Calibration..................... 182
Compass Variance....................... 182
Computer, Trip/Travel.................... 178Connector
UCI ................................ 232
Universal Consumer Interface (UCI)......... 232
Conserving Fuel........................ 178
Console, Floor.......................... 153
Console, Overhead....................... 138
Contract, Service........................ 436
Converter, Catalytic...................... 380
Coolant Pressure Cap (Radiator Cap).......... 390
Cooling System......................... 388
Adding Coolant (Antifreeze).............. 390
Coolant Capacity...................... 419
Coolant Level......................388,391
Disposal of Used Coolant................ 391
Drain, Flush, and Refill.................. 389
Inspection........................... 391
Points to Remember.................... 392
Pressure Cap......................... 390
Radiator Cap......................... 390
INDEX 447
10
Page 454 of 466

Key, Sentry (Immobilizer)................... 15
Key-In Reminder......................... 15
Keyless Entry System...................... 20
Keys................................. 12
Knee Bolster............................ 50
Lane Change and Turn Signals.............. 127
Lap/Shoulder Belts....................... 41
LATCH (Lower Anchors and Tether for
CHildren)............................68,70
Latch Plate............................. 42
Latches................................ 78
Hood............................... 121
Lead Free Gasoline...................... 319
Leaks, Fluid............................ 78
Life of Tires............................ 304
Light Bulbs..........................78,412
Lights..............................78,123
Airbag........................57,62,77,167Anti-Lock.........................173,282
Automatic Headlights................... 124
Brake Assist Warning................... 289
Brake Warning.....................170,280
Bulb Replacement...................412,413
Courtesy/Reading...................128,139
Cruise.............................. 164
Daytime Running...................... 126
Dimmer Switch, Headlight.............126,127
Electronic Stability Program (ESP)
Indicator...........................286,289
Electronic Throttle Control Warning......... 165
Engine Temperature Warning.............. 167
Exterior.............................. 78
Fog .............................126,168
Hazard Warning Flasher................. 344
Headlight Switch...................... 123
Headlights........................... 123
Headlights On Reminder................. 126
454 INDEX