2008 DODGE AVENGER reset
[x] Cancel search: resetPage 239 of 467

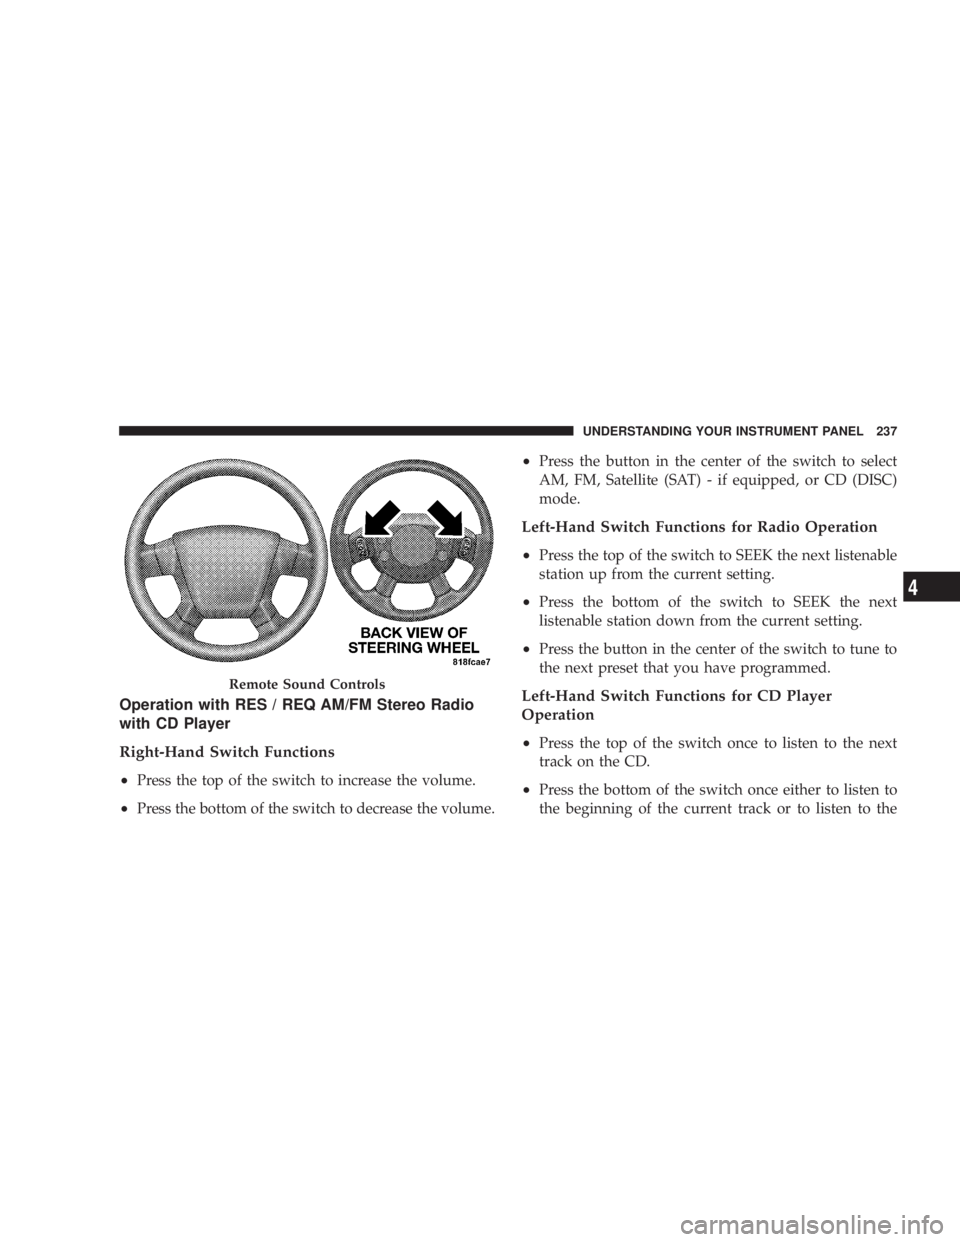
Operation with RES / REQ AM/FM Stereo Radio
with CD Player
Right-Hand Switch Functions
² Press the top of the switch to increase the volume.
² Press the bottom of the switch to decrease the volume. ² Press the button in the center of the switch to select
AM, FM, Satellite (SAT) - if equipped, or CD (DISC)
mode.
Left-Hand Switch Functions for Radio Operation
² Press the top of the switch to SEEK the next listenable
station up from the current setting.
² Press the bottom of the switch to SEEK the next
listenable station down from the current setting.
² Press the button in the center of the switch to tune to
the next preset that you have programmed.
Left-Hand Switch Functions for CD Player
Operation
² Press the top of the switch once to listen to the next
track on the CD.
² Press the bottom of the switch once either to listen to
the beginning of the current track or to listen to theRemote Sound Controls UNDERSTANDING YOUR INSTRUMENT PANEL 237
4
Page 240 of 467

beginning of the previous track if it is within one
second after the current track begins to play.
² Press the switch up or down twice to listen to the
second track on the CD, three times to listen to the
third track, and so forth.
² Press the button located in the center of the control to
change CDs on the 6-Disc in-dash CD changer radio.
This button does not function for other radios.
Operation with RER Multi-Media System
Right-Hand Switch Functions
² Press the top of the switch to increase the volume.
² Press the bottom of the switch to decrease the volume.
² Press the button in the center of the switch to select
AM, FM, Satellite (SAT), Hard Drive (HD), or CD
(DISC) mode. Left-Hand Switch Functions for Radio Operation
² Press the top of the switch to SEEK the next listenable
station up from the current setting.
² Press the bottom of the switch to SEEK the next
listenable station down from the current setting.
² Press the button in the center of the switch to go to the
next preset that you have programmed.
Left-Hand Switch Functions for CD Player
Operation
² Press the top of the switch once to listen to the next
track on the CD.
² Press the bottom of the switch once either to listen to
the beginning of the current track or to listen to the
beginning of the previous track if it is within one
second after the current track begins to play.238 UNDERSTANDING YOUR INSTRUMENT PANEL
Page 275 of 467

CAUTION!If the transaxle operating temperature exceeds ac-
ceptable limits, the vehicle computer will override
OVERDRIVE and ª3º DRIVE range by changing
shift points. This is done to prevent transaxle damage
due to overheating.
Reset Mode - Electronic Transaxle
The transaxle is monitored electronically for abnormal
conditions. If a condition is detected that could cause
damage, the transaxle automatically shifts into second
gear. The transaxle remains in second gear (3rd gear with
a six speed automatic) despite the forward gear selected.
Park (P), Reverse (R), and Neutral (N) will continue to
operate. This Reset feature allows the vehicle to be driven
to a dealer for service without damaging the transaxle. In the event that the problem has been momentary, the
transaxle can be reset to regain all forward gears.
1. Stop the vehicle.
2. Shift into PARK.
3. Turn the ignition OFF, and then restart the engine.
4. Shift into the desired gear range and resume driving.
NOTE: Even if the transaxle can be reset, it is recom-
mended that you visit a dealer at your earliest possible
convenience. Your dealer has diagnostic equipment to
determine if the problem could recur.
If the transaxle cannot be reset, dealer service is required. STARTING AND OPERATING 273
5
Page 332 of 467

WARNING!² Never have any smoking materials lit in or near
the vehicle when the gas cap is removed or the
tank filled.
² Never add fuel when the engine is running. This is
in violation of most state and federal fire regula-
tions and doing so will cause the malfunction
indicator light to turn on.
² A fire may result if gasoline is pumped into a
portable container that is inside of a vehicle. You
could be burned. Always place gas containers on
the ground while filling.
NOTE:
² Tighten the gas cap until you hear a ªclickingº sound.
This is an indication that the gas cap is tightened
properly. The Malfunction Indicator Light in the in-
strument cluster may turn on if the gas cap is not secured properly. Make sure that the gas cap is tight-
ened each time the vehicle is refueled.
² When the fuel nozzle ªclicksº or shuts off, the fuel
tank is full.
LOOSE FILLER CAP MESSAGE
If the vehicles diagnostic system determines that the fuel
filler cap in loose, improperly installed, or damaged, a
ªgASCAPº message will be displayed in the instrument
cluster. Tighten the gas cap until a ªclickingº sound is
heard. This is an indication that the gas cap is properly
tightened. Press the trip odometer reset button to turn off
the message. If the problem persists, the message will
appear the next time the vehicle is started. This might
indicate a damaged cap. If the problem is detected twice
in a row, the system will turn on the Malfunction
Indicator Light (MIL). Resolving the problem will turn
the MIL light off.330 STARTING AND OPERATING
Page 374 of 467

RESET button to turn off the message. If the problem
persists, the message will appear the next time the
vehicle is started. This might indicate a damaged cap. If
the problem is detected twice in a row, the system will
turn on the MIL. Resolving the problem will turn the MIL
light off.
EMISSIONS INSPECTION AND MAINTENANCE
PROGRAMS
In some localities, it may be a legal requirement to pass
an inspection of this vehicle's emissions control system.
Failure to pass could prevent vehicle registration.
For states that require an Inspection and Mainte-
nance (I/M), this check verifies the Malfunction
Indicator Light (MIL) is functioning and is not on
when the engine is running, and that the OBD II system
is ready for testing. Normally, the OBD II system will be ready. The OBD II
system may not be ready if the vehicle was recently
serviced, recently had a dead battery, or a battery replace-
ment. If the OBD II system should be determined not
ready for the I/M test, the vehicle may fail the test.
This vehicle has a simple ignition key-actuated test,
which you can use prior to going to the test station. To
check if this vehicle's OBD II system is ready, you must
do the following:
1. Insert the ignition key into the ignition switch.
2. Turn the ignition to the ON position, but do not crank
or start the engine.
3. If you crank or start the engine, you will have to start
this test over.
4. As soon as you turn the ignition key to the ON
position, you will see the MIL symbol come on as part of
a normal bulb check.372 MAINTAINING YOUR VEHICLE
Page 429 of 467

oil if it has been six months since your last oil change
even if the oil change indicator message is NOT
illuminated.
² Change your engine oil more often if you drive your
vehicle off-road for an extended period of time.
² Under no circumstances should oil change intervals
exceed 6,000 mi (10 000 km) or six months, whichever
comes first.
Your authorized dealer will reset the oil change indicator
message after completing the scheduled oil change. If a
scheduled oil change is performed by someone other
than your authorized dealer, the message can be reset by
referring to the steps described under ªOil Change
Requiredº under ªElectronic Vehicle Information Center
(EVIC)º in Section 4 or under ªOdometer/Trip Odom-
eterº under ªInstrument Cluster Descriptionsº in Section
4. At Each Stop for Fuel
² Check the engine oil level about five minutes after a
fully warmed engine is shut off. Checking the oil level
while the vehicle is on level ground will improve the
accuracy of the oil level reading. Add oil only when
the level is at or below the SAFE or MIN mark.
² Check the windshield washer solvent and add if
required.
Once a Month
² Check tire pressure and look for unusual wear or
damage.
² Inspect the battery and clean and tighten the terminals
as required.
² Check the fluid levels of coolant reservoir, brake
master cylinder, power steering, and automatic trans-
axle, and add fluid as needed. MAINTENANCE SCHEDULES 427
8 M
A
I
N
T
E
N
A
N
C
E
S
C
H
E
D
U
L
E
S
Page 447 of 467

Automatic Door Locks ..................... 32
Automatic Oil Change Indicator ........ 173,184,426
Automatic Temperature Control (ATC) ......... 246
Automatic Transaxle .............. 12,261,267,397
Adding Fluid ................... 397,398,424
Filter ............................... 399
Fluid and Filter Changes ................. 399
Fluid Level Check ................... 397,398
Interlock System ....................... 269
Reset Mode .......................... 273
Selection Of Lubricant ................... 424
Shifting ............................. 270
Special Additives ...................... 399
Autostick ............................. 274
Ball Joints ............................. 385
Battery ............................... 381
Gas Caution .......................... 381
Keyless Transmitter Replacement (RKE) ....... 26 Location ............................ 381
Bearings .............................. 400
Belts, Drive ............................ 378
Beverage Cooler ........................ 161
Body Mechanism Lubrication ............... 386
B-Pillar Location ........................ 295
Brake Assist System ...................... 282
Brake, Parking .......................... 276
Brake System ........................ 278,394
Anti-Lock (ABS) ....................... 279
Fluid Check ....................... 396,424
Hoses .............................. 395
Master Cylinder ....................... 396
Parking ............................. 276
Warning Light ........................ 179
Brakes ............................. 278,394
Brake/Transmission Interlock ............... 269
Break-In Recommendations, New Vehicle ........ 78
Bulb Replacement ..................... 41 1,412 INDEX 445
10
Page 457 of 467

MP3 Player ......................... 220,223
MTBE/ETBE ........................... 321
Multi-Function Control Lever ............... 130
Navigation Radio ........................ 223
Navigation System ....................... 223
New Vehicle Break-In Period ................ 78
Occupant Restraints ..................... 59,62
Occupant Restraints (Sedan) ......... 40,54,55,59,60
Octane Rating, Gasoline (Fuel) .............. 319
Odometer ............................. 172
Trip ............................. 172,174
Oil Change Indicator ................ 173,184,426
Oil Change Indicator, Reset .............. 173,184
Oil, Engine ......................... 374,422
Capacity ............................ 420
Change Interval ............... 173,184,376,426
Checking ............................ 374 Dipstick ............................. 374
Disposal ............................ 378
Filter ............................ 378,422
Filter Disposal ........................ 378
Identification Logo ..................... 376
Materials Added to ..................... 378
Recommendation ................... 376,420
Synthetic ............................ 377
Viscosity .......................... 377,420
Oil Filter, Change ........................ 378
Oil Filter, Selection ....................... 378
Oil Pressure Light ....................... 171
Onboard Diagnostic System .............. 371,372
Opener, Garage Door (HomeLink t ) ........... 143
Operator Manual (Owner's Manual) ............ 4
Overdrive .......................... 271,272
Overheating, Engine ...................... 348
Owner's Manual (Operator Manual) ......... 4,440 INDEX 455
10