Page 41 of 131
35
1
READY TO SET OFF
Steering wheel controls
LIGHTING CONTROL
Selection is by rotation of the white mark
on the ring, when the ignition key is in the
“RUNNING” position.
All lights off
Side lights on
This is indicated on the
instrument panel by lighting of the
warning light.
Dipped headlamps/main beam headlamps on
Dipped headlamps/main beam headlamps change
Pull the control fully towards you.
Headlamp flash
Direction indicators (green flashing)
“Motorway” function
System which indicates a change of lane on
a motorway.
Press up or down once, without passing
the point of resistance; the corresponding
direction indicators will flash three times. Pull the control towards you
gently, regardless of the position
of the ring.
Left: downwards. The direction
arrow warning light flashes on the
instrument panel.
Right: upwards. The direction
arrow warning light flashes on the instrument
panel.
Turn the ring into position.
Page 42 of 131

36
Steering wheel controls
Headlamp beam
You are advised to adjust the height of the
headlamp beams in accordance with the
load in your vehicle.
This function can only be accessed in
the main beam headlamps and dipped
headlamps position. Press these controls, located
on the fascia panel, several
times in succession to adjust the
headlamps.
An indicator light on the display
indicates the adjustment position
selected (0, 1, 2, 3).
Fog lamps
The controls are located on the fascia panel
control pad.
Front and rear fog lamps
The fog lamps should only be used in
fog or when snow is falling.
In clear weather or in rain, both day and
night, lit rear fog lamps dazzle and are
prohibited.
Do not forget to switch them off when they
are no longer necessary.
“Follow me home” lighting
The temporary maintaining of the dipped
headlamps, after switching off the vehicle’s
ignition, makes the driver ’s exit easier when
the light is poor and lights the space in front
of the vehicle.
Activation
With the ignition key in the STOP position
or removed, pull the lighting control towards
the steering wheel within 2 minutes after
switching off the engine.
Each time the control is operated, the
duration for which the lights will remain on is
extended by 30 seconds, up to a maximum
of 210 seconds. Once this period of time has
elapsed, the lights switch off automatically.
Deactivation
Pull the lighting control towards the steering
wheel for more than 2 seconds.
The front fog lamps operate with
the side lights and the dipped
headlamps.
The rear fog lamps operate with
the dipped headlamps.
Press one of these controls to switch on the
lights. The warning light comes on,
accompanied by a message
on the display, the first time
the control is operated and
remains on until the function is deactivated
automatically.
Page 43 of 131

36
Steering wheel controls
Headlamp beam
You are advised to adjust the height of the
headlamp beams in accordance with the
load in your vehicle.
This function can only be accessed in
the main beam headlamps and dipped
headlamps position. Press these controls, located
on the fascia panel, several
times in succession to adjust the
headlamps.
An indicator light on the display
indicates the adjustment position
selected (0, 1, 2, 3).
Fog lamps
The controls are located on the fascia panel
control pad.
Front and rear fog lamps
The fog lamps should only be used in
fog or when snow is falling.
In clear weather or in rain, both day and
night, lit rear fog lamps dazzle and are
prohibited.
Do not forget to switch them off when they
are no longer necessary.
“Follow me home” lighting
The temporary maintaining of the dipped
headlamps, after switching off the vehicle’s
ignition, makes the driver ’s exit easier when
the light is poor and lights the space in front
of the vehicle.
Activation
With the ignition key in the STOP position
or removed, pull the lighting control towards
the steering wheel within 2 minutes after
switching off the engine.
Each time the control is operated, the
duration for which the lights will remain on is
extended by 30 seconds, up to a maximum
of 210 seconds. Once this period of time has
elapsed, the lights switch off automatically.
Deactivation
Pull the lighting control towards the steering
wheel for more than 2 seconds.
The front fog lamps operate with
the side lights and the dipped
headlamps.
The rear fog lamps operate with
the dipped headlamps.
Press one of these controls to switch on the
lights. The warning light comes on,
accompanied by a message
on the display, the first time
the control is operated and
remains on until the function is deactivated
automatically.
Page 44 of 131

37
1
READY TO SET OFF
Steering wheel controls
WIPERS STALK
Windscreen wipers
Wiping is only active when the ignition key is
in the RUNNING position.
The stalk may have four different positions.
Three speeds can be selected by turning the
ring.
To change the blades, refer to the
“Changing a wiper blade” section of
chapter 7.
Good practice
Check that the windscreen wiper blades can
operate freely when using the wipers in icy
weather.
Slow intermittent.
Slow continuous.
Fast continuous.
Single wipe: by pushing up.
Windscreen wash
Push the stalk down, the windscreen wash
alone is activated.
Hold the stalk down, the windscreen wash
is accompanied by a timed sweep of the
wipers. To top up the levels, refer to the
“Levels” section of chapter 7.
Rear wiper
This is positioned on the window
of the large rear door.
Turn the ring.
Rear screen wash
The rear screen wash is incorporated next to
the third brake light.
Push the stalk up, the rear screen wash
alone is activated.
Hold the stalk up, the rear screen wash is
accompanied by a timed sweep of the wiper.
Page 45 of 131

38
Mirrors and windows
Interior mirror
The lever located on the lower edge moves
the mirror into two positions.
For the day position , the lever is pushed.
For the night position to prevent dazzle,
pull the lever towards you.
Exterior mirrors
The mirror glass is spherical in order to
widen the lateral field of vision. Objects
seen in the mirror are in reality closer than
they appear. Therefore, this must be taken
into account in order to assess the distance
correctly.
Electric controls
The electric control is located on the left-
hand interior side, level with the mirror.
MIRRORS AND WINDOWS
To de-ice the mirrors, press the
rear screen de-icing button.
Select the mirror to be adjusted by turning
the control to the right or to the left, then
move the control in the direction of the
adjustment required.
Manual controls
The right-hand and left-hand manual
controls are located on the interior side of
the base of each mirror.
Move the lever in the direction of the
adjustment required.
Page 46 of 131

39
1
READY TO SET OFF
Mirrors and windows
ELECTRIC WINDOWS
Electric controls
The electric windows have a safety auto-
reverse function and are associated with
one-touch controls for lowering and raising.
From the driver ’s seat, the controls placed
on the door operate the vehicle’s front
windows.
On the passenger ’s side, the control
operates the passenger ’s front window.
One-touch controls
An extended press on the control raises or
lowers the window completely.
Press the control again to stop the window.
Press the control briefly to trigger the
movement of the window.
Manual controls
Turn the window winder located on the door
trim pad.
Good practice
Always remove the key from the ignition
when leaving the vehicle, even for a short
time.
If the electric window meets an obstacle
during operation, you must reverse the
movement of the window. To do this, press
the control concerned.
When the driver operates the passenger
electric window controls, he must ensure
that no one is preventing correct closing of
the windows.
The driver must ensure that the passenger
uses the electric window correctly.
Be aware of children when operating the
windows.
REAR WINDOWS (COMBI)
To tilt the rear windows, tilt the lever, then
push it fully in to lock the windows in the
open position.
Page 47 of 131

40
Gearbox and steering wheel
ELECTRONIC GEARBOX SYSTEM
The 5-speed electronic gearbox system
gives you the choice between the comfort of
automatic mode or the driving pleasure of a
manual gearbox.
This gearbox gives you access to two driving
modes :
- an automatic mode for the automatic
management of gear changes, with no
driver intervention necessary,
- a sequential mode for manual gear
changes made by the driver using the
gear lever.
It is comprised of a gear lever 1 on the
central console to select the driving mode,
reverse gear and neutral, or to select
sequential mode.
Gear lever positions
N : neutral.
With your foot on the brake pedal, select this
position to start the engine.
R : reverse gear.
With the vehicle stationary, hold your foot
down on the brake pedal and push the gear
lever upwards.
A : automatic mode.
Move the gear lever downwards to select
this mode.
M +/- : sequential mode with manual gear
changes.
Move the lever downwards, then to the left
to select this mode, then :
- push it forwards to move up a gear,
- pull it backwards to go down a gear.
Starting the vehicle
Select position N .
Press firmly on the brake pedal whilst
starting the engine.
Start the engine. “N” appears on the
instrument panel display.
Select first gear (position M or A) or reverse
gear (position R).
Release the parking brake.
Remove your foot from the brake pedal, then
accelerate.
“AUTO” and “1” or “R” appear on the
instrument panel display.
It is possible to start in second gear,
only in sequential mode.
Page 48 of 131

41
1
READY TO SET OFF
Gearbox and steering wheel
Stopping – Starting on a gradient
This is an electronic gearbox system without
a clutch pedal.
To immobilise the vehicle on a gradient,
you must use the parking brake and not
the accelerator.
When starting on a gradient, accelerate
gradually while releasing the parking brake.
Changing to sequential mode
Once you have started the engine, you
can go into sequential mode by selecting
position M.
“AUTO” disappears and
the gears selected appear
successively on the instrument
panel display.
Gear change requests are only possible if
the engine speed allows them.
Gently lift your foot from the accelerator
pedal to select the gear.
When driving at low speed (e.g. approaching
a stop sign or at traffic lights), the gearbox
automatically changes down to first gear.
Changing to automatic mode
When in sequential mode, you can return to
automatic mode by selecting position A.
Stopping the vehicle
Before switching off the engine, you can :
- select position N to engage neutral.
- leave a gear engaged, such as first or
reverse gear.
In either case, you must engage the parking
brake to immobilise the vehicle.
Reinitialising
Following a battery disconnection, you must
reinitialise the gearbox :
- switch on the ignition, “AUTO” appears
on the instrument panel display,
- press on the brake pedal,
- wait for about 30 seconds until “N” or
a gear appears on the instrument panel
display,
- release the brake pedal.
The gearbox is now operational again.
Operating anomaly
With the ignition switched on, the �fl� �a�s�h�i�n�g� �o�f� “AUTO” and the lighting of this warning lamp, accompanied by a sound signal and a message on the instrument panel display, indicate a
gearbox malfunction.
Have the system checked by your CITROËN dealer.
You must always press the brake pedal
down when starting the engine.
When the vehicle is moving, never
select neutral N.
Only select reverse gear R with the vehicle
stationary and your foot on the brake pedal.
In all cases, you must engage the parking
brake to immobilise the vehicle.
When on a steep gradient, you are advised
to use sequential mode.
“AUTO” is displayed and the
gear selected appears on the
instrument panel display.
The gearbox operates in
automatic mode, without the need for driver
intervention.
It always selects the gear best suited to the
following parameters :
- driving style,
- road profile,
- vehicle load.
To maximise driving comfort and obtain the
most suitable gear, avoid making rough
movements on the accelerator pedal.
If you press the accelerator beyond the point
of resistance, the gearbox selects the next
gear down to allow for faster acceleration.
 1
1 2
2 3
3 4
4 5
5 6
6 7
7 8
8 9
9 10
10 11
11 12
12 13
13 14
14 15
15 16
16 17
17 18
18 19
19 20
20 21
21 22
22 23
23 24
24 25
25 26
26 27
27 28
28 29
29 30
30 31
31 32
32 33
33 34
34 35
35 36
36 37
37 38
38 39
39 40
40 41
41 42
42 43
43 44
44 45
45 46
46 47
47 48
48 49
49 50
50 51
51 52
52 53
53 54
54 55
55 56
56 57
57 58
58 59
59 60
60 61
61 62
62 63
63 64
64 65
65 66
66 67
67 68
68 69
69 70
70 71
71 72
72 73
73 74
74 75
75 76
76 77
77 78
78 79
79 80
80 81
81 82
82 83
83 84
84 85
85 86
86 87
87 88
88 89
89 90
90 91
91 92
92 93
93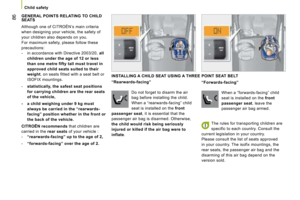 94
94 95
95 96
96 97
97 98
98 99
99 100
100 101
101 102
102 103
103 104
104 105
105 106
106 107
107 108
108 109
109 110
110 111
111 112
112 113
113 114
114 115
115 116
116 117
117 118
118 119
119 120
120 121
121 122
122 123
123 124
124 125
125 126
126 127
127 128
128 129
129 130
130