Page 47 of 216

C O M F O R T
II
50
Head restraint height adjustment Front armrest
Heated seats adjustment
The adjustment is correct when the
top of the head restraint is aligned
with the top of the head of the seated
person. Never drive with the removed
head restraints in the vehicle
as they could be thrown
around the vehicle on sharp braking.
They must be in place and adjusted
correctly.
After installing the head restraint,
check that the height adjustment
button is locked correctly.
You can move the console housing
cover in order to use it as an armrest.
With the
engine running , tilt the button
to the position required.
The temperature of the seat is regulat-
ed automatically.
There are two setting positions:
- “HI”: High heating
- “LO”: Low heating
When the button is in the intermediate
position, the heating is switched off.
The indicator lights A comes on when
the system is activated . To raise the head restraint, pull it
upwards.
To lower the head restraint, push it
downwards pressing the height adjust-
ment button at the same time.
To remove the head restraint, bring it to
the uppermost position then remove it
pressing the height adjustment button
at the same time.
� �T�o� �r�e�fi� �t� �t�h�e� �h�e�a�d� �r�e�s�t�r�a�i�n�t�,� �e�n�g�a�g�e� �t�h�e�
stems of the head restraint in the holes
pressing the height adjustment button
at the same time.
Page 48 of 216
C O M F O R T
II
51
REAR SEATS (ROW 2)
Seat back angle adjustment
Pull the control and adjust.
When the seat back is at the correct
angle, release the control.
Sit in the centre of the rear bench seat
to check that the two seats are at the
same level and that the angle of their
seat backs is the same.
Forwards-backwards adjustment
Pull the control towards the outside and
adjust.
When your seat is at the correct
distance, release the control.
To ensure that the seat is secured
correctly, move it forwards and
backwards slightly without using the
control. When manoeuvring the seats,
ensure that no person or ob-
ject is in the vicinity of the mov-
ing parts to avoid any risk of injury or
damage.
To prevent the seat back from mov-
ing forwards sharply and knocking
you, press on it with your back or
push it with your hand while operat-
ing the lever.
The rear seats can be folded in two
parts (1/3 - 2/3).
Page 50 of 216
C O M F O R T
II
53
Folding the second row
1. Raise the rear seat lever A , or
Pull the button in the boot B for at least one second, or
Pull the rear seat releasing strap C towards you.
2. The seat backs fold forwards then the cushion rises and folds fo rwards.
3. After carrying out these operations, press on the seat lightly to check that it is secured correctly.
Before folding the seats, lower the head restraints fully.
Before folding the seat backs forwards, insert the seat belt b
uckles in the slots provided for this purpose in the rear seat
cushion.
Before folding the seats , ensure that no object or person is hindering the execution of the operatio ns.
Do not place luggage on the folded seats.
Page 51 of 216

C O M F O R T
II
54
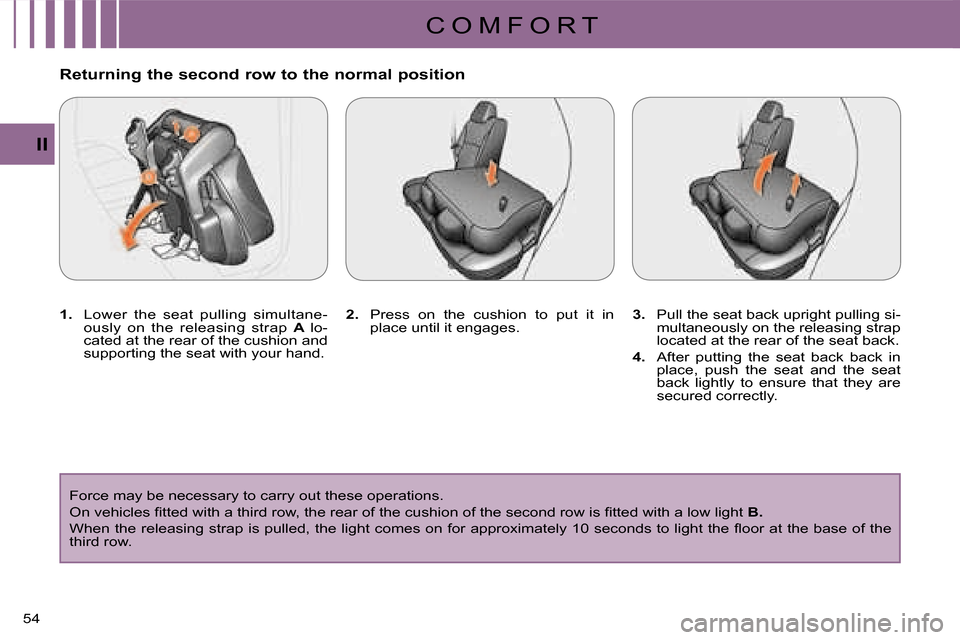
Returning the second row to the normal position
1. Lower the seat pulling simultane-
ously on the releasing strap
A lo-
cated at the rear of the cushion and
supporting the seat with your hand.
Force may be necessary to carry out these operations.
� �O�n� �v�e�h�i�c�l�e�s� �fi� �t�t�e�d� �w�i�t�h� �a� �t�h�i�r�d� �r�o�w�,� �t�h�e� �r�e�a�r� �o�f� �t�h�e� �c�u�s�h�i�o �n� �o�f� �t�h�e� �s�e�c�o�n�d� �r�o�w� �i�s� �fi� �t�t�e�d� �w�i�t�h� �a� �l�o�w� �l�i�g�h�t� � B .
� �W�h�e�n� �t�h�e� �r�e�l�e�a�s�i�n�g� �s�t�r�a�p� �i�s� �p�u�l�l�e�d�,� �t�h�e� �l�i�g�h�t� �c�o�m�e�s� �o�n� �f�o�r� �a�p�p�r�o�x�i�m�a�t�e�l�y� �1�0� �s�e�c�o�n�d�s� �t�o� �l�i�g�h�t� �t�h�e� �fl� �o�o�r� �a�t� �t�h�e� �b�a�s�e� �o�f� �t �h�e�
third row.
2. Press on the cushion to put it in
place until it engages.
3. Pull the seat back upright pulling si-
multaneously on the releasing strap
located at the rear of the seat back.
4. After putting the seat back back in
place, push the seat and the seat
back lightly to ensure that they are
secured correctly.
Page 58 of 216
C O M F O R T
II
62
FRONT INTERIOR LAYOUT
1. Spectacles storage.
2. Storage compartment.
3. �U�p�p�e�r� �g�l�o�v�e� �b�o�x� �w�i�t�h�
air conditioning.
4. �L�o�w�e�r� �g�l�o�v�e� �b�o�x� �w�i�t�h� �l�o�c�k�.�
5. Lighter
�1�2� �v�o�l�t� �s�o�c�k�e�t� �(�1�2�0� �W� �m�a�x�)�.�
6. Armrest with storage compartments
�1�2� �v�o�l�t� �s�o�c�k�e�t� �(�1�2�0� �W� �m�a�x�)�.�
7. Cup holder.
8. Removable ashtray.
9. Bottle holder.
10. Enclosed storage compartment.
11. Cup holder.
12. Sun visor.
Page 60 of 216

C O M F O R T
II
64
Lower glove box
� �T�h�i�s� �i�s� �fi� �t�t�e�d� �w�i�t�h� �a� �l�o�c�k�.�
To unlock it, turn the key to the left.
To open it, pull the handle A .
To close it, push the lid up.
To lock it, turn the key to the right.
� �I�t� �i�s� �fi� �t�t�e�d� �w�i�t�h� �a� �p�e�n� �h�o�l�d�e�r� �a�n�d� �a� �c�a�r�d�
holder.
It is lit on opening when the lights stalk
is activated. Lighter
12 volt socket (120 W max)
When the ignition switch is in the “ON”
or “ACC” position, press the lighter.
After a moment you hear a click when
the lighter pops out.
When the lighter socket is used to con-
nect electrical equipment, ensure that
this equipment operates correctly with
a voltage of 12 volts and has an electri-
�c�a�l� �p�o�w�e�r� �o�f� �1�2�0� �W� �m�a�x�i�m�u�m�.�
The prolonged use of electri-
cal equipment without running
the engine may discharge the
battery. Armrest with storage compartments
12 volt socket (120 W max)
Upper storage compartment
Pull the right-hand lever to open the
storage compartment lid, which serves
as an armrest.
To close, fold down the lid until it locks.
Page 75 of 216

A C C E S S
III
78
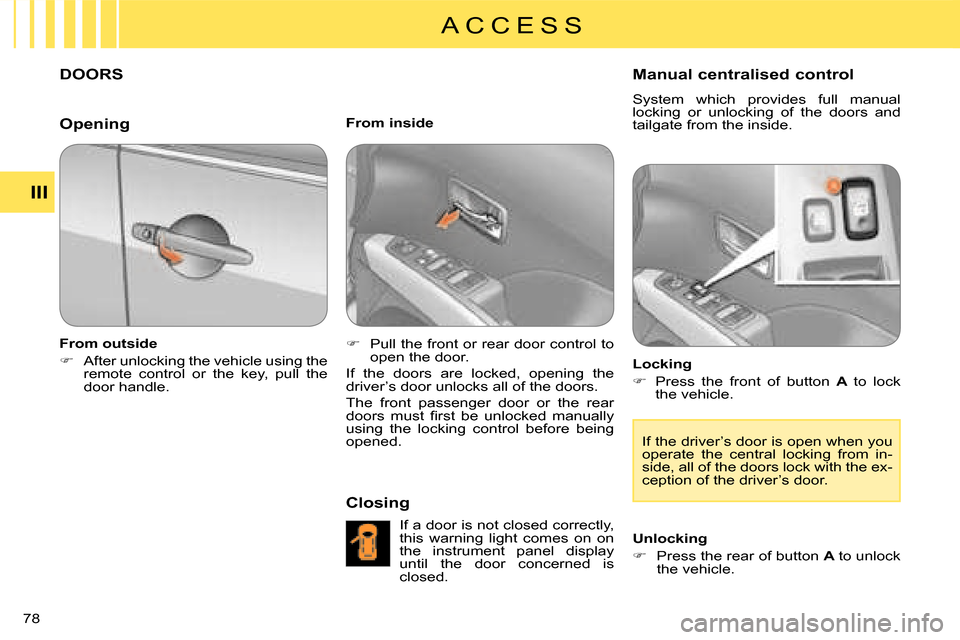
DOORS
From outside
�� � After unlocking the vehicle using the
remote control or the key, pull the
door handle. From inside
�� � Pull the front or rear door control to
open the door.
If the doors are locked, opening the
driver’s door unlocks all of the doors.
The front passenger door or the rear
�d�o�o�r�s� �m�u�s�t� �fi� �r�s�t� �b�e� �u�n�l�o�c�k�e�d� �m�a�n�u�a�l�l�y�
using the locking control before being
opened.
Closing
If a door is not closed correctly,
this warning light comes on on
the instrument panel display
until the door concerned is
closed. Manual centralised control
System which provides full manual
locking or unlocking of the doors and
tailgate from the inside.
Locking
� Press the front of button A to lock
the vehicle.
If the driver’s door is open when you
operate the central locking from in-
�s�i�d�e�,� �a�l�l� �o�f� �t�h�e� �d�o�o�r�s� �l�o�c�k� �w�i�t�h� �t�h�e� �e�x�-
ception of the driver’s door.
Unlocking
�� � Press the rear of button A to unlock
the vehicle.
Opening
Page 77 of 216

A C C E S S
III
80
Opening
�� � After unlocking the vehicle using the
remote control or the key, press the
handle A and raise the tailgate.
“Tailgate open” warning
This warning light comes on on
the instrument panel display
when the tailgate is not closed
correctly.
TAILGATE LOWER TAILGATE
Opening
�� � Push the handle C to the right and
tilt the tailgate
D gently.
Closing
�� � Pull the handle B downwards to
guide the tailgate,
�� � release the handle and press the
�e�x�t�e�r�i�o�r� �s�u�r�f�a�c�e� �o�f� �t�h�e� �t�a�i�l�g�a�t�e� �g�e�n�t�l�y�
to close it. Closing
�� � Raise the tailgate D , push it to close
it, then check that it is secured
correctly. Before opening the tailgate, ensure
that no one is within the radius of
opening.
For reasons of safety and correct op-
eration, do not drive with the tailgate
open.
If the battery is disconnected, the
tailgate cannot be opened.
Do not climb onto the lower tailgate
and do not subject it to heavy knocks,
it may be damaged.
Always close the lower tailgate and
check that it is secured correctly be-
fore closing the main tailgate.
When closing the lower tailgate, en-
sure that no person or object is in the
�p�r�o�x�i�m�i�t�y� �o�f� �t�h�e� �m�o�v�i�n�g� �p�a�r�t�s� �t�o� �a�v�o�i�d�
any risk of injury or damage.
Do not open the lower tailgate when
�a� �t�o�w�b�a�r� �i�s� �fi� �t�t�e�d�.� �
�M�a�x�i�m�u�m� �a�u�t�h�o�r�i�s�e�d� �w�e�i�g�h�t� �o�n� �t�h�e�
lower tailgate when open: 200 kg .