Page 30 of 531
How To Use Remote Start
All of the following conditions must be met before the
engine will Remote Start:
²Gear shift lever in PARK
²Doors closed
²Hood closed
²Trunk closed
²HAZARD switch off
²BRAKE switch inactive (brake pedal not pressed)
²Ignition key removed from ignition switch
²Battery at an acceptable charge level, and
²RKE PANIC button not pressed.
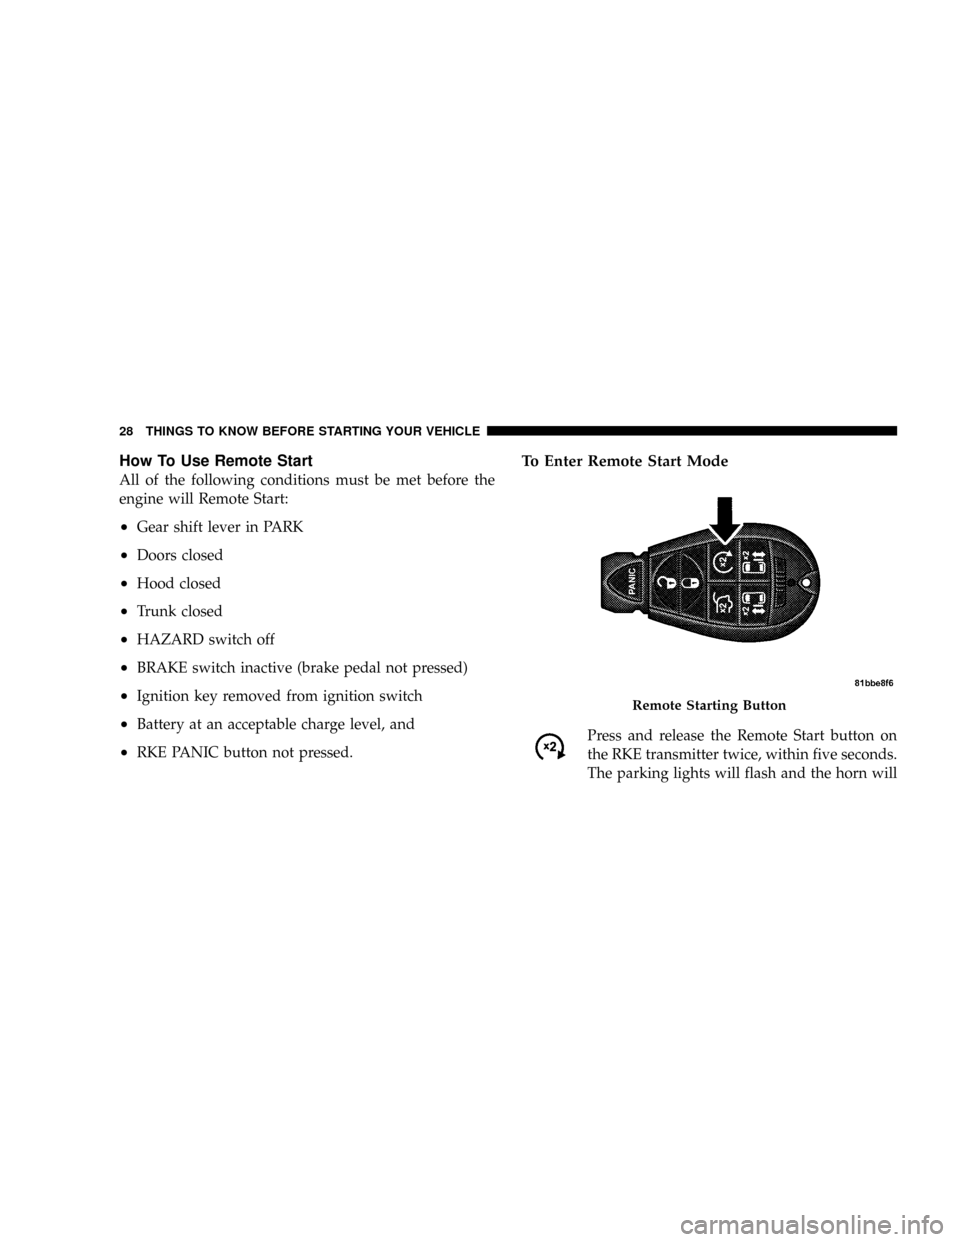
To Enter Remote Start Mode
Press and release the Remote Start button on
the RKE transmitter twice, within five seconds.
The parking lights will flash and the horn will
Remote Starting Button
28 THINGS TO KNOW BEFORE STARTING YOUR VEHICLE
Page 32 of 531
²For vehicles equipped with the Electronic Vehicle
Information Center (EVIC), the message ªInsert Key/
Turn To Runº will flash in the EVIC until you insert
the key. Once inserted, the message ªTurn To Runº
will flash in the EVIC until you turn the key to run.
Cancel Remote Start
Remote Starting will also cancel if any of the following
occur:
²The engine stalls or RPM exceeds 2500.
²Any engine warning telltale lights come on.
²The hood is opened.
²The Hazard Switch is pressed.
²The transmission gear selector lever is moved out of
PARK.
²Pressing the brake pedal.
²Allow the engine to run for the entire 15 minute cycle.
To Turn Off the Engine While in Remote Start
Mode
Press and release the Remote Start button one time.
NOTE:To avoid inadvertent shut downs, the system
will disable the one time press of the Remote Start button
for two seconds after receiving a valid Remote Start
request.
When To Reset Remote Start
The vehicle can be started remotely up to a maximum of
two times. The vehicle is also allowed a maximum of one
failed start, where the Remote Starting sequence was
initiated but the engine stopped cranking without start-
ing. After either of these conditions, or if the Security
Alarm System is alarming, or if the PANIC button was
pressed, the vehicle must be reset by inserting a valid key
into the ignition switch, rotating to the RUN position,
and then rotating back to the LOCK/OFF position.
30 THINGS TO KNOW BEFORE STARTING YOUR VEHICLE
Page 81 of 531
3. Requested by police under a legal warrant.
4. Otherwise required by law.
Data Parameters That May Be Recorded:
²Diagnostic trouble code(s) and warning light status for
electronically-controlled safety systems, including the
airbag system
²Airbag disable light status (if equipped)
²9Time9of airbag deployment (in terms of ignition
cycles and vehicle mileage)
²Airbag deployment level (if applicable)
²Impact acceleration and angle
²Seat belt status
²Brake status (service and parking brakes)
²Accelerator status (including vehicle speed)
²Engine control status (including engine speed)
²Transmission gear selection
²Cruise control status
²Traction/stability control status
²Tire pressure monitoring system status ± if equipped
THINGS TO KNOW BEFORE STARTING YOUR VEHICLE 79
2
Page 96 of 531

PERIODIC SAFETY CHECKS YOU SHOULD MAKE
OUTSIDE THE VEHICLE
Tires
Examine tires for excessive tread wear or uneven wear
patterns. Check for stones, nails, glass, or other objects
lodged in the tread. Inspect tread and sidewall for cuts or
cracks. Check wheel nuts for tightness, and tires (includ-
ing spare) for proper pressure.
Lights
Have someone observe the operation of exterior lights
while you work the controls. Check turn signal and high
beam indicator lights on the instrument panel.
Fluid Leaks
Check area under vehicle after overnight parking for fuel,
engine coolant, oil or other fluid leaks. Also, if gasoline
fumes are detected or fuel, power steering fluid, trans-
mission fluid or brake fluid leaks are suspected, the cause
should be located and corrected immediately.
Exhaust Gas
WARNING!
Exhaust gases can injure or kill. They contain carbon
monoxide (CO) which is colorless and odorless.
Breathing it can make you unconscious and can
eventually poison you. To avoid breathing (CO)
follow the safety tips below.
Do not run the engine in a closed garage or in confined
areas any longer than needed to move your vehicle in or
out of the area.
If it is necessary to sit in a parked vehicle with the engine
running, adjust your heating or cooling controls to force
outside air into the vehicle. Set the blower at high speed.
94 THINGS TO KNOW BEFORE STARTING YOUR VEHICLE
Page 155 of 531
Plastic Grocery Bag Retainer Hooks
Retainer hooks which will hold plastic grocery bag
handles are built into the seatbacks of all rear seats and
some front seats. The floor supports the partial weight of
the bagged goods.
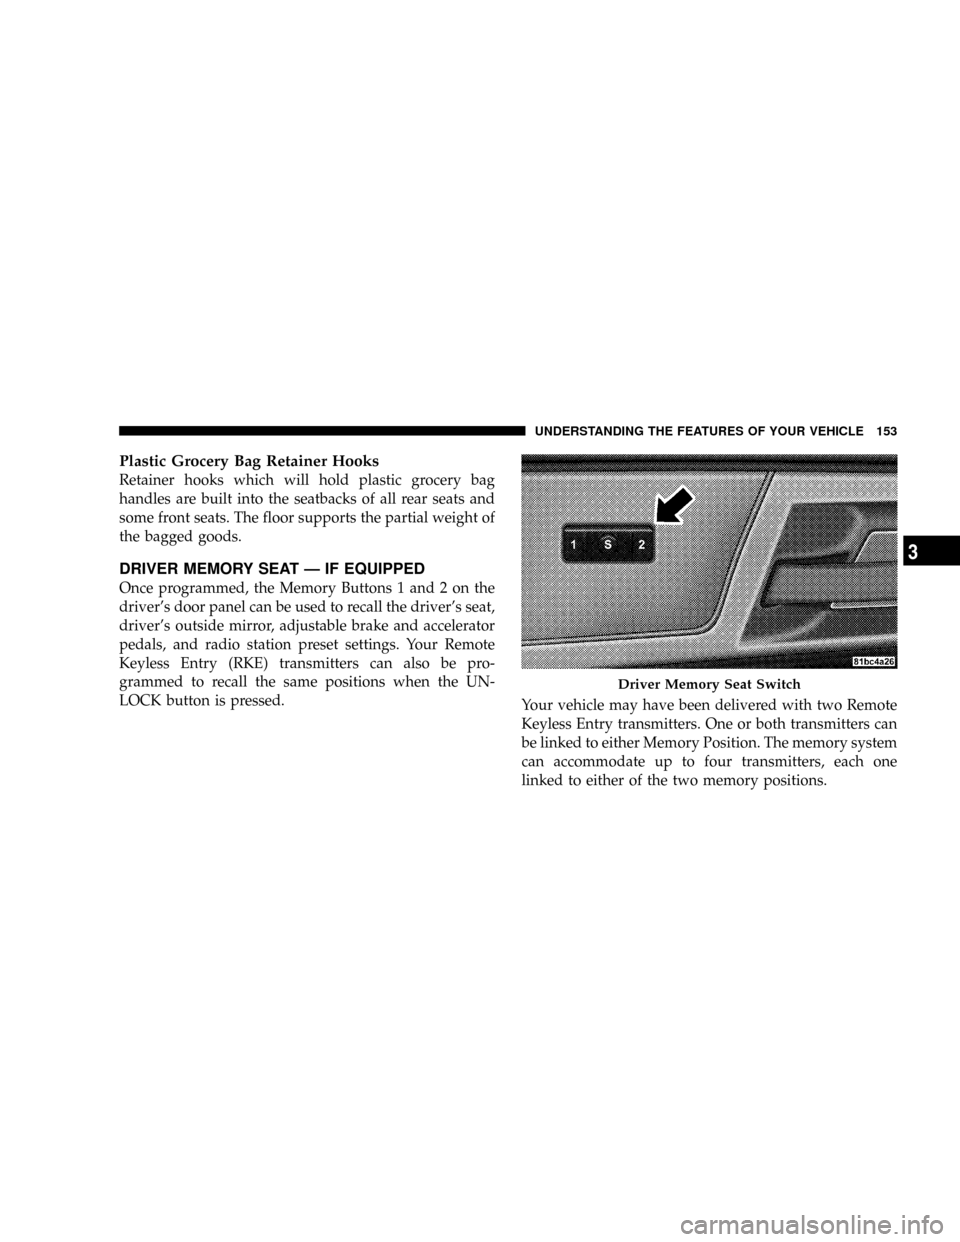
DRIVER MEMORY SEAT Ð IF EQUIPPED
Once programmed, the Memory Buttons 1 and 2 on the
driver's door panel can be used to recall the driver's seat,
driver's outside mirror, adjustable brake and accelerator
pedals, and radio station preset settings. Your Remote
Keyless Entry (RKE) transmitters can also be pro-
grammed to recall the same positions when the UN-
LOCK button is pressed.
Your vehicle may have been delivered with two Remote
Keyless Entry transmitters. One or both transmitters can
be linked to either Memory Position. The memory system
can accommodate up to four transmitters, each one
linked to either of the two memory positions.
Driver Memory Seat Switch
UNDERSTANDING THE FEATURES OF YOUR VEHICLE 153
3
Page 156 of 531
Setting Memory Positions And Linking RKE
Transmitter To Memory
NOTE:Each time the SET(S) button and a numbered
button (1 or 2) are pressed, you erase the memory settings
for that button and store a new one.
1. Insert the ignition key and turn the ignition switch to
the ON position.
2. Press the driver door Memory Buttons number 1 if
you are setting the memory for driver 1, or button
number 2 if you are setting the memory for driver 2. The
system will recall any stored settings. Wait for the system
to complete the memory recall before continuing to step
3.
3. Adjust the driver's seat, recliner, and driver's side-
view mirror to the desired positions.
4. Adjust the brake and accelerator pedals to the desired
positions.5. Turn on the radio and set the radio station presets (up
to 10 AM and 10 FM stations can be set).
6. Turn the ignition switch to the OFF position and
remove the key.
7. Press and release the SET(S) button located on the
driver's door. A chime will sound signaling that you are
in the memory set mode.
8. Within five seconds, press and release Memory Button
1 or 2 on the driver's door. A chime will sound signaling
to you that the driver memory has been set. The next step
must be performed within five seconds if you desire to
also use a Remote Keyless Entry transmitter to recall
memory positions.
9. Press and release the LOCK button on one of the
transmitters. A chime will sound signaling to you that the
transmitter has been successfully linked to memory.
154 UNDERSTANDING THE FEATURES OF YOUR VEHICLE
Page 163 of 531

HALO Lights Ð If Equipped
Halo Lights are strategically-placed, soft lighting that
helps to illuminate specific areas to aid the occupants in
locating specific features while driving at night.
To activate the Halo lights, push in on the Halo
switch located below the dimmer control.
Pressing the switch in a second time, will turn
the Halo lights off.
Exterior Lights
Parking Lights
Turn the headlight switch knob to the first detent
to turn the park lights on. This also turns on all
instrument panel lighting.
Daytime Running Lights (Canada/Fleet Vehicles
Only)
The headlights on your vehicle will illuminate when the
engine is started and the transmission is in any gear
except PARK. This provides a constant lights on condi-
tion until the ignition is turned OFF. The lights illuminate
at less than 50% of normal intensity. If the parking brake
is applied the Daytime Running Lights (DRL) will turn
off. Also, if a turn signal is activated, the DRL lamp on the
same side of the vehicle will turn off for the duration of
the turn signal activation. Once the turn signal is no
longer active, the DRL lamp will illuminate.
Headlights
Turn the headlight switch knob to the 2nd detent
to turn the headlights and park lights on. This
also turns on all instrument panel lighting.
To change the brightness of the instrument panel lights,
rotate the dimmer control up or down.
UNDERSTANDING THE FEATURES OF YOUR VEHICLE 161
3
Page 177 of 531
If(SERVICE PARK ASSIST SYSTEM(appears in the
Electronic Vehicle Information Center (EVIC), after mak-
ing sure the rear bumper is clean, please see your
authorized dealer.
Should this wrench symbol display with the
letterPnext to it, your Park Sense System
needs servicing. Contact your authorized
dealer.
Cleaning The Rear Park Assist System
Clean the Rear Park Assist Sensors with water, car wash
soap and a soft cloth. Do not use rough or hard cloths. Do
not scratch or poke the sensors, otherwise, you could
damage the sensors.
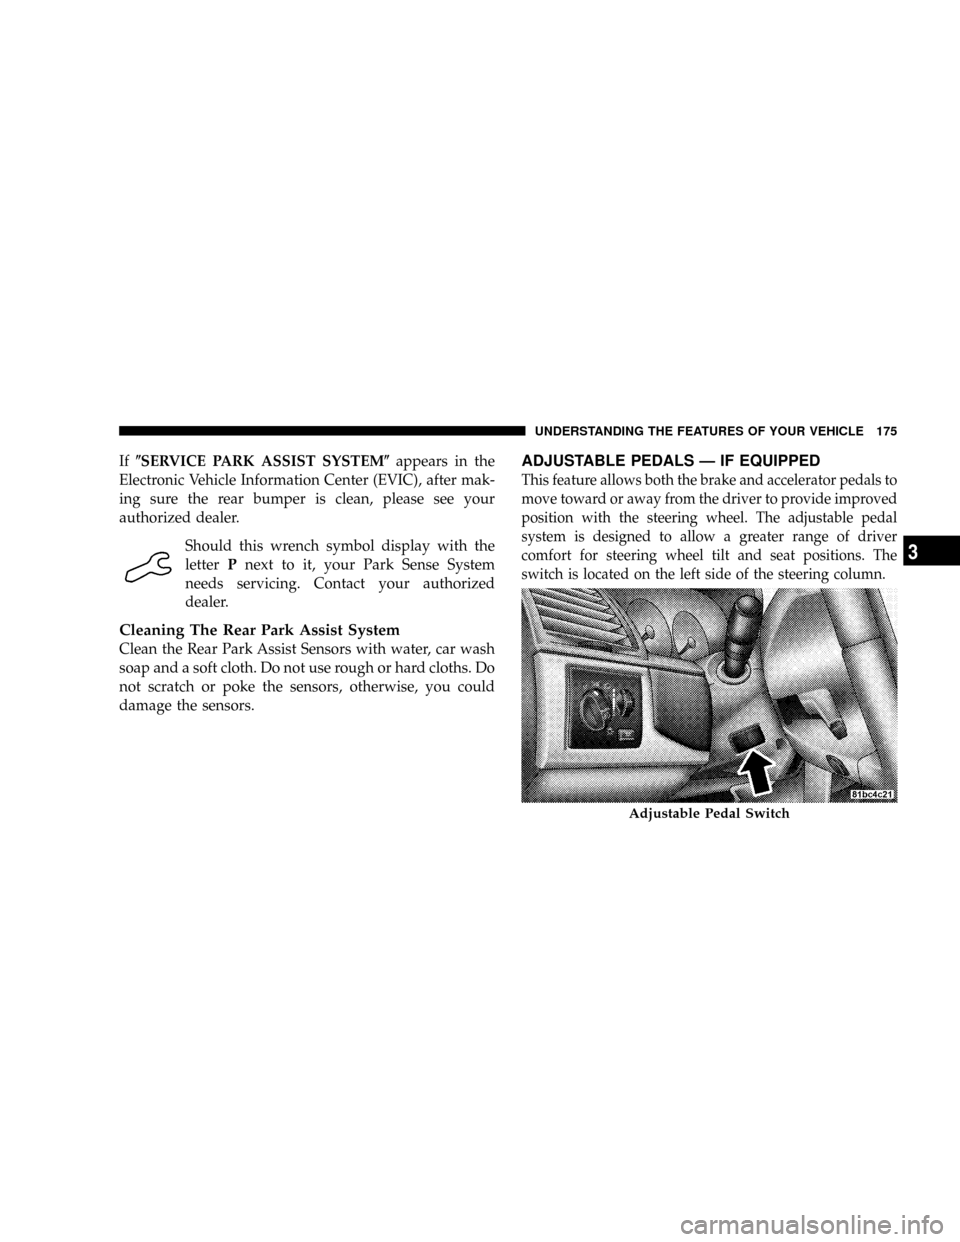
ADJUSTABLE PEDALS Ð IF EQUIPPED
This feature allows both the brake and accelerator pedals to
move toward or away from the driver to provide improved
position with the steering wheel. The adjustable pedal
system is designed to allow a greater range of driver
comfort for steering wheel tilt and seat positions. The
switch is located on the left side of the steering column.
Adjustable Pedal Switch
UNDERSTANDING THE FEATURES OF YOUR VEHICLE 175
3