Page 183 of 531

Courtesy/Interior Lighting
At the forward end of the console are two courtesy lights
(standard dome light has two buttons). The lights turn on
when a front door, a sliding door or the liftgate is opened.
If your vehicle is equipped with Remote Keyless Entry,
the lights will also turn on when the unlock button on the
transmitter is pressed.
The courtesy lights also function as reading lights. Press
in on each lens to turn these lights on while inside the
vehicle. Press a second time to turn the each light off. You
may adjust the direction of these lights by pressing the
outside ring which is identified with four directional
arrows.
The area around the instrument panel cupholders is also
illuminated from a light in the overhead console. This
light is turned on when the headlight switch is on and
will adjust in brightness when the dimmer control is
rotated up or down.
Sunglass Storage
At the rear of the front overhead console, a compartment
is provided for the storage of two pairs of sunglasses.
Press the door latch to open the compartment. The door
will slowly rotate to an open position.
NOTE:The front overhead console used with factory
sunroof incorporates a sunroof switch.
Rear Overhead Consoles Ð If Equipped
The rear overhead storage system is available in two
versions: with or without sunroof.
An additional LED at the front of the rear console shines
down on the second row footwell area while in courtesy
mode, for added convenience.
UNDERSTANDING THE FEATURES OF YOUR VEHICLE 181
3
Page 195 of 531

ELECTRICAL POWER OUTLETS Ð IF EQUIPPED
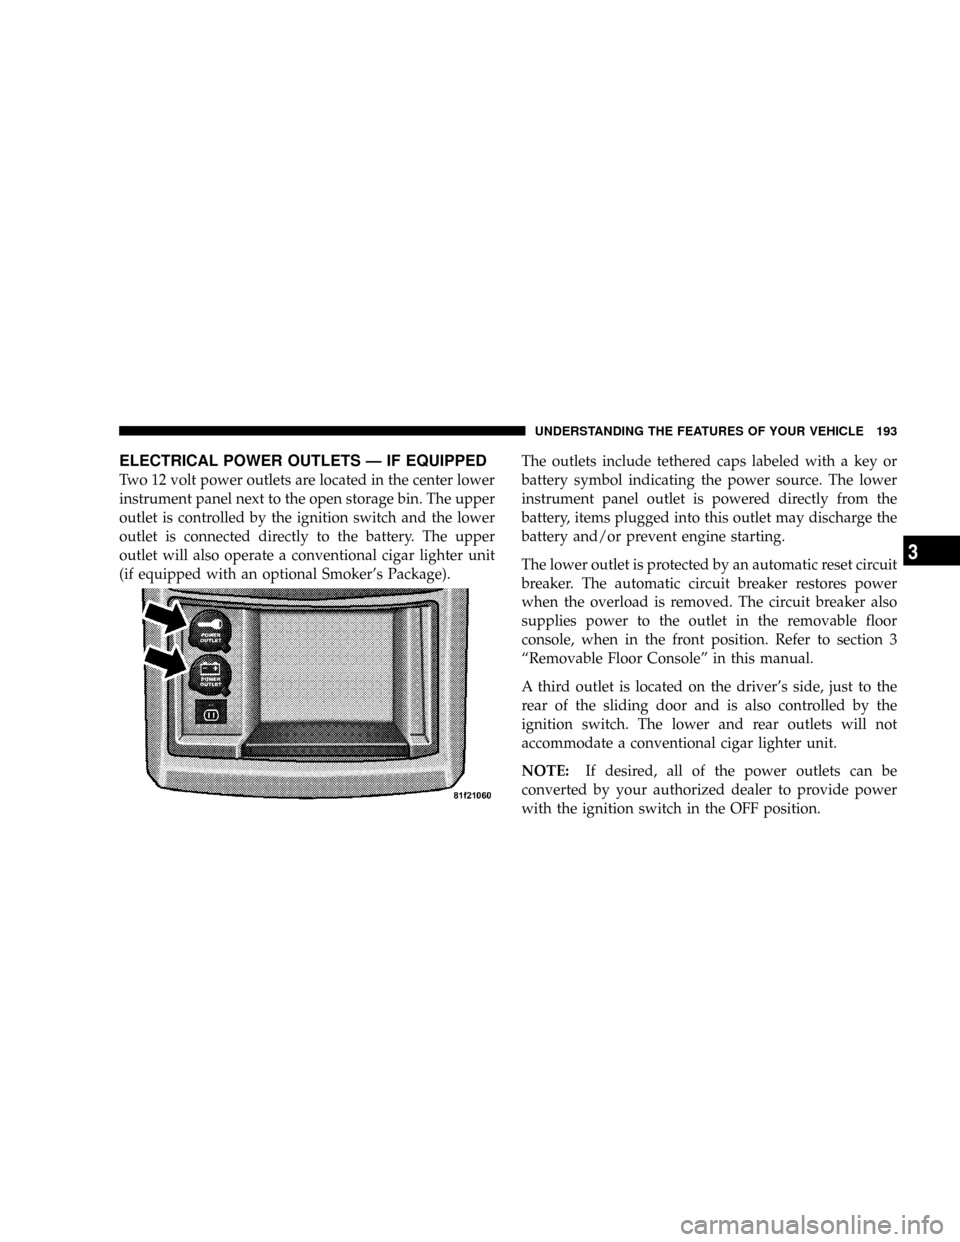
Two 12 volt power outlets are located in the center lower
instrument panel next to the open storage bin. The upper
outlet is controlled by the ignition switch and the lower
outlet is connected directly to the battery. The upper
outlet will also operate a conventional cigar lighter unit
(if equipped with an optional Smoker's Package).The outlets include tethered caps labeled with a key or
battery symbol indicating the power source. The lower
instrument panel outlet is powered directly from the
battery, items plugged into this outlet may discharge the
battery and/or prevent engine starting.
The lower outlet is protected by an automatic reset circuit
breaker. The automatic circuit breaker restores power
when the overload is removed. The circuit breaker also
supplies power to the outlet in the removable floor
console, when in the front position. Refer to section 3
ªRemovable Floor Consoleº in this manual.
A third outlet is located on the driver's side, just to the
rear of the sliding door and is also controlled by the
ignition switch. The lower and rear outlets will not
accommodate a conventional cigar lighter unit.
NOTE:If desired, all of the power outlets can be
converted by your authorized dealer to provide power
with the ignition switch in the OFF position.
UNDERSTANDING THE FEATURES OF YOUR VEHICLE 193
3
Page 196 of 531
POWER INVERTER Ð IF EQUIPPED
A 110 volt, 150 watt inverter outlet (if equipped) converts
DC current to AC current and is located on the left rear
trim panel immediately behind the second row left
passenger seat. This outlet can be used to power small
appliances and electronics.The Power Inverter switch is located near the center of
the instrument panel below the two 12 volt power
outlets. Press the switch to turn the power on for the
outlet, press the switch a second time to turn the power
off.
110 Volt Power Inverter
Inverter Outlet Power Switch
194 UNDERSTANDING THE FEATURES OF YOUR VEHICLE
Page 200 of 531
CUP HOLDERS AND CONVENIENCE TRAY
DRAWER
There are nine cup holders in the interior. Two cup
holders in the center front instrument panel, four in the
floor consoles and three more are located in the third row
quarter trim panel.
All liners are removable for cleaning. Pull the flexible
liner from the cup holder drawer or tray; starting at one
edge to ease removal. Refer to ªCleaning The Instrument
Panel Cup Holdersº in Section 7.
Instrument Panel Cup Holders
The instrument panel cup holders are located in a pull
out drawer just above the lower storage bin.Pull the drawer out firmly until it stops, and place the
container to be held in either one of the cup holder wells.
The cup holders are designed to accommodate a wide
variety of container types and sizes. Press down on the
container to engage the cup holder retention fingers.Front Cup Holders
198 UNDERSTANDING THE FEATURES OF YOUR VEHICLE
Page 201 of 531

Interior Bottle Holders
There are four bottle holders located in the interior. One
bottle holder is molded into each front interior door trim
panels, and one bottle holder is molded into each side
sliding interior door trim panel. Each holder accommo-
dates up to 20 oz. (.6 L) size plastic bottles.
Two outboard mesh pockets on intermediate seating. The
mesh pockets are flexible enough to hold juice boxes,
toys, games or MP3 players, etc.
Smokers Package Kit Ð If Equipped
With the optional authorized dealer-installed Smokers
Package Kit, a removable ash receiver is inserted into one
of the two cup holders in the center front instrument
panel. To install the ash receiver, align the receiver so the
thumb grip on the lid is facing rearward. Press the ash
receiver into either of the cup wells to secure. Pull
upward on the ash receiver to remove for cleaning
and/or storage.
The left rear trim panel cup holder is designed to
accommodate a second ash receiver if desired.
UNDERSTANDING THE FEATURES OF YOUR VEHICLE 199
3
Page 221 of 531
UNDERSTANDING YOUR INSTRUMENT PANEL
CONTENTS
mInstrument Panels And Controls............223
mBase Instrument Cluster..................224
mPremium Instrument Cluster...............225
mInstrument Cluster Descriptions............226
mCompass Mini-Trip Computer (CMTC) Ð
If Equipped...........................239
NCompass Mini-Trip Computer (CMTC)
Odometer Displays....................239
NCompass Mini-Trip Computer (CMTC)
Reset Buttons........................240NCompass/Temperature Display...........241
mElectronic Vehicle Information Center (EVIC) Ð
If Equipped...........................243
NEVIC Displays.......................244
NTrip Functions.......................246
NCompass Display.....................247
NPersonal Settings (Customer Programmable
Features)...........................249
mRadio General Information................252
NRadio Broadcast Signals.................2524
Page 222 of 531

mSales Code REQ Ð AM/FM Stereo Radio And
6±Disc CD/DVD Changer
(MP3/WMA AUX Jack)..................254
NOperating Instructions - Radio Mode.......254
NOperation Instructions - (Disc Mode For CD
And MP3/WMA Audio Play, DVD-Video)....262
NNotes On Playing MP3/WMA Files........264
NList Button
(Disc Mode For MP3/WMA Play)..........267
NInfo Button
(Disc Mode For MP3/WMA Play)..........267
mSales Code RES Ð AM/FM Stereo Radio
With CD Player (MP3 AUX Jack)............269
NOperating Instructions - Radio Mode.......270NOperation Instructions - CD Mode For CD
And MP3 Audio Play..................275
NNotes On Playing MP3 Files.............277
NList Button (CD Mode For MP3 Play).......280
NInfo Button (CD Mode For MP3 Play).......280
mSales Code REN Ð Multimedia System Ð
If Equipped...........................282
NOperating Instructions Ð Satellite Radio
(If Equipped)........................282
NOperating Instructions Ð Voice Recognition
System (VR) (If Equipped)...............283
NOperating Instructions Ð Hands-Free
Communication (UConnectt) (If Equipped) . . . 283
NClock Setting Procedure.................283
220 UNDERSTANDING YOUR INSTRUMENT PANEL
Page 223 of 531

mSales Code RER Ð Multimedia System Ð
If Equipped...........................285
NOperating Instructions Ð Satellite Radio.....286
NOperating Instructions Ð Hands-Free
Communication (UConnectt) (If Equipped) . . . 286
NClock Setting Procedure.................286
mSatellite Radio Ð If Equipped
(REN/REQ/RER/RES/REU Radios Only).....288
NSystem Activation.....................289
NElectronic Serial Number/Sirius Identification
Number (ESN/SID)....................289
NSelecting Satellite Mode.................290
NSatellite Antenna......................290
NReception Quality.....................290NOperating Instructions - Satellite Mode......290
NOperating Instructions - Hands-Free Phone
(If Equipped)........................293
NOperating Instructions - Video Entertainment
System (VESt) (If Equipped).............293
mUniversal Consumer Interface (UCI) Ð
If Equipped...........................293
NConnecting The iPodtDevice............294
NControlling The iPodtUsing Radio Buttons . . . 294
NPlay Mode..........................295
NList Or Browse Mode..................296
mSirius Backseat TV&Trade; Ð If Equipped.....298
mVideo Entertainment System (VESt)Ð
If Equipped...........................299
UNDERSTANDING YOUR INSTRUMENT PANEL 221
4