Page 158 of 531
To Disable A RKE Transmitter Linked to Memory
1. Turn the ignition switch to the OFF position and
remove the key.
2. Press and release Memory Button 1. The system will
recall any memory settings stored in position 1. Wait for
the system to complete the memory recall before continu-
ing to step 3.
3. Press and release the memory SET(S) button located
on the driver's door. A chime will sound signaling that
you are in the memory set mode.
4. Within five seconds, press and release Memory Button
1 on the driver's door. A chime will sound signaling to
you that the driver memory has been set.
5. Within five seconds, press and release the UNLOCK
button on the Remote Keyless Entry transmitter. A chime
will sound signaling to you that the transmitter link has
been successfully disabled.To disable another transmitter linked to either Memory
Position, repeat steps 1 to 5 for each transmitter.
NOTE:Once programmed, all transmitters linked to
memory can be easily enabled or disabled at one time.
Refer to the Remote Linked to Memory9Customer Pro-
grammable Features9in the Electronic Vehicle Informa-
tion Center (EVIC) for more information.
TO OPEN AND CLOSE THE HOOD
To open the hood, two latches must be released.
1. Pull the hood release lever located on the instrument
panel, below the steering column.
2. Move to the front of the vehicle and look inside the
center of the hood opening. Locate then push the safety
catch lever to the right while raising the hood at the same
time.
156 UNDERSTANDING THE FEATURES OF YOUR VEHICLE
Page 163 of 531

HALO Lights Ð If Equipped
Halo Lights are strategically-placed, soft lighting that
helps to illuminate specific areas to aid the occupants in
locating specific features while driving at night.
To activate the Halo lights, push in on the Halo
switch located below the dimmer control.
Pressing the switch in a second time, will turn
the Halo lights off.
Exterior Lights
Parking Lights
Turn the headlight switch knob to the first detent
to turn the park lights on. This also turns on all
instrument panel lighting.
Daytime Running Lights (Canada/Fleet Vehicles
Only)
The headlights on your vehicle will illuminate when the
engine is started and the transmission is in any gear
except PARK. This provides a constant lights on condi-
tion until the ignition is turned OFF. The lights illuminate
at less than 50% of normal intensity. If the parking brake
is applied the Daytime Running Lights (DRL) will turn
off. Also, if a turn signal is activated, the DRL lamp on the
same side of the vehicle will turn off for the duration of
the turn signal activation. Once the turn signal is no
longer active, the DRL lamp will illuminate.
Headlights
Turn the headlight switch knob to the 2nd detent
to turn the headlights and park lights on. This
also turns on all instrument panel lighting.
To change the brightness of the instrument panel lights,
rotate the dimmer control up or down.
UNDERSTANDING THE FEATURES OF YOUR VEHICLE 161
3
Page 167 of 531
MULTIFUNCTION LEVER
The multifunction control lever is located on the left side
of the steering column.
The Multifunction Lever assembly controls:
²Turn Signals
²Headlight Low and High Beams
²Flash-to-Pass (Optical Horn)
²Front and Rear Wiper And Washer Functions
Turn Signals
Move the multifunction lever up or down to signal a
right-hand or left-hand turn.
The arrow on either side of the instrument cluster flashes
to indicate the direction of the turn, and proper operation
of the front and rear turn signal lights.If either indicator flashes at a rapid rate, check for a
defective outside turn signal light bulb. If one of the
indicators fails to light when the lever is moved, it would
suggest that the indicator light is defective.
You may manually signal a lane change by moving the
lever partially up or down.
Turn Signal Switch
UNDERSTANDING THE FEATURES OF YOUR VEHICLE 165
3
Page 168 of 531
Turn Signal Auto-Mode
Tap the multifunction control lever once and the turn
signal (left or right) will flash three times, and automati-
cally turn off.
Turn Signal Warning
If the vehicle electronics sense that the vehicle has
traveled at over 18 mph (29 km/h) for about 1 mi (1.6
km) with the turn signals on, a chime will sound to alert
the driver.
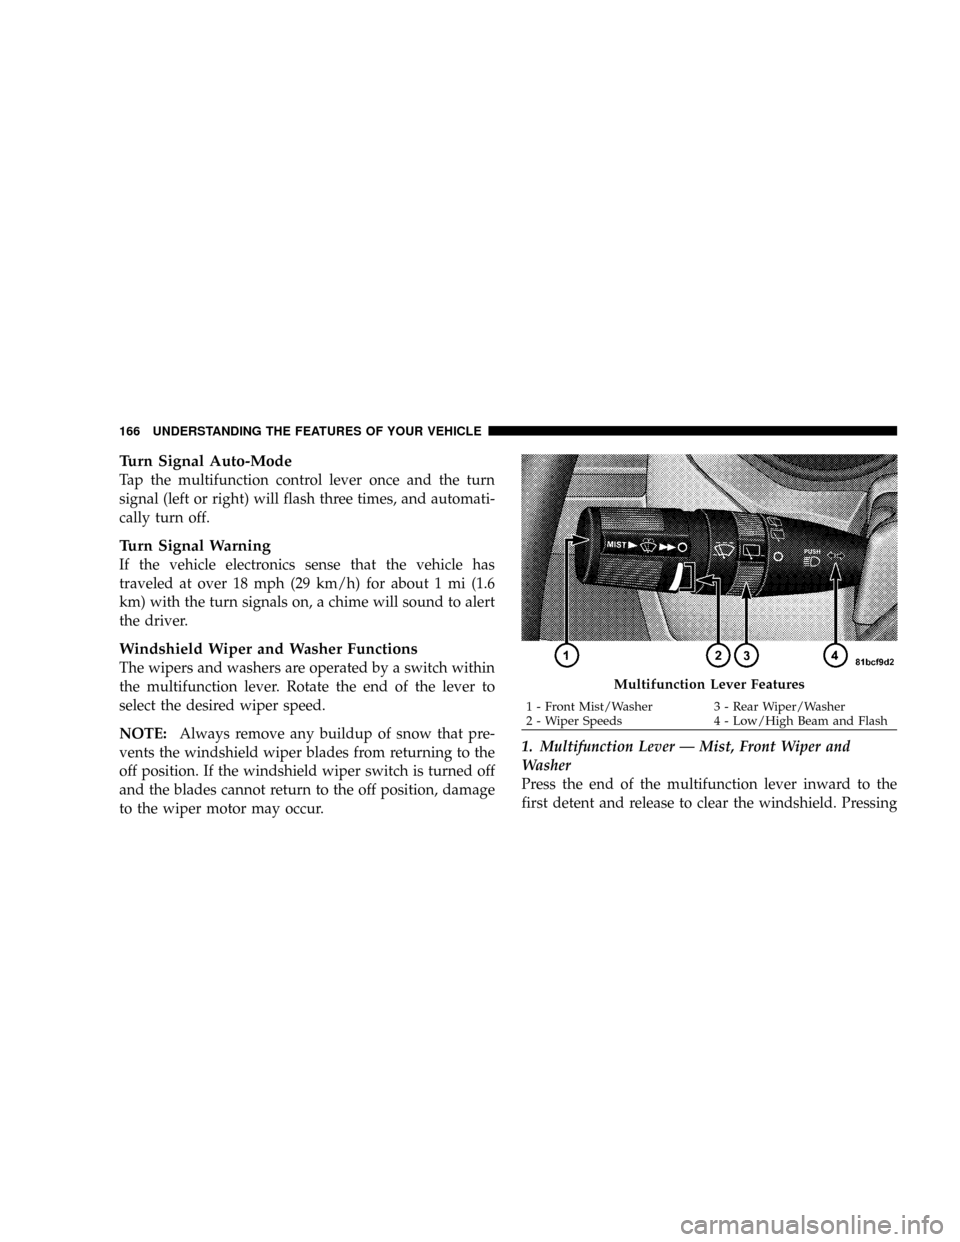
Windshield Wiper and Washer Functions
The wipers and washers are operated by a switch within
the multifunction lever. Rotate the end of the lever to
select the desired wiper speed.
NOTE:Always remove any buildup of snow that pre-
vents the windshield wiper blades from returning to the
off position. If the windshield wiper switch is turned off
and the blades cannot return to the off position, damage
to the wiper motor may occur.1. Multifunction Lever Ð Mist, Front Wiper and
Washer
Press the end of the multifunction lever inward to the
first detent and release to clear the windshield. Pressing
Multifunction Lever Features
1 - Front Mist/Washer 3 - Rear Wiper/Washer
2 - Wiper Speeds 4 - Low/High Beam and Flash 166 UNDERSTANDING THE FEATURES OF YOUR VEHICLE
Page 170 of 531
4. Headlight Low/High Beam Select Switch and
Flash-to-Pass
Headlight Low/High Beam Select SwitchWhen the
headlights are turned on, pushing the lever assembly
toward the instrument panel will switch from low beams
to high beams. Pulling back to the neutral position
returns to low beam headlights.
Flash-to-Pass (Optical Horn)You can signal another
vehicle with your headlights by lightly pulling the mul-
tifunction lever toward you. This will cause the head-
lights to turn on at high beam and remain on until the
lever is released.WARNING!
Sudden loss of visibility through the windshield
could lead to an accident. You might not see other
vehicles or other obstacles. To avoid sudden icing of
the windshield during freezing weather, warm the
windshield with defroster before and during wind-
shield washer use.
Headlights On When Wipers Are On Ð If
Equipped
Headlights on when windshield wipers are on may be
found on vehicles equipped with automatic headlight
system. Refer to the Electronic Vehicle Information Cen-
ter (EVIC) in Section 4 under ªPERSONAL SETTINGS
(CUSTOMER PROGRAMMABLE FEATURES)º for more
information.
168 UNDERSTANDING THE FEATURES OF YOUR VEHICLE
Page 190 of 531
GATE OPERATOR/CANADIAN PROGRAMMING
Canadian radio frequency laws require transmitter sig-
nals to time-out (or quit) after several seconds of trans-
mission ± which may not be long enough for HomeLinkt
to pick up the signal during programming. Similar to this
Canadian law, some U.S. gate operators are designed to
time-out in the same manner.
It may be helpful to unplug the device during the cycling
process to prevent possible overheating of the garage
door or gate motor.
If you are having difficulties programming a garage door
opener or a gate operator, replace ªProgramming
HomeLinktº Step 3, with the following:
3. Continue to press and hold the HomeLinktbutton
while you press and release - every two seconds
(ªcycleº) your hand-held transmitter until HomeLinkthas successfully accepted the frequency signal. The
indicator light will flash slowly and then rapidly when
fully trained.
If you unplugged the device for training, plug it back in
at this time.
Then proceed with Step 4 under ªProgramming
HomeLinkt,º earlier in this section.
SECURITY
It is advised to erase all channels before you sell or turn
in your vehicle.
To do this, press and hold the two outside buttons for 20
seconds until the red indicator flashes. Note that all
channels will be erased. Individual channels cannot be
erased.
The HomeLinktUniversal Transceiver is disabled when
the Vehicle Security Alarm is active.
188 UNDERSTANDING THE FEATURES OF YOUR VEHICLE
Page 231 of 531
For additional information on Tire Pressures, refer to
Section 5 Ð Starting and Operating, ªTire Inflation
Pressuresº of this manual.
6. Oil Pressure Warning Light
This light shows low engine oil pressure. The light
should turn on momentarily when the engine is
started. If the light turns on while driving, stop the
vehicle and shut off the engine as soon as possible. A
chime will sound for four minutes when this light turns
on.
Do not operate the vehicle until the cause is corrected.
This light does not show how much oil is in the engine.
The engine oil level must be checked under the hood.
7. Engine Temperature Warning Light
This light warns of an overheated engine condi-
tion. If the engine is critically hot, a continuouschime will sound for four minutes. After the chime turns
off, the engine will still be critically hot until the light
turns off.
8. Speedometer
Indicates vehicle speed.
9. Turn Signal Indicators
The arrow will flash with the exterior turn signal
when the turn signal lever is operated.
If the vehicle electronics sense that the vehicle has
traveled about one mile with the turn signals on, a
continuous chime will sound to alert you to turn the
signals off. If either indicator flashes at a rapid rate, check
for a defective outside light bulb.
10. Electronic Stability Program (ESP) Indicator Light
The malfunction lamp for the ESP is combined
with BAS. The yellow ªESP/BAS Warning
Lampº comes on when the ignition switch is
UNDERSTANDING YOUR INSTRUMENT PANEL 229
4
Page 234 of 531
brakes. If the ABS light does not turn on when the
Ignition switch is turned to the ON position, have the
light inspected by an authorized dealer.
14. Electronic Stability Program (ESP) Indicator
Light/Traction Control System (TCS) Indicator Light
If this indicator light flashes during accelera-
tion, apply as little throttle as possible. While
driving, ease up on the accelerator. Adapt your
speed and driving to the prevailing road con-
ditions, and do not switch off the ESP, or TCS.
15. Tachometer
The red segments indicate the maximum permissible
engine revolutions per minute (RPM x 1000) for each gear
range. Before reaching the red area, ease up on the
accelerator.16. High Beam Light
This light shows that the headlights are on high
beam. Pull the turn signal lever towards the
steering wheel to switch the headlights from high or low
beam.
17. Front Fog Light Indicator Ð If Equipped
This light shows when the front fog lights are ON.
18. Seat Belt Reminder Light
When the ignition switch is first turned ON, this
light will turn on for five to eight seconds as a bulb
check. During the bulb check, if the driver's seat
belt is unbuckled, a chime will sound. After the bulb
check or when driving, if the driver's seat belt remains
unbuckled, the Seat Belt Reminder Light will illuminate
and the chime will sound. Refer to the Occupant Re-
straints section for more information.
232 UNDERSTANDING YOUR INSTRUMENT PANEL