2008 CHRYSLER TOWN AND COUNTRY set clock
[x] Cancel search: set clockPage 285 of 531
Operating Instructions Ð Voice Recognition
System (VR) (If Equipped)
For the radio, refer to ªVoice Recognition System (VR)º in
Section 3.
For Hands Free Phone Communication (UConnectt)
ªVoice Recognition System (VR),º refer to ªHands-Free
Communication (UConnectt)º in Section 3.
Operating Instructions Ð Hands-Free
Communication (UConnectT) (If Equipped)
Refer to ªHands-Free Communication (UConnectt)º in
Section 3.
Clock Setting Procedure
Setting the Clock
1. Turn on the multimedia system.
2. Touch the screen where the time is displayed. The
clock setting menu will appear on the screen.3. To move the hour forward, touch the screen where the
word ªHourº with the arrow pointing upward is dis-
played. To move the hour backward, touch the screen
where the word ªHourº with the arrow pointing down-
ward is displayed.
4. To move the minute forward, touch the screen where
the word ªMinº with the arrow pointing upward is
displayed. To move the minute backward, touch the
screen where the word ªMinº with the arrow pointing
downward is displayed.
5. To save the new time setting, touch the screen where
the word ªSaveº is displayed.
Changing Daylight Savings Time
When selected, this feature will display the time of day in
daylight savings time. Proceed as follows to change the
current setting:
1. Turn on the multimedia system.
UNDERSTANDING YOUR INSTRUMENT PANEL 283
4
Page 286 of 531
2. Touch the screen where the time is displayed. The
clock setting menu will appear on the screen.
3. When this feature is on, a check mark will appear in
the box next to the words ªDaylight Savings.º Touch the
screen where the words ªDaylight Savingsº are dis-
played to change the current setting.
Show Time if Radio is Off
When selected, this feature will display the time of day
on the touch screen when the multimedia system is
turned off. Proceed as follows to change the current
setting:
1. Turn on the multimedia system.
2. Touch the screen where the time is displayed. The
clock setting menu will appear on the screen.
3. When this feature is on, a check mark will appear in
the box next to the words ªShow Time if Radio is Off.ºTouch the screen where the words ªShow Time if Radio is
Offº are displayed to change the current setting.
Changing the Time Zone
1. Turn on the multimedia system.
2. Touch the screen where the time is displayed. The
clock setting menu will appear on the screen.
3. Touch the screen where the words ªSet Time Zoneº are
displayed. The time zone selection menu will appear on
the screen.
4. Select a time zone by touching the screen where your
selection appears. If you do not see a time zone that you
want to select, touch the screen where the word ªPageº is
displayed to view additional time zones in the menu.
5. Touch the screen where the word ªSaveº is displayed.
284 UNDERSTANDING YOUR INSTRUMENT PANEL
Page 288 of 531

Other special features include direct tune, music type
selections, traffic messaging (optional), easy store presets,
parental lockout for VESt(if equipped), backup camera
display for vehicles equipped with a backup camera, and
on some models, a dual display screen operation. Refer to
your ªNavigation User's Manualº for detailed operating
instructions.
Operating Instructions Ð Satellite Radio
Refer to your ªNavigation User's Manualº for detailed
operating instructions.
Operating Instructions Ð Hands-Free
Communication (UConnectT) (If Equipped)
Refer to your ªNavigation User's Manualº for detailed
operating instructions.
Clock Setting Procedure
The GPS receiver in this system is synchronized to the
time data being transmitted by the GPS satellites. The
satellites' clock is Greenwich Mean Time (GMT). This is
the worldwide standard for time. This makes the sys-
tem's clock very accurate once the appropriate time zone
and daylight savings information is set.
Changing the Time Zone
1. Turn on the multimedia system.
2. Touch the screen where the time is displayed. The
clock setting menu will appear on the screen. If the words
ªTime: GPS Timeº are displayed at the top of the screen,
proceed to Step 4. Otherwise, proceed to Step 3.
3. If the words ªTime: User Clockº are displayed at the
top of the screen, touch the bottom of the screen where
the words ªUser Clockº are displayed. The GPS time
setting menu will appear on the screen.
286 UNDERSTANDING YOUR INSTRUMENT PANEL
Page 289 of 531
4. Touch the screen where the words ªSet Time Zoneº are
displayed. The time zone selection menu will appear on
the screen.
5. Select a time zone by touching the screen where your
selection appears. If you do not see a time zone that you
want to select, touch the screen where the word ªPageº is
displayed to view additional time zones in the menu.
Changing Daylight Savings Time
When selected, this feature will display the time of day in
daylight savings time. Proceed as follows to change the
current setting:
1. Turn on the multimedia system.
2. Touch the screen where the time is displayed. The
clock setting menu will appear on the screen.3. When this feature is on, a check mark will appear in
the box next to the words ªDaylight Savings.º Touch the
screen where the words ªDaylight Savingsº are dis-
played to change the current setting.
Setting the User Clock
If you wish to set the clock to a time different from the
system clock, you can manually adjust the time by
performing the following:
1. Turn on the multimedia system.
2. Touch the screen where the time is displayed. The
clock setting menu will appear on the screen. If the words
ªTime: User Clockº are displayed at the top of the screen,
proceed to Step 4. Otherwise, proceed to Step 3.
3. If the words ªTime: GPS Timeº are displayed at the top
of the screen, touch the bottom of the screen where the
words ªGPS Timeº are displayed. The user clock time
setting menu will appear on the screen.
UNDERSTANDING YOUR INSTRUMENT PANEL 287
4
Page 290 of 531
4. To move the hour forward, touch the screen where the
word ªHourº with the arrow pointing upward is dis-
played. To move the hour backward, touch the screen
where the word ªHourº with the arrow pointing down-
ward is displayed.
5. To move the minute forward, touch the screen where
the word ªMinº with the arrow pointing upward is
displayed. To move the minute backward, touch the
screen where the word ªMinº with the arrow pointing
downward is displayed.
6. To save the new time setting, touch the screen where
the word ªSaveº is displayed.
Show Time if Radio is Off
When selected, this feature will display the time of day
on the touch screen when the system is turned off.
Proceed as follows to change the current setting:
1. Turn on the multimedia system.2. Touch the screen where the time is displayed. The
clock setting menu will appear on the screen.
3. When this feature is on, a check mark will appear in
the box next to the words ªShow Time if Radio is Off.º
Touch the screen where the words ªShow Time if Radio is
Offº are displayed to change the current setting.
SATELLITE RADIO Ð IF EQUIPPED
(REN/REQ/RER/RES/REU RADIOS ONLY)
Satellite radio uses direct satellite-to-receiver broadcast-
ing technology to provide clear digital sound, coast to
coast. The subscription service provider is Sirius Satellite
Radio. This service offers over 130 channels of music,
sports, news, entertainment, and programming for chil-
dren, directly from its satellites and broadcasting studios.
NOTE:Sirius service is not available in Hawaii and has
limited coverage in Alaska.
288 UNDERSTANDING YOUR INSTRUMENT PANEL
Page 299 of 531
Tune/Scroll Knob
In the List mode, the Tune/Scroll knob functions in a
similar manner as the scroll wheel on the iPodt.
Turning the Tune/Scroll knob clockwise (forward) and
counterclockwise (backward) scrolls through lists, dis-
playing the track detail on the radio display. Once you
have the track to be played highlighted on the radio
display, press the Tune/Scroll knob to select and start
playing the track. By turning the Tune/Scroll knob fast,
you can jump through the list faster. During fast scroll,
you may notice a slight delay in updating the informa-
tion on the radio display.
During all List modes, the iPodtwill display all lists in
ªwrap-aroundº mode. So if the track you wish to select is
at the bottom of the list, you just turn the Tune/Scroll
knob backward (counterclockwise) to get to the track
faster.Radio Preset Buttons
In the List mode, the radio preset buttons are used as
shortcuts to the following lists on the iPodtdevice.
²1 ± Playlists
²2 ± Artists
²3 ± Albums
²4 ± Genres
²5 - Audiobooks
²6 ± Podcasts
After pressing a preset button, you will see the list you
are in on the top line and the first item in that list on the
second line.
To exit the List mode without selecting a track, press the
same preset button again to go back to Play mode.
UNDERSTANDING YOUR INSTRUMENT PANEL 297
4
Page 312 of 531
Rear Temperature Control
When the blower knob on the front climate control unit is
set to any position other thanRR, the rear temperature
selection follows the setting of the rear temperature
control knob on the front climate control unit. The rear
mode selection follows the setting of the rear mode
control knob.
To change the temperature in the rear of the vehicle,
rotate the temperature control knob counterclockwise for
cold and clockwise for heated air.
When rear controls are locked by the front system, the
lock symbol on the temperature knob is illuminated and
the rear overhead adjustments are ignored.
The rear airflow modes will mirror the front unit opera-
tion. Rear PANEL mode is automatically selected when
the front control is in the PANEL mode. When the front
unit is in BI-LEVEL mode, airflow will be emitted from
both the upper and lower rear outlets. When the frontcontrol is in FLOOR, DEFROST, or MIX modes, airflow
will be directed out of the rear floor outlets.
Rear Mode Control
FLOOR Mode
Air comes from the floor outlets.
BI-LEVEL Mode
Air comes from both the headliner outlets and the
floor outlets.
NOTE:In many temperature positions, the BI-LEVEL
mode is designed to provide cooler air out of the head-
liner outlets and warmer air from the floor outlets.
HEADLINER Mode
Air comes from the outlets in the headliner. Each of
these outlets can be individually adjusted to direct
the flow of air. Moving the air vanes of the outlets to one
side will shut off the airflow.
310 UNDERSTANDING YOUR INSTRUMENT PANEL
Page 319 of 531
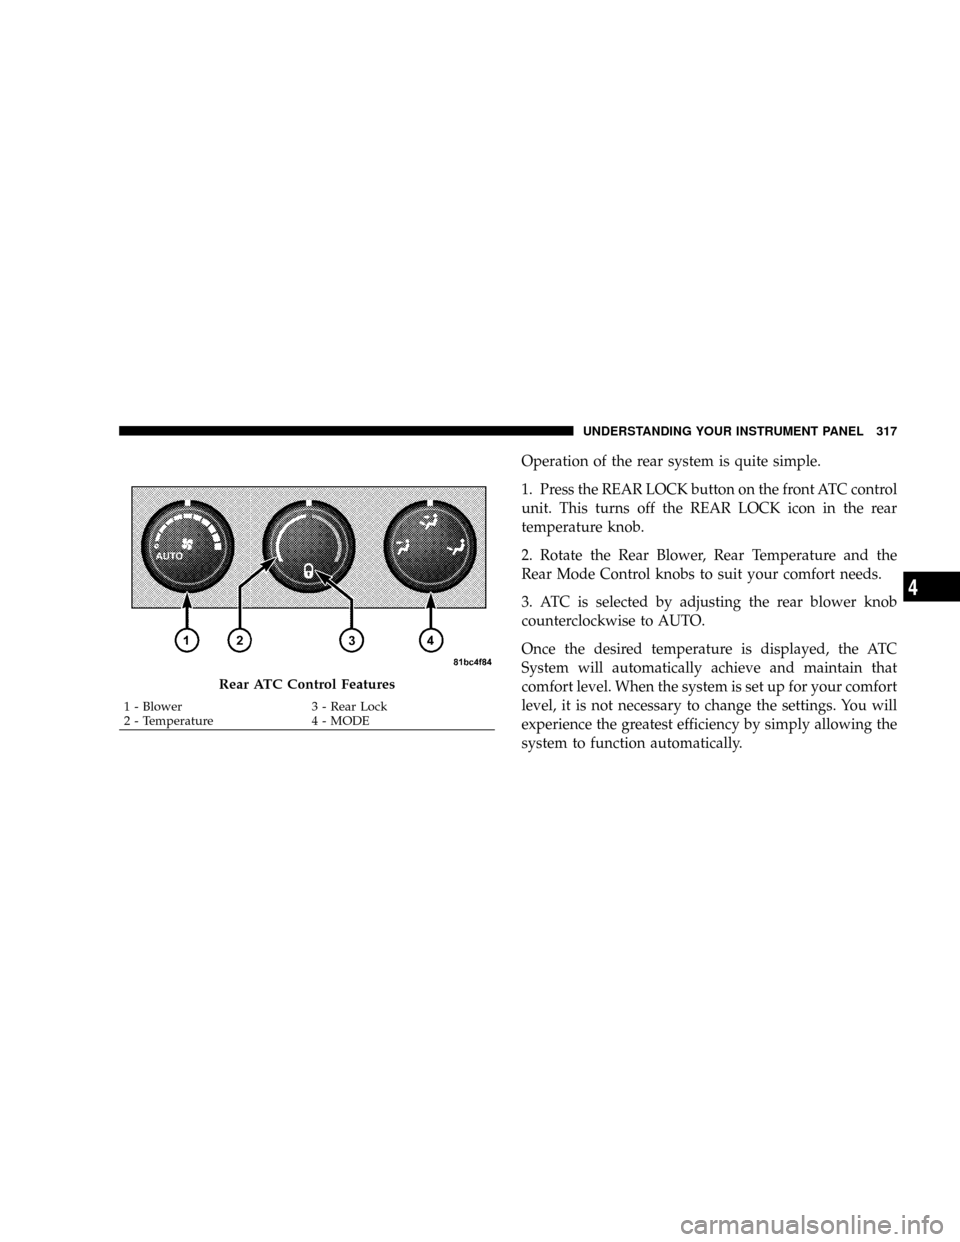
Operation of the rear system is quite simple.
1. Press the REAR LOCK button on the front ATC control
unit. This turns off the REAR LOCK icon in the rear
temperature knob.
2. Rotate the Rear Blower, Rear Temperature and the
Rear Mode Control knobs to suit your comfort needs.
3. ATC is selected by adjusting the rear blower knob
counterclockwise to AUTO.
Once the desired temperature is displayed, the ATC
System will automatically achieve and maintain that
comfort level. When the system is set up for your comfort
level, it is not necessary to change the settings. You will
experience the greatest efficiency by simply allowing the
system to function automatically.
Rear ATC Control Features
1 - Blower 3 - Rear Lock
2 - Temperature 4 - MODEUNDERSTANDING YOUR INSTRUMENT PANEL 317
4