2008 CHRYSLER TOWN AND COUNTRY high beam
[x] Cancel search: high beamPage 96 of 531

PERIODIC SAFETY CHECKS YOU SHOULD MAKE
OUTSIDE THE VEHICLE
Tires
Examine tires for excessive tread wear or uneven wear
patterns. Check for stones, nails, glass, or other objects
lodged in the tread. Inspect tread and sidewall for cuts or
cracks. Check wheel nuts for tightness, and tires (includ-
ing spare) for proper pressure.
Lights
Have someone observe the operation of exterior lights
while you work the controls. Check turn signal and high
beam indicator lights on the instrument panel.
Fluid Leaks
Check area under vehicle after overnight parking for fuel,
engine coolant, oil or other fluid leaks. Also, if gasoline
fumes are detected or fuel, power steering fluid, trans-
mission fluid or brake fluid leaks are suspected, the cause
should be located and corrected immediately.
Exhaust Gas
WARNING!
Exhaust gases can injure or kill. They contain carbon
monoxide (CO) which is colorless and odorless.
Breathing it can make you unconscious and can
eventually poison you. To avoid breathing (CO)
follow the safety tips below.
Do not run the engine in a closed garage or in confined
areas any longer than needed to move your vehicle in or
out of the area.
If it is necessary to sit in a parked vehicle with the engine
running, adjust your heating or cooling controls to force
outside air into the vehicle. Set the blower at high speed.
94 THINGS TO KNOW BEFORE STARTING YOUR VEHICLE
Page 161 of 531

LIGHTS
All of the lights, except the hazard warning lights,
headlamp high beams and flash to pass, are controlled by
switches to the left of the steering column on the instru-
ment panel.
Interior Lighting
Interior lights are turned on when a door or liftgate is
opened, the keyless entry transmitter is activated, or
when the dimmer control is moved to the extreme top.
The interior lights will automatically turn off in about 10
minutes for the first activation and 90 seconds every
activation thereafter until the engine is started, if one of
the following occur:
²A door, sliding door or the liftgate is left open
²Any overhead reading light is left on
²If the dimmer control is in the extreme top position
NOTE:The key must be out of the ignition switch or the
ignition switch must be in the OFF position for this
feature to operate.
Headlight Switch Assembly
UNDERSTANDING THE FEATURES OF YOUR VEHICLE 159
3
Page 167 of 531
MULTIFUNCTION LEVER
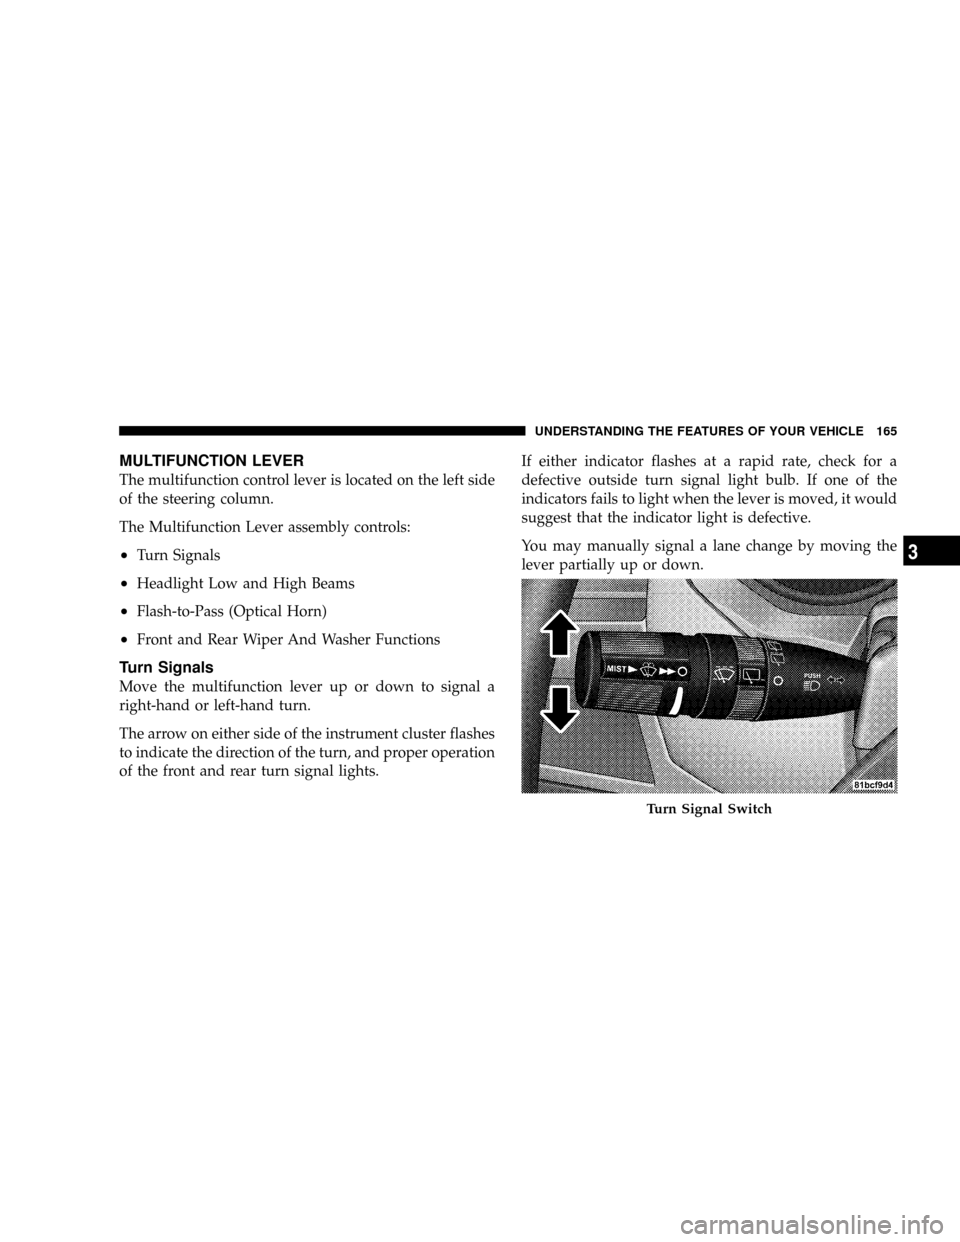
The multifunction control lever is located on the left side
of the steering column.
The Multifunction Lever assembly controls:
²Turn Signals
²Headlight Low and High Beams
²Flash-to-Pass (Optical Horn)
²Front and Rear Wiper And Washer Functions
Turn Signals
Move the multifunction lever up or down to signal a
right-hand or left-hand turn.
The arrow on either side of the instrument cluster flashes
to indicate the direction of the turn, and proper operation
of the front and rear turn signal lights.If either indicator flashes at a rapid rate, check for a
defective outside turn signal light bulb. If one of the
indicators fails to light when the lever is moved, it would
suggest that the indicator light is defective.
You may manually signal a lane change by moving the
lever partially up or down.
Turn Signal Switch
UNDERSTANDING THE FEATURES OF YOUR VEHICLE 165
3
Page 168 of 531
Turn Signal Auto-Mode
Tap the multifunction control lever once and the turn
signal (left or right) will flash three times, and automati-
cally turn off.
Turn Signal Warning
If the vehicle electronics sense that the vehicle has
traveled at over 18 mph (29 km/h) for about 1 mi (1.6
km) with the turn signals on, a chime will sound to alert
the driver.
Windshield Wiper and Washer Functions
The wipers and washers are operated by a switch within
the multifunction lever. Rotate the end of the lever to
select the desired wiper speed.
NOTE:Always remove any buildup of snow that pre-
vents the windshield wiper blades from returning to the
off position. If the windshield wiper switch is turned off
and the blades cannot return to the off position, damage
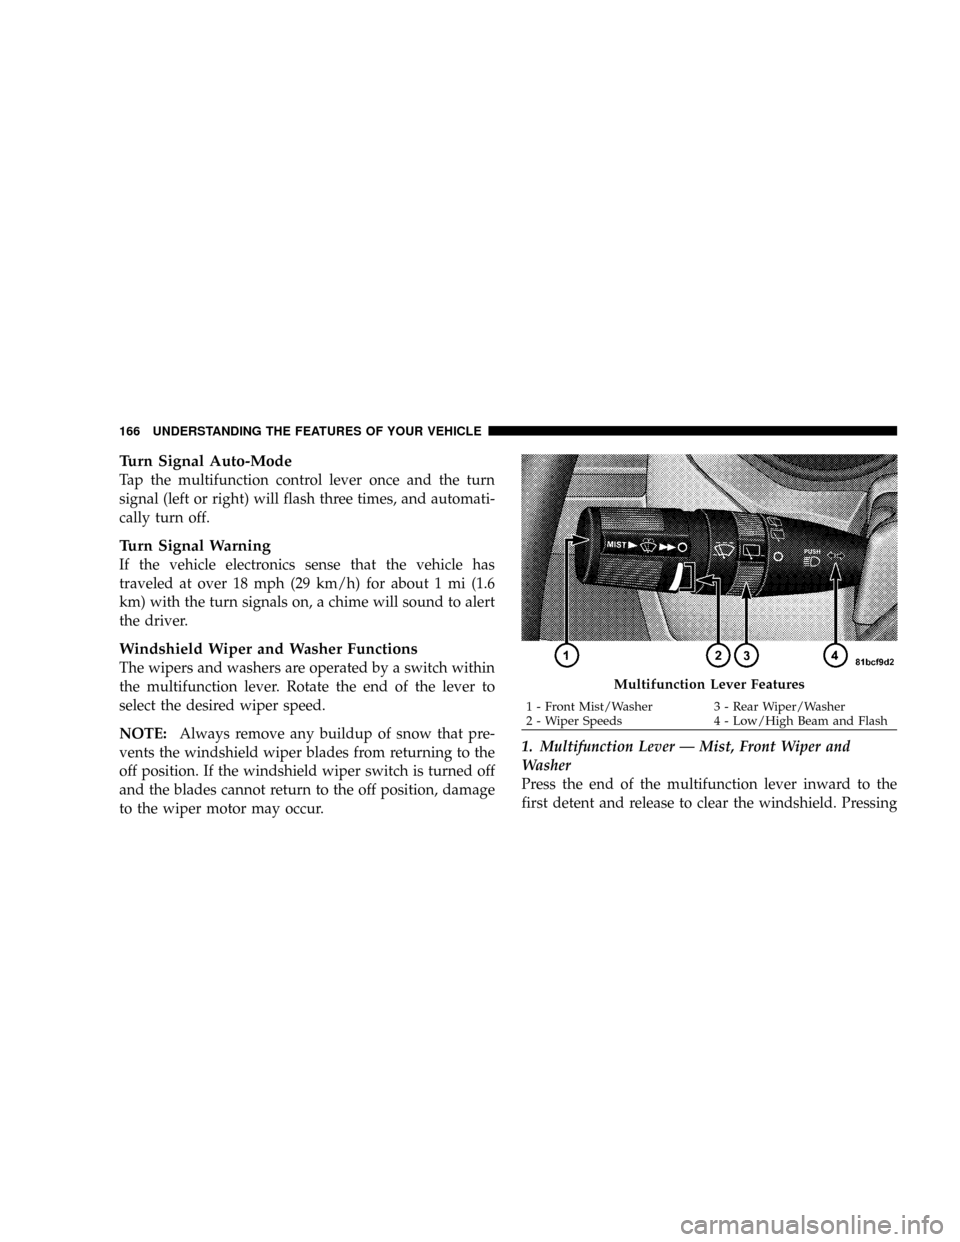
to the wiper motor may occur.1. Multifunction Lever Ð Mist, Front Wiper and
Washer
Press the end of the multifunction lever inward to the
first detent and release to clear the windshield. Pressing
Multifunction Lever Features
1 - Front Mist/Washer 3 - Rear Wiper/Washer
2 - Wiper Speeds 4 - Low/High Beam and Flash 166 UNDERSTANDING THE FEATURES OF YOUR VEHICLE
Page 170 of 531
4. Headlight Low/High Beam Select Switch and
Flash-to-Pass
Headlight Low/High Beam Select SwitchWhen the
headlights are turned on, pushing the lever assembly
toward the instrument panel will switch from low beams
to high beams. Pulling back to the neutral position
returns to low beam headlights.
Flash-to-Pass (Optical Horn)You can signal another
vehicle with your headlights by lightly pulling the mul-
tifunction lever toward you. This will cause the head-
lights to turn on at high beam and remain on until the
lever is released.WARNING!
Sudden loss of visibility through the windshield
could lead to an accident. You might not see other
vehicles or other obstacles. To avoid sudden icing of
the windshield during freezing weather, warm the
windshield with defroster before and during wind-
shield washer use.
Headlights On When Wipers Are On Ð If
Equipped
Headlights on when windshield wipers are on may be
found on vehicles equipped with automatic headlight
system. Refer to the Electronic Vehicle Information Cen-
ter (EVIC) in Section 4 under ªPERSONAL SETTINGS
(CUSTOMER PROGRAMMABLE FEATURES)º for more
information.
168 UNDERSTANDING THE FEATURES OF YOUR VEHICLE
Page 234 of 531
brakes. If the ABS light does not turn on when the
Ignition switch is turned to the ON position, have the
light inspected by an authorized dealer.
14. Electronic Stability Program (ESP) Indicator
Light/Traction Control System (TCS) Indicator Light
If this indicator light flashes during accelera-
tion, apply as little throttle as possible. While
driving, ease up on the accelerator. Adapt your
speed and driving to the prevailing road con-
ditions, and do not switch off the ESP, or TCS.
15. Tachometer
The red segments indicate the maximum permissible
engine revolutions per minute (RPM x 1000) for each gear
range. Before reaching the red area, ease up on the
accelerator.16. High Beam Light
This light shows that the headlights are on high
beam. Pull the turn signal lever towards the
steering wheel to switch the headlights from high or low
beam.
17. Front Fog Light Indicator Ð If Equipped
This light shows when the front fog lights are ON.
18. Seat Belt Reminder Light
When the ignition switch is first turned ON, this
light will turn on for five to eight seconds as a bulb
check. During the bulb check, if the driver's seat
belt is unbuckled, a chime will sound. After the bulb
check or when driving, if the driver's seat belt remains
unbuckled, the Seat Belt Reminder Light will illuminate
and the chime will sound. Refer to the Occupant Re-
straints section for more information.
232 UNDERSTANDING YOUR INSTRUMENT PANEL
Page 253 of 531
Sound Horn with Remote Key Lock
When ON is selected, a short horn sound will occur when
the remote keyless entry LOCK button is pressed. This
feature may be selected with or without the flash lights
on lock/unlock feature. To make your selection, press
and release the RESET button until ON or OFF appears.
Flash Lights with Remote Key Lock
When ON is selected, the front and rear turn signals will
flash when the doors are locked or unlocked with the
remote keyless entry transmitter. This feature may be
selected with or without the sound horn on lock feature
selected. To make your selection, press and release the
RESET button until ON or OFF appears.
Automatic High Beams Ð If Equipped
When this feature is selected, the high beam headlights
will deactivate automatically under certain conditions. To
make your selection, press and release the FUNCTIONSELECT button until YES (Y) or NO (N) appears. Refer to
ªLights/SmartBeams Ð If Equippedº in Section 3 of this
manual for more information.
Headlights On with Wipers (Available with Auto
Headlights Only)
When YES (Y) is selected, and the headlight switch is in
the AUTO position, the headlights will turn on approxi-
mately 10 seconds after the wipers are turned on. The
headlights will also turn off when the wipers are turned
off if they were turned on by this feature. To make your
selection, press and release the FUNCTION SELECT
button until YES (Y) or NO (N) appears.
NOTE:Turning the headlights on during the daytime
causes the instrument panel lights to dim. To increase the
brightness, refer to ªLightsº in Section 3 of this manual.
Delay Turning Headlights Off
When this feature is selected, the driver can choose to
have the headlights remain on for 0, 30, 60, or 90 seconds
UNDERSTANDING YOUR INSTRUMENT PANEL 251
4
Page 482 of 531
REPLACEMENT LIGHT BULBS
LIGHT BULBS Ð Interior Bulb Number
Center & Rear Dome Light.................. 578
Center & Rear Reading Lights............... 578
Front Door Courtesy Light.................. 578
Front Header Reading Lights Ð If Equipped..... 578
Instrument Cluster Lights.................PC74
Liftgate Light(s).......................... 578
Overhead Console Reading Lights..........PC579
Removable Console Light Ð If Equipped....... 194
Visor Vanity Lights....................6501966
NOTE:For lighted switches, see your dealer for replace-
ment.
All of the interior bulbs are glass wedge base or glass
cartridge types. Aluminum base bulbs are not approved
and should not be used for replacement.LIGHT BULBS Ð Exterior Bulb Number
Backup, Tail, Stop Light...................3157
Center High-Mounted Stop Light. . . LED (See Note 1)
Fog Light Ð If Equipped..................9145
Park/Turn Signal.............PY27 / 7W or 3757A
Front Side Marker...................... W5W
Headlight Ð (Low and High Beam Halogen).... H11
Headlight (HID Ð If Equipped).............. D1S
License................................ 168
Note 1: The Center High-Mounted Stop Light (CHMSL)
uses LED lights that are not serviceable separately. The
CHMSL must be replaced as an assembly, see your
authorized Dealer.
480 MAINTAINING YOUR VEHICLE