Page 106 of 494
NOTE:
•You may not hear all of the tones due to cellular phone
network configurations; this is normal.
•Some paging and voice mail systems have system time
out settings that are too short and may not allow the
use of this feature.
Barge In - Overriding Prompts
The “Voice Recognition” button can be used when you
wish to skip part of a prompt and issue your voice
recognition command immediately. For example, if a
prompt is asking�Would you like to pair a phone, clear
a�,�you could press the “Voice Recognition” button and
say,�Pair a Phone�to select that option without having to
listen to the rest of the voice prompt.
Turning Confirmation Prompts On/Off
Turning confirmation prompts off will stop the system
from confirming your choices (e.g., the UConnect�sys-
tem will not repeat a phone number before you dial it).
•Press the PHONE button to begin.
•After the�Ready�prompt and the following beep, say
�Setup Confirmations.�The UConnect�system will
play the current confirmation prompt status and you
will be given the choice to change it.
Phone and Network Status Indicators
If available on the radio and/or on a premium display
such as the instrument panel cluster, and supported by
your cell phone, the UConnect�system will provide
notification to inform you of your phone and network
status when you are attempting to make a phone call
using UConnect�. The status is given for roaming, net-
work signal strength, phone battery strength, etc.
Dialing Using the Cellular Phone Keypad
You can dial a phone number with your cellular phone
keypad and still use the UConnect�system (while dial-
ing via the cell phone keypad, the user must exercise
caution and take precautionary safety measures). By
104 UNDERSTANDING THE FEATURES OF YOUR VEHICLE
Page 136 of 494
Passing Light / Flash to Pass
You can signal another vehicle with your headlights by
lightly pulling the Multifunction Control Lever toward
you. This will cause the headlights to turn on at high
beam and remain on until the lever is released.
NOTE:If the Multifunction Control Lever is held in the
flash to pass position for more than 15 seconds, the high
beams will shut off. If this occurs, wait 30 seconds for the
next flash to pass operation.
Daytime Running Lights (DRL) — If Equipped
The high beam lights will come on as DRL at DRL
intensity (lower), whenever the ignition is on, the engine
is running, the headlight switch is off, the parking brake
is off, the turn signal is off, and the gear select lever is in
any position except PARK.NOTE:On this vehicle, the DRLwill automatically turn
off when the turn signal is in operation and automatically
turn back on when the turn signal is not operating.
Lights On Reminder
If the headlights or parking lights are on after the ignition
is turned OFF, a chime will sound to alert the driver
when the driver’s door is opened.
Fog Lights — If Equipped
The front fog light switch is on the Multifunction
Control Lever. To activate the front fog lights, turn
on the parking lights or the low beam headlights
and pull out the end of the control lever.
134 UNDERSTANDING THE FEATURES OF YOUR VEHICLE
Page 137 of 494
NOTE:The front fog lights will only operate with the
headlights on low beam. Selecting high beam headlights
will turn off the front fog lights.
Turn Signals
Move the Multifunction Control Lever up or down and
the arrows on each side of the instrument cluster flash to
show proper operation of the front and rear turn signal
lights. You can signal a lane change by moving the lever
partially up or down without moving beyond the detent.
Front Fog Light Control
Turn Signal Control
UNDERSTANDING THE FEATURES OF YOUR VEHICLE 135
3
Page 148 of 494
WARNING!
Vehicle exhaust contains carbon monoxide, a danger-
ous gas. Do not run your vehicle in the garage while
training the transceiver. Exhaust gas can cause seri-
ous injury or death.
Programming HomeLink�
Before You Begin
If you have not trained any of the HomeLink�buttons,
erase all channels before you begin training.
To do this, press and hold the two outside buttons for 20
seconds until the red indicator flashes.
It is recommended that a new battery be placed in the
hand-held transmitter of the device being programmed
to HomeLink�for more efficient training and accurate
transmission of the radio-frequency signal.Your vehicle should be parked outside of the garage
when programming.
1. Turn the ignition switch to the ON/RUN position.
2. Hold the battery side of the hand-held transmitter
away from the HomeLink�button you wish to program.
Place the hand-held transmitter 1–3 in (3-8 cm) away
from the HomeLink�button you wish to program while
keeping the indicator light in view.
3. Simultaneously press and hold both the chosen
HomeLink�button and the hand-held transmitter button
until the HomeLink�indicator changes from a slow to a
rapidly blinking light, then release both the HomeLink�
and hand-held transmitter buttons.
Watch for the HomeLink�indicator to change flash rates.
When it changes, it is programmed. It may take up to 30
seconds, or longer in rare cases. The garage door may
open and close while you train.
146 UNDERSTANDING THE FEATURES OF YOUR VEHICLE
Page 150 of 494
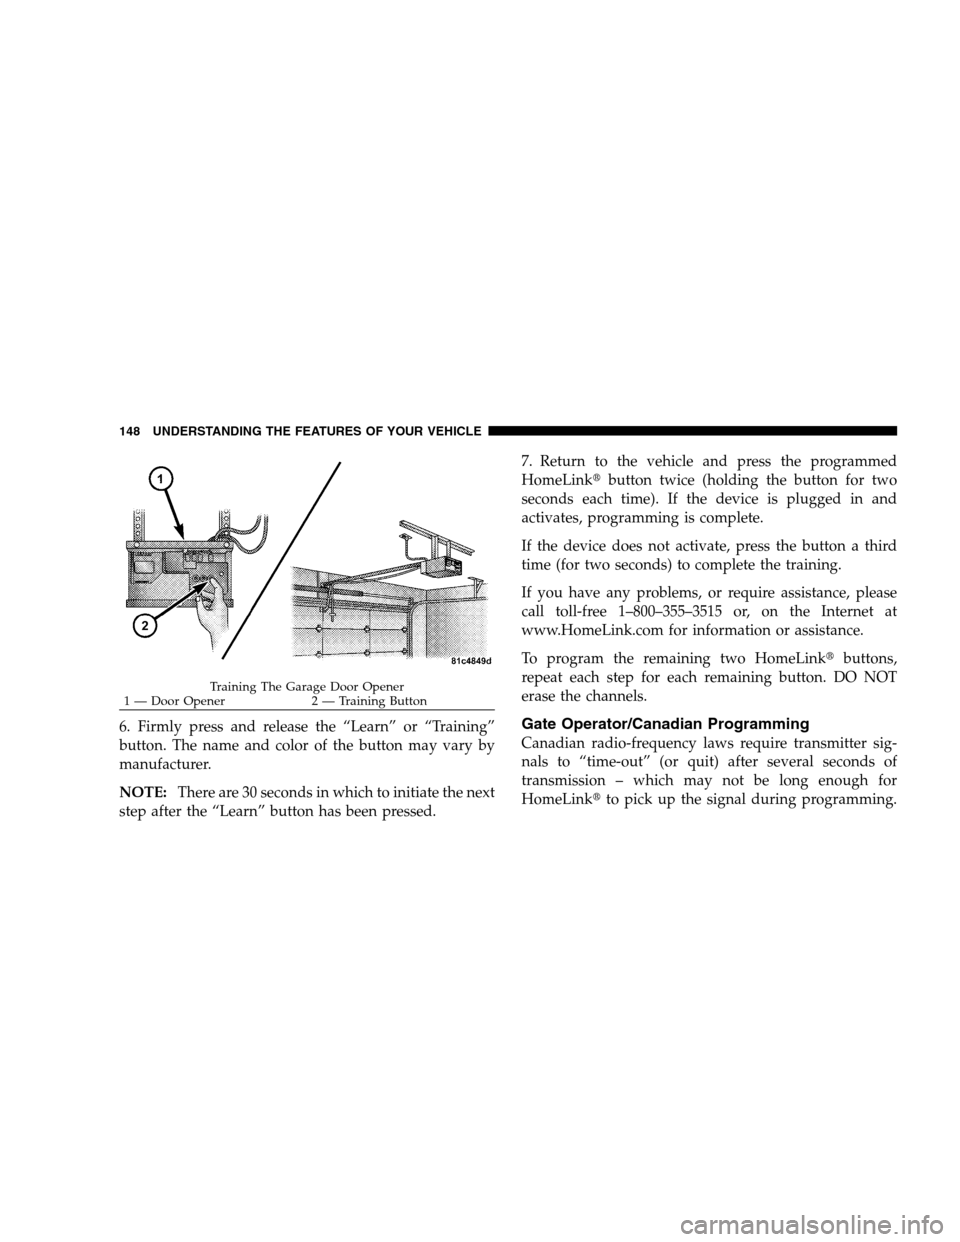
6. Firmly press and release the “Learn” or “Training”
button. The name and color of the button may vary by
manufacturer.
NOTE:There are 30 seconds in which to initiate the next
step after the “Learn” button has been pressed.7. Return to the vehicle and press the programmed
HomeLink�button twice (holding the button for two
seconds each time). If the device is plugged in and
activates, programming is complete.
If the device does not activate, press the button a third
time (for two seconds) to complete the training.
If you have any problems, or require assistance, please
call toll-free 1–800–355–3515 or, on the Internet at
www.HomeLink.com for information or assistance.
To program the remaining two HomeLink�buttons,
repeat each step for each remaining button. DO NOT
erase the channels.Gate Operator/Canadian Programming
Canadian radio-frequency laws require transmitter sig-
nals to “time-out” (or quit) after several seconds of
transmission – which may not be long enough for
HomeLink�to pick up the signal during programming.
Training The Garage Door Opener
1 — Door Opener 2 — Training Button 148 UNDERSTANDING THE FEATURES OF YOUR VEHICLE
Page 151 of 494
Similar to this Canadian law, some U.S. gate operators are
designed to “time-out” in the same manner.
It may be helpful to unplug the device during the cycling
process to prevent possible overheating of the garage
door or gate motor.
If you are having difficulties programming a garage door
opener or a gate operator, replace “Programming
HomeLink�” Step 3 with the following:
3. Continue to press and hold the HomeLink�button
while you press and release - every two seconds
(“cycle”) your hand-held transmitter until HomeLink�
has successfully accepted the frequency signal. The
indicator light will flash slowly and then rapidly when
fully trained.
If you unplugged the device for training, plug it back in
at this time.Then proceed with Step 4 under “Programming
HomeLink�” earlier in this section.
Using HomeLink�
To operate, simply press and release the programmed
HomeLink�button. Activation will now occur for the
trained device (i.e., garage door opener, gate operator,
Security system, entry door lock, home/office lighting,
etc. The hand-held transmitter of the device may also be
used at any time.
Reprogramming A Single HomeLink�Button
To re-program a channel that has been previously
trained, follow these steps:
1. Turn the ignition switch to the ON/RUN position.
2. Press and hold the desired HomeLink�button until
the indicator light begins to flash after 20 seconds.Do not
release the button.
UNDERSTANDING THE FEATURES OF YOUR VEHICLE 149
3
Page 181 of 494
the ON position. The light should illuminate for approxi-
mately two seconds. The light should then turn off unless
the parking brake is applied or a brake fault is detected.
If the light does not illuminate, have the light inspected
by an authorized dealer.
The light also will turn on when the parking brake is
applied with the ignition switch in the ON position.
NOTE:This light shows only that the parking brake is
applied. It does not show the degree of brake application.
20. Turn Signal Indicators
The arrows will flash in unison with the exterior
turn signal, when using the turn signal lever.
21. Front Fog Light Indicator — If Equipped
This light shows when the front fog lights are ON.22. Electronic Stability Program (ESP) Indicator Light
The yellow ESP/BAS malfunction indicator
light will turn on when the ignition switch is
turned to the ON position. The light should go
out with the engine running. If the light re-
mains on after several ignition cycles, and you have
driven the vehicle several miles/kilometers at speeds
greater than 30 mph (48 km/h), and the ESP is synchro-
nized (refer to Synchronizing ESP), see your authorized
dealer as soon as possible to have the problem diagnosed
and corrected.
23. Anti-Lock Warning Light (ABS)
This light monitors the ABS. This light will
come on when the ignition key is turned to the
ON position and may stay on for as long as
four seconds.
If the ABS light remains on or comes on during driving,
it indicates that the Anti-Lock portion of the brake system
UNDERSTANDING YOUR INSTRUMENT PANEL 179
4
Page 184 of 494

(Refer to “Tire Inflation Pressures” under “Tires — Gen-
eral Information” and to “Tire Pressure Monitor System
(TPMS)” in Section 5 of this manual for more informa-
tion).
25. Malfunction Indicator Light
This light is part of an onboard diagnostic system
called OBD that monitors emissions, engine, and
automatic transaxle control systems. The light
will illuminate when the key is in the ON/RUN position
before engine start. If the bulb does not come on when
turning the key from LOCK/OFF to ON/RUN, have the
condition checked promptly.
Certain conditions such as a loose or missing gas cap,
poor fuel quality, etc. may illuminate the light after
engine start. The vehicle should be serviced if the light
stays on through several of your typical driving cycles. In
most situations the vehicle will drive normally and will
not require towing.If the Malfunction Indicator Light flashes when the
engine is running, serious conditions may exist that
could lead to immediate loss of power or severe catalytic
converter damage. The vehicle should be serviced as
soon as possible if this occurs.
26. High Beam Indicator
This light shows that the headlights are on high
beam. Push the turn signal lever away from the
steering wheel to switch the headlights from high or low
beam.
27. Electronic Vehicle Information Center (EVIC)
Display—Premium Cluster Only
This display shows the EVIC messages when the appro-
priate conditions exist. Refer to “Electronic Vehicle Infor-
mation Center (EVIC)” in this section for more informa-
tion.
182 UNDERSTANDING YOUR INSTRUMENT PANEL