Page 374 of 494

▫A/C Air Filter — If Equipped............389
▫Power Steering — Fluid Check............391
▫Front Suspension Ball Joints..............391
▫Steering Linkage......................392
▫Body Lubrication.....................392
▫Windshield Wiper Blades................392
▫Windshield Washers...................393
▫Exhaust System......................393
▫Cooling System.......................394
▫Hoses And Vacuum/Vapor Harnesses.......400
▫Fuel System.........................400
▫Brake System........................400
▫Automatic Transaxle...................403▫Front And Rear Wheel Bearings...........406
▫Appearance Care And Protection From
Corrosion...........................406
▫Cleaning The Center Console Cup Holders . . . 411
�Fuses/Totally Integrated Power Module
(TIPM)..............................412
�Vehicle Storage........................417
�Replacement Bulbs......................417
�Bulb Replacement......................418
▫Headlight Bulb Replacement.............418
▫Head Light Assembly Removal —
Bulb Replacement.....................420
▫Front Turn Signal/Park Light.............422
▫FrontFogLight ......................422
372 MAINTAINING YOUR VEHICLE
Page 375 of 494
▫Tail/Stop Light, Rear Turn Signal Light,
Backup Light........................424
▫License Plate Light....................427
▫Center High-Mounted Stop Light (CHMSL) . . . 428�Fluids And Capacities...................429
�Fluids, Lubricants, And Genuine Parts........430
▫Engine.............................430
MAINTAINING YOUR VEHICLE 373
7
Page 379 of 494

ONBOARD DIAGNOSTIC SYSTEM — OBD II
Your vehicle is equipped with a sophisticated Onboard
Diagnostic system called OBD II. This system monitors
the performance of the emissions, engine, and automatic
transaxle control systems. When these systems are oper-
ating properly, your vehicle will provide excellent per-
formance and fuel economy, as well as engine emissions
well within current government regulations.
If any of these systems require service, the OBD II system
will turn on the Malfunction Indicator Light (MIL). It will
also store diagnostic codes and other information to
assist your service technician in making repairs. Al-
though your vehicle will usually be drivable and not
need towing, see your authorized dealer for service as
soon as possible.CAUTION!
•Prolonged driving with the MIL on could cause
further damage to the emission control system. It
could also affect fuel economy and drivability. The
vehicle must be serviced before any emissions
tests can be performed.
•If the MIL is flashing while the engine is running,
severe catalytic converter damage and power loss
will soon occur. Immediate service is required.
Loose Fuel Filler Cap Message
After fuel is added, the vehicle diagnostic system can
determine if the fuel filler cap is possibly loose or
improperly installed. A “gASCAP” message will be dis-
played in the instrument cluster. Tighten the gas cap until
a�clicking�sound is heard. This is an indication that the
gas cap is properly tightened. Press the Trip Odometer
MAINTAINING YOUR VEHICLE 377
7
Page 380 of 494

RESET button to turn off the message. If the problem
persists, the message will appear the next time the
vehicle is started. This might indicate a damaged cap. If
the problem is detected twice in a row, the system will
turn on the MIL. Resolving the problem will turn the MIL
light off.
EMISSIONS INSPECTION AND MAINTENANCE
PROGRAMS
In some localities, it may be a legal requirement to pass
an inspection of your vehicle’s emissions control system.
Failure to pass could prevent vehicle registration.
For states that require an Inspection and Mainte-
nance (I/M), this check verifies the Malfunction
Indicator Light (MIL) is functioning and is not on
when the engine is running, and that the OBD II system
is ready for testing.Normally, the OBD II system will be ready. The OBD II
system maynotbe ready if your vehicle was recently
serviced, recently had a dead battery, or a battery replace-
ment. If the OBD II system should be determined not
ready for the I/M test, your vehicle may fail the test.
Your vehicle has a simple ignition key-actuated test,
which you can use prior to going to the test station. To
check if your vehicle’s OBD II system is ready, you must
do the following:
1. Insert your ignition key into the ignition switch.
2. Turn the ignition to the ON position, but do not crank
or start the engine.
3. If you crank or start the engine, you will have to start
this test over.
4. As soon as you turn your key to the ON position, you
will see the MIL symbol come on as part of a normal bulb
check.
378 MAINTAINING YOUR VEHICLE
Page 392 of 494

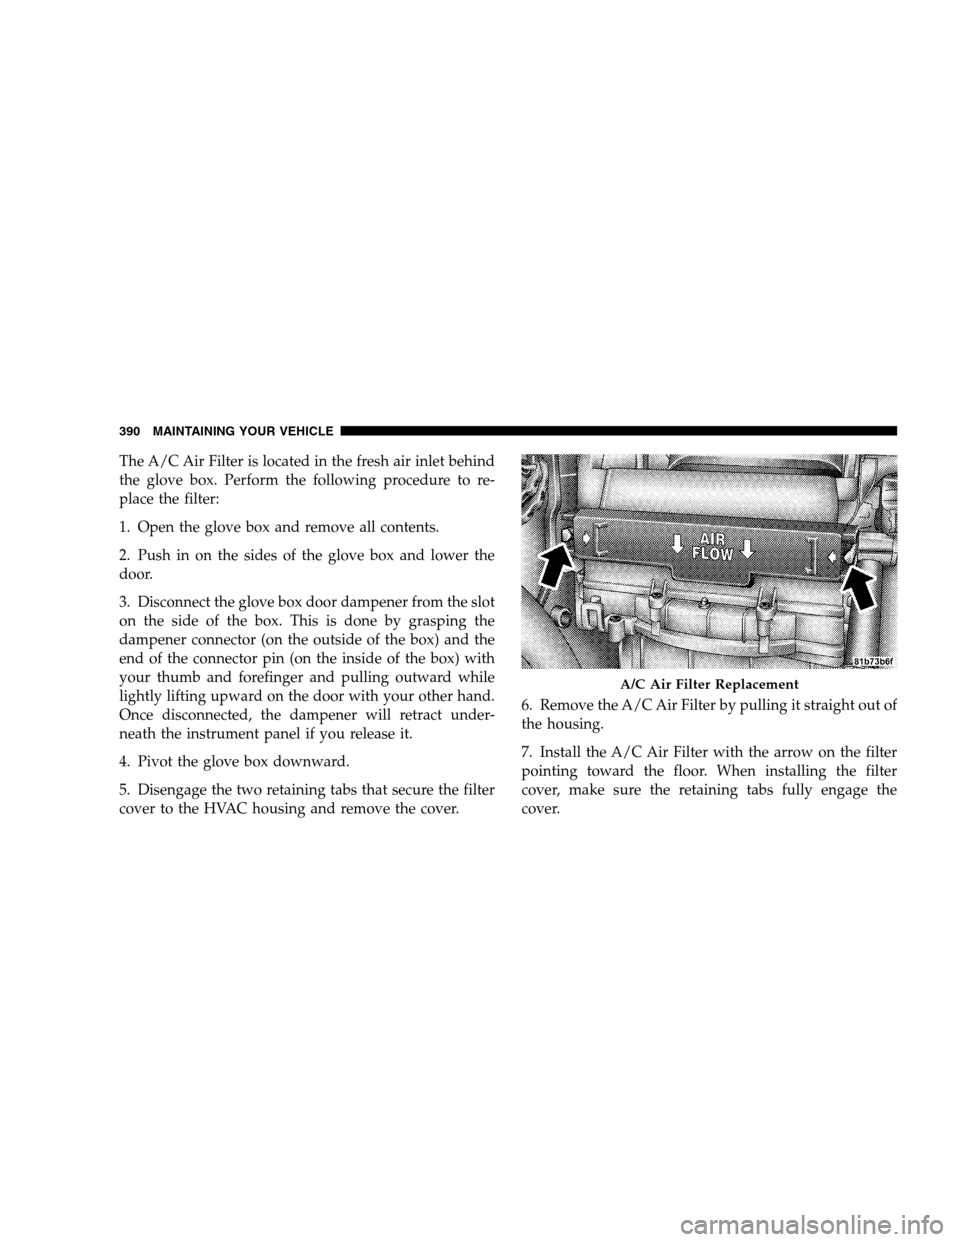
The A/C Air Filter is located in the fresh air inlet behind
the glove box. Perform the following procedure to re-
place the filter:
1. Open the glove box and remove all contents.
2. Push in on the sides of the glove box and lower the
door.
3. Disconnect the glove box door dampener from the slot
on the side of the box. This is done by grasping the
dampener connector (on the outside of the box) and the
end of the connector pin (on the inside of the box) with
your thumb and forefinger and pulling outward while
lightly lifting upward on the door with your other hand.
Once disconnected, the dampener will retract under-
neath the instrument panel if you release it.
4. Pivot the glove box downward.
5. Disengage the two retaining tabs that secure the filter
cover to the HVAC housing and remove the cover.6. Remove the A/C Air Filter by pulling it straight out of
the housing.
7. Install the A/C Air Filter with the arrow on the filter
pointing toward the floor. When installing the filter
cover, make sure the retaining tabs fully engage the
cover.
A/C Air Filter Replacement
390 MAINTAINING YOUR VEHICLE
Page 404 of 494

WARNING!
Worn brake hoses can burst and cause brake failure.
You could have an accident. If you see any signs of
cracking, scuffing, or worn spots, have the brake
hoses replaced immediately.
Master Cylinder - Brake Fluid Level Check
Check the fluid level in the master cylinder immediately
if the brake system warning light indicates system fail-
ure.
Check the fluid level in the master cylinder when per-
forming underhood services.Clean the top of the master cylinder area before removing
the cap. If necessary, add fluid to bring the fluid level up
to the requirements described on the brake fluid reser-
voir.
Overfilling of fluid is not recommended because it may
cause leaking in the system.
Fluid level can be expected to fall as the brake pads wear.
Brake fluid level should be checked when pads are
replaced. However, low fluid level may be caused by a
leak and a checkup may be needed.
Use only manufacturers recommended brake fluid. Refer
to “Fluids, Lubricants, and Genuine Parts” for the correct
fluid type.
402 MAINTAINING YOUR VEHICLE
Page 412 of 494

•For grease stains, apply Mopar�Multi-Purpose
Cleaner to a clean, damp cloth and remove stain. Use
a fresh, damp towel to remove soap residue.
•Do not use any solvents or protectants on Yes Essen-
tials�products.
Cleaning Headlights
Your vehicle has plastic headlights that are lighter and
less susceptible to stone breakage than glass headlights.
Plastic is not as scratch resistant as glass and therefore
different lens cleaning procedures must be followed.
To minimize the possibility of scratching the lenses and
reducing light output, avoid wiping with a dry cloth. To
remove road dirt, wash with a mild soap solution fol-
lowed by rinsing.
Do not use abrasive cleaning components, solvents, steel
wool or other aggressive material to clean the lenses.
Glass Surfaces
All glass surfaces should be cleaned on a regular basis
with Mopar�Glass Cleaner or any commercial
household-type glass cleaner. Never use an abrasive type
cleaner. Use caution when cleaning the inside rear win-
dow equipped with electric defrosters or the right rear
quarter window equipped with the radio antenna. Do
not use scrapers or other sharp instruments, which may
scratch the elements.
When cleaning the rear view mirror, spray cleaner on the
towel or rag that you are using. Do not spray cleaner
directly on the mirror.
Cleaning Plastic Instrument Cluster Lenses
The lenses in front of the instruments in this vehicle are
molded in clear plastic. When cleaning the lenses, care
must be taken to avoid scratching the plastic.
410 MAINTAINING YOUR VEHICLE
Page 415 of 494
CavityCartridge
FuseMini Fuse Description
3—10 Amp
RedBattery Feed — Center
High Mounted Stop
Light (CHMSL)/Brake
Switch
4—10 Amp
RedBattery Feed — Igni-
tion Switch
5—20 Amp
YellowTrailer Tow — If
Equipped
6—10 Amp
RedIgnition Off Draw
(IOD) — Power Mirror
Switch/Climate Con-
trols
7—30 Amp
GreenIgnition Off Draw
(IOD) Sense 1
8—30 Amp
GreenIgnition Off Draw
(IOD) Sense 2CavityCartridge
FuseMini Fuse Description
940 Amp
GreenBattery Feed — Power
Seats - if equipped/
PZEV Air Pump - if
equipped
10 —20 Amp
YellowBattery Feed — Cabin
Compartment Node
(CCN)
11 —15 Amp
Lt BlueSelectable Power Out-
let
12 —20 Amp
Yellow—
13 —20 Amp
Yellow—
MAINTAINING YOUR VEHICLE 413
7