2008 CHEVROLET UPLANDER manual radio set
[x] Cancel search: manual radio setPage 248 of 476

Setting Preset Stations
Up to 30 stations (six FM1, six FM2, and six AM,
six XM1 and six XM2 (if equipped)), can be programmed
on the six numbered pushbuttons, by performing the
following steps:
1. Turn the radio on.
2. Press BAND to select FM1, FM2, AM, or XM1 or
XM2 (if equipped).
3. Tune in the desired station.
4. Press AUTO EQ to select the equalization.
5. Press and hold one of the six numbered
pushbuttons until a beep sounds. When that
numbered pushbutton is pressed, the station that
was set, returns and the equalization that was
selected is stored for that pushbutton.
6. Repeat the steps for each pushbutton.
Setting the Tone (Bass/Treble)
O
/e(Bass/Treble):Press to select BASS or
TREBLE. Turn to increase or to decrease. If a station is
weak or has static, decrease the treble.
To adjust the bass and treble to the middle position,
press and hold when the tone control is on the display.
The level changes to the middle position.
To adjust all tone and speaker controls to the middle
position, press and hold when no tone or speaker control
displays. AUDIO SETTINGS CENTERED displays.
AUTO EQ (Automatic Equalization):Press to select
customized equalization settings designed for country,
custom, classical, pop, rock, jazz, and talk. Selecting
CUSTOM or changing bass or treble, returns the EQ to
the manual bass and treble settings.
The radio saves separate AUTO EQ settings for each
preset and source.
3-88
Page 254 of 476

To eject multiple CDs, do the following:
1. Press and hold eject for two seconds. A beep
sounds and EJECT ALL DISCS displays.
2. When REMOVE DISC displays, the CD ejects and
can be removed.
To stop ejecting the CDs, press the load or the
eject button.
If the CD is not removed, after 25 seconds, the CD
automatically pulls it back into the player. If CD
is pushed back into the player, before 25 seconds,
the player senses an error and tries to eject the
CD several times before stopping.
Do not repeatedly press the
Xbutton to eject a CD
after pushing it in manually because the eject timer
resets to 25 seconds after each press of the button.
The CD will eject only after an uninterrupted 25 seconds
occurs.
O/e(Tune):Turn to go to the next or previous
track.
{(Fast Reverse):Press and hold to reverse within
the current track.
|(Fast Forward):Press and hold to fast forward
through the current track.
RDM (Random):Press to hear the tracks in random,
rather than sequential order, on one CD or all of
the loaded CDs.To use random, do one of the following:
Press and release this button until RANDOM DISC
PLAY displays, to play the tracks on a CD in
random order.
Press and release this button until RANDOM ALL
DISCS displays, to play the tracks on all of the
CDs that are loaded in random order.
To turn off random play, press and release the RDM
button until RANDOM OFF displays.
RPT (Repeat):Press to hear a track or depending on
your radio, an entire CD.
To use repeat, do one of the following:
Press and release until REPEAT displays, to repeat
a track.
Press and release, depending on the radio,
until REPEAT ONE DISC displays, to repeat
an entire CD.
To turn off repeated play, press and release until
REPEAT OFF displays.
tSEEKu:Press the left arrow to go to the start of
the current track, if more than eight seconds have played.
Press the right arrow to go to the next track. If either
arrow is held or pressed more than once, the player
continues moving backward or forward through the CD.
3-94
Page 262 of 476

Navigation/Radio System
Your vehicle may have a navigation radio system.
The navigation system has built-in features intended
to minimize driver distraction. Technology alone,
no matter how advanced, can never replace your
own judgment. See the Navigation System manual for
some tips to help you reduce distractions while driving.
Rear Seat Entertainment (RSE)
System
Vehicles with a Rear Seat Entertainment (RSE) system
have a DVD player, a video display screen, auxiliary
inputs, two sets of wireless headphones, and a remote
control.
Parental Control
rj
(Parental Control):This button is located behind
the video screen, next to the auxiliary jacks. Press this
button while using rear seat audio (RSA) to make the
video screen go blank and to mute the audio while a DVD
or CD is playing. The power indicator lights on the DVD
player �ash. Turning on the parental control also disables
all other button operations from the remote control andthe DVD player, except for the eject button. Press this
button again to restore operation of the RSA, DVD player,
and remote control.
This button can also be used to turn the DVD player
power on and to automatically resume play of a disc that
is in the player while the ignition is on. If no disc is in the
player, the system powers up with no display on the LCD
screen.
Before You Drive
The RSE is designed for rear seat passengers only.
The driver cannot safely view the video screen
while driving and should not try to do so.
Normal operation could be limited under extremely low
or high temperatures, in order to protect the system
from damage. Operate the RSE system under normal
or comfortable cabin temperature ranges.
Headphones
Notice:Do not store the headphones in heat or
direct sunlight. This could damage the headphones
and repairs will not be covered by your warranty.
Storage in extreme cold can weaken the batteries.
Keep the headphones stored in a cool, dry place.
3-102
Page 279 of 476

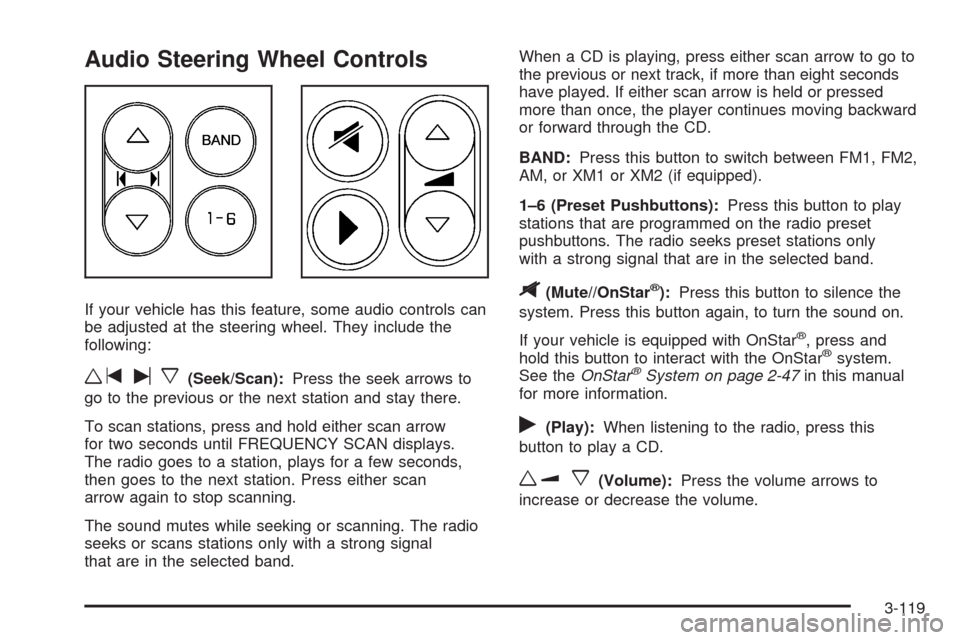
Audio Steering Wheel Controls
If your vehicle has this feature, some audio controls can
be adjusted at the steering wheel. They include the
following:
wtux(Seek/Scan):Press the seek arrows to
go to the previous or the next station and stay there.
To scan stations, press and hold either scan arrow
for two seconds until FREQUENCY SCAN displays.
The radio goes to a station, plays for a few seconds,
then goes to the next station. Press either scan
arrow again to stop scanning.
The sound mutes while seeking or scanning. The radio
seeks or scans stations only with a strong signal
that are in the selected band.When a CD is playing, press either scan arrow to go to
the previous or next track, if more than eight seconds
have played. If either scan arrow is held or pressed
more than once, the player continues moving backward
or forward through the CD.
BAND:Press this button to switch between FM1, FM2,
AM, or XM1 or XM2 (if equipped).
1–6 (Preset Pushbuttons):Press this button to play
stations that are programmed on the radio preset
pushbuttons. The radio seeks preset stations only
with a strong signal that are in the selected band.
$(Mute//OnStar®):Press this button to silence the
system. Press this button again, to turn the sound on.
If your vehicle is equipped with OnStar
®, press and
hold this button to interact with the OnStar®system.
See theOnStar®System on page 2-47in this manual
for more information.
r(Play):When listening to the radio, press this
button to play a CD.
wux(Volume):Press the volume arrows to
increase or decrease the volume.
3-119
Page 464 of 476

Audio System (cont.)
Navigation/Radio System, see Navigation
Manual.................................................3-102
Radio Reception........................................3-120
Rear Seat Audio (RSA)...............................3-117
Setting the Time..........................................3-85
Theft-Deterrent Feature...............................3-118
XM™ Satellite Radio Antenna System...........3-121
Audio System(s).............................................3-86
Automatic Door Lock.......................................2-12
Automatic Transmission
Fluid..........................................................5-20
Operation...................................................2-35
B
Battery..........................................................5-36
Electric Power Management..........................3-20
Run-Down Protection...................................3-21
Brake
Emergencies................................................ 4-6
Brakes..........................................................5-33
System Warning Light..................................3-41
Braking........................................................... 4-4
Braking in Emergencies..................................... 4-6
Break-In, New Vehicle.....................................2-31
Bucket Seats, Rear........................................... 1-6
Built-in Child Restraint.....................................1-68Bulb Replacement...........................................5-42
Front Turn Signal, Parking and Daytime
Running Lamps........................................5-44
Halogen Bulbs............................................5-42
Headlamp Aiming........................................5-41
License Plate Lamps....................................5-46
Replacement Bulbs......................................5-46
Taillamps, Turn Signal, Stoplamps and
Back-up Lamps........................................5-44
Buying New Tires...........................................5-65
C
Calibration.....................................................3-56
California Fuel.................................................. 5-5
California Perchlorate Materials Requirements....... 5-4
California Proposition 65 Warning....................... 5-3
Canadian Owners................................................ ii
Capacities and Speci�cations..........................5-105
Captain Chairs, Rear.......................................1-14
Carbon Monoxide...........................2-41, 4-17, 4-28
Care of
Safety Belts and Built-in Child Restraint
Harness..................................................5-93
Cargo Lamp...................................................3-19
CD, MP3 .......................................................3-98
Chains, Tire...................................................5-70
Charging System Light....................................3-40
2
Page 472 of 476

R
Radiator Pressure Cap....................................5-24
Radio Frequency Identi�cation (RFID), Privacy....7-17
Radios..........................................................3-84
Radio(s)........................................................3-86
Radios
Navigation/Radio System, see Navigation
Manual.................................................3-102
Rear Seat Audio........................................3-117
Reception.................................................3-120
Setting the Time..........................................3-85
Theft-Deterrent..........................................3-118
Rear Climate Control System............................3-30
Rear Reading Lamps......................................3-19
Rear Seat Audio (RSA)..................................3-117
Rear Seat Entertainment System.....................3-102
Rear Seat Operation......................................... 1-6
Rear Windshield Washer/Wiper.........................3-10
Rearview Mirrors.............................................2-43
Reclining Seatbacks.......................................... 1-4
Recommended Fluids and Lubricants.................6-11
Recreational Vehicle Towing.............................4-27
Remote Keyless Entry (RKE) System.................. 2-4
Remote Keyless Entry (RKE) System, Operation . . . 2-5
Remote Vehicle Start........................................ 2-8
Removing the Flat Tire and Installing the
Spare Tire..................................................5-76Removing the Spare Tire and Tools...................5-74
Replacement Bulbs.........................................5-46
Reporting Safety Defects
Canadian Government..................................7-14
General Motors...........................................7-14
United States Government............................7-14
Restraint System Check
Checking the Restraint Systems....................1-91
Replacing Restraint System Parts After
a Crash..................................................1-92
Retained Accessory Power (RAP)......................2-32
Roadside
Assistance Program....................................... 7-6
Rocking Your Vehicle to Get it Out....................4-21
Routing, Engine Drive Belt...............................6-14
Running the Engine While Parked.....................2-42
S
Safety Belt
Reminder Light............................................3-36
Safety Belts
Care of Safety Belts and Built-in Child
Restraint Harness.....................................5-93
How to Wear Safety Belts Properly................1-28
Lap-Shoulder Belt........................................1-36
Safety Belt Extender....................................1-42
10