Page 397 of 476
Store the wheel cover securely in the rear of the
vehicle until you have the �at tire repaired or replaced.
Once the wheel cover has been removed, use the
following procedure to remove the �at tire and install
the spare tire.
1. Do a safety check is done before proceeding.
SeeChanging a Flat Tire on page 5-73for more
information.2. Loosen the wheel nuts
using the folding
wrench, but do not
remove them.
Turn the handle counterclockwise about
180 degrees, then �ip the handle back to the
starting position. This avoids taking the wrench off
the lug nut for each turn.
5-77
Page 398 of 476

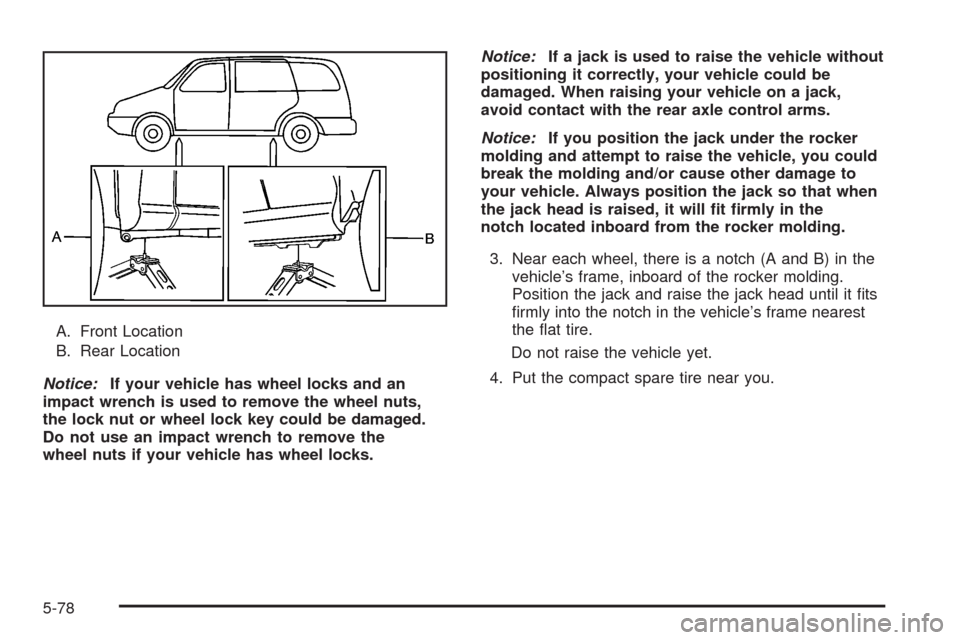
A. Front Location
B. Rear Location
Notice:If your vehicle has wheel locks and an
impact wrench is used to remove the wheel nuts,
the lock nut or wheel lock key could be damaged.
Do not use an impact wrench to remove the
wheel nuts if your vehicle has wheel locks.Notice:If a jack is used to raise the vehicle without
positioning it correctly, your vehicle could be
damaged. When raising your vehicle on a jack,
avoid contact with the rear axle control arms.
Notice:If you position the jack under the rocker
molding and attempt to raise the vehicle, you could
break the molding and/or cause other damage to
your vehicle. Always position the jack so that when
the jack head is raised, it will �t �rmly in the
notch located inboard from the rocker molding.
3. Near each wheel, there is a notch (A and B) in the
vehicle’s frame, inboard of the rocker molding.
Position the jack and raise the jack head until it �ts
�rmly into the notch in the vehicle’s frame nearest
the �at tire.
Do not raise the vehicle yet.
4. Put the compact spare tire near you.
5-78
Page 400 of 476
6. Raise the vehicle by turning the folding wrench
clockwise in the jack. Raise the vehicle far enough
off the ground so there is enough room for the
compact spare tire to �t under the wheel well.
7. Remove all the wheel nuts and take off the �at tire.
{CAUTION:
Rust or dirt on a wheel, or on the parts to
which it is fastened, can make wheel nuts
become loose after time. The wheel could
come off and cause an accident. When you
change a wheel, remove any rust or dirt from
places where the wheel attaches to the vehicle.
In an emergency, you can use a cloth or a
paper towel to do this; but be sure to use a
scraper or wire brush later, if needed, to get all
the rust or dirt off. SeeChanging a Flat Tire
on page 5-73.
5-80
Page 401 of 476
{CAUTION:
Never use oil or grease on studs or nuts.
Because the nuts might come loose. The
vehicle’s wheel could fall off, causing a crash.
8. Remove any rust or dirt
from the wheel bolts,
mounting surfaces
and spare wheel.9. Install the compact
spare tire and put the
wheel nuts back
on with the rounded
end of the nuts toward
the wheel.
Tighten each nut by hand until the wheel is held
against the hub.
5-81
Page 403 of 476

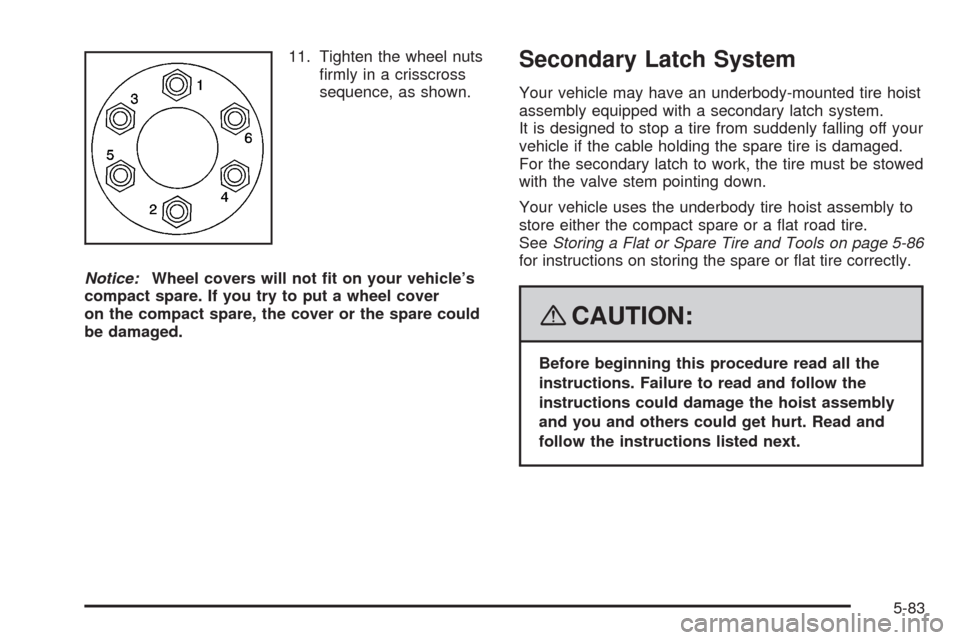
11. Tighten the wheel nuts
�rmly in a crisscross
sequence, as shown.
Notice:Wheel covers will not �t on your vehicle’s
compact spare. If you try to put a wheel cover
on the compact spare, the cover or the spare could
be damaged.Secondary Latch System
Your vehicle may have an underbody-mounted tire hoist
assembly equipped with a secondary latch system.
It is designed to stop a tire from suddenly falling off your
vehicle if the cable holding the spare tire is damaged.
For the secondary latch to work, the tire must be stowed
with the valve stem pointing down.
Your vehicle uses the underbody tire hoist assembly to
store either the compact spare or a �at road tire.
SeeStoring a Flat or Spare Tire and Tools on page 5-86
for instructions on storing the spare or �at tire correctly.
{CAUTION:
Before beginning this procedure read all the
instructions. Failure to read and follow the
instructions could damage the hoist assembly
and you and others could get hurt. Read and
follow the instructions listed next.
5-83
Page 405 of 476
2. Turn the folding wrench clockwise to raise the jack
until it lifts the secondary latch device under the
wheel plate.
3. Keep raising the jack until the compact spare tire
stops moving upward and is held �rmly in place.
This lets you know that the secondary latch
has released.
4. Lower the jack by turning the folding wrench
counterclockwise. Keep lowering the jack until
the compact spare tire is resting on the folding
wrench.
5. Grasp the compact spare tire with both hands and
pull it out from under the vehicle.
6. Reach under the vehicle and remove the folding
wrench and jack.
Have the hoist assembly inspected as soon as you can.
You will not be able to store a spare or �at tire using
the hoist assembly until it has been repaired or replaced.
5-85
Page 407 of 476

To store the spare tire:
1. Lay the tire near the rear of the vehicle with the
valve stem down.
2. Remove the small center cap by tapping the back
of the cap with the extension of the shaft, if the
vehicle has aluminum wheels.
3. Slide the cable retainer through the center of the
wheel and start to raise the tire.
Make sure the retainer is fully seated across the
underside of the wheel.
4. When the tire is almost in the stored position, turn
the tire so the valve is towards the rear of the
vehicle.
This will help when you check and maintain tire
pressure in the spare.
5. Raise the tire fully against the underside of the
vehicle. Continue turning the folding wrench until
you feel more than two clicks. This indicates that the
compact spare tire is secure and the cable is
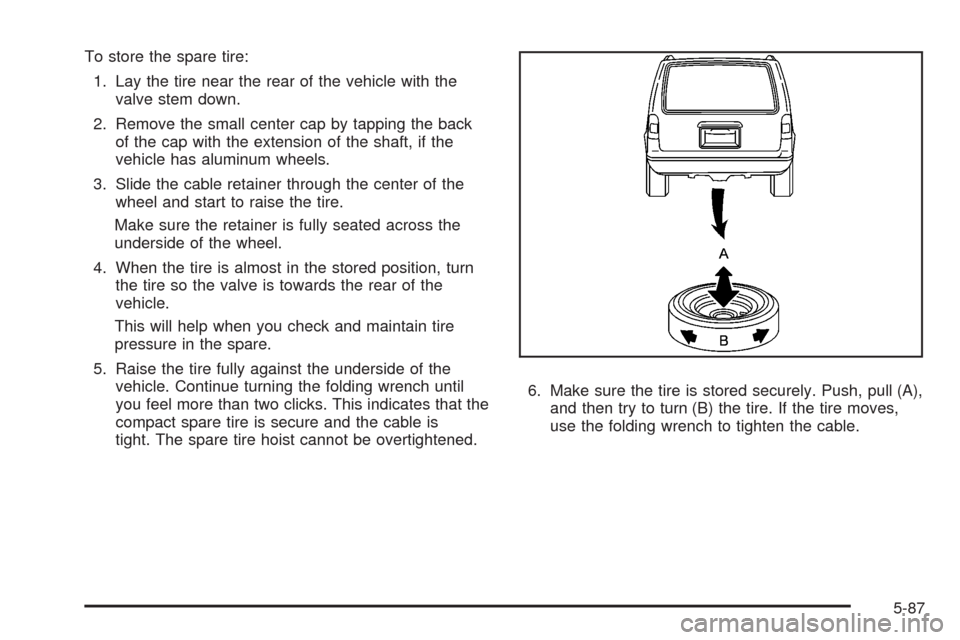
tight. The spare tire hoist cannot be overtightened.6. Make sure the tire is stored securely. Push, pull (A),
and then try to turn (B) the tire. If the tire moves,
use the folding wrench to tighten the cable.
5-87
Page 408 of 476
Storing the Tools
A. Strap
B. Bag and Tools
C. JackPut back all tools as they were stored in the jack
storage compartment and put the compartment cover
back on.
To replace the cover, line up the tabs on the right of the
cover with the slots in the cover opening. Push the
cover in place and push down the tab so that it rests in
the groove. This secures the cover in place.
Store the center cap or the plastic bolt-on wheel covers
until a full size tire is put back on the vehicle.
When you replace the compact spare with a full-size
tire, reinstall the bolt-on wheel covers or the center cap.
Hand-tighten them over the wheel nuts, using the
folding wrench.
5-88