2008 CHEVROLET TRAIL BLAZER steering wheel
[x] Cancel search: steering wheelPage 183 of 472
Select Button
r
(Select):Press the select button to reset certain
DIC functions, turn off or acknowledge messages on
the DIC display, and set your customization settings.
For example, this button will allow you to reset the trip
odometers, turn off the FUEL LEVEL LOW message,
and enables you to scroll through and select the
language in which the DIC information will appear.
DIC Warnings and Messages
Messages are displayed on the DIC to notify the driver
that the status of the vehicle has changed and that
some action may be needed to correct the condition.
Multiple messages may appear one after another.
Some messages may not require immediate action.
Press any of the DIC buttons on the steering wheel or
the trip odometer reset stem on the instrument panel
cluster to acknowledge that you received the messages
and to clear them from the display.
Some messages cannot be cleared from the display
because they are more urgent. These messages require
action before they can be removed from the DIC display.Take any messages that appear on the display seriously
and remember that clearing the messages will only make
the messages disappear, not correct the problem.
The following are the possible messages that can be
displayed and some information about them.
CHANGE ENGINE OIL
This message displays when the engine oil needs to be
changed and service is required for your vehicle. See
Scheduled Maintenance on page 6-4andEngine Oil on
page 5-17for more information. Also seeEngine Oil
Life System on page 5-22for information on how
to reset the message. This message clears itself
after 10 seconds until the next ignition cycle.
CHECK TIRE PRESSURE
This message displays when the pressure in one or
more of the vehicle’s tires needs to be checked. If a tire
pressure message appears on the DIC, stop as soon
as you can. Have the tire pressures checked and set to
those shown on the Tire Loading Information label.
SeeTires on page 5-58,Loading Your Vehicle on
page 4-35, andInflation - Tire Pressure on page 5-65.
The DIC also shows the tire pressure values. See
DIC Operation and Displays on page 3-50. If the tire
pressure is low, the low tire pressure warning light
comes on. SeeTire Pressure Light on page 3-41.
3-53
Page 195 of 472
While your vehicle is parked:
Familiarize yourself with all of its controls.
Familiarize yourself with its operation.
Set up your audio system by presetting your
favorite radio stations, setting the tone, and
adjusting the speakers. Then, when driving
conditions permit, you can tune to your favorite
radio stations using the presets and steering wheel
controls if the vehicle has them.
Notice:Before adding any sound equipment to
your vehicle, such as an audio system, CD player,
CB radio, mobile telephone, or two-way radio, make
sure that it can be added by checking with your
dealer/retailer. Also, check federal rules covering
mobile radio and telephone units. If sound
equipment can be added, it is very important to do
it properly. Added sound equipment may interfere
with the operation of your vehicle’s engine, radio,
or other systems, and even damage them.
Your vehicle’s systems may interfere with the
operation of sound equipment that has been added.Notice:The chime signals related to safety belts,
parking brake, and other functions of your vehicle
operate through the radio/entertainment system.
If that equipment is replaced or additional equipment
is added to your vehicle, the chimes may not
work. Make sure that replacement or additional
equipment is compatible with your vehicle before
installing it. SeeAccessories and Modifications
on page 5-3.
Your vehicle may have a feature called Retained
Accessory Power (RAP). With RAP, the audio system
can be played even after the ignition is turned off.
SeeRetained Accessory Power (RAP) on page 2-21
for more information.
3-65
Page 235 of 472
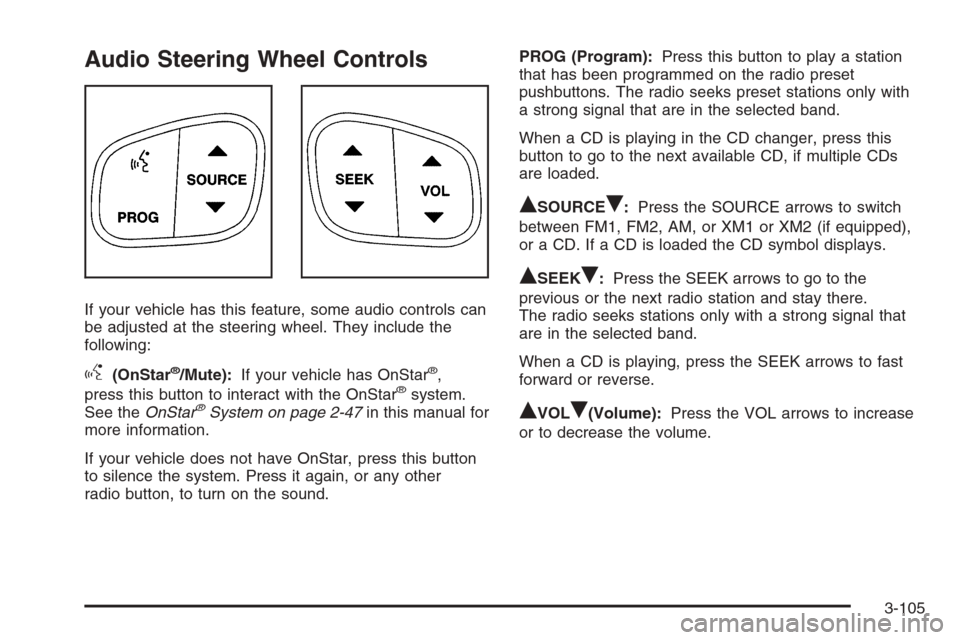
Audio Steering Wheel Controls
If your vehicle has this feature, some audio controls can
be adjusted at the steering wheel. They include the
following:
g(OnStar®/Mute):If your vehicle has OnStar®,
press this button to interact with the OnStar®system.
See theOnStar®System on page 2-47in this manual for
more information.
If your vehicle does not have OnStar, press this button
to silence the system. Press it again, or any other
radio button, to turn on the sound.PROG (Program):Press this button to play a station
that has been programmed on the radio preset
pushbuttons. The radio seeks preset stations only with
a strong signal that are in the selected band.
When a CD is playing in the CD changer, press this
button to go to the next available CD, if multiple CDs
are loaded.
QSOURCER:Press the SOURCE arrows to switch
between FM1, FM2, AM, or XM1 or XM2 (if equipped),
or a CD. If a CD is loaded the CD symbol displays.
QSEEKR:Press the SEEK arrows to go to the
previous or the next radio station and stay there.
The radio seeks stations only with a strong signal that
are in the selected band.
When a CD is playing, press the SEEK arrows to fast
forward or reverse.
QVOLR(Volume):Press the VOL arrows to increase
or to decrease the volume.
3-105
Page 239 of 472
Your Driving, the Road, and Your Vehicle..........4-2
Defensive Driving...........................................4-2
Drunk Driving.................................................4-2
Control of a Vehicle........................................4-3
Braking.........................................................4-3
Antilock Brake System (ABS)...........................4-4
Braking in Emergencies...................................4-5
Locking Rear Axle..........................................4-5
StabiliTrak
®System........................................4-5
All-Wheel Drive (AWD) System
(TrailBlazer SS).........................................4-10
Steering......................................................4-10
Off-Road Recovery.......................................4-12
Passing.......................................................4-12
Loss of Control.............................................4-12
Competitive Driving.......................................4-13
Off-Road Driving (Except SS).........................4-14
Driving at Night............................................4-26Driving in Rain and on Wet Roads..................4-26
Before Leaving on a Long Trip.......................4-27
Highway Hypnosis........................................4-28
Hill and Mountain Roads................................4-28
Winter Driving..............................................4-29
If Your Vehicle is Stuck in Sand, Mud, Ice,
or Snow...................................................4-33
Rocking Your Vehicle to Get It Out.................4-34
Recovery Hooks...........................................4-34
Loading Your Vehicle....................................4-35
Adding a Snow Plow or Similar Equipment.......4-41
Towing..........................................................4-41
Towing Your Vehicle.....................................4-41
Recreational Vehicle Towing...........................4-42
Electronically Controlled Air Suspension
System....................................................4-47
Towing a Trailer...........................................4-48
Section 4 Driving Your Vehicle
4-1
Page 243 of 472
As you brake, the computer keeps receiving updates on
wheel speed and controls braking pressure accordingly.
Remember: ABS does not change the time you need
to get your foot up to the brake pedal or always
decrease stopping distance. If you get too close to the
vehicle in front of you, you will not have time to
apply the brakes if that vehicle suddenly slows or stops.
Always leave enough room up ahead to stop, even
though you have ABS.
Using ABS
Do not pump the brakes. Just hold the brake pedal down
�rmly and let antilock work for you. You might feel the
brakes vibrate or notice some noise, but this is normal.
Braking in Emergencies
With ABS, you can steer and brake at the same time. In
many emergencies, steering can help you more than
even the very best braking.
Locking Rear Axle
If your vehicle has this feature, your locking rear axle
can give you additional traction on snow, mud, ice, sand
or gravel. It works like a standard axle most of the
time, but when one of the rear wheels has no traction
and the other does, this feature will allow the wheel with
traction to move the vehicle.
StabiliTrak®System
Your vehicle is equipped with StabiliTrak®, Electronic
Stability Control (ESC) which combines antilock
brake, traction and stability control systems and helps
the driver maintain directional control of the vehicle
in most driving conditions.
Traction control activates when the controller senses
wheel spin. StabiliTrak
®will selectively apply the brakes
and reduce engine torque to help regain traction.
Stability control activates when the controller senses a
discrepancy between your intended path and the
direction the vehicle is travelling. StabiliTrak
®selectively
applies braking pressure at any one of the vehicle’s
brakes to help guide the vehicle in the direction which
you are steering.
When you �rst start your vehicle and begin to drive
away, the system performs several diagnostic checks to
insure there are no problems. You may hear or feel
the system working. This is normal and does not mean
there is a problem with your vehicle. If driving
conditions delay system initialization, the STABILITRAK
NOT READY message may be displayed. If this is
the case, your vehicle does not need servicing.
For more information on the stability messages, see
DIC Warnings and Messages on page 3-53.
4-5
Page 248 of 472
All-Wheel Drive (AWD) System
(TrailBlazer SS)
If your vehicle has this feature, engine power is sent to all
four wheels all the time.
This is like four-wheel drive, but there is no separate
lever or switch to engage or disengage the front axle. It is
fully automatic, and adjusts itself as needed for road
conditions.
Steering
Power Steering
If you lose power steering assist because the engine
stops or the system is not functioning, you can steer but it
will take much more effort.
Steering Tips
It is important to take curves at a reasonable speed.
A lot of the “driver lost control” accidents mentioned on
the news happen on curves. Here is why:
Experienced driver or beginner, each of us is subject to
the same laws of physics when driving on curves. The
traction of the tires against the road surface makes it
possible for the vehicle to change its path when you turn
the front wheels. If there is no traction, inertia will keep
the vehicle going in the same direction. If you have
ever tried to steer a vehicle on wet ice, you will
understand this.Traction in a curve depends on the condition of the tires
and the road surface, the angle at which the curve is
banked, and your speed. While in a curve, speed is the
one factor you can control.
Suppose you are steering through a sharp curve.
Then you suddenly accelerate. Both control
systems — steering and acceleration — have to
do their work where the tires meet the road. Adding the
sudden acceleration can demand too much of those
places. You can lose control.
What should you do if this ever happens? Ease up on
the accelerator pedal, steer the vehicle the way you
want it to go, and slow down.
Speed limit signs near curves warn that you should
adjust your speed. Of course, the posted speeds
are based on good weather and road conditions. Under
less favorable conditions you will want to go slower.
If you need to reduce speed when approaching a curve,
do it before you enter the curve, while the front
wheels are straight ahead.
Try to adjust the speed so you can drive through the
curve. Maintain a reasonable, steady speed. Wait
to accelerate until you are out of the curve, and then
accelerate gently into the straightaway.
Adding non-dealer/non-retailer accessories can affect
your vehicle’s performance. SeeAccessories and
Modifications on page 5-3.
4-10
Page 249 of 472
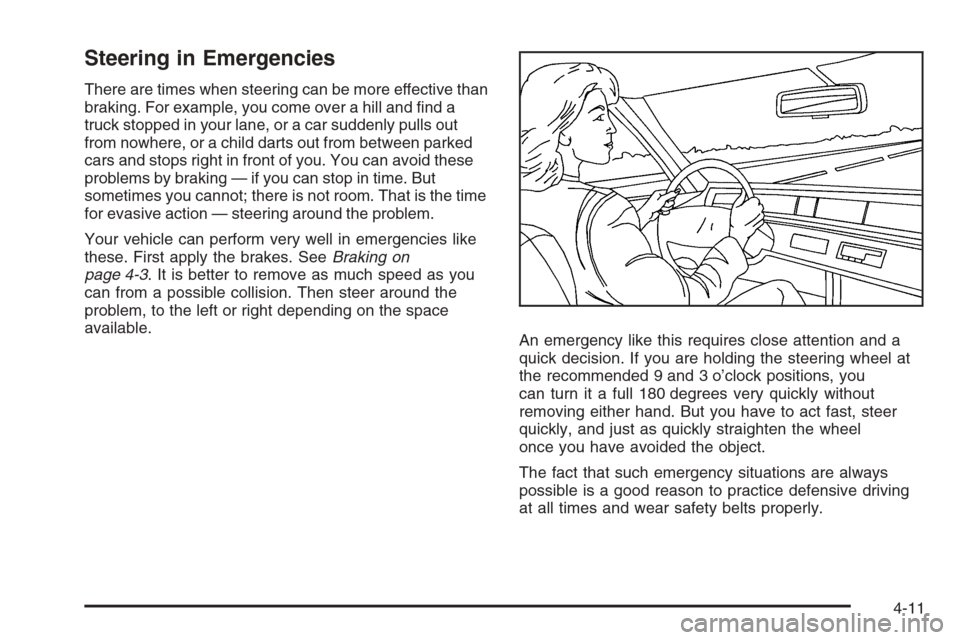
Steering in Emergencies
There are times when steering can be more effective than
braking. For example, you come over a hill and �nd a
truck stopped in your lane, or a car suddenly pulls out
from nowhere, or a child darts out from between parked
cars and stops right in front of you. You can avoid these
problems by braking — if you can stop in time. But
sometimes you cannot; there is not room. That is the time
for evasive action — steering around the problem.
Your vehicle can perform very well in emergencies like
these. First apply the brakes. SeeBraking on
page 4-3. It is better to remove as much speed as you
can from a possible collision. Then steer around the
problem, to the left or right depending on the space
available.
An emergency like this requires close attention and a
quick decision. If you are holding the steering wheel at
the recommended 9 and 3 o’clock positions, you
can turn it a full 180 degrees very quickly without
removing either hand. But you have to act fast, steer
quickly, and just as quickly straighten the wheel
once you have avoided the object.
The fact that such emergency situations are always
possible is a good reason to practice defensive driving
at all times and wear safety belts properly.
4-11
Page 250 of 472
Off-Road Recovery
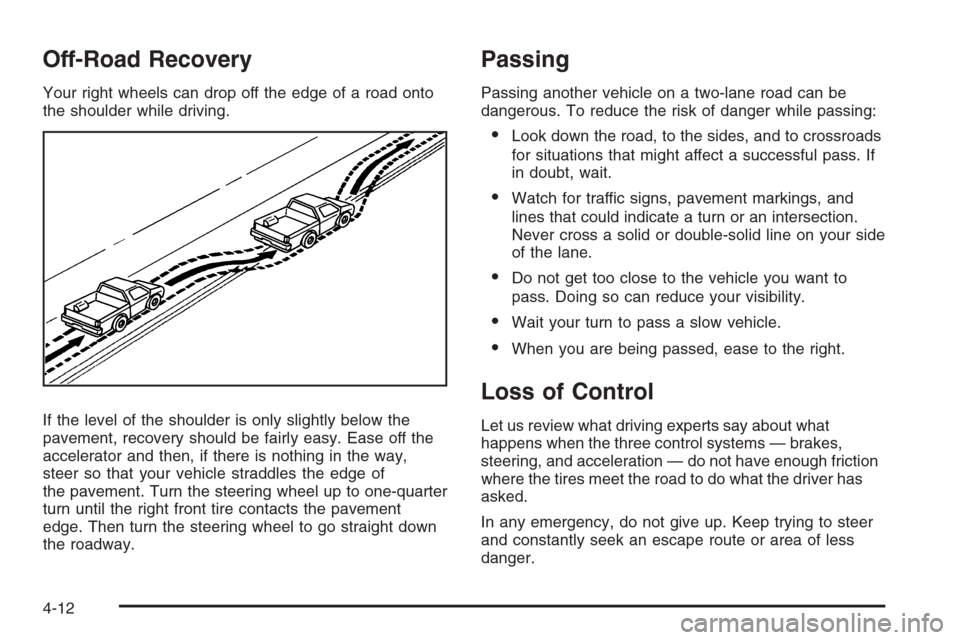
Your right wheels can drop off the edge of a road onto
the shoulder while driving.
If the level of the shoulder is only slightly below the
pavement, recovery should be fairly easy. Ease off the
accelerator and then, if there is nothing in the way,
steer so that your vehicle straddles the edge of
the pavement. Turn the steering wheel up to one-quarter
turn until the right front tire contacts the pavement
edge. Then turn the steering wheel to go straight down
the roadway.
Passing
Passing another vehicle on a two-lane road can be
dangerous. To reduce the risk of danger while passing:
Look down the road, to the sides, and to crossroads
for situations that might affect a successful pass. If
in doubt, wait.
Watch for traffic signs, pavement markings, and
lines that could indicate a turn or an intersection.
Never cross a solid or double-solid line on your side
of the lane.
Do not get too close to the vehicle you want to
pass. Doing so can reduce your visibility.
Wait your turn to pass a slow vehicle.
When you are being passed, ease to the right.
Loss of Control
Let us review what driving experts say about what
happens when the three control systems — brakes,
steering, and acceleration — do not have enough friction
where the tires meet the road to do what the driver has
asked.
In any emergency, do not give up. Keep trying to steer
and constantly seek an escape route or area of less
danger.
4-12