2008 CHEVROLET TRAIL BLAZER service
[x] Cancel search: servicePage 89 of 472
PASS-Key®III+ Electronic
Immobilizer
The PASS-Key®III+ system operates on a radio
frequency subject to Federal Communications
Commission (FCC) Rules and with Industry Canada.
This device complies with Part 15 of the FCC Rules.
Operation is subject to the following two conditions:
1. This device may not cause harmful interference.
2. This device must accept any interference received,
including interference that may cause undesired
operation.
This device complies with RSS-210 of Industry Canada.
Operation is subject to the following two conditions:
1. This device may not cause interference.
2. This device must accept any interference received,
including interference that may cause undesired
operation of the device.
Changes or modi�cations to this system by other than
an authorized service facility could void authorization to
use this equipment.
PASS-Key
®III+ uses a radio frequency transponder in
the key that matches a decoder in your vehicle.
PASS-Key®III+ Electronic
Immobilizer Operation
(Canada Only)
Your vehicle has a passive theft-deterrent system.
The system is automatically armed when the key
is removed from the ignition.
The system is automatically disarmed when the key is
turned to ON/RUN.
You do not have to manually arm or disarm the system.
The security light will come on if there is a problem
with arming or disarming the theft-deterrent system.
The key uses a transponder that matches an immobilizer
control unit in your vehicle. Only the correct key will
start the vehicle. If the key is ever damaged, you may
not be able to start your vehicle.
When trying to start the vehicle, if the engine does not
start and the security light comes on, there may be
a problem with your theft-deterrent system. Turn
the ignition off and try again.
2-17
Page 90 of 472
If the engine still does not start, and the key appears to
be undamaged, try another ignition key. At this time,
you may also want to check the fuse. SeeFuses
and Circuit Breakers on page 5-110. If the engine still
does not start with the other key, your vehicle needs
service. If your vehicle does start, the �rst key may be
faulty. See your dealer/retailer who can service the
theft-deterrent system and have a new key made.
It is possible for the theft-deterrent system decoder to
learn the transponder value of a new or replacement
key. Up to 10 keys may be programmed for the vehicle.
The following procedure is for programming additional
keys only.
Canadian Owners:If you lose or damage your keys,
only a dealer/retailer can service the theft-deterrent
system to have new keys made. To program additional
keys you will require two current driver’s keys.
To program a new key do the following:
1. Verify that the new key has PK3+ stamped on it.
2. Insert the current driver’s key in the ignition
and start the engine. If the engine will not start see
your dealer/retailer for service.3. After the engine has started, turn the key to
LOCK/OFF, and remove the key.
4. Insert the second current driver’s key in the ignition
and start the engine within ten seconds of removing
the previous key. If the engine will not start see
your dealer/retailer for service.
5. After the engine has started, turn the key to
LOCK/OFF, and remove the key. Insert the key to
be programmed and turn it to ON within ten
seconds of removing the previous key.
The security light will turn off once the key has
been programmed.
6. Repeat the Steps 1 through 5 if additional keys are
to be programmed.
If the security light comes on and stays on while driving,
you will be able to restart the engine if you turn it off.
The theft-deterrent system, however, is not working
properly and must be serviced by your dealer/retailer.
Your vehicle is not protected by the theft-deterrent
system at this time.
In an emergency, contact Roadside Assistance. See
Roadside Assistance Program on page 7-7.
Do not leave the key or device that disarms or
deactivates the theft deterrent system in the vehicle.
2-18
Page 92 of 472
Ignition Positions
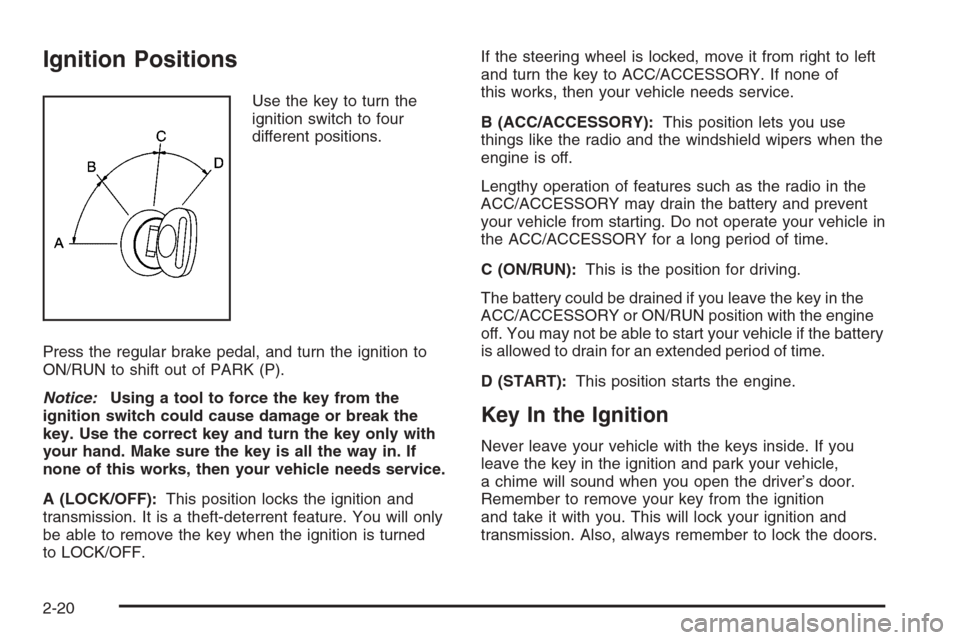
Use the key to turn the
ignition switch to four
different positions.
Press the regular brake pedal, and turn the ignition to
ON/RUN to shift out of PARK (P).
Notice:Using a tool to force the key from the
ignition switch could cause damage or break the
key. Use the correct key and turn the key only with
your hand. Make sure the key is all the way in. If
none of this works, then your vehicle needs service.
A (LOCK/OFF):This position locks the ignition and
transmission. It is a theft-deterrent feature. You will only
be able to remove the key when the ignition is turned
to LOCK/OFF.If the steering wheel is locked, move it from right to left
and turn the key to ACC/ACCESSORY. If none of
this works, then your vehicle needs service.
B (ACC/ACCESSORY):This position lets you use
things like the radio and the windshield wipers when the
engine is off.
Lengthy operation of features such as the radio in the
ACC/ACCESSORY may drain the battery and prevent
your vehicle from starting. Do not operate your vehicle in
the ACC/ACCESSORY for a long period of time.
C (ON/RUN):This is the position for driving.
The battery could be drained if you leave the key in the
ACC/ACCESSORY or ON/RUN position with the engine
off. You may not be able to start your vehicle if the battery
is allowed to drain for an extended period of time.
D (START):This position starts the engine.
Key In the Ignition
Never leave your vehicle with the keys inside. If you
leave the key in the ignition and park your vehicle,
a chime will sound when you open the driver’s door.
Remember to remove your key from the ignition
and take it with you. This will lock your ignition and
transmission. Also, always remember to lock the doors.
2-20
Page 101 of 472
When the vehicle senses a loss of traction, the system
will automatically engage four-wheel drive. Driving in
this mode results in slightly lower fuel economy
than Two-Wheel High.
4
m(Four-Wheel High):This setting should be used
when you need extra traction, such as on snowy or
icy roads or in most off-road situations. This setting also
engages your front axle to help drive your vehicle.
4
n(Four-Wheel Low):This setting also engages
your front axle and delivers extra torque. It sends
maximum power to all four wheels. You might choose
this setting if you are driving off-road in deep sand, deep
mud, and climbing or descending steep hills.
{CAUTION:
Shifting the transfer case to NEUTRAL can
cause your vehicle to roll even if the
transmission is in PARK (P). You or someone
else could be seriously injured. Be sure to set
the parking brake before placing the transfer
case in NEUTRAL. SeeParking Brake on
page 2-32.NEUTRAL:Shift the vehicle’s transfer case to
NEUTRAL only when towing your vehicle. See
Recreational Vehicle Towing on page 4-42for more
information.
An indicator light in the knob will show you which
position the transfer case is in. The indicator lights will
come on brie�y when you turn on the ignition and
one will stay on. If the lights do not come on, you should
take your vehicle to your dealer for service. An
indicator light will �ash while shifting the transfer case.
It will stay on when the shift is complete. If for some
reason the transfer case cannot make a requested shift,
it will return to the last chosen setting.
If the service Four-Wheel Drive Warning Light on the
instrument panel cluster stays on, you should take your
vehicle to your dealer for service. SeeService
Four-Wheel Drive Warning Light on page 3-47for
further information.Shifting Into Four-Wheel High or Automatic
Four-Wheel Drive
Turn the knob to Four-Wheel High or Automatic
Four-Wheel Drive. This can be done at any speed
unless you are shifting out of Four-Wheel Low. The
indicator light will �ash while shifting. It will remain on
when the shift is complete.
2-29
Page 107 of 472
Shifting Out of PARK (P)
This vehicle has an electronic shift lock release system.
The shift lock release is designed to:
Prevent ignition key removal unless the shift lever
is in PARK (P) with the shift lever button fully
released, and
Prevent movement of the shift lever out of
PARK (P), unless the ignition is in ON/RUN and the
regular brake pedal is applied.
The shift lock release is always functional except in
the case of an uncharged or low voltage (less than
9 volt) battery.
If your vehicle has an uncharged battery or a battery
with low voltage, try charging or jump starting the
battery. SeeJump Starting on page 5-44for more
information.
To shift out of PARK (P) use the following:
1. Apply the brake pedal.
2. Press the shift lever button.
3. Move the shift lever to the desired position.If you still are unable to shift out of PARK (P):
1. Fully release the shift lever button.
2. Hold the brake pedal down and press the shift lever
button again.
3. Move the shift lever to the desired position.
If you still cannot move the shift lever from PARK (P),
consult your dealer/retailer or a professional towing
service.
Parking Over Things That Burn
{CAUTION:
Things that can burn could touch hot exhaust
parts under your vehicle and ignite. Do not
park over papers, leaves, dry grass, or other
things that can burn.
2-35
Page 110 of 472
Manual Rearview Mirror with
OnStar
®
When you are sitting in a comfortable driving position,
adjust the mirror so you can see clearly behind your
vehicle. Hold the mirror in the center to move it up or
down and side to side. The day/night adjustment allows
you to adjust the mirror to avoid glare from the lamps
behind you. Move the lever to the right for nighttime use
and to the left for daytime use.
There may also be three OnStar
®buttons located at the
bottom of the mirror face. See your dealer/retailer for
more information on the system and how to subscribe to
OnStar
®. SeeOnStar®System on page 2-47for more
information on the services OnStar®provides.
Automatic Dimming Rearview Mirror
with OnStar
®and Compass
Your vehicle may have an automatic-dimming rearview
mirror with a compass.
There may be three additional buttons for the OnStar
®
system. See your dealer/retailer for more information
on the system and how to subscribe to OnStar®.
SeeOnStar®System on page 2-47for more information
about the services OnStar®provides.
O(On/Off):This is the on/off button.
Automatic Dimming Mirror Operation
The automatic dimming mirror comes on each time the
ignition is turned to start. To turn the automatic
dimming feature off or back on, press the on/off button.
The indicator light on the mirror is lit when the
automatic dimming feature is on.
Compass Operation
Press the on/off button once to turn the compass on
or off.
There is a compass display in the window in the upper
right corner of the mirror face.
Compass Calibration
Press and hold the on/off button to activate the compass
calibration mode. CAL will be displayed in the compass
window on the mirror.
The compass can be calibrated by driving the vehicle in
circles at 5 mph (8 km/h) or less until the display
reads a direction.
If after a few seconds the display does not show a
compass direction, (N for North for example), there may
be a strong magnetic �eld interfering with the compass.
Such interference may be caused by a magnetic
antenna mount, note pad holder, or similar object. If the
letter C or CAL appears in the compass window, the
compass may need to be reset or calibrated.
2-38
Page 119 of 472
OnStar®System
OnStar uses several innovative technologies and live
advisors to provide you with a wide range of safety,
security, information, and convenience services. If your
airbags deploy, the system is designed to make an
automatic call to OnStar Emergency advisors who can
request emergency services be sent to your location.
If you lock your keys in the vehicle, call OnStar at
1-888-4-ONSTAR and they can send a signal to unlock
your doors. If you need roadside assistance, press
the OnStar button and they can contact Roadside
Service for you.OnStar service is provided to you subject to the OnStar
Terms and Conditions. You may cancel your OnStar
service at any time by contacting OnStar. A complete
OnStar Owner’s Guide and the OnStar Terms and
Conditions are included in the vehicle’s OnStar
Subscriber glove box literature. For more information,
visit onstar.com or onstar.ca, contact OnStar at
1-888-4-ONSTAR (1-888-466-7827) or TTY
1-877-248-2080, or press the OnStar button to speak
with an OnStar advisor 24 hours a day, 7 days a week.
Not all OnStar features are available on all vehicles.
To check if your vehicle is equipped to provide the
services described below, or for a full description of
OnStar services and system limitations, see the OnStar
Owner’s Guide in your glove box or visit onstar.com.
OnStar Services
For new vehicles with OnStar, the Safe & Sound Plan,
or the Directions & Connections Plan is included for
one year from the date of purchase. You can extend this
plan beyond the �rst year, or upgrade to the Directions
& Connections Plan. For more information, press
the OnStar button to speak with an advisor. Some
OnStar services (such as Remote Door Unlock or Stolen
Vehicle Location Assistance) may not be available
until you register with OnStar.
2-47
Page 120 of 472
Available Services with Safe & Sound Plan
Automatic Noti�cation of Airbag Deployment
Advanced Automatic Crash Noti�cation (AACN)
(If equipped)
Link to Emergency Services
Roadside Assistance
Stolen Vehicle Location Assistance
AccidentAssist
Remote Door Unlock/Vehicle Alert
OnStar Vehicle Diagnostics
GM Goodwrench On Demand Diagnostics
OnStar Hands-Free Calling with 30 complimentary
minutes
OnStar Virtual Advisor (U.S. Only)
Available Services included with Directions
& Connections Plan
All Safe and Sound Plan Services
Driving Directions - Advisor delivered or OnStar
Turn-by-Turn Navigation (If equipped)
RideAssist
Information and Convenience Services
OnStar Hands-Free Calling
OnStar Hands-Free Calling allows eligible OnStar
subscribers to make and receive calls using voice
commands. Hands-Free Calling is fully integrated into
the vehicle, and can be used with OnStar Pre-Paid
Minute Packages. Hands-Free Calling may also
be linked to a Verizon Wireless service plan in the U.S.
or a Bell Mobility service plan in Canada, depending
on eligibility. To �nd out more, refer to the OnStar
Owner’s Guide in the vehicle’s glove box, visit
www.onstar.com or www.onstar.ca, or speak with an
OnStar advisor by pressing the OnStar button or calling
1-888-4-ONSTAR (1-888-466-7827).
2-48