2008 CHEVROLET SILVERADO brake light
[x] Cancel search: brake lightPage 405 of 596
Electric Brake Control Wiring
Provisions
These wiring provisions are included with your vehicle
as part of the trailer wiring package. These provisions
are for an electric brake controller. The instrument panel
contains blunt cut wires near the data link connector
for the trailer brake controller. The harness contains the
following wires:
Dark Blue: Brake Signal to Trailer Connector
Red/Black: Battery
Light Blue/White: Brake Switch
White: Ground
It should be installed by your dealer or a qualied
service center.
If your vehicle is equipped with an ITBC, the blunt cuts
exist, but are not connected further in the harness. If
you install an aftermarket trailer brake controller,
the ITBC must be disconnected. Do not power both
ITBC and aftermarket controllers to control the trailer
brakes at the same time.
Auxiliary Battery
The auxiliary battery provision can be used to supply
electrical power to additional equipment that you may
choose to add, such as a slide-in camper. If your vehicle
has this provision, this relay will be located on the driver’s
side of the vehicle, next to the underhood electrical
center.
Be sure to follow the proper installation instructions that
are included with any electrical equipment that you install.
Notice:Leaving electrical equipment on for
extended periods will drain the battery. Always turn
off electrical equipment when not in use and do
not use equipment that exceeds the maximum
amperage rating for the auxiliary battery provision.
Trailer Recommendations
You must subtract your hitch loads from the CWR for
your vehicle. Weigh your vehicle with the trailer
attached, so that you won’t go over the GVWR or
GAWR. If you are using a weight-distributing hitch,
weigh the vehicle without the spring bars in place.
You’ll get the best performance if you spread out the
weight of your load the right way, and if you choose the
correct hitch and trailer brakes.
For more information, seeTowing a Trailer on
page 4-55.
4-93
Page 451 of 596
Brake Wear
Your vehicle has front disc brakes and could have rear
drum brakes or rear disc brakes.
Disc brake pads have built-in wear indicators that make
a high-pitched warning sound when the brake pads
are worn and new pads are needed. The sound can
come and go or be heard all the time your vehicle
is moving, except when you are pushing on the brake
pedal rmly.
{CAUTION:
The brake wear warning sound means that soon
the brakes will not work well. That could lead to
an accident. When you hear the brake wear
warning sound, have your vehicle serviced.
Notice:Continuing to drive with worn-out brake
pads could result in costly brake repair.
Some driving conditions or climates can cause a brake
squeal when the brakes are rst applied or lightly
applied. This does not mean something is wrong with
the brakes.Properly torqued wheel nuts are necessary to help
prevent brake pulsation. When tires are rotated,
inspect brake pads for wear and evenly tighten wheel
nuts in the proper sequence to torque specications
inCapacities and Specifications on page 5-133.
If you have rear drum brakes, they do not have wear
indicators, but if you ever hear a rear brake rubbing
noise, have the rear brake linings inspected immediately.
Rear brake drums should be removed and inspected
each time the tires are removed for rotation or changing.
Drum brakes have an inspection hole to inspect lining
wear during scheduled maintenance. When you
have the front brake pads replaced, have the rear
brakes inspected, too.
Brake linings should always be replaced as complete
axle sets.
Brake Pedal Travel
See your dealer/retailer if the brake pedal does not
return to normal height, or if there is a rapid increase in
pedal travel. This could be a sign that brake service
might be required.
Brake Adjustment
Every time you make a brake stop, the brakes adjust
for wear.
5-45
Page 454 of 596
3. Get the vehicles close enough so the jumper cables
can reach, but be sure the vehicles are not touching
each other. If they are, it could cause an unwanted
ground connection. You would not be able to
start your vehicle, and the bad grounding could
damage the electrical systems.
To avoid the possibility of the vehicles rolling, set the
parking brake rmly on both vehicles involved in the
jump start procedure. Put the automatic transmission
in P (PARK) or a manual transmission in NEUTRAL
before setting the parking brake. If you have a
four-wheel-drive vehicle, be sure the transfer case
is in a drive gear, not in NEUTRAL.
Notice:If you leave your radio or other accessories
on during the jump starting procedure, they could
be damaged. The repairs would not be covered
by your warranty. Always turn off your radio and
other accessories when jump starting your vehicle.
4. Turn off the ignition on both vehicles. Unplug
unnecessary accessories plugged into the cigarette
lighter or the accessory power outlets. Turn off
the radio and all the lamps that are not needed.
This will avoid sparks and help save both batteries.
And it could save the radio!5. Open the hood on the other vehicle and locate the
positive (+) and negative (−) terminal locations on
that vehicle.
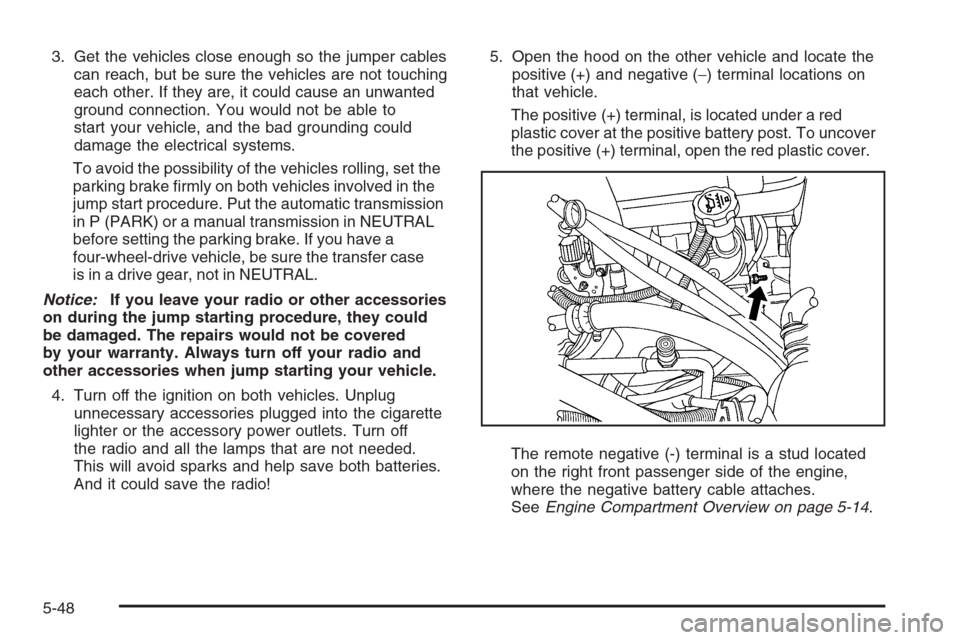
The positive (+) terminal, is located under a red
plastic cover at the positive battery post. To uncover
the positive (+) terminal, open the red plastic cover.
The remote negative (-) terminal is a stud located
on the right front passenger side of the engine,
where the negative battery cable attaches.
SeeEngine Compartment Overview on page 5-14.
5-48
Page 536 of 596

Fuses Usage
6 Trailer Brake Controller
7 Front Washer
8 Oxygen Sensor
9 Antilock Brakes System 2
10 Trailer Back-up Lamps
11 Driver Side Low-Beam Headlamp
12 Engine Control Module (Battery)
13Fuel Injectors, Ignition Coils
(Right Side)
14Transmission Control Module
(Battery)
15 Vehicle Back-up Lamps
16Passenger Side Low-Beam
Headlamp
17 Air Conditioning Compressor
18 Oxygen Sensors
19 Transmission Controls (Ignition)
20 Fuel Pump
21 Fuel System Control ModuleFuses Usage
22 Not Used
23 Not Used
24Fuel Injectors, Ignition Coils
(Left Side)
25 Trailer Park Lamps
26 Driver Side Park Lamps
27 Passenger Side Park Lamps
28 Fog Lamps
29 Horn
30Passenger Side High-Beam
Headlamp
31 Daytime Running Lamps
32 Driver Side High-Beam Headlamp
33 Daytime Running Lights 2
34 Sunroof
35Key Ignition System, Theft Deterrent
System
36 Windshield Wiper
37 SEO B2 Uptter Usage (Battery)
5-130
Page 537 of 596
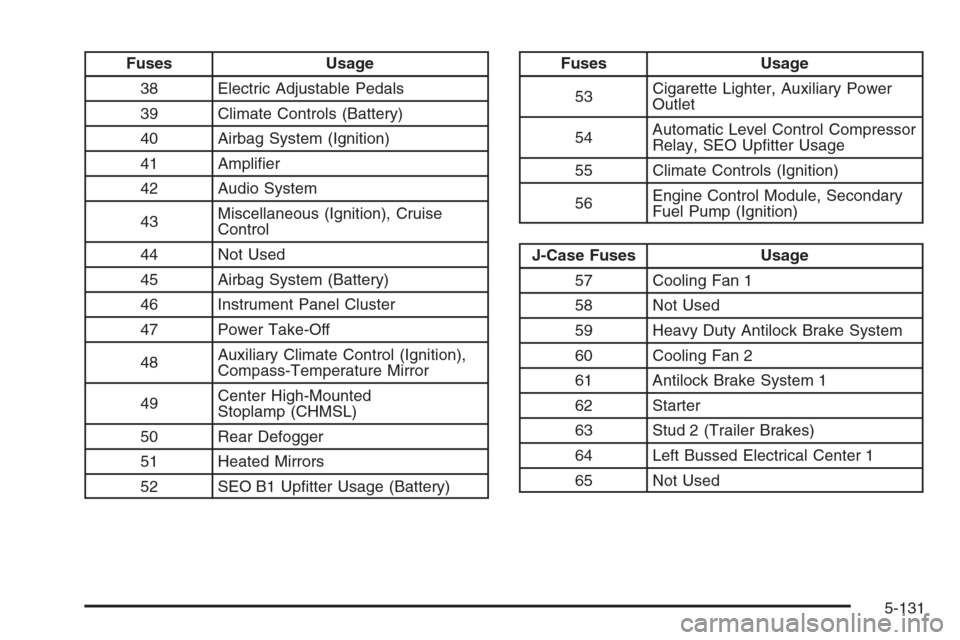
Fuses Usage
38 Electric Adjustable Pedals
39 Climate Controls (Battery)
40 Airbag System (Ignition)
41 Amplier
42 Audio System
43Miscellaneous (Ignition), Cruise
Control
44 Not Used
45 Airbag System (Battery)
46 Instrument Panel Cluster
47 Power Take-Off
48Auxiliary Climate Control (Ignition),
Compass-Temperature Mirror
49Center High-Mounted
Stoplamp (CHMSL)
50 Rear Defogger
51 Heated Mirrors
52 SEO B1 Uptter Usage (Battery)Fuses Usage
53Cigarette Lighter, Auxiliary Power
Outlet
54Automatic Level Control Compressor
Relay, SEO Uptter Usage
55 Climate Controls (Ignition)
56Engine Control Module, Secondary
Fuel Pump (Ignition)
J-Case Fuses Usage
57 Cooling Fan 1
58 Not Used
59 Heavy Duty Antilock Brake System
60 Cooling Fan 2
61 Antilock Brake System 1
62 Starter
63 Stud 2 (Trailer Brakes)
64 Left Bussed Electrical Center 1
65 Not Used
5-131
Page 581 of 596
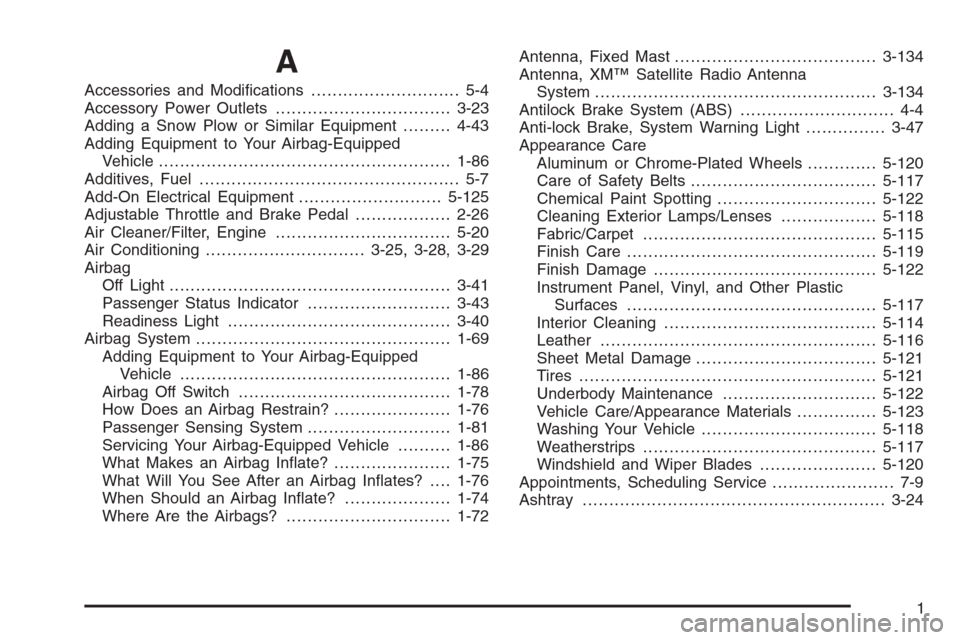
A
Accessories and Modications............................ 5-4
Accessory Power Outlets.................................3-23
Adding a Snow Plow or Similar Equipment.........4-43
Adding Equipment to Your Airbag-Equipped
Vehicle.......................................................1-86
Additives, Fuel................................................. 5-7
Add-On Electrical Equipment...........................5-125
Adjustable Throttle and Brake Pedal..................2-26
Air Cleaner/Filter, Engine.................................5-20
Air Conditioning..............................3-25, 3-28, 3-29
Airbag
Off Light.....................................................3-41
Passenger Status Indicator...........................3-43
Readiness Light..........................................3-40
Airbag System................................................1-69
Adding Equipment to Your Airbag-Equipped
Vehicle...................................................1-86
Airbag Off Switch........................................1-78
How Does an Airbag Restrain?......................1-76
Passenger Sensing System...........................1-81
Servicing Your Airbag-Equipped Vehicle..........1-86
What Makes an Airbag Inate?......................1-75
What Will You See After an Airbag Inates?....1-76
When Should an Airbag Inate?....................1-74
Where Are the Airbags?...............................1-72Antenna, Fixed Mast......................................3-134
Antenna, XM™ Satellite Radio Antenna
System.....................................................3-134
Antilock Brake System (ABS)............................. 4-4
Anti-lock Brake, System Warning Light...............3-47
Appearance Care
Aluminum or Chrome-Plated Wheels.............5-120
Care of Safety Belts...................................5-117
Chemical Paint Spotting..............................5-122
Cleaning Exterior Lamps/Lenses..................5-118
Fabric/Carpet............................................5-115
Finish Care...............................................5-119
Finish Damage..........................................5-122
Instrument Panel, Vinyl, and Other Plastic
Surfaces...............................................5-117
Interior Cleaning........................................5-114
Leather....................................................5-116
Sheet Metal Damage..................................5-121
Tires........................................................5-121
Underbody Maintenance.............................5-122
Vehicle Care/Appearance Materials...............5-123
Washing Your Vehicle.................................5-118
Weatherstrips............................................5-117
Windshield and Wiper Blades......................5-120
Appointments, Scheduling Service....................... 7-9
Ashtray.........................................................3-24
1
Page 582 of 596
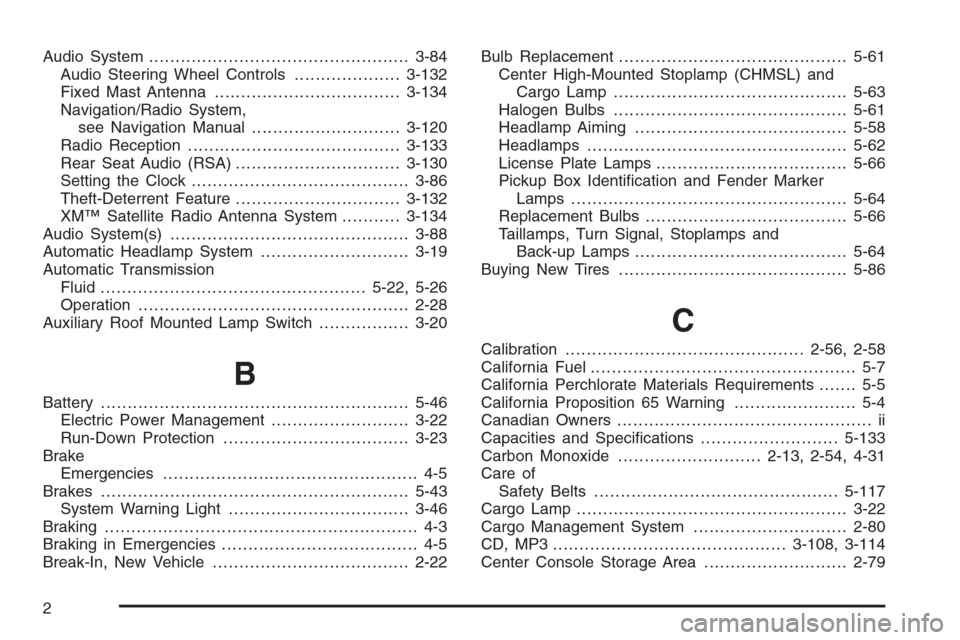
Audio System.................................................3-84
Audio Steering Wheel Controls....................3-132
Fixed Mast Antenna...................................3-134
Navigation/Radio System,
see Navigation Manual............................3-120
Radio Reception........................................3-133
Rear Seat Audio (RSA)...............................3-130
Setting the Clock.........................................3-86
Theft-Deterrent Feature...............................3-132
XM™ Satellite Radio Antenna System...........3-134
Audio System(s).............................................3-88
Automatic Headlamp System............................3-19
Automatic Transmission
Fluid..................................................5-22, 5-26
Operation...................................................2-28
Auxiliary Roof Mounted Lamp Switch.................3-20
B
Battery..........................................................5-46
Electric Power Management..........................3-22
Run-Down Protection...................................3-23
Brake
Emergencies................................................ 4-5
Brakes..........................................................5-43
System Warning Light..................................3-46
Braking........................................................... 4-3
Braking in Emergencies..................................... 4-5
Break-In, New Vehicle.....................................2-22Bulb Replacement...........................................5-61
Center High-Mounted Stoplamp (CHMSL) and
Cargo Lamp............................................5-63
Halogen Bulbs............................................5-61
Headlamp Aiming........................................5-58
Headlamps.................................................5-62
License Plate Lamps....................................5-66
Pickup Box Identication and Fender Marker
Lamps ....................................................5-64
Replacement Bulbs......................................5-66
Taillamps, Turn Signal, Stoplamps and
Back-up Lamps........................................5-64
Buying New Tires...........................................5-86
C
Calibration.............................................2-56, 2-58
California Fuel.................................................. 5-7
California Perchlorate Materials Requirements....... 5-5
California Proposition 65 Warning....................... 5-4
Canadian Owners................................................ ii
Capacities and Specications..........................5-133
Carbon Monoxide...........................2-13, 2-54, 4-31
Care of
Safety Belts..............................................5-117
Cargo Lamp...................................................3-22
Cargo Management System.............................2-80
CD, MP3 ............................................3-108, 3-114
Center Console Storage Area...........................2-79
2
Page 588 of 596
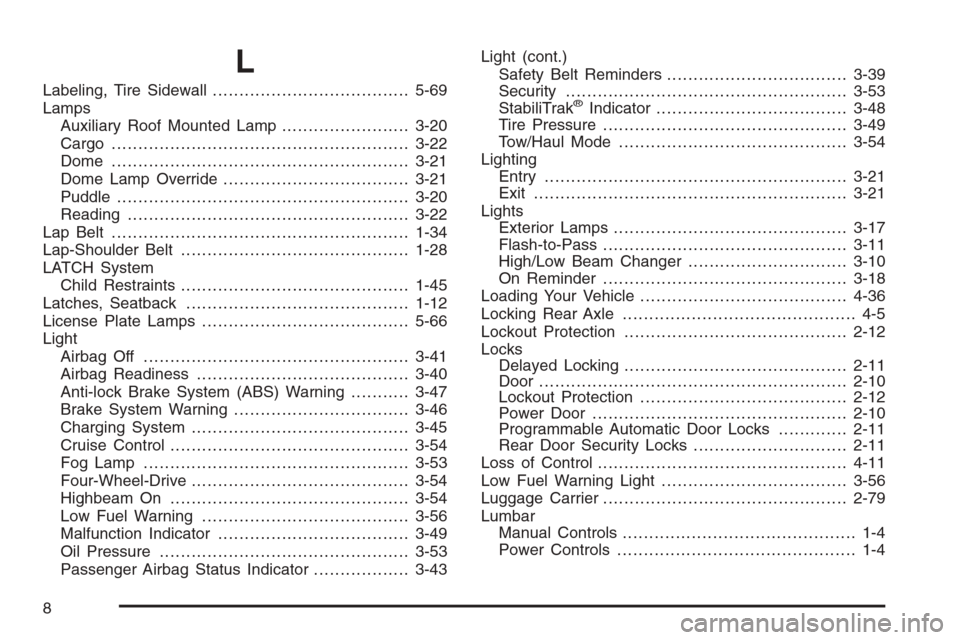
L
Labeling, Tire Sidewall.....................................5-69
Lamps
Auxiliary Roof Mounted Lamp........................3-20
Cargo........................................................3-22
Dome ........................................................3-21
Dome Lamp Override...................................3-21
Puddle.......................................................3-20
Reading.....................................................3-22
Lap Belt ........................................................1-34
Lap-Shoulder Belt...........................................1-28
LATCH System
Child Restraints...........................................1-45
Latches, Seatback..........................................1-12
License Plate Lamps.......................................5-66
Light
Airbag Off..................................................3-41
Airbag Readiness........................................3-40
Anti-lock Brake System (ABS) Warning...........3-47
Brake System Warning.................................3-46
Charging System.........................................3-45
Cruise Control.............................................3-54
Fog Lamp ..................................................3-53
Four-Wheel-Drive.........................................3-54
Highbeam On.............................................3-54
Low Fuel Warning.......................................3-56
Malfunction Indicator....................................3-49
Oil Pressure...............................................3-53
Passenger Airbag Status Indicator..................3-43Light (cont.)
Safety Belt Reminders..................................3-39
Security.....................................................3-53
StabiliTrak®Indicator....................................3-48
Tire Pressure..............................................3-49
Tow/Haul Mode ...........................................3-54
Lighting
Entry.........................................................3-21
Exit...........................................................3-21
Lights
Exterior Lamps............................................3-17
Flash-to-Pass..............................................3-11
High/Low Beam Changer..............................3-10
On Reminder..............................................3-18
Loading Your Vehicle.......................................4-36
Locking Rear Axle............................................ 4-5
Lockout Protection..........................................2-12
Locks
Delayed Locking..........................................2-11
Door ..........................................................2-10
Lockout Protection.......................................2-12
Power Door................................................2-10
Programmable Automatic Door Locks.............2-11
Rear Door Security Locks.............................2-11
Loss of Control...............................................4-11
Low Fuel Warning Light...................................3-56
Luggage Carrier..............................................2-79
Lumbar
Manual Controls............................................ 1-4
Power Controls............................................. 1-4
8