Page 403 of 596
Heavy-Duty Trailer Wiring Harness
Package
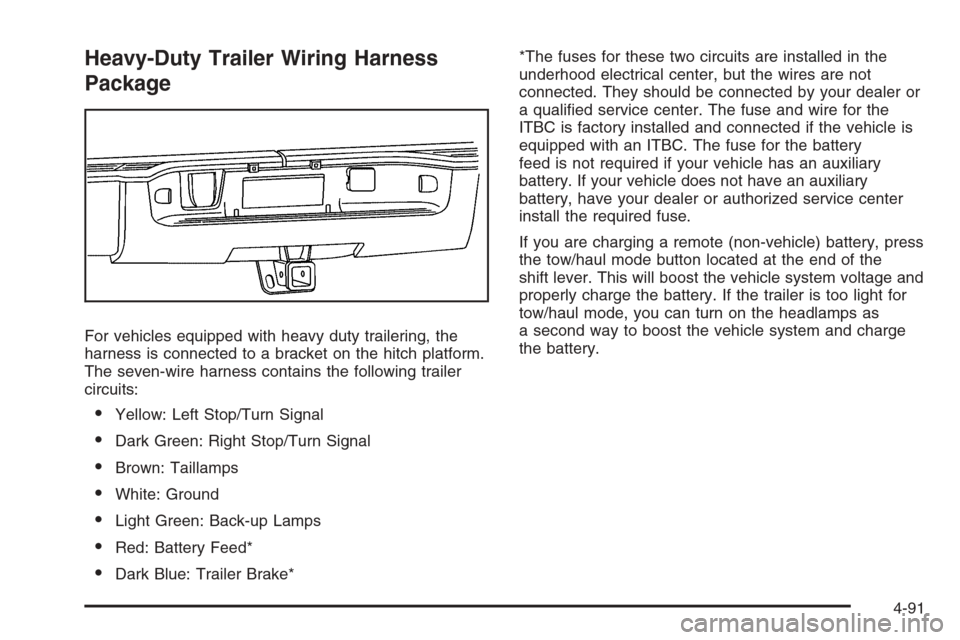
For vehicles equipped with heavy duty trailering, the
harness is connected to a bracket on the hitch platform.
The seven-wire harness contains the following trailer
circuits:
Yellow: Left Stop/Turn Signal
Dark Green: Right Stop/Turn Signal
Brown: Taillamps
White: Ground
Light Green: Back-up Lamps
Red: Battery Feed*
Dark Blue: Trailer Brake**The fuses for these two circuits are installed in the
underhood electrical center, but the wires are not
connected. They should be connected by your dealer or
a quali�ed service center. The fuse and wire for the
ITBC is factory installed and connected if the vehicle is
equipped with an ITBC. The fuse for the battery
feed is not required if your vehicle has an auxiliary
battery. If your vehicle does not have an auxiliary
battery, have your dealer or authorized service center
install the required fuse.
If you are charging a remote (non-vehicle) battery, press
the tow/haul mode button located at the end of the
shift lever. This will boost the vehicle system voltage and
properly charge the battery. If the trailer is too light for
tow/haul mode, you can turn on the headlamps as
a second way to boost the vehicle system and charge
the battery.
4-91
Page 409 of 596
Tires.........................................................5-121
Sheet Metal Damage...................................5-121
Finish Damage...........................................5-122
Underbody Maintenance...............................5-122
Chemical Paint Spotting...............................5-122
Vehicle Care/Appearance Materials................5-123
Vehicle Identi�cation.....................................5-124
Vehicle Identi�cation Number (VIN)................5-124
Service Parts Identi�cation Label...................5-124Electrical System..........................................5-125
Add-On Electrical Equipment.........................5-125
Windshield Wiper Fuses...............................5-125
Power Windows and Other Power Options......5-125
Fuses and Circuit Breakers..........................5-125
Instrument Panel Fuse Block........................5-126
Center Instrument Panel Fuse Block..............5-128
Underhood Fuse Block................................5-129
Capacities and Speci�cations........................5-133
Section 5 Service and Appearance Care
5-3
Page 411 of 596
California Perchlorate Materials
Requirements
Certain types of automotive applications, such as airbag
initiators, seat belt pretensioners, and lithium batteries
contained in remote keyless entry transmitters, may
contain perchlorate materials. Special handling may be
necessary. For additional information, see
www.dtsc.ca.gov/hazardouswaste/perchlorate.
Doing Your Own Service Work
{CAUTION:
You can be injured and your vehicle could be
damaged if you try to do service work on a
vehicle without knowing enough about it.
Be sure you have sufficient knowledge,
experience, the proper replacement parts,
and tools before you attempt any vehicle
maintenance task.
Be sure to use the proper nuts, bolts,
and other fasteners. English and metric
fasteners can be easily confused. If you
use the wrong fasteners, parts can later
break or fall off. You could be hurt.If you want to do some of your own service work, you
should use the proper service manual. It tells you much
more about how to service your vehicle than this
manual can. To order the proper service manual, see
Service Publications Ordering Information on page 7-15.
Your vehicle has an airbag system. Before attempting
to do your own service work, seeServicing Your
Airbag-Equipped Vehicle on page 1-86.
You should keep a record with all parts receipts and list
the mileage and the date of any service work you
perform. SeeMaintenance Record on page 6-18.
Adding Equipment to the Outside
of Your Vehicle
Things you might add to the outside of your vehicle can
affect the air�ow around it. This can cause wind
noise and can affect fuel economy and windshield
washer performance. Check with your dealer/retailer
before adding equipment to the outside of your vehicle.
5-5
Page 421 of 596
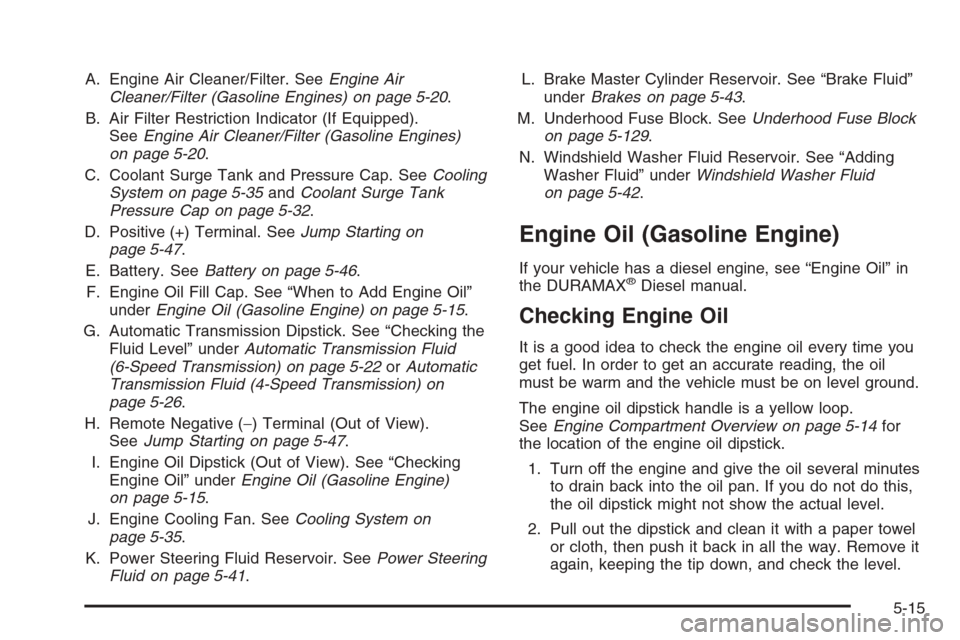
A. Engine Air Cleaner/Filter. SeeEngine Air
Cleaner/Filter (Gasoline Engines) on page 5-20.
B. Air Filter Restriction Indicator (If Equipped).
SeeEngine Air Cleaner/Filter (Gasoline Engines)
on page 5-20.
C. Coolant Surge Tank and Pressure Cap. SeeCooling
System on page 5-35andCoolant Surge Tank
Pressure Cap on page 5-32.
D. Positive (+) Terminal. SeeJump Starting on
page 5-47.
E. Battery. SeeBattery on page 5-46.
F. Engine Oil Fill Cap. See “When to Add Engine Oil”
underEngine Oil (Gasoline Engine) on page 5-15.
G. Automatic Transmission Dipstick. See “Checking the
Fluid Level” underAutomatic Transmission Fluid
(6-Speed Transmission) on page 5-22orAutomatic
Transmission Fluid (4-Speed Transmission) on
page 5-26.
H. Remote Negative (−) Terminal (Out of View).
SeeJump Starting on page 5-47.
I. Engine Oil Dipstick (Out of View). See “Checking
Engine Oil” underEngine Oil (Gasoline Engine)
on page 5-15.
J. Engine Cooling Fan. SeeCooling System on
page 5-35.
K. Power Steering Fluid Reservoir. SeePower Steering
Fluid on page 5-41.L. Brake Master Cylinder Reservoir. See “Brake Fluid”
underBrakes on page 5-43.
M. Underhood Fuse Block. SeeUnderhood Fuse Block
on page 5-129.
N. Windshield Washer Fluid Reservoir. See “Adding
Washer Fluid” underWindshield Washer Fluid
on page 5-42.
Engine Oil (Gasoline Engine)
If your vehicle has a diesel engine, see “Engine Oil” in
the DURAMAX®Diesel manual.
Checking Engine Oil
It is a good idea to check the engine oil every time you
get fuel. In order to get an accurate reading, the oil
must be warm and the vehicle must be on level ground.
The engine oil dipstick handle is a yellow loop.
SeeEngine Compartment Overview on page 5-14for
the location of the engine oil dipstick.
1. Turn off the engine and give the oil several minutes
to drain back into the oil pan. If you do not do this,
the oil dipstick might not show the actual level.
2. Pull out the dipstick and clean it with a paper towel
or cloth, then push it back in all the way. Remove it
again, keeping the tip down, and check the level.
5-15
Page 531 of 596
Electrical System
Add-On Electrical Equipment
Notice:Do not add anything electrical to your
vehicle unless you check with your dealer/retailer
�rst. Some electrical equipment can damage your
vehicle and the damage would not be covered by
your warranty. Some add-on electrical equipment can
keep other components from working as they should.
Add-on equipment can drain your vehicle’s battery, even
if your vehicle is not operating.
Your vehicle has an airbag system. Before attempting to
add anything electrical to your vehicle, seeServicing
Your Airbag-Equipped Vehicle on page 1-86.
Windshield Wiper Fuses
The windshield wiper motor is protected by an internal
circuit breaker and a fuse. If the motor overheats due to
heavy snow, etc., the wiper will stop until the motor
cools. If the overload is caused by some electrical
problem and not snow, etc., be sure to get it �xed.
Power Windows and Other
Power Options
Circuit breakers protect the power windows and other
power accessories. If the current load is too heavy,
the circuit breaker opens and then closes after a cool
down period, protecting the circuit until the problem
is �xed or goes away.
Fuses and Circuit Breakers
The wiring circuits in your vehicle are protected from
short circuits by a combination of fuses, circuit breakers
and fusible thermal links. This greatly reduces the
chance of �res caused by electrical problems.
Look at the silver-colored band inside the fuse. If the
band is broken or melted, replace the fuse. Be sure you
replace a bad fuse with a new one of the identical size
and rating.
Fuses of the same amperage can be temporarily
borrowed from another fuse location, if a fuse goes out.
Replace the fuse as soon as you can.
5-125
Page 532 of 596
Instrument Panel Fuse Block
The instrument panel fuse
block access door is
located on the driver side
edge of the instrument
panel.
Pull off the cover to access the fuse block.
Fuses Usage
1 Rear Seats
2 Rear Accessory Power Outlet
3 Steering Wheel Controls Backlight
4 Driver Door Module
5Dome Lamps, Driver Side
Turn Signal
6 Driver Side Turn Signal, Stoplamp
5-126
Page 533 of 596
Fuses Usage
7 Instrument Panel Back Lighting
8Passenger Side Turn Signal,
Stoplamp
9 Universal Home Remote
10 Power Door Lock 2 (Unlock Feature)
11 Power Door Lock 2 (Lock Feature)
12Stoplamps, Center-High Mounted
Stoplamp
13 Rear Climate Controls
14 Power Mirror
15 Body Control Module (BCM)
16 Accessory Power Outlets
17 Interior Lamps
18 Power Door Lock 1 (Unlock Feature)
19 Rear Seat Entertainment
20 Ultrasonic Rear Parking Assist
21 Power Door Lock 1 (Lock Feature)Fuses Usage
22 Driver Information Center (DIC)
23 Not Used
24 Not Used
25Driver Seat Module, Remote
Keyless Entry System
26Driver Power Door Lock
(Unlock Feature)
Circuit Breaker Usage
LT DRDriver Side Power Window
Circuit Breaker
Harness
ConnectorUsage
LT DR Driver Door Harness Connection
BODY Harness Connector
BODY Harness Connector
5-127
Page 534 of 596
Center Instrument Panel Fuse Block
The center instrument panel fuse block is located
underneath the instrument panel, to the left of the
steering column.
Top View
Harness
ConnectorUsage
BODY 2 Body Harness Connector 2
BODY 1 Body Harness Connector 1
Harness
ConnectorUsage
BODY 3 Body Harness Connector 3
HEADLINER 3 Headliner Harness Connector 3
HEADLINER 2 Headliner Harness Connector 2
HEADLINER 1 Headliner Harness Connector 1
SEO/UPFITTERSpecial Equipment Option Up�tter
Harness Connector
Circuit Breaker Usage
CB1Passenger Side Power Window
Circuit Breaker
CB2 Passenger Seat Circuit Breaker
CB3 Driver Seat Circuit Breaker
CB4 Rear Sliding Window
5-128