2008 CHEVROLET SILVERADO wheel
[x] Cancel search: wheelPage 337 of 596
Driving in Mud, Sand, Snow, or Ice
When you drive in mud, snow, or sand, your wheels will
not get good traction. You cannot accelerate as
quickly, turning is more difficult, and you will need longer
braking distances. If your vehicle has four-wheel
drive, seeFour-Wheel Drive on page 2-36for transfer
case mode selection.
It is best to use a low gear when you are in mud — the
deeper the mud, the lower the gear. In really deep mud,
the idea is to keep your vehicle moving so you do
not get stuck.
When you drive on sand, you will sense a change in
wheel traction. But it will depend upon how loosely
packed the sand is. On loosely packed sand, such as
on beaches or sand dunes, your tires will tend to
sink into the sand. This has an effect on steering,
accelerating, and braking. Drive at a reduced speed and
avoid sharp turns or abrupt maneuvers.Hard packed snow and ice offer the worst tire traction.
On these surfaces, it is very easy to lose control.
On wet ice, for example, the traction is so poor that you
will have difficulty accelerating. And if you do get
moving, poor steering and difficult braking can cause
you to slide out of control.
{CAUTION:
Driving on frozen lakes, ponds, or rivers can
be dangerous. Underwater springs, currents
under the ice, or sudden thaws can weaken
the ice. Your vehicle could fall through the ice
and you and your passengers could drown.
Drive your vehicle on safe surfaces only.
4-25
Page 338 of 596
Driving in Water
{CAUTION:
Driving through rushing water can be
dangerous. Deep water can sweep your vehicle
downstream and you and your passengers
could drown. If it is only shallow water, it can
still wash away the ground from under your
tires, and you could lose traction and roll the
vehicle over. Do not drive through rushing
water.
Heavy rain can mean �ash �ooding, and �ood waters
demand extreme caution.
Find out how deep the water is before you drive through
it. If it is deep enough to cover the wheel hubs, axles,
or exhaust pipe, do not try it — you probably will not get
through. Also, water that deep can damage the axle
and other vehicle parts.If the water is not too deep, drive slowly through it.
At faster speeds, water splashes on the ignition system
and your vehicle can stall. Stalling can also occur if you
get the tailpipe under water. And, as long as the tailpipe is
under water, you will never be able to start the engine.
When you go through water, remember that when the
brakes get wet, it may take you longer to stop.
SeeDriving in Rain and on Wet Roads on page 4-28
for more information on driving through water.
After Off-Road Driving
Remove any brush or debris that has collected on the
underbody, chassis, or under the hood. These
accumulations can be a �re hazard.
After operation in mud or sand, have the brake linings
cleaned and checked. These substances can cause
glazing and uneven braking. Check the body structure,
steering, suspension, wheels, tires, and exhaust
system for damage. Also, check the fuel lines and
cooling system for any leakage.
Your vehicle will require more frequent service due to
off-road use. Refer to the Maintenance Schedule
for additional information.
4-26
Page 346 of 596
Then, shut the engine off and close the window almost
all the way to preserve the heat. Start the engine
again and repeat this only when you feel really
uncomfortable from the cold. But do it as little as
possible. Preserve the fuel as long as you can. To help
keep warm, you can get out of the vehicle and do
some fairly vigorous exercises every half hour or so until
help comes.
If Your Vehicle is Stuck in Sand,
Mud, Ice, or Snow
Slowly and cautiously spin the wheels to free your
vehicle when stuck in sand, mud, ice, or snow. See
Rocking Your Vehicle to Get It Out on page 4-34.
If your vehicle has a traction system, it can often help to
free a stuck vehicle. Refer to your vehicle’s traction
system in the Index. If the stuck condition is too severe
for the traction system to free the vehicle, turn the
traction system off and use the rocking method.
{CAUTION:
If you let your vehicle’s tires spin at high
speed, they can explode, and you or others
could be injured. The vehicle can overheat,
causing an engine compartment �re or other
damage. Spin the wheels as little as possible
and avoid going above 35 mph (55 km/h) as
shown on the speedometer.
For information about using tire chains on your vehicle,
seeTire Chains on page 5-92.
Rocking Your Vehicle to Get It Out
First, turn the steering wheel left and right to clear
the area around the front wheels. For four-wheel-drive
vehicles, shift into Four-Wheel High. For vehicles
with StabiliTrak
®, turn the traction control part of the
system off. SeeStabiliTrak®System on page 4-6. Then
shift back and forth between REVERSE (R) and a
forward gear, spinning the wheels as little as possible.
4-34
Page 347 of 596
To prevent transmission wear, wait until the wheels stop
spinning before shifting gears. Release the accelerator
pedal while you shift, and press lightly on the accelerator
pedal when the transmission is in gear. By slowly
spinning the wheels in the forward and reverse
directions, you will cause a rocking motion that could
free your vehicle. If that does not get your vehicle
out after a few tries, it might need to be towed out. Or,
you can use recovery hooks, if your vehicle has
them. If your vehicle does need to be towed out, see
Towing Your Vehicle on page 4-50.
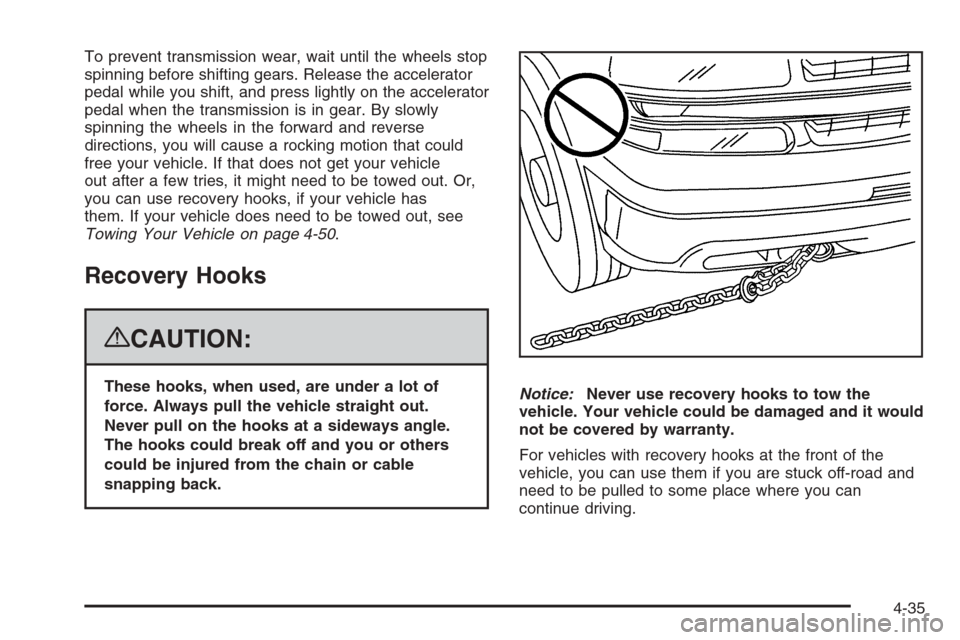
Recovery Hooks
{CAUTION:
These hooks, when used, are under a lot of
force. Always pull the vehicle straight out.
Never pull on the hooks at a sideways angle.
The hooks could break off and you or others
could be injured from the chain or cable
snapping back.Notice:Never use recovery hooks to tow the
vehicle. Your vehicle could be damaged and it would
not be covered by warranty.
For vehicles with recovery hooks at the front of the
vehicle, you can use them if you are stuck off-road and
need to be pulled to some place where you can
continue driving.
4-35
Page 354 of 596
Two-Tiered Loading
Depending on the model of your pick-up, you can
create an upper load platform by positioning
two or four 2 inches (5 cm) by 6 inches (15 cm)
wooden planks across the width of the pickup box.
The planks must be inserted in the pickup box
depressions. The length of the planks must allow
for at least a 3/4 inch (2 cm) bearing surface
on each end of the plank.
When using this upper load platform, be sure the
load is securely tied down to prevent it from
shifting. The load’s center of gravity should be
positioned in a zone over the rear axle. The zone
is located in the area between the front of each
wheel well and the rear of each wheel well.
The center of gravity height must not extend above
the top of the pickup box �areboard.
Any load that extends beyond the vehicle’s
taillamp area must be properly marked according
to local laws and regulations.
Remember not to exceed the Gross Axle Weight
Rating (GAWR) of the front or rear axle.Add-On Equipment
When you carry removable items, you may need
to put a limit on how many people you carry
inside your vehicle. Be sure to weigh your vehicle
before you buy and install the new equipment.
Notice:Overloading your vehicle may cause
damage. Repairs would not be covered by your
warranty. Do not overload your vehicle.
Remember not to exceed the Gross Axle Weight
Rating (GAWR) of the front or rear axle.
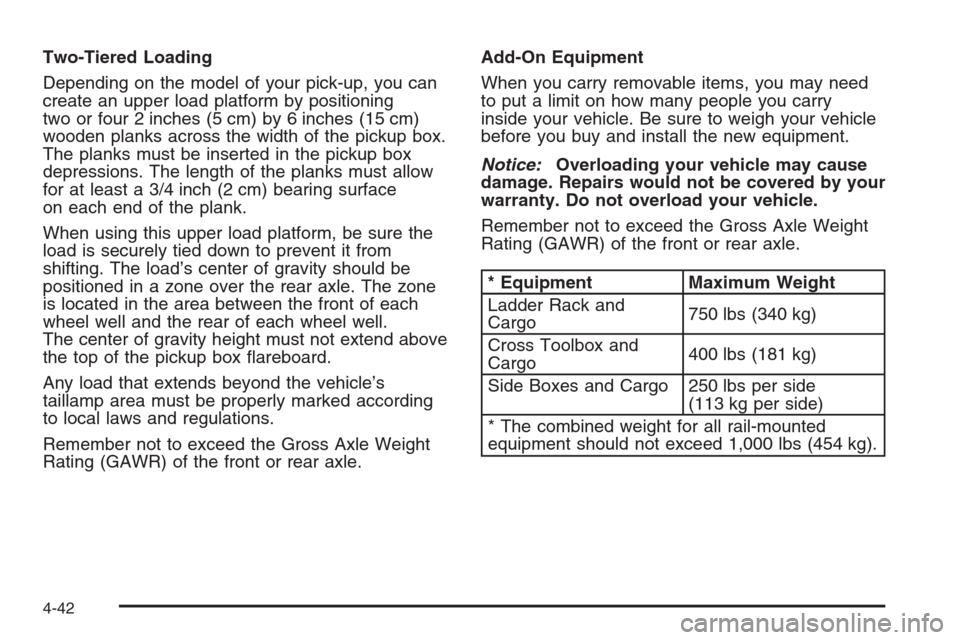
* Equipment Maximum Weight
Ladder Rack and
Cargo750 lbs (340 kg)
Cross Toolbox and
Cargo400 lbs (181 kg)
Side Boxes and Cargo 250 lbs per side
(113 kg per side)
* The combined weight for all rail-mounted
equipment should not exceed 1,000 lbs (454 kg).
4-42
Page 357 of 596
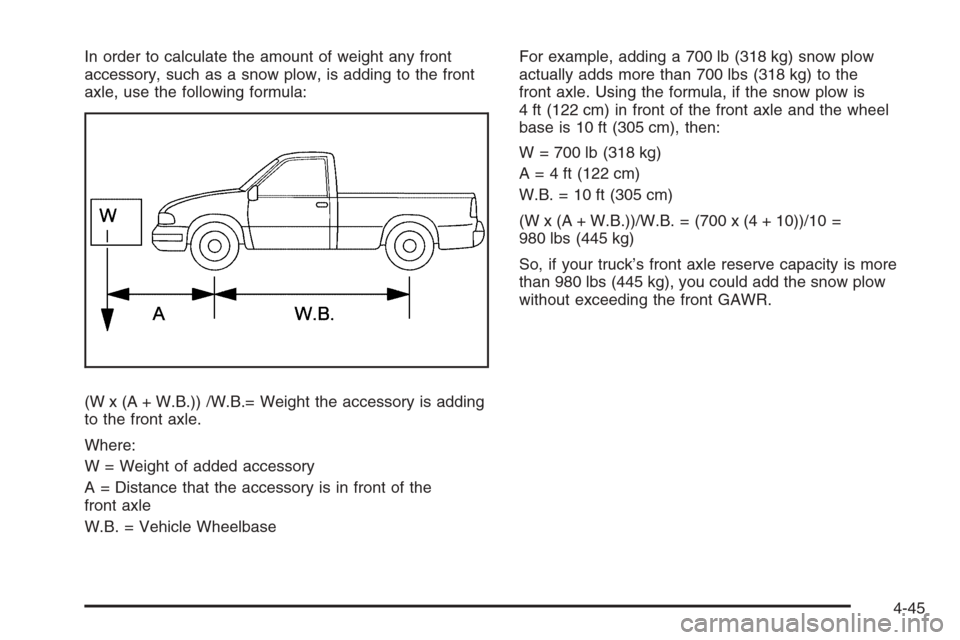
In order to calculate the amount of weight any front
accessory, such as a snow plow, is adding to the front
axle, use the following formula:
(W x (A + W.B.)) /W.B.= Weight the accessory is adding
to the front axle.
Where:
W = Weight of added accessory
A = Distance that the accessory is in front of the
front axle
W.B. = Vehicle WheelbaseFor example, adding a 700 lb (318 kg) snow plow
actually adds more than 700 lbs (318 kg) to the
front axle. Using the formula, if the snow plow is
4 ft (122 cm) in front of the front axle and the wheel
base is 10 ft (305 cm), then:
W = 700 lb (318 kg)
A = 4 ft (122 cm)
W.B. = 10 ft (305 cm)
(W x (A + W.B.))/W.B. = (700 x (4 + 10))/10 =
980 lbs (445 kg)
So, if your truck’s front axle reserve capacity is more
than 980 lbs (445 kg), you could add the snow plow
without exceeding the front GAWR.
4-45
Page 361 of 596
You must weigh any accessories or other
equipment that you add to your vehicle. Then,
subtract this extra weight from the CWR. This extra
weight may shorten the center of gravity zone of
your vehicle. Your dealer can help you with this.
If your slide-in camper and its load weighs
less than the CWR, the center of gravity zone for
your vehicle may be larger.
Your dealer can help you make a good
vehicle-camper match and help you determine
the CWR.
After you have loaded your vehicle and camper,
drive to a weigh station and weigh the front and rear
wheels separately. This will tell you the loads on the
axles. The loads on the front and rear axles should
not be more than either of the Gross Axle Weight
Ratings (GAWR). The total of the axle loads should
not be more than the Gross Vehicle Weight
Rating (GVWR).
Open the driver’s door and look at the
Certi�cation/Tire label to �nd out your vehicle’s
GAWRs and GVWR.
If your vehicle has gone over the weight ratings,
move or take out some things until all the
weight falls below the ratings.Secure loose items to prevent weight shifts that
could affect the balance of your vehicle. When the
truck-camper is loaded, drive to a scale and weigh
on the front and on the rear wheels separately to
determine axle loads. Individual axle loads should
not exceed either of the gross axle weight ratings
(GAWR). The total axle loads should not exceed
your vehicle’s gross vehicle weight rating (GVWR).
These ratings are given on the vehicle certi�cation
label attached to the rear edge of the driver’s door.
See “Certi�cation/Tire Label” underLoading Your
Vehicle on page 4-36. If weight ratings are
exceeded, move or remove items to bring all
weights below the ratings.
When you install and load your slide-in camper,
check the manufacturer’s instructions.
If you want more information on curb weights,
cargo weights, Cargo Weight Rating and the
correct center of gravity zone for your vehicle, your
dealer can help you. Just ask for a copy of
“Consumer Information, Truck-Camper Loading.”
4-49
Page 362 of 596
Pickup Conversion to Chassis Cab
We are aware that some vehicle owners might consider
having the pickup box removed and a commercial or
recreational body installed. Owners should be aware that,
as manufactured, there are differences between a
chassis cab and a pickup with the box removed which
could affect vehicle safety. The components necessary to
adapt a pickup to permit its safe use with a specialized
body should be installed by the body builder.
Towing
Towing Your Vehicle
To avoid vehicle damage, a platform or �atbed trailer
should be used to transport this vehicle. Consult
your dealer/retailer or a professional towing service if
you need to have your disabled vehicle towed. See
Roadside Assistance Program on page 7-7.
If you want to tow your vehicle behind another vehicle
for recreational purposes (such as behind a motorhome),
see “Recreational Vehicle Towing” following.
Recreational Vehicle Towing
Recreational vehicle towing means towing your vehicle
behind another vehicle – such as behind a motorhome.
The two most common types of recreational vehicle
towing are known as dinghy towing, towing your vehicle
will all four wheels on the ground, and dolly towing,
towing your vehicle with two wheels on the ground and
two wheels up on a device known as a “dolly”.
With the proper preparation and equipment, many
vehicles can be towed in these ways. See “Dinghy
Towing” and “Dolly Towing” following.
Here are some important things to consider before you
do recreational vehicle towing:
What’s the towing capacity of the towing vehicle?
Be sure you read the tow vehicle manufacturer’s
recommendations.
How far will you tow? Some vehicles have
restrictions on how far and how long they can tow.
Do you have the proper towing equipment?
See your dealer or trailering professional for
additional advice and equipment recommendations.
Is your vehicle ready to be towed? Just as you
would prepare your vehicle for a long trip, you’ll
want to make sure your vehicle is prepared to be
towed. SeeBefore Leaving on a Long Trip on
page 4-29.
4-50