2008 CHEVROLET HHR oil pressure
[x] Cancel search: oil pressurePage 269 of 430

A. Pressure Cap. SeePressure Cap on page 5-26.
B. Engine Air Cleaner/Filter. SeeEngine Air
Cleaner/Filter on page 5-20.
C. Windshield Washer Fluid Reservoir. See “Adding
Washer Fluid” underWindshield Washer Fluid
on page 5-33.
D. Coolant Recovery Tank. See “Checking Coolant”
underEngine Coolant on page 5-24.
E. Engine Oil Dipstick. See “Checking Engine Oil”
underEngine Oil on page 5-15.
F. Engine Oil Fill Cap. See “When to Add Engine Oil”
underEngine Oil on page 5-15.
G. Brake Master Cylinder Reservoir. See “Brake Fluid”
underBrakes on page 5-34andHydraulic Clutch
on page 5-23.
H. Underhood Fuse Block. SeeEngine Compartment
Fuse Block on page 5-122.
I. Remote Negative (−) Terminal. SeeJump Starting
on page 5-38.
J. Remote Positive (+) Terminal. SeeJump Starting on
page 5-38.Engine Oil
Checking Engine Oil
It is a good idea to check the engine oil every time you
get fuel. In order to get an accurate reading, the oil
must be warm and the vehicle must be on level ground.
The engine oil dipstick handle is a yellow loop.
SeeEngine Compartment Overview on page 5-12for
the location of the engine oil dipstick.
1. Turn off the engine and give the oil several minutes
to drain back into the oil pan. If you do not do this,
the oil dipstick might not show the actual level.
2. Pull out the dipstick and clean it with a paper towel
or cloth, then push it back in all the way. Remove it
again, keeping the tip down, and check the level.
When to Add Engine Oil
If the oil is below the MIN (minimum) mark, add
at least one quart/liter of the recommended oil.
5-15
Page 283 of 430
{CAUTION:
An electric engine cooling fan under the hood
can start up even when the engine is not
running and can injure you. Keep hands,
clothing, and tools away from any underhood
electric fan.
If the coolant inside the coolant recovery tank is
boiling, do not do anything else until it cools down.
The vehicle should be parked on a level surface.
When the engine is cold, the coolant level should be at
or above the COLD FILL line. If it is not, you may
have a leak at the pressure cap or in the radiator hoses,
heater hoses, radiator, water pump, or somewhere in
the cooling system.
{CAUTION:
Heater and radiator hoses, and other engine
parts, can be very hot. Do not touch them.
If you do, you can be burned.
Do not run the engine if there is a leak. If you
run the engine, it could lose all coolant.
That could cause an engine re, and you could
be burned. Get any leak xed before you drive
the vehicle.
If there seems to be no leak, with the engine on, check
to see if the electric engine cooling fan is running.
If the engine is overheating, the fan should be running.
If it is not, than the vehicle needs service.
Notice:Engine damage from running the engine
without coolant is not covered by the warranty.
Notice:Using coolant other than DEX-COOL
®may
cause premature engine, heater core, or radiator
corrosion. In addition, the engine coolant could
require changing sooner, at 30,000 miles (50 000 km)
or 24 months, whichever occurs rst. Any repairs
would not be covered by the warranty. Always use
DEX-COOL
®(silicate-free) coolant in the vehicle.
5-29
Page 285 of 430
{CAUTION:
Adding only plain water to the cooling system
can be dangerous. Plain water, or some other
liquid such as alcohol, can boil before the
proper coolant mixture will. The vehicle’s
coolant warning system is set for the proper
coolant mixture. With plain water or the wrong
mixture, the engine could get too hot but you
would not get the overheat warning. The engine
could catch re and you or others could be
burned. Use a 50/50 mixture of clean, drinkable
water and DEX-COOL
®coolant.
Notice:In cold weather, water can freeze and crack
the engine, radiator, heater core and other parts.
Use the recommended coolant and the proper
coolant mixture.
{CAUTION:
You can be burned if you spill coolant on hot
engine parts. Coolant contains ethylene glycol
and it will burn if the engine parts are hot
enough. Do not spill coolant on a hot engine.
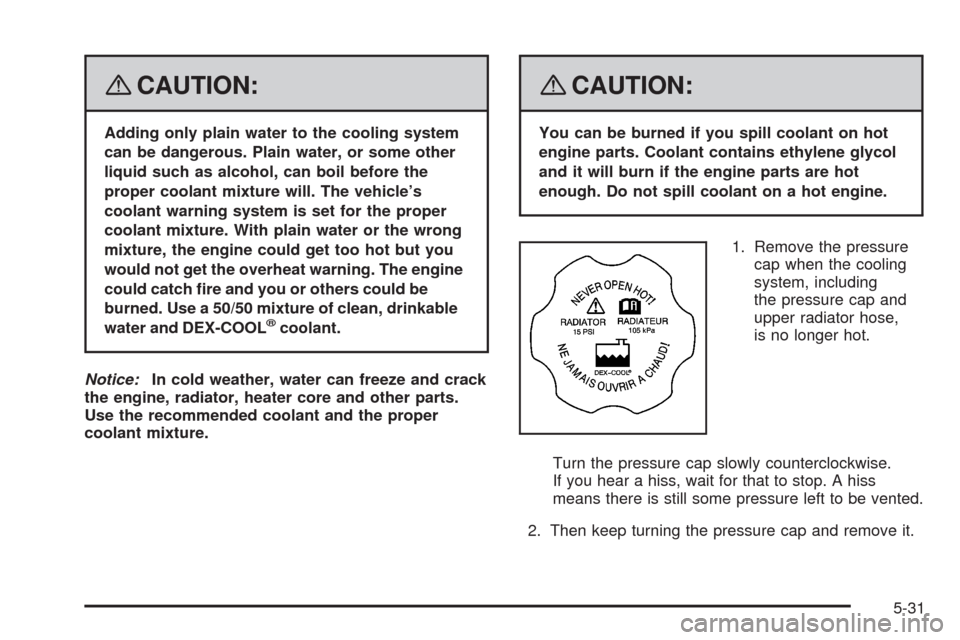
1. Remove the pressure
cap when the cooling
system, including
the pressure cap and
upper radiator hose,
is no longer hot.
Turn the pressure cap slowly counterclockwise.
If you hear a hiss, wait for that to stop. A hiss
means there is still some pressure left to be vented.
2. Then keep turning the pressure cap and remove it.
5-31
Page 311 of 430
Tire Terminology and Denitions
Air Pressure:The amount of air inside the
tire pressing outward on each square inch of the
tire. Air pressure is expressed in pounds per
square inch (psi) or kilopascal (kPa).
Accessory Weight
:This means the combined
weight of optional accessories. Some examples of
optional accessories are, automatic transmission,
power steering, power brakes, power windows,
power seats, and air conditioning.
Aspect Ratio
:The relationship of a tire’s height
to its width.
Belt
:A rubber coated layer of cords that is located
between the plies and the tread. Cords may be
made from steel or other reinforcing materials.
Bead
:The tire bead contains steel wires wrapped
by steel cords that hold the tire onto the rim.
Bias Ply Tire
:A pneumatic tire in which the plies
are laid at alternate angles less than 90 degrees
to the centerline of the tread.Cold Tire Pressure
:The amount of air pressure
in a tire, measured in pounds per square inch
(psi) or kilopascals (kPa) before a tire has built up
heat from driving. SeeInflation - Tire Pressure
on page 5-60.
Curb Weight
:The weight of a motor vehicle with
standard and optional equipment including the
maximum capacity of fuel, oil, and coolant,
but without passengers and cargo.
DOT Markings
:A code molded into the sidewall
of a tire signifying that the tire is in compliance
with the U.S. Department of Transportation (DOT)
motor vehicle safety standards. The DOT code
includes the Tire Identication Number (TIN),
an alphanumeric designator which can also identify
the tire manufacturer, production plant, brand,
and date of production.
GVWR
:Gross Vehicle Weight Rating.
SeeLoading Your Vehicle on page 4-27.
GAWR FRT
:Gross Axle Weight Rating for
the front axle. SeeLoading Your Vehicle on
page 4-27.
5-57
Page 365 of 430
Do not clean your vehicle using the following cleaners
or techniques:
Never use a knife or any other sharp object to
remove a soil from any interior surface.
Never use a stiff brush. It can cause damage to
your vehicle’s interior surfaces.
Never apply heavy pressure or rub aggressively
with a cleaning cloth. Use of heavy pressure
can damage your interior and does not improve the
effectiveness of soil removal.
Use only mild, neutral-pH soaps. Avoid laundry
detergents or dishwashing soaps with degreasers.
Using too much soap will leave a residue that
leaves streaks and attracts dirt. For liquid cleaners,
about 20 drops per gallon (3.78 L) of water is a
good guide.
Do not heavily saturate your upholstery while
cleaning.
Damage to your vehicle’s interior may result from
the use of many organic solvents such as naptha,
alcohol, etc.
Fabric/Carpet
Use a vacuum cleaner with a soft brush attachment
frequently to remove dust and loose dirt. A canister
vacuum with a beater bar in the nozzle may only be used
on oor carpet and carpeted oor mats. For soils, always
try to remove them rst with plain water or club soda.
Before cleaning, gently remove as much of the soil as
possible using one of the following techniques:
For liquids: gently blot the remaining soil with a paper
towel. Allow the soil to absorb into the paper towel
until no more can be removed.
For solid dry soils: remove as much as possible and
then vacuum.
To clean, use the following instructions:
1. Saturate a lint-free, clean white cloth with water or
club soda.
2. Wring the cloth to remove excess moisture.
3. Start on the outside edge of the soil and gently rub
toward the center. Continue cleaning, using a clean
area of the cloth each time it becomes soiled.
4. Continue to gently rub the soiled area until the
cleaning cloth remains clean.
5. If the soil is not completely removed, use a mild
soap solution and repeat the cleaning process
that was used with plain water.
5-111
Page 385 of 430
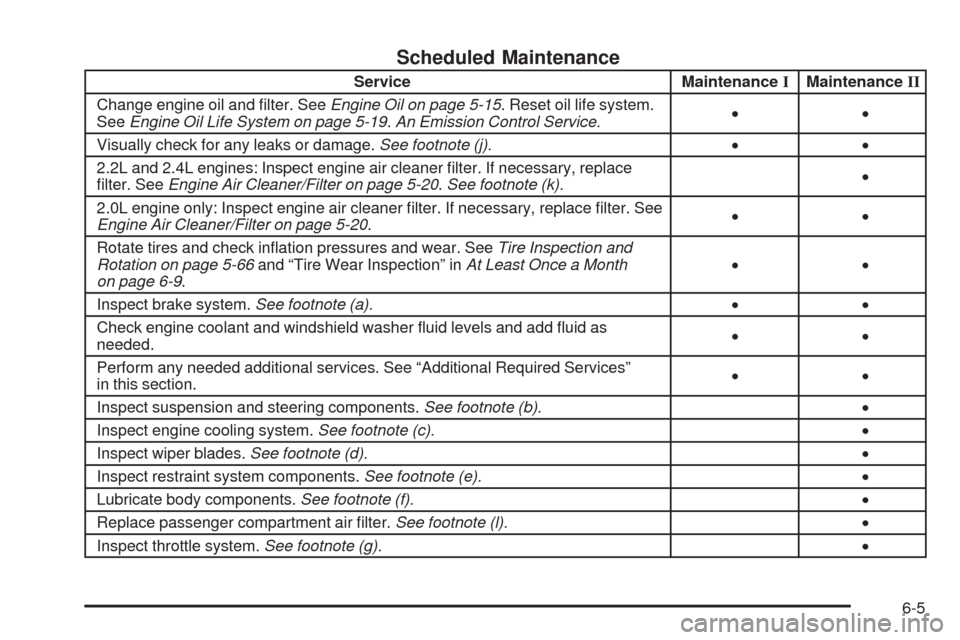
Scheduled Maintenance
Service MaintenanceIMaintenanceII
Change engine oil and lter. SeeEngine Oil on page 5-15. Reset oil life system.
SeeEngine Oil Life System on page 5-19.An Emission Control Service.••
Visually check for any leaks or damage.See footnote (j).••
2.2L and 2.4L engines: Inspect engine air cleaner lter. If necessary, replace
lter. SeeEngine Air Cleaner/Filter on page 5-20.See footnote (k).•
2.0L engine only: Inspect engine air cleaner lter. If necessary, replace lter. See
Engine Air Cleaner/Filter on page 5-20.••
Rotate tires and check ination pressures and wear. SeeTire Inspection and
Rotation on page 5-66and “Tire Wear Inspection” inAt Least Once a Month
on page 6-9.••
Inspect brake system.See footnote (a).••
Check engine coolant and windshield washer uid levels and add uid as
needed.••
Perform any needed additional services. See “Additional Required Services”
in this section.••
Inspect suspension and steering components.See footnote (b).•
Inspect engine cooling system.See footnote (c).•
Inspect wiper blades.See footnote (d).•
Inspect restraint system components.See footnote (e).•
Lubricate body components.See footnote (f).•
Replace passenger compartment air lter.See footnote (l).•
Inspect throttle system.See footnote (g).•
6-5
Page 388 of 430
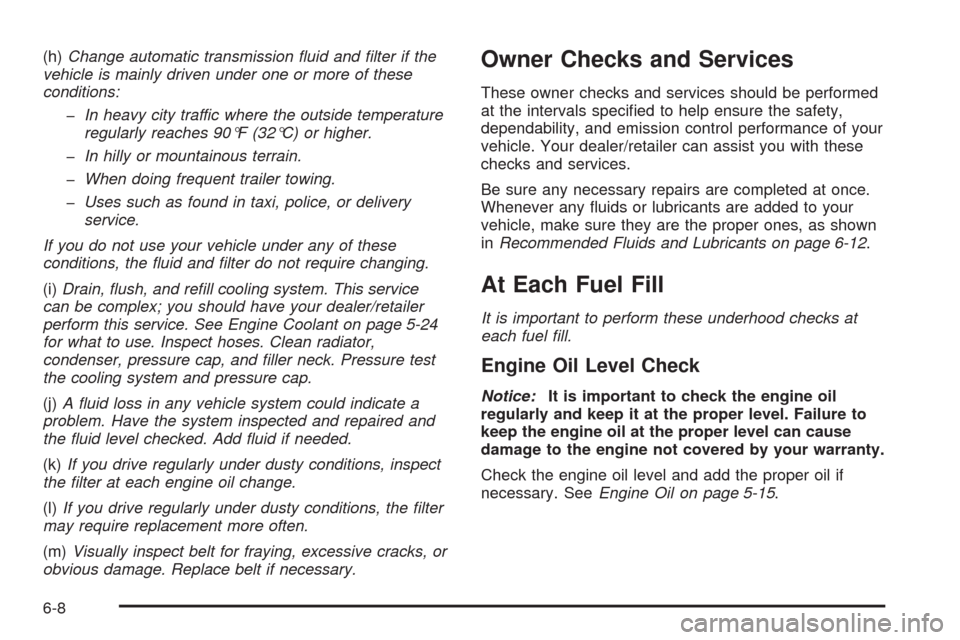
(h)Change automatic transmission fluid and filter if the
vehicle is mainly driven under one or more of these
conditions:
In heavy city traffic where the outside temperature
regularly reaches 90°F (32°C) or higher.
In hilly or mountainous terrain.
When doing frequent trailer towing.
Uses such as found in taxi, police, or delivery
service.
If you do not use your vehicle under any of these
conditions, the fluid and filter do not require changing.
(i)Drain, flush, and refill cooling system. This service
can be complex; you should have your dealer/retailer
perform this service. See Engine Coolant on page 5-24
for what to use. Inspect hoses. Clean radiator,
condenser, pressure cap, and filler neck. Pressure test
the cooling system and pressure cap.
(j)A fluid loss in any vehicle system could indicate a
problem. Have the system inspected and repaired and
the fluid level checked. Add fluid if needed.
(k)If you drive regularly under dusty conditions, inspect
the filter at each engine oil change.
(l)If you drive regularly under dusty conditions, the filter
may require replacement more often.
(m)Visually inspect belt for fraying, excessive cracks, or
obvious damage. Replace belt if necessary.Owner Checks and Services
These owner checks and services should be performed
at the intervals specied to help ensure the safety,
dependability, and emission control performance of your
vehicle. Your dealer/retailer can assist you with these
checks and services.
Be sure any necessary repairs are completed at once.
Whenever any uids or lubricants are added to your
vehicle, make sure they are the proper ones, as shown
inRecommended Fluids and Lubricants on page 6-12.
At Each Fuel Fill
It is important to perform these underhood checks at
each fuel fill.
Engine Oil Level Check
Notice:It is important to check the engine oil
regularly and keep it at the proper level. Failure to
keep the engine oil at the proper level can cause
damage to the engine not covered by your warranty.
Check the engine oil level and add the proper oil if
necessary. SeeEngine Oil on page 5-15.
6-8
Page 389 of 430
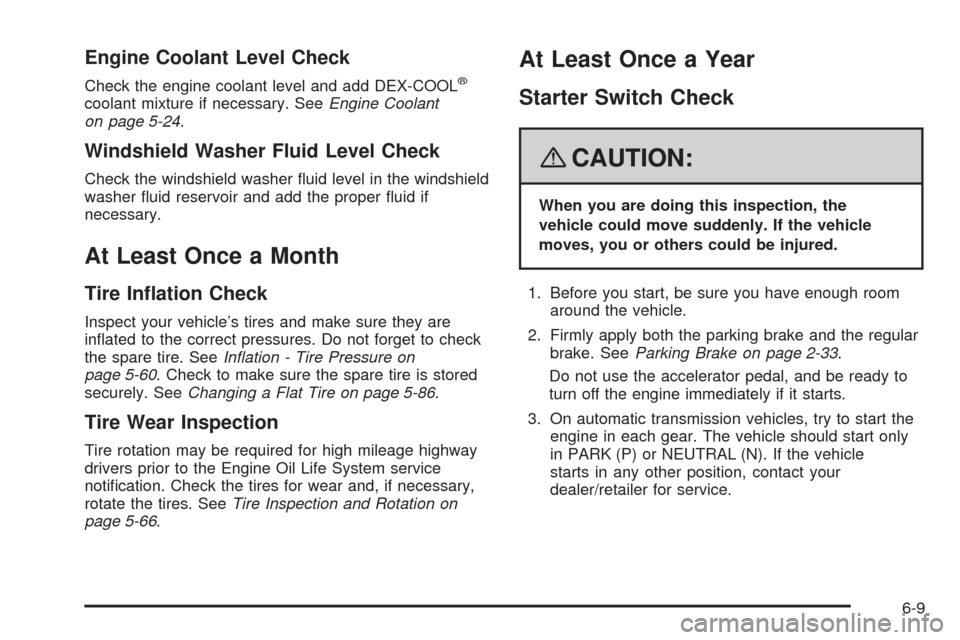
Engine Coolant Level Check
Check the engine coolant level and add DEX-COOL®
coolant mixture if necessary. SeeEngine Coolant
on page 5-24.
Windshield Washer Fluid Level Check
Check the windshield washer uid level in the windshield
washer uid reservoir and add the proper uid if
necessary.
At Least Once a Month
Tire Ination Check
Inspect your vehicle’s tires and make sure they are
inated to the correct pressures. Do not forget to check
the spare tire. SeeInflation - Tire Pressure on
page 5-60. Check to make sure the spare tire is stored
securely. SeeChanging a Flat Tire on page 5-86.
Tire Wear Inspection
Tire rotation may be required for high mileage highway
drivers prior to the Engine Oil Life System service
notication. Check the tires for wear and, if necessary,
rotate the tires. SeeTire Inspection and Rotation on
page 5-66.
At Least Once a Year
Starter Switch Check
{CAUTION:
When you are doing this inspection, the
vehicle could move suddenly. If the vehicle
moves, you or others could be injured.
1. Before you start, be sure you have enough room
around the vehicle.
2. Firmly apply both the parking brake and the regular
brake. SeeParking Brake on page 2-33.
Do not use the accelerator pedal, and be ready to
turn off the engine immediately if it starts.
3. On automatic transmission vehicles, try to start the
engine in each gear. The vehicle should start only
in PARK (P) or NEUTRAL (N). If the vehicle
starts in any other position, contact your
dealer/retailer for service.
6-9