2008 CHEVROLET HHR manual transmission
[x] Cancel search: manual transmissionPage 112 of 430
If you forget to release your parking brake, a chime will
sound and a warning message will be displayed
when the parking brake is applied and the vehicle is
moving faster than 5 mph (8 kph). SeeDIC Warnings
and Messages on page 3-48.
Notice:Driving with the parking brake on can
overheat the brake system and cause premature
wear or damage to brake system parts. Make sure
that the parking brake is fully released and the brake
warning light is off before driving.
Shifting Into PARK (P) (Automatic
Transmission)
{CAUTION:
It can be dangerous to get out of your vehicle
if the shift lever is not fully in PARK (P) with
the parking brake rmly set. Your vehicle can
roll. If you have left the engine running, the
vehicle can move suddenly.
CAUTION: (Continued)
CAUTION: (Continued)
You or others could be injured. To be sure
your vehicle will not move, even when you are
on fairly level ground, use the steps that
follow. If you are pulling a trailer, seeTowing a
Trailer (Manual Transaxle) on page 4-34or
Towing a Trailer (Automatic Transaxle) on
page 4-34.
To shift into PARK (P), do the following:
1. Hold the brake pedal down with your right foot and
set the parking brake. SeeParking Brake on
page 2-33for more information.
2. Move the shift lever into PARK (P) by holding in the
button on the shift lever and pushing the lever all
the way toward the front of the vehicle.
3. Turn the ignition key to LOCK/OFF.
4. Remove the key and take it with you. If you can
leave your vehicle with the key in your hand, your
vehicle is in PARK (P).
2-34
Page 114 of 430
Shifting Out of PARK (P) (Automatic
Transmission)
This vehicle is equipped with an electronic shift lock
release system. The shift lock release is designed to:
Prevent ignition key removal unless the shift
lever is in PARK (P) with the shift lever button fully
released, and
Prevent movement of the shift lever out of PARK (P)
unless the ignition is in ON/RUN or
ACC/ACCESSORY and the regular brake pedal is
applied.
The shift lock release is always functional except in the
case of a an uncharged or low voltage (less than 9 volt)
battery.
If your vehicle has an uncharged battery or a battery
with low voltage, try charging or jump starting the
battery. SeeJump Starting on page 5-38for more
information.To shift out of PARK (P):
1. Apply the brake pedal.
2. Then press the shift lever button.
3. Move the shift lever to the desired position.
If you still are unable to shift out of PARK (P):
1. Fully release the shift lever button.
2. While holding down the brake pedal, press the shift
lever button again.
3. Move the shift lever to the desired position.
If you still cannot move the shift lever from PARK (P),
consult your dealer or a professional towing service.
Parking Your Vehicle (Manual
Transmission)
Before leaving your vehicle, fully press the clutch pedal
down, move the shift lever into REVERSE (R), and
rmly apply the parking brake. Once the shift lever has
been placed in REVERSE (R) with the clutch pedal
pressed down, you can turn the ignition key to LOCK,
remove the key and release the clutch pedal. See
Manual Transmission Operation on page 2-31.
2-36
Page 116 of 430
Running the Engine While Parked
It is better not to park with the engine running. But if you
ever have to, here are some things to know.
{CAUTION:
Idling the engine with the climate control
system off could allow dangerous exhaust into
your vehicle. See the earlier caution under
Engine Exhaust on page 2-37.
Also, idling in a closed-in place can let deadly
carbon monoxide (CO) into your vehicle even if
the climate control fan is at the highest setting.
One place this can happen is a garage.
Exhaust — with CO — can come in easily.
NEVER park in a garage with the engine
running.
Another closed-in place can be a blizzard. See
Winter Driving on page 4-22.
{CAUTION:
It can be dangerous to get out of your vehicle
if the shift lever is not fully in PARK (P) with
the parking brake rmly set. Your vehicle can
roll. Do not leave your vehicle when the engine
is running unless you have to. If you have left
the engine running, the vehicle can move
suddenly. You or others could be injured. To
be sure your vehicle will not move, even when
you are on fairly level ground, always set the
parking brake and move the shift lever to
PARK (P).
Follow the proper steps to be sure your vehicle will not
move. SeeShifting Into PARK (P) (Automatic
Transmission) on page 2-34.
If you are parking on a hill and if you are pulling a
trailer, also seeTowing a Trailer (Manual Transaxle) on
page 4-34orTowing a Trailer (Automatic Transaxle)
on page 4-34.
2-38
Page 125 of 430
Your Responsibility
Increase the radio volume if you cannot hear the OnStar
advisor. If the light next to the OnStar buttons is red,
this means that your system is not functioning properly
and should be checked by your dealer/retailer. If the
light appears clear (no light is appearing), your OnStar
subscription has expired. You can always press the
OnStar button to conrm that your OnStar equipment
is active.
Storage Areas
Glove Box
To open the glove box, lift up on the lever.
Cupholder(s)
There are two cupholders located in the oor console
between the front seats. There is also a cupholder
for the rear seat passenger located at the rear of the
oor console.If your vehicle is an SS model, the automatic
transmission vehicles have a cupholder in front of the
shifter.
Cupholders have inserts that can be removed for
cleaning.
Instrument Panel Storage
Your vehicle has a storage compartment on the
instrument panel above the air vents. Push the button
on the compartment to open the lid.
Floor Console Storage Area
There are two small storage compartments on the oor
console, one at the front under the window switches
and one next to the parking brake lever.
For the SS model, automatic transmission vehicles have
a storage bin on the right side of the automatic shifter.
Manual transmission vehicles have storage bins in
front of and behind the manual shifter.
Rubber liners can be removed for cleaning.
2-47
Page 137 of 430
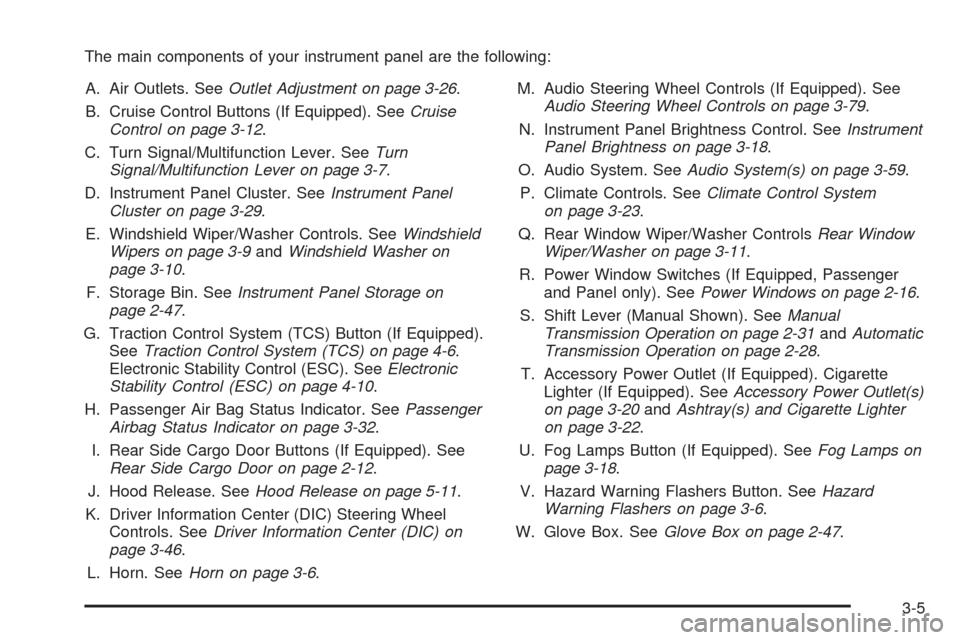
The main components of your instrument panel are the following:
A. Air Outlets. SeeOutlet Adjustment on page 3-26.
B. Cruise Control Buttons (If Equipped). SeeCruise
Control on page 3-12.
C. Turn Signal/Multifunction Lever. SeeTurn
Signal/Multifunction Lever on page 3-7.
D. Instrument Panel Cluster. SeeInstrument Panel
Cluster on page 3-29.
E. Windshield Wiper/Washer Controls. SeeWindshield
Wipers on page 3-9andWindshield Washer on
page 3-10.
F. Storage Bin. SeeInstrument Panel Storage on
page 2-47.
G. Traction Control System (TCS) Button (If Equipped).
SeeTraction Control System (TCS) on page 4-6.
Electronic Stability Control (ESC). SeeElectronic
Stability Control (ESC) on page 4-10.
H. Passenger Air Bag Status Indicator. SeePassenger
Airbag Status Indicator on page 3-32.
I. Rear Side Cargo Door Buttons (If Equipped). See
Rear Side Cargo Door on page 2-12.
J. Hood Release. SeeHood Release on page 5-11.
K. Driver Information Center (DIC) Steering Wheel
Controls. SeeDriver Information Center (DIC) on
page 3-46.
L. Horn. SeeHorn on page 3-6.M. Audio Steering Wheel Controls (If Equipped). See
Audio Steering Wheel Controls on page 3-79.
N. Instrument Panel Brightness Control. SeeInstrument
Panel Brightness on page 3-18.
O. Audio System. SeeAudio System(s) on page 3-59.
P. Climate Controls. SeeClimate Control System
on page 3-23.
Q. Rear Window Wiper/Washer ControlsRear Window
Wiper/Washer on page 3-11.
R. Power Window Switches (If Equipped, Passenger
and Panel only). SeePower Windows on page 2-16.
S. Shift Lever (Manual Shown). SeeManual
Transmission Operation on page 2-31andAutomatic
Transmission Operation on page 2-28.
T. Accessory Power Outlet (If Equipped). Cigarette
Lighter (If Equipped). SeeAccessory Power Outlet(s)
on page 3-20andAshtray(s) and Cigarette Lighter
on page 3-22.
U. Fog Lamps Button (If Equipped). SeeFog Lamps on
page 3-18.
V. Hazard Warning Flashers Button. SeeHazard
Warning Flashers on page 3-6.
W. Glove Box. SeeGlove Box on page 2-47.
3-5
Page 146 of 430
Reducing Speed While Using Cruise
Control
If the cruise control system is already engaged,
Push and hold the SET−button until the lower
speed desired is reached, then release it.
To slow down in very small amounts, push the
SET−button briey. Each time this is done,
the vehicle goes about 1 mph (1.6 km/h) slower.
Passing Another Vehicle While Using
Cruise Control
Use the accelerator pedal to increase the vehicle speed.
When you take your foot off the pedal, the vehicle
slows down to the cruise control speed you set earlier.
Using Cruise Control on Hills
How well your cruise control will work on hills depends
upon the vehicle speed, load and the steepness of
the hills. When going up steep hills, you might have to
step on the accelerator pedal to maintain the vehicle
speed. When going downhill, you might have to brake or
shift to a lower gear to keep the vehicle speed down.
When the brakes are applied the cruise control turns off.
Many drivers nd this to be too much trouble and do
not use cruise control on steep hills.
Ending Cruise Control
To end cruise control, step lightly on the brake pedal or
the clutch pedal if your vehicle has a manual
transmission.
Stepping on the brake pedal or clutch pedal will only end
the current cruise control session. Press the cruise
control on/off button to turn the system completely off.
Erasing Speed Memory
The cruise control set speed memory is erased when
the cruise control or the ignition is turned off.
3-14
Page 167 of 430
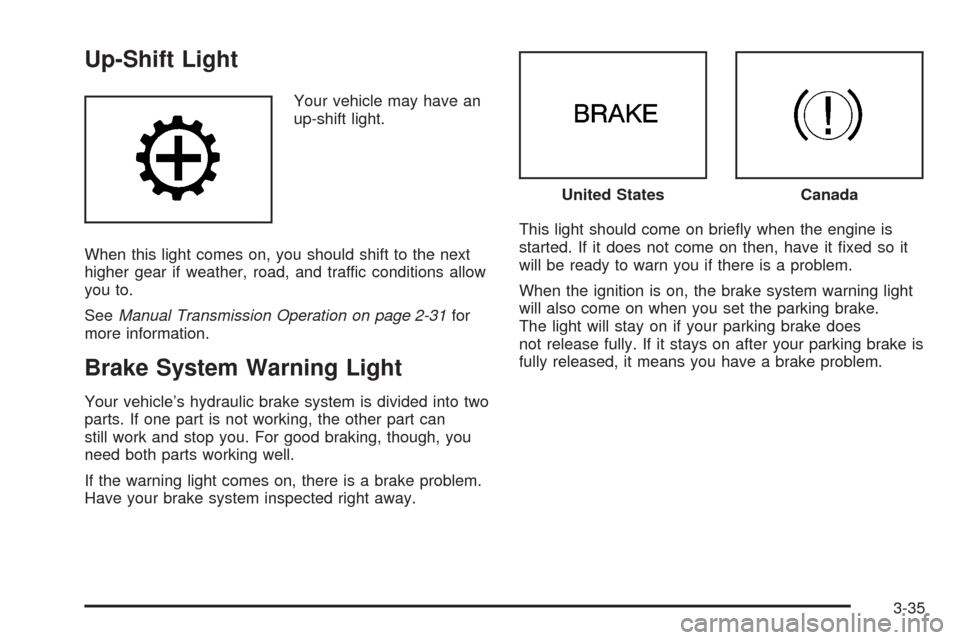
Up-Shift Light
Your vehicle may have an
up-shift light.
When this light comes on, you should shift to the next
higher gear if weather, road, and traffic conditions allow
you to.
SeeManual Transmission Operation on page 2-31for
more information.
Brake System Warning Light
Your vehicle’s hydraulic brake system is divided into two
parts. If one part is not working, the other part can
still work and stop you. For good braking, though, you
need both parts working well.
If the warning light comes on, there is a brake problem.
Have your brake system inspected right away.This light should come on briey when the engine is
started. If it does not come on then, have it xed so it
will be ready to warn you if there is a problem.
When the ignition is on, the brake system warning light
will also come on when you set the parking brake.
The light will stay on if your parking brake does
not release fully. If it stays on after your parking brake is
fully released, it means you have a brake problem.
United StatesCanada
3-35
Page 189 of 430
AUTO UNLK (Unlock)
This feature, which allows the vehicle to automatically
unlock certain doors, can be enabled or disabled. When
AUTO UNLK appears on the display, press and hold
the reset button for at least one second to scroll through
the available settings:
ALL (default):All of the doors will automatically unlock.
DRIVER:The driver’s door will automatically unlock.
NONE:None of the doors will automatically unlock. You
will need to manually unlock the doors.
If you have a manual transmission vehicle, the door(s)
will automatically unlock when the key is turned off.
If you have an automatic transmission vehicle, you can
select when the automatic unlocking will occur. See
“UNLK (Unlock) (Automatic Transmission Only)”
following.
SeeProgrammable Automatic Door Unlock on
page 2-10for more information.
To select a setting and move on to the next feature,
press the information button while the desired setting is
displayed on the DIC.
UNLK (Unlock) (Automatic
Transmission Only)
This screen displays only if your vehicle has an
automatic transmission and DRIVER or ALL is selected
for the AUTO UNLK feature. This feature determines
when the automatic door unlocking will occur. When
UNLK appears on the display, press and hold the reset
button for at least one second to scroll through the
available settings:
KEY OFF:The door(s) will unlock when the key is
turned off.
SHIFT TO P (Park) (default):The door(s) will unlock
when the vehicle is shifted into PARK (P).
SeeProgrammable Automatic Door Unlock on
page 2-10for more information.
To select a setting and move on to the next feature,
press the information button while the desired setting is
displayed on the DIC.
3-57